Shadow of the Tomb Raider - Hidden City Survival Caches
Updated: 9/8/21(†)
Paititi is a HUGE level, and you must revisit it several times in order to access all areas and find every item. This guide focuses on revisiting the level after completing it. If you are playing through for the first time, you may want to follow the main walkthrough instead to avoid possible spoilers. Collectibles are numbered in the order they appear in the walkthrough and on the annotated level map.
Follow this link for a List of All Artifacts by Story/Dialect.
Treasure Chests · Relics · Artifacts & Photos · Documents · Murals · Monoliths · Survival Caches · Explorer Backpacks · Archivist Maps · Side Missions · Challenges
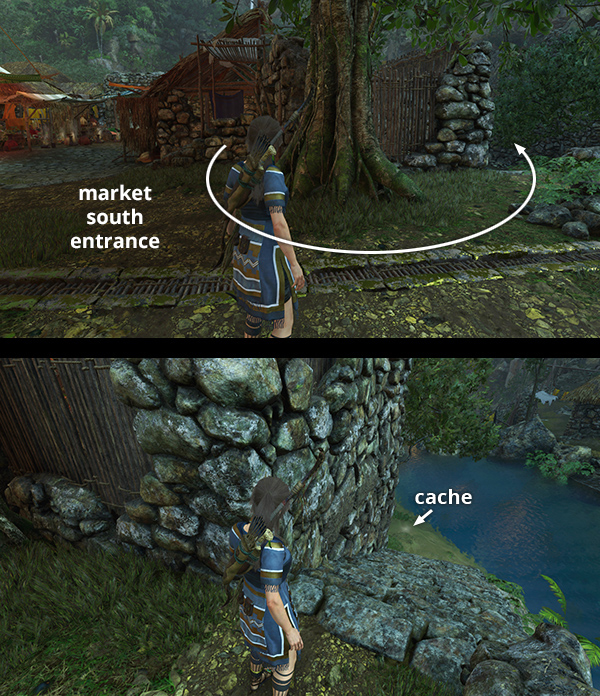
SURVIVAL CACHE 1
This cache is buried on the riverbank just east of the MARKET in the lower city. If you missed it, return to the marketplace and exit to the south. Go around to the left and down the stone steps. Dig up the cache at the foot of the steps. (Click image for more and larger screenshots.)
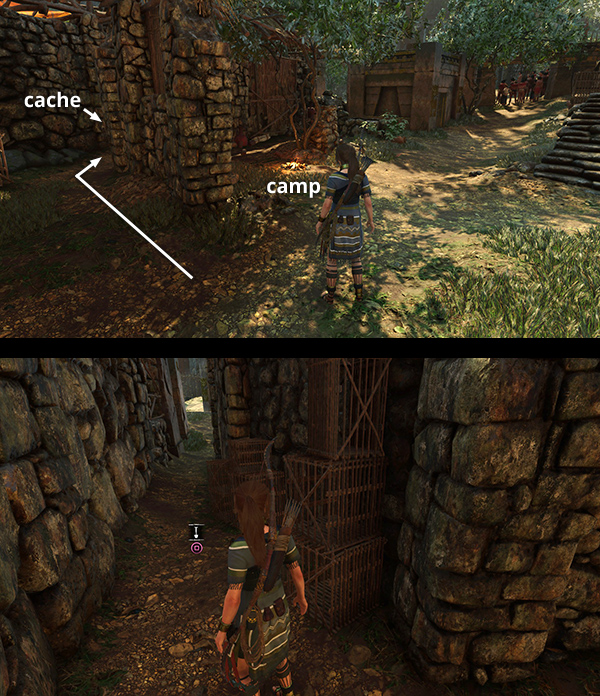
SURVIVAL CACHE 2
This cache is in the narrow alley between the Paititi Market Base Camp and the stone wall surrounding the MARKET. If you missed it, return to that camp and go around either side of the wall surrounding the campfire to find the cache. (Click image for more and larger screenshots.)
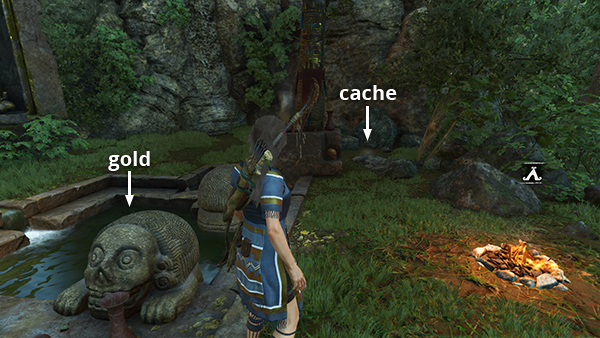
SURVIVAL CACHE 3
This cache is buried a few steps northwest of the Temple District Base Camp, beyond the small pool with the stone turtles and hidden gold. (Click screenshot to enlarge.)
SURVIVAL CACHE 4
This cache is in the south-central part of the city, in the roofless house below and to the southeast of monolith #1. If you missed it, return to the monolith, then follow the irrigation channel to the edge of the ledge. Drop down into the house below on the right and you'll find the cache buried in a corner. (Click images for more and larger screenshots.)


SURVIVAL CACHE 5 (Monolith Riches)
This cache is just north of the Village Caves Base Camp. It can only be found by deciphering monolith #1, and following the clue: "Canals bring water to the arid parts of the village, and they washed me away." Check the walkthrough for details. (Click screenshot to enlarge.)
SURVIVAL CACHE 6
This cache is underwater at the south end of the river. When you reach that area, look for a wooden walkway curving around the west side of the pool. The cache is buried under this walkway, near document #7. (Click screenshot to enlarge.)
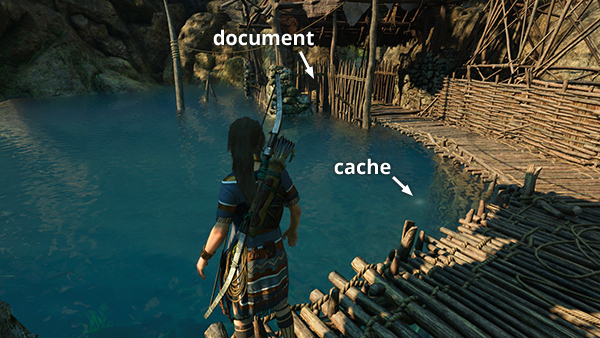
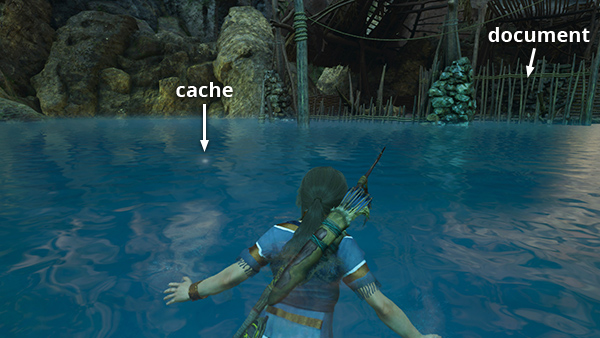
SURVIVAL CACHE 7
The next cache is also underwater at the south end of the river. It's just to the left of the walkway with document #7. (Click screenshot to enlarge.)
SURVIVAL CACHE 8
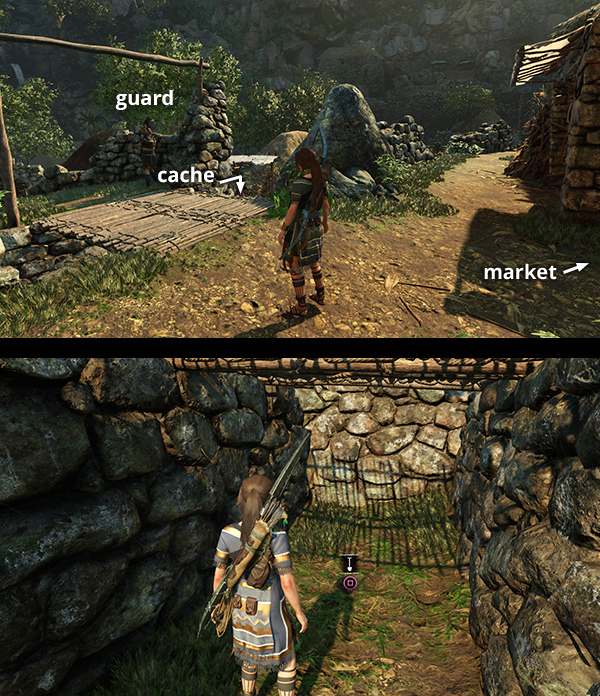
Just beyond the northwest corner of the lower city MARKET there's a small, wooden footbridge leading to the fields to the north. There's a cult guard standing watch near the bridge. The survival cache is buried underneath. (Click image for more and larger screenshots.)

SURVIVAL CACHE 9
Northwest of the footbridge with survival cache #8, there are two small, man-made waterfalls. To the left of these waterfalls is a semicircular, raised planting bed with another buried survival cache. (Click image for more and larger screenshots.)
SURVIVAL CACHE 10
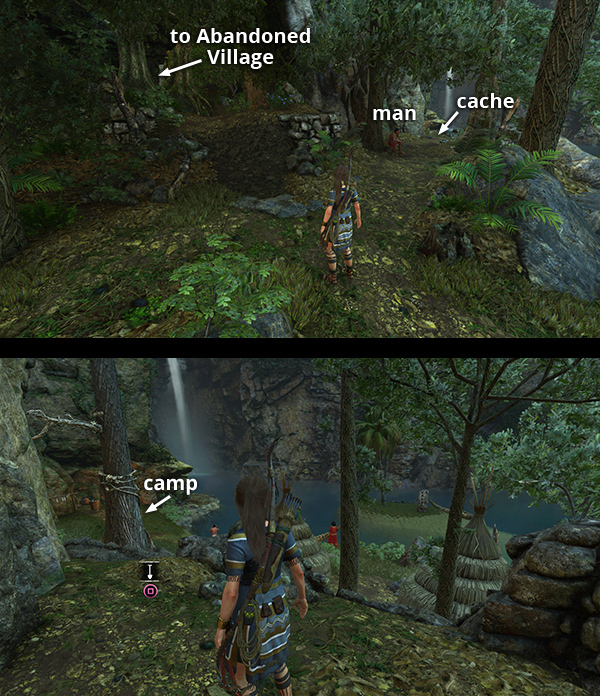
This cache is buried on the ledge between the Fishing District Base Camp and the path leading through the jungle to the ABANDONED VILLAGE. Both the camp and the Abandoned Village entrance are marked on the annotated map. (Click screenshots for more and larger images.)

SURVIVAL CACHE 11 (Monolith Riches)
This cache is beneath the waterfall at the north end of the river, near the Fishing District Base Camp. It can only be found by deciphering monolith #2, and following the clue: "The waters below protect me from the waters above." The walkthrough includes details and additional screenshots. (Click screenshot to enlarge.)
SURVIVAL CACHE 12
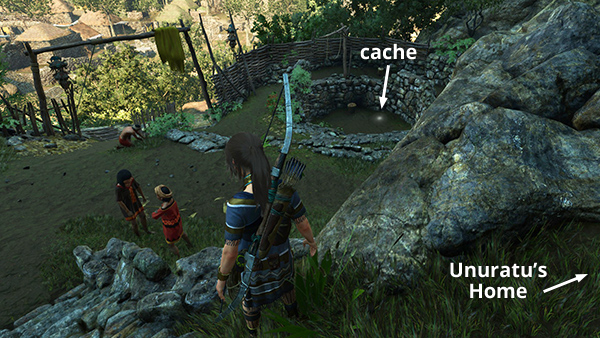
This cache can be found a short distance east of the entrance to Unuratu's Home. If you missed it, fast travel to the Unuratu's Home Base Camp, exit the cave, and turn right. The cache is buried in the large, circular depression lined with stone walls. (Click screenshot to enlarge.)
SURVIVAL CACHE 13 (Monolith Riches)
This cache is in the area with the terraced pools, north of Unuratu's Home. It can only be found by deciphering monolith #3, and following the clue: "The youngest of four turns his back on his brothers, unable to speak as I lie in his mouth." Check the walkthrough for details. (Click screenshot to enlarge.)
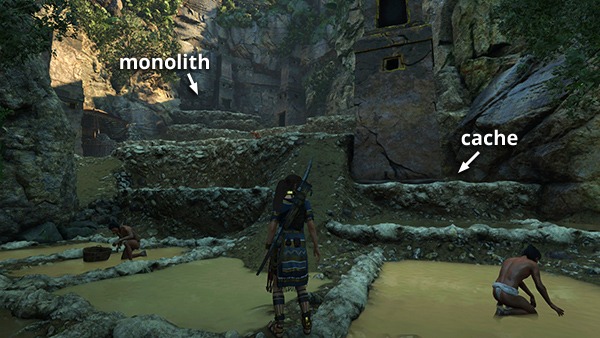
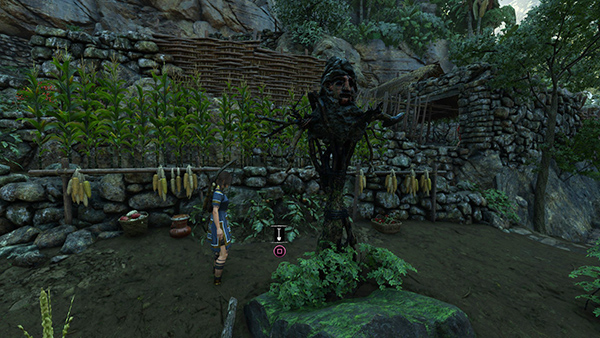
SURVIVAL CACHE 14 (Monolith Riches)
This cache can only be found by deciphering monolith #4, between Unuratu's Home and the wide, stone bridge connecting the upper and lower city. Doing so provides a clue: "A lone sentry stands guard over me and his harvest," which leads to the cache in the planting beds below. Check the walkthrough for details. (Click screenshot to enlarge.)
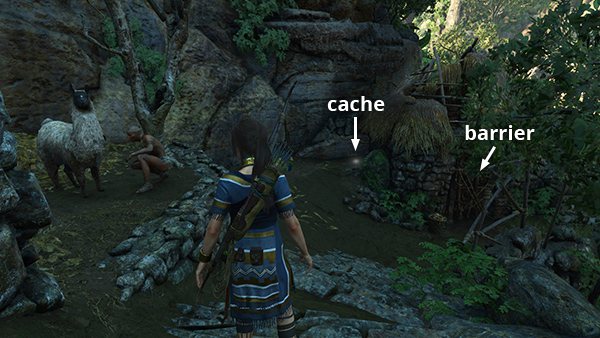
SURVIVAL CACHE 15
This cache is buried just south of monolith #4, between Unuratu's Home and the bridge to the upper city. There's a man with a llama nearby. The cache is just to the left of the thatched hut with the braided rope barrier in the doorway. (Click screenshot to enlarge.)
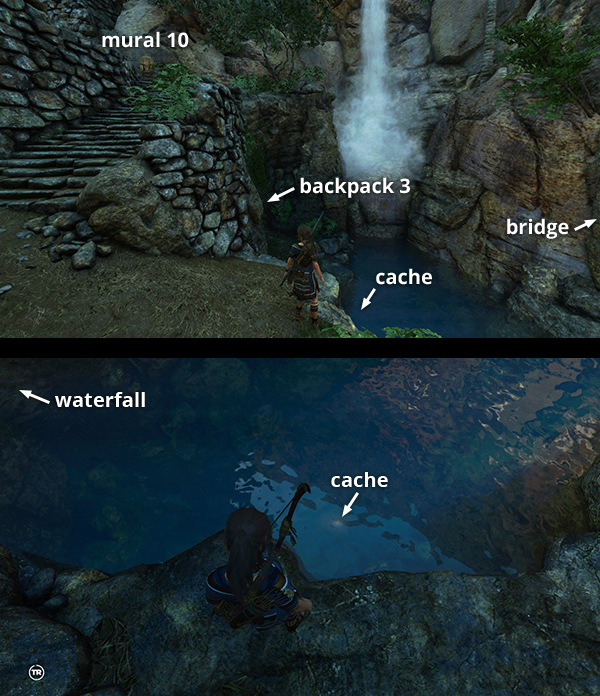
SURVIVAL CACHE 16
This is one of the caches revealed on your in-game map when you examine explorer backpack #3, found in the cave near the small waterfall northeast of the stone bridge connecting the upper and lower city. Unlike Monolith Riches, however, you don't have to find each pack to dig up the related caches. While standing in the little cave with the backpack, turn away from it and look over the edge into the water to spot the cache on the river bottom. (Click image for more and larger screenshots.)
SURVIVAL CACHE 17
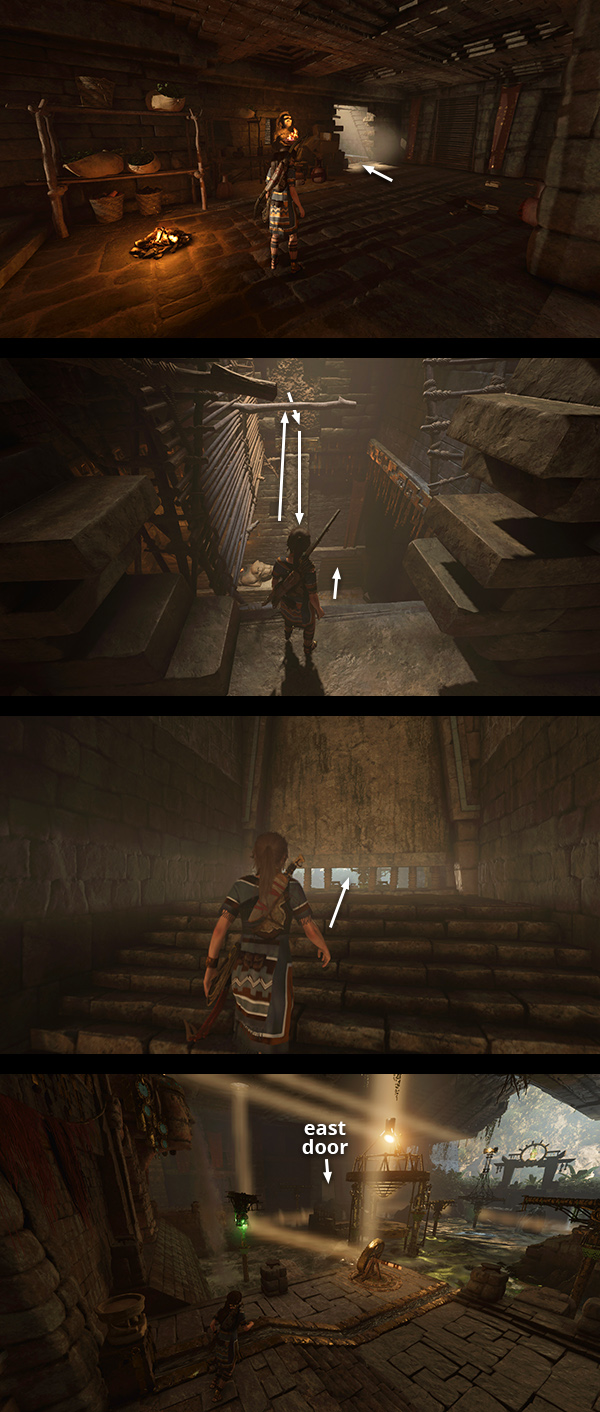
This cache is in the Temple of the Sun Challenge Tomb, in the hallway on the east side of the main puzzle room with the pool and mirrors. If this is your first time exploring here, follow the challenge tomb walkthrough.
If you've already completed the tomb but missed this cache, see the bug note below. Fast travel to the Temple of the Sun Base Camp and swing/rappel down into the hallway to the northwest. Continue to the west and crawl under the door into the mirror room. Use mirror #1 to rotate the beam on the left. Cross over it to the northeast corner. Use mirror #2 to rotate the second beam, enabling you to reach the doorway on the east side of the room. Enter and turn left. The cache is at the far (north) end of this hallway. (Document #17 is also here.) If this is all you need, there's no need to solve the rest of the puzzle. Just climb the wooden slats at the south end of the hallway and follow the canyon back to civilization. (Click images for more and larger screenshots.)
BUG NOTE: On returning to the mirror room, I found the rotating beams were missing, making it impossible to continue. Killing Lara by jumping into the pool and letting the game reload fixed the issue for me, but you may want to change save slots at the base camp before climbing down into the hallway, just in case.
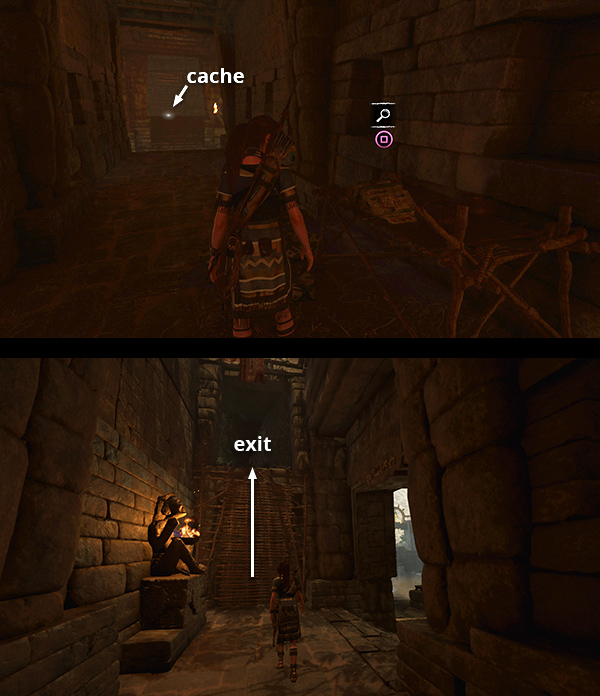
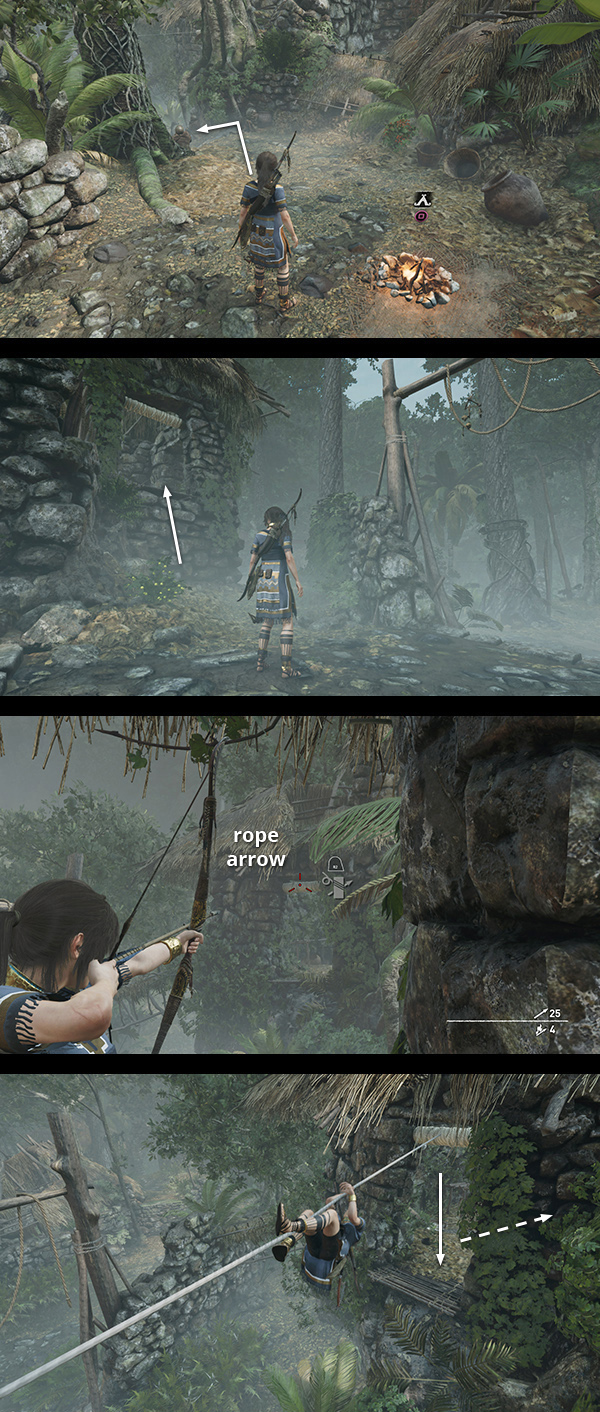
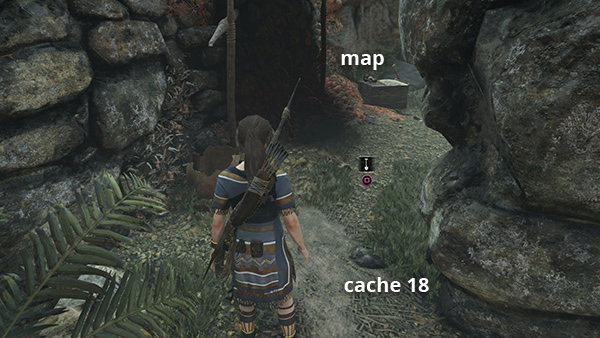
SURVIVAL CACHE 18
This cache is in the Abandoned Village northwest of the city. If you've already discovered the Abandoned Village Base Camp, fast travel there. Otherwise find the Abandoned Village Entrance on the map and/or follow the main walkthrough to reach the camp.
The cache is just north of the campfire, but you'll need to take a roundabout route to reach it. Go down the steps to the northwest. Climb into the building on the left, turn around, and use a rope arrow to run a line over to the opposite building. Climb the line and drop down in the doorway. Go through the building and up the steps to the right to find the buried cache. (Click images for more and larger screenshots.)
SURVIVAL CACHE 19
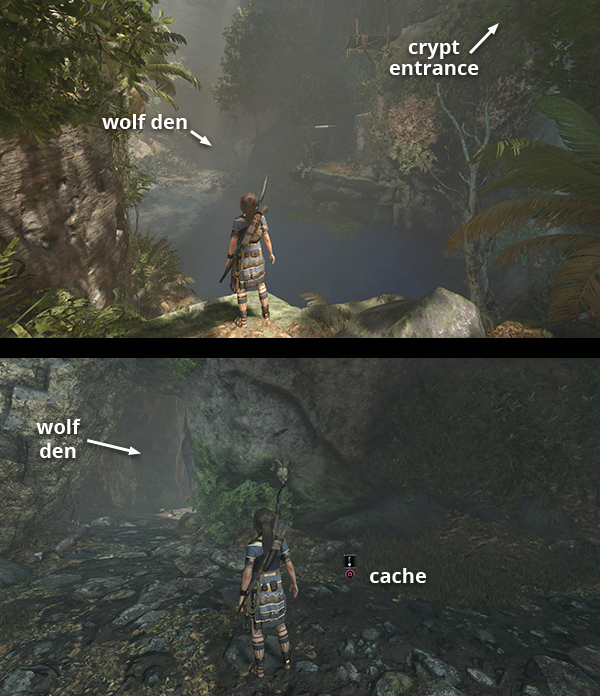
From the Abandoned Village Base Camp (see cache #18, above), go down the steps to the northwest then follow either of the paths leading to the large pool to the north. Swim across the pool to the beach in front of the Black Wolf Den, which is labeled with a sparkly wolf icon on the map. If this is your first time here, or the wolves have had time to respawn, watch out for them. This cache is buried just outside the cave entrance, on the right. The walkthrough has details. (Click image for more and larger screenshots.)
SURVIVAL CACHE 20
This cache is in Crypt of Chuki, the Weaver, near the Abandoned Village northwest of Paititi. If you haven't explored this crypt yet, follow the walkthrough. If you raided the crypt but missed this cache, return to the Abandoned Village Base Camp and follow the walkthrough to reach the crypt entrance. Once inside, proceed to the round opening in the floor above the pool. Dive in and you'll find the cache on the bottom in the center of a circle of statues. If this is all you need, climb out of the water, go through the doorway to the northwest, turn left, scramble under the spears, then climb the curving staircase to the exit. (Click image for more and larger screenshots.)
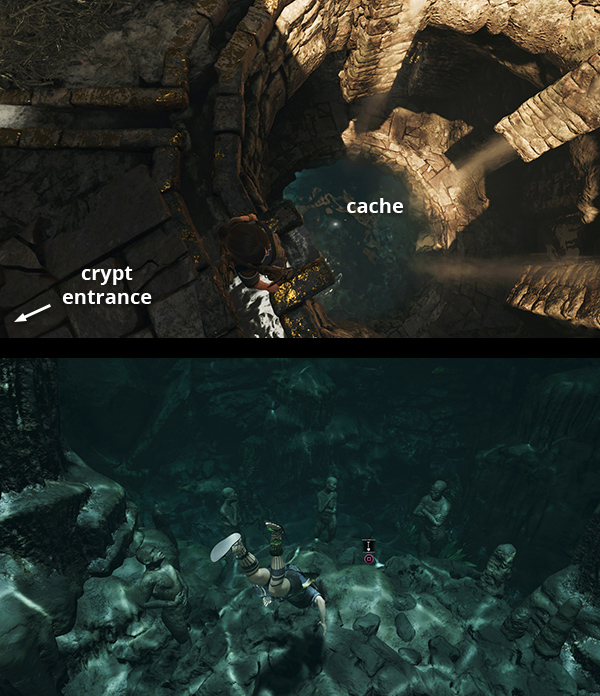
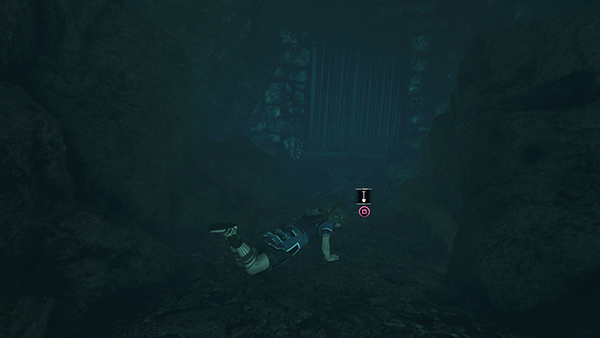
SURVIVAL CACHE 21
The next cache is also in the flooded cavern leading to Chuki's Crypt, near the Abandoned Village northwest of the city. If you discovered the Abandoned Village Base Camp, you can fast travel there. Otherwise follow the main walkthrough to reach the crypt entrance. Then follow the crypt guide to find the cache. (Click screenshot to enlarge.)
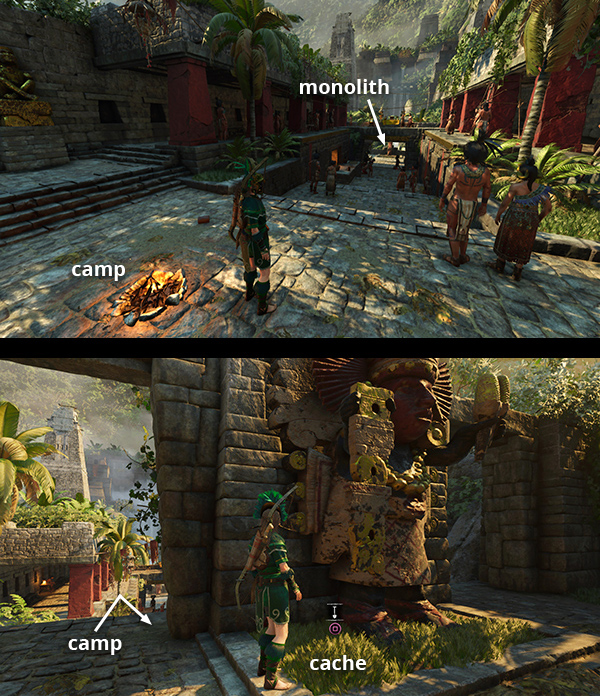
SURVIVAL CACHE 22 (Monolith Riches)
This cache is in the south-central part of the city, near monolith #1. It can only be found by deciphering monolith #5, located in the Temple District, and following the clue: "Seven golden birds perched here and there. One escaped to the trees with his treasure. Dropped from his talons, I'm waiting for you." Check the walkthrough for details and additional screenshots. (Click image for more and larger screenshots.)

SURVIVAL CACHE 23 (Monolith Riches)
This cache is found in Upper Paititi, which you'll be able to explore after completing the Cenote level. To unearth the cache, you must first decipher monolith #6, located due south of the Upper City Main Gate Base Camp. This provides a clue: "They stand back-to-back, two brothers in arms. I lie at the feet of the one who watches the shaded serpent." The cache itself is buried at the foot of a large statue just north of the Upper City Main Gate Base Camp. Check the walkthrough for details and additional screenshots. (Click image for more and larger screenshots.)
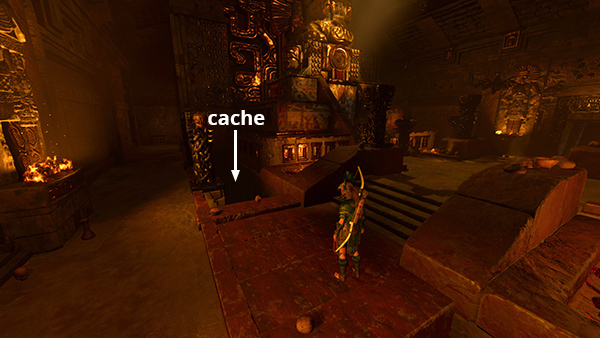
SURVIVAL CACHE 24
This cache is inside the Temple of Kukulkan in the Upper City. If you missed it on your way to rescue Unuratu from prison during the 'Rebellion Lives' chapter, fast travel to the Temple of Kukulkan Base Camp and re-enter the temple through the doorway to the west. The cache is buried in the northwest corner of the pit surrounding the altar. (Click screenshot to enlarge.)
Note that the Temple of Kukulkan Base Camp does not appear until you've completed this area and reached the Porvenir Oil Fields. You can also re-enter the temple through the doorway at the top of the stairs north of the Upper City Main Gate Base Camp.
SURVIVAL CACHE 25
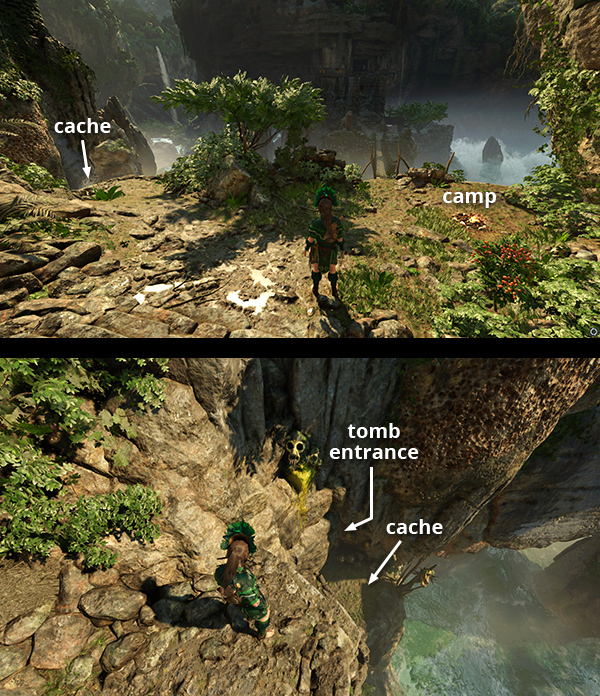
This cache is in the gorge between the Temple of Kukulkan and Unuratu's prison cell. If you missed it while playing through the story, fast travel to the Temple of Kukulkan Base Camp, which becomes available after the Porvenir Oil Fields level. Move to the north end of the ledge and look over the edge to spot the entrance to the Ancient Aqueduct Challenge Tomb. The cache is buried just to the right of the tomb entrance. (Click image for more and larger screenshots.)
SURVIVAL CACHE 26
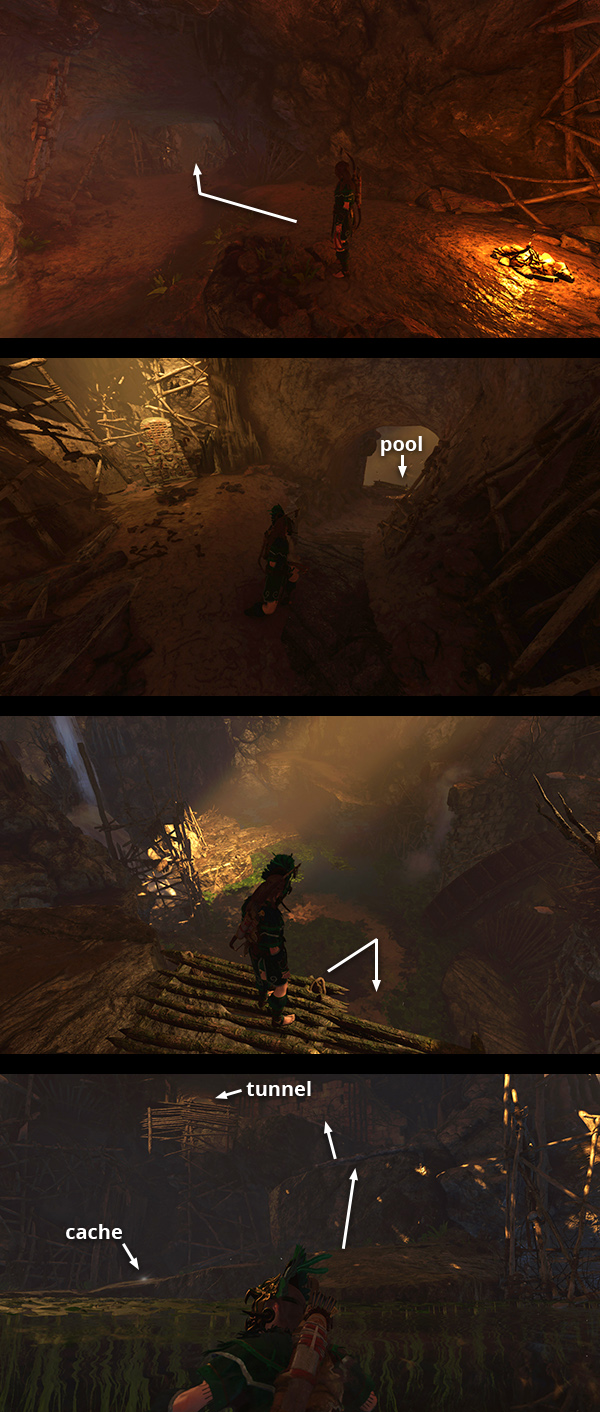
This cache is on the way to the Ancient Aqueduct Challenge Tomb. If you haven't explored this tomb yet, fast travel to the Temple of Kukulkan Base Camp, which appears once you've finished the Porvenir Oil Fields level. Then follow the tomb walkthrough.
If you raided the tomb but missed the cache, instead fast travel to the Subterranean River Base Camp. Follow the passageway to the east, past the point where a brief cutscene shows Lara stowing her weapons and putting on her Serpent Guard mask. Continue to a wooden ledge overlooking a pool. Dive in, surface, and turn around to face east. You'll spot the cache on a ledge at water level just below the tunnel you came from. When you have it, climb the ledges on the right to get back to the fast travel camp. (Click images for more and larger screenshots.)
SURVIVAL CACHE 27
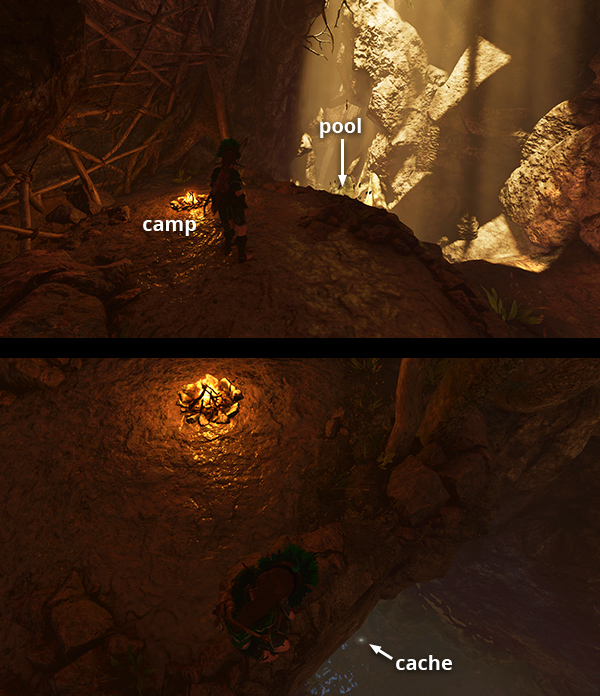
This cache is also on the way to the Ancient Aqueduct Challenge Tomb. If you haven't explored this tomb yet, fast travel to the Temple of Kukulkan Base Camp, which appears once you've finished the Porvenir Oil Fields level. Then follow the tomb walkthrough.
If you raided the tomb but missed the cache, instead fast travel to the Subterranean River Base Camp. The cache is buried on the bottom of the pool almost directly below the campfire. When you're done here, scale the rough climbing wall to get back to the fast travel camp so you can leave this area. (Click image for more and larger screenshots.)
SURVIVAL CACHE 28
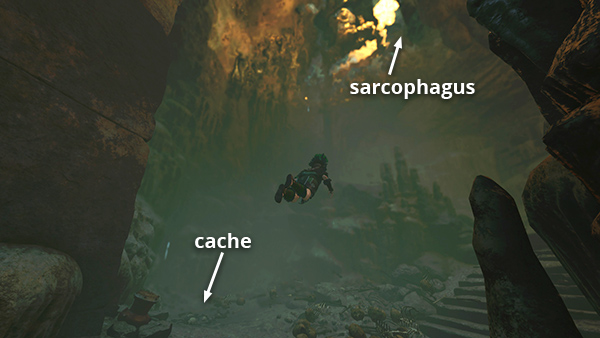
This cache is in the Crypt of Uturunku, The Ferryman, in the gorge east of the city near Unuratu's prison cell. To return there later in the game, fast travel to the Temple of Kukulkan Base Camp, which appears once you've finished the Porvenir Oil Fields level. Then follow this short guide to get back to the crypt entrance.
If you haven't explored this crypt yet, follow the crypt walkthrough to reach the cache and sarcophagus. If you've already completed the crypt, it will now be flooded. Follow this alternate guide to reach the cache, buried on the bottom of the flooded sinkhole below the sarcophagus room. That page also explains how to get back to the base camp afterwards. (Click screenshot to enlarge.)
SURVIVAL CACHE 29 (Monolith Riches)
This cache is on the island in the gorge east of the city, where you rescued Unuratu from prison. It can only be found by deciphering monolith #7, just across the bridge from the Temple of Kukulkan Base Camp, and reading the clue: "A once ferocious warrior, raised as a warning. I fell from his mouth and now lie beneath him." This leads to the buried cache at the southeast tip of the island. The walkthrough includes details and additional screenshots. (Click image for more and larger screenshots.)
SURVIVAL CACHE 30
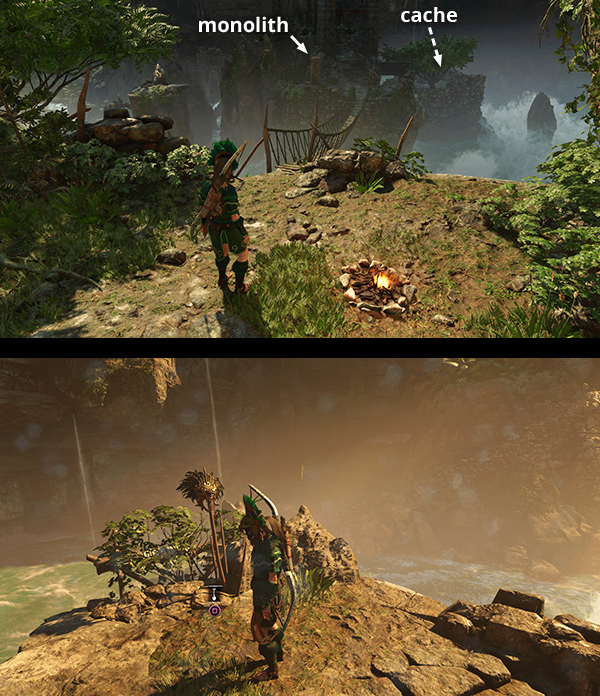
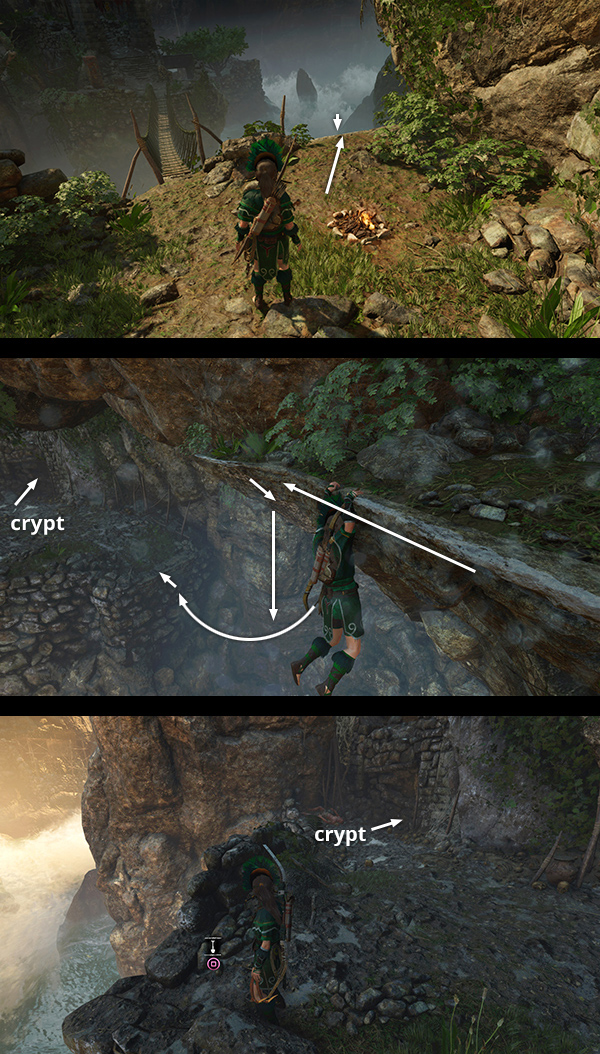
This cache is on the way to the Crypt of Qispi, The Merchant, on the southwest side of the gorge where Lara frees Unuratu from prison. Fast travel to the Temple of Kukulkan Base Camp. Hang from the edge to the right of the rope bridge and climb/rappel to the crypt entrance, below and to the left (south). The cache is on the ledge outside the crypt entrance. Check the walkthrough for details and screenshots. (Click image for more and larger screenshots.)
SURVIVAL CACHE 31
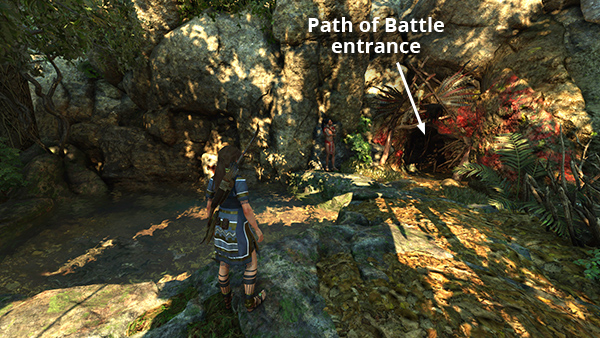
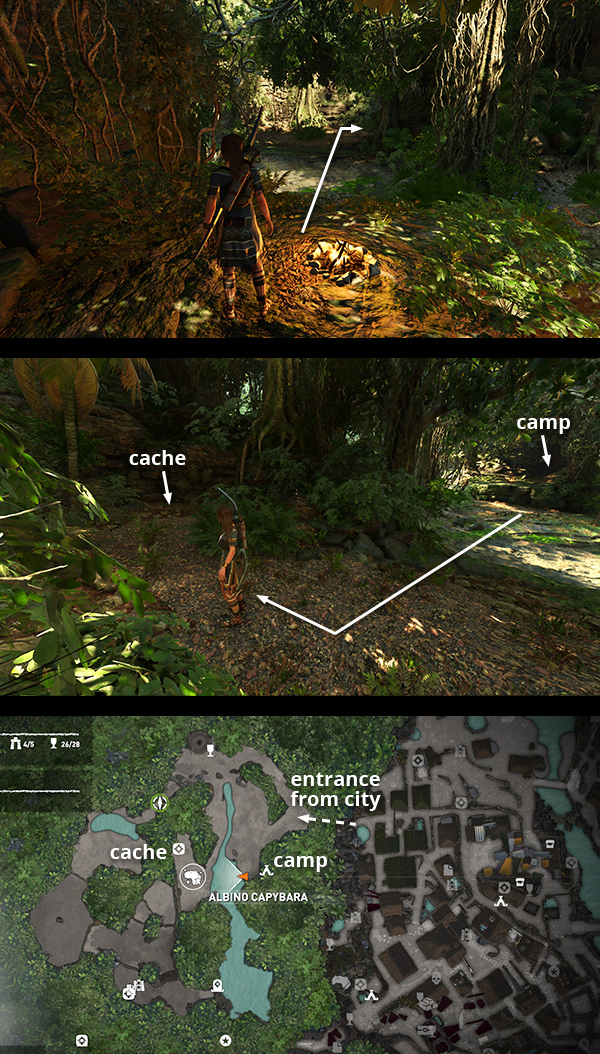
This cache is in the jungle west of the city, near the entrance to the Path of Battle Challenge Tomb. My walkthrough covers it during the Hearts and Minds: Champion's Bow Side Mission, but you can go after it any time. If you've already discovered the Wild Jungle Base Camp, fast travel there now. If not, go through the tunnel from the lower city, shown in the first screenshot and marked 'Path of Battle Entrance' on the annotated map. Then head southwest to the camp, which is built on a small shelf beside a stream. Cross the stream to the west. The cache is buried at the right (north) end of the alcove with the albino capybara map icon. (Click images for larger screenshots and map detail.)
SURVIVAL CACHE 32
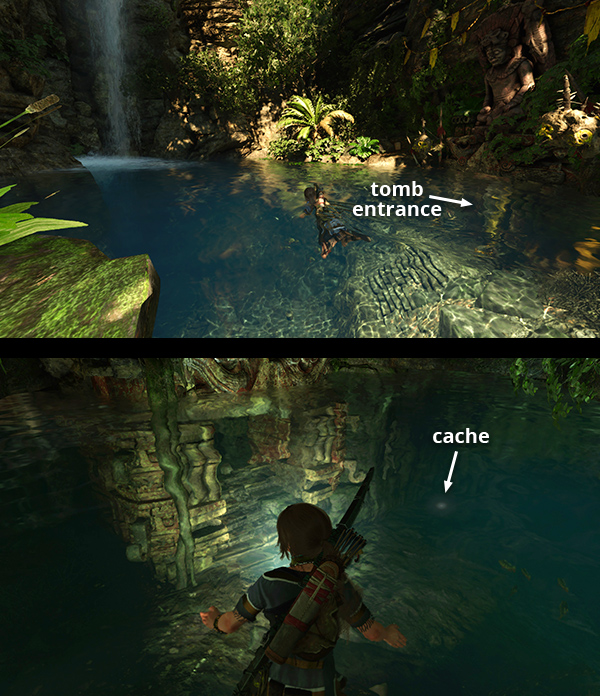
The last 3 caches are in the Path of Battle Challenge Tomb. If it's your first time exploring there, refer to the tomb walkthrough. If you cleared the tomb but missed this cache, fast travel to the Wild Jungle Base Camp. Follow the stream south to the the pool with the waterfall. The tomb entrance is underwater on the right. Swim inside and surface for air. The cache is buried in the far right corner of this little flooded anteroom. (Click image for more and larger screenshots.)
SURVIVAL CACHE 33
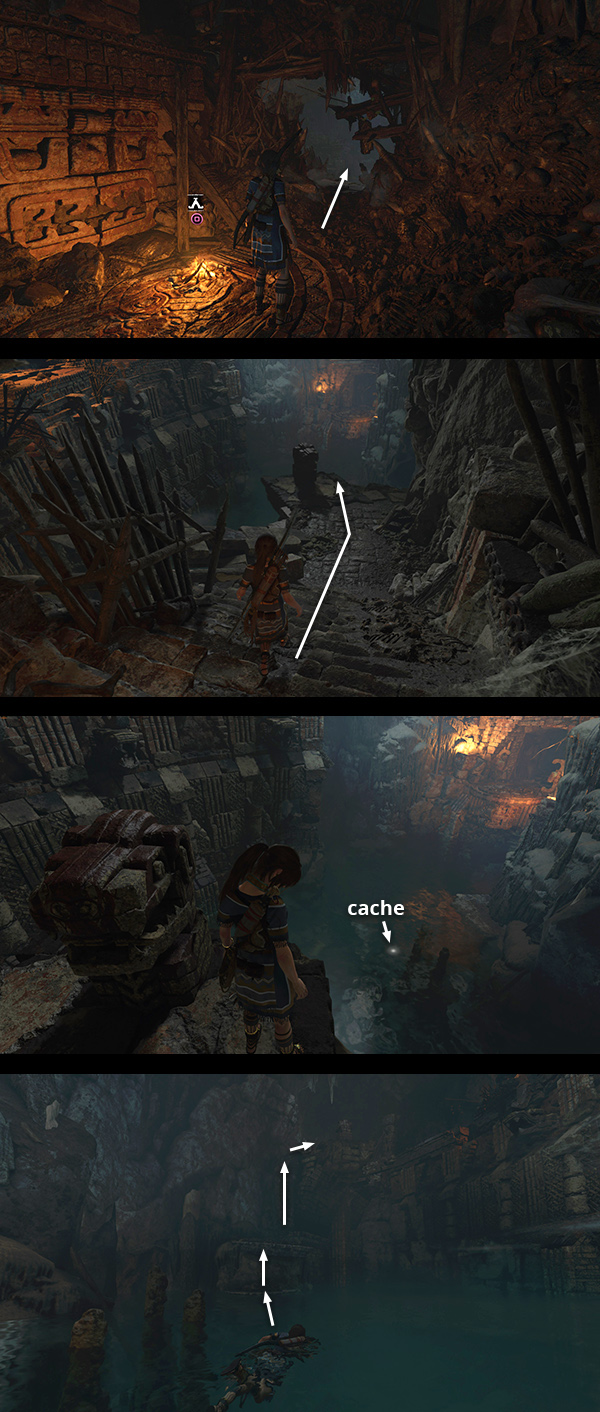
This cache is also in the Path of Battle Challenge Tomb. If you missed it, fast travel to the Ossuary Base Camp. Go through the opening to the southwest into the large cavern with the pool. Move down the slope and stand next to the jaguar-head handle. Look down into the pool to spot the cache. Dive in and retrieve it. Climb out of the water on the ledges below the jaguar handle. (Document #42 is here—or was if you found it earlier.) Scale the climbable wall back to the top. If that's all you need, return up the steps and straight on to the base camp. (Click image for more and larger screenshots.)
SURVIVAL CACHE 34
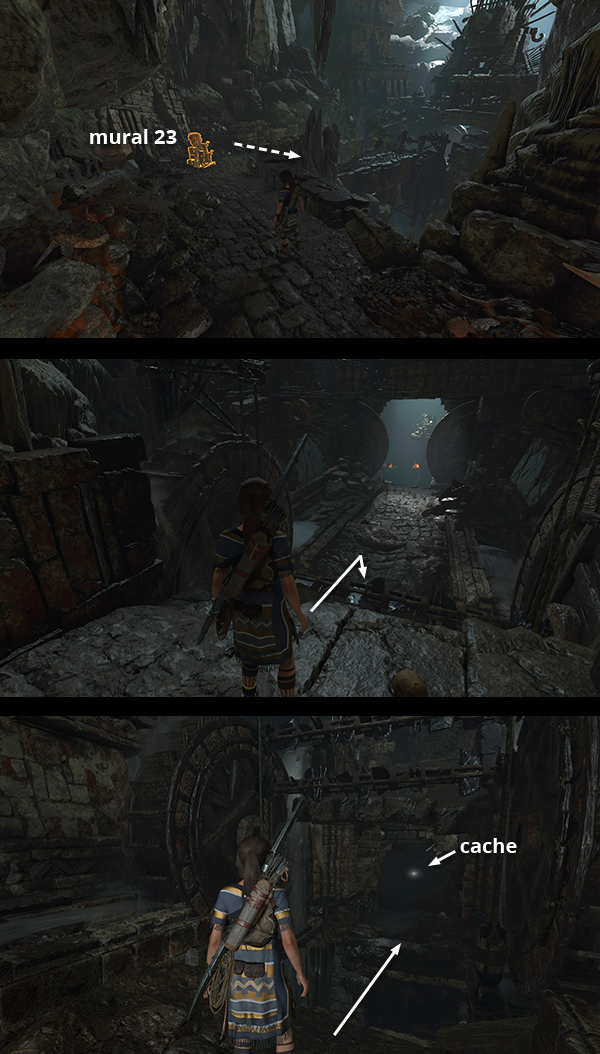
The last cache is also in the Path of Battle Challenge Tomb. If you explored the tomb but missed the cache, return to the Ossuary Base Camp. Follow the Quick Guide to get back to mural #23. Just beyond the mural, turn right and proceed down the steps to a ledge near a moving obsidian blade trap. Wait for the blades to descend, then jump over them onto the walkway below. Turn around to face the blades and you'll spot the cache in the dark passageway ahead. Wait for the blades to rise then quickly jump across the pit to grab the far edge. Pull up, continue forward, and dig up the cache. If you need help finding your way back to the base camp, check the tomb walkthrough. (Click image for more and larger screenshots.)
Walkthroughs: First Visit · Second Visit (after Cenote) · Third Visit (after San Juan) | Collectibles Guides | Main SOTTR Page
†UPDATE HISTORY: 9/8/21 - Page first posted online.
WAS THIS WALKTHROUGH HELPFUL? If not, I apologize and invite you to contact me with any questions. If you need help right away, I recommend the r/TombRaider subreddit. Other fan-run forums are listed at tombraiders.net/stella/community.html. If this site was useful, please consider supporting it financially or in other ways. For details, visit tombraiders.net/stella/support.html. As always, I welcome your corrections/suggestions. Thank you!
Copyright © Stellalune (). All rights reserved. Feel free to copy or print this walkthrough for personal use. By all means, share it with friends, but please include this credit line so people can send me their feedback. No part of this walkthrough may be reproduced on another site without permission. Follow this link for details about this site's advertising and privacy policy.
Stella's Tomb Raider Site: tombraiders.net.