Shadow of the Tomb Raider - Hidden City Monoliths
Updated: 9/8/21(†)
Paititi is a HUGE level, and you must revisit it several times in order to access all areas and find every item. This guide focuses on revisiting the level after completing it. If you are playing through for the first time, you may want to follow the main walkthrough instead to avoid possible spoilers. Monoliths and other Collectibles are numbered in the order they appear in the walkthrough and on the annotated level map.
Follow this link for a List of All Artifacts by Story/Dialect.
Treasure Chests · Relics · Artifacts & Photos · Documents · Murals · Monoliths · Survival Caches · Explorer Backpacks · Archivist Maps · Side Missions · Challenges
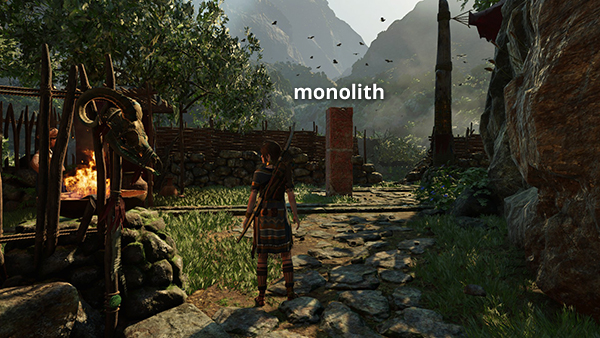
MONOLITH 1 (Proficient Yucatec)
This monolith is located in the south central part of the city. If you missed it, or didn't know enough Yucatec to read it the first time you passed it, you can reach it easily from any of the camps in the lower city. In this screenshot, Lara has just come up the stairs from the southwest. Deciphering this monolith leads you to survival cache #5, buried just north of the Village Caves Base Camp. Check the map and walkthrough for details. (Click screenshot to enlarge.)
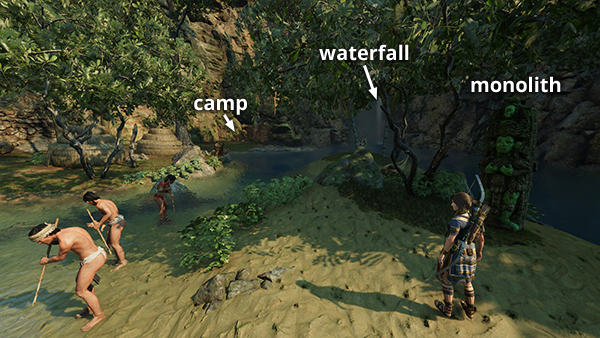
MONOLITH 2 (Fluent Mam)
This monolith can be found on one of the small islands at the north end of the river, southeast of the Fishing District Base Camp, near where the villagers are fishing in the shallow water. Examining it provides a clue to the location of survival cache #11 in the pool below the waterfall. See the walkthrough for more info. (Click screenshot to enlarge.)
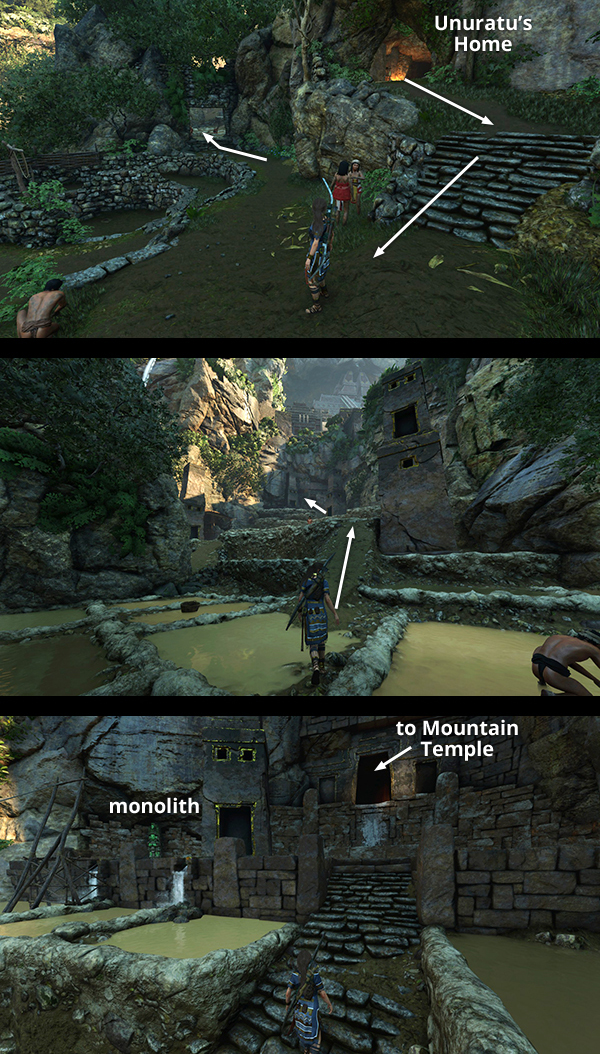
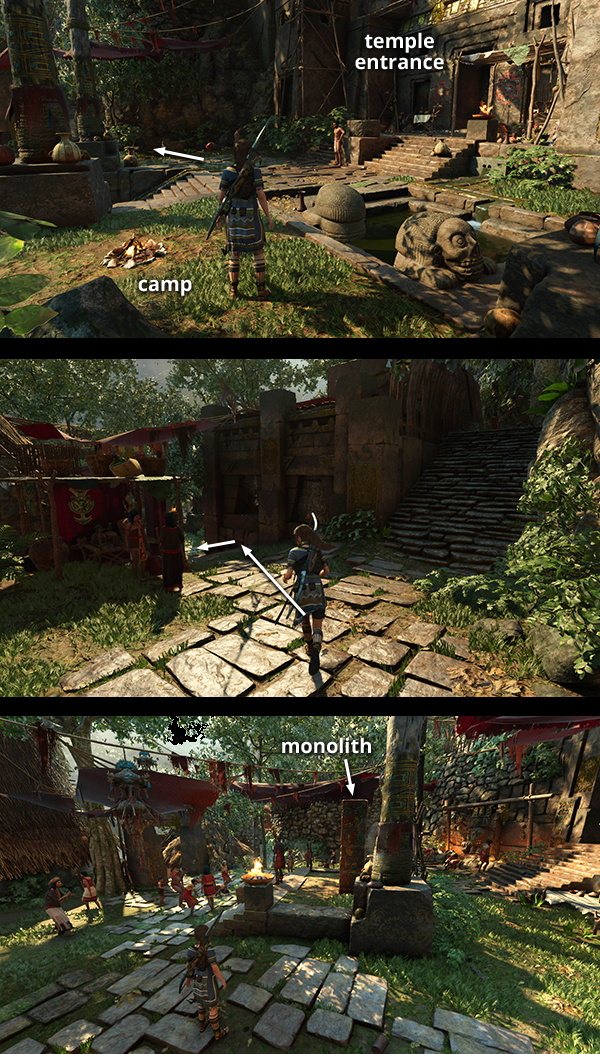
MONOLITH 3 (Fluent Mam)
This monolith can be found at the top of the area with the terraced pools, near the entrance to the Mountain Temple. If you missed it, fast travel to the Unuratu's Home Base Camp, exit the cave, head down the steps, and turn right. Go through the archway into the area with the terraced pools and climb to the top. The monolith is just to the left of the temple entrance. Deciphering it leads to survival cache #13, near the bottom of the hill with the pools. Details are in the walkthrough. (Click image for more and larger screenshots.)
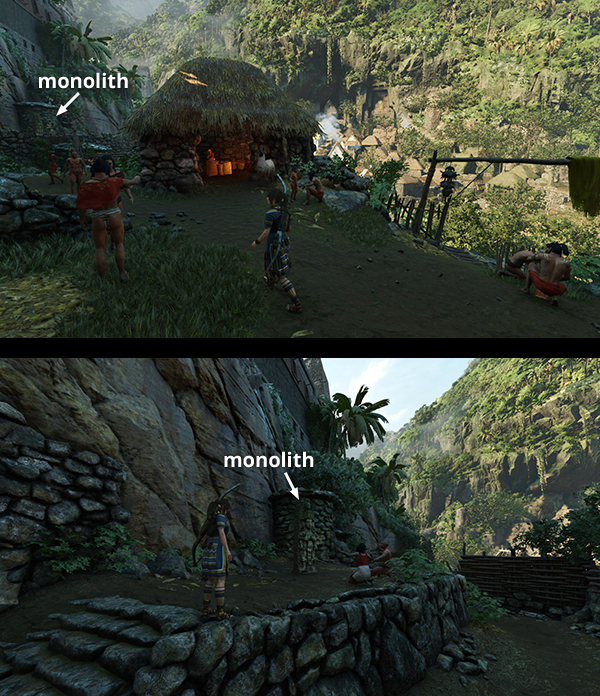
MONOLITH 4 (Proficient Mam)
This monolith is on the east side of the river, just below the high walls separating upper and lower Paititi. Fast travel to the Unuratu's Home Base Camp, exit the cave, head down the steps, and turn left. Then continue southward to find the monolith. Deciphering it yields a clue to survival cache #14, buried in the planting beds below. Again, check the walkthrough for more info. (Click image for more and larger screenshots.)
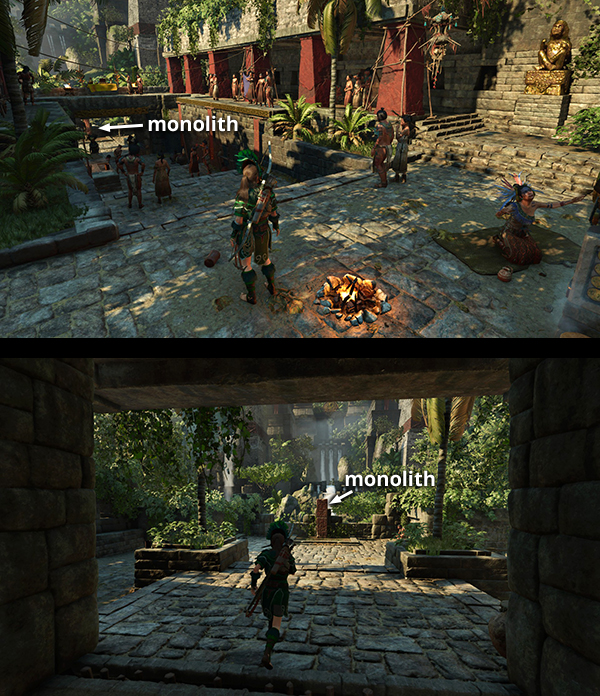
MONOLITH 5 - (Fluent Yucatec)
This monolith is in the Temple District on the west side of the city. You'll probably pass it a few times before you're able to read it. To get back there, fast travel to the Temple District Base Camp, cross the terrace to the southeast, then head down the steps to an open area where a man is speaking to a small crowd from atop a dais. The monolith is behind him. Deciphering it leads you to survival cache #22, buried near monolith #1. The walkthrough has details. (Click image for more and larger screenshots.)
MONOLITH 6 - (Proficient Yucatec)
This monolith is in the upper city, which is only accessible after Lara returns from The Cenote and obtains the Serpent Guard disguise. You'll pass it as you enter the upper city via the bridge from the lower city. If you missed it the first time, it's easier to fast travel to the Upper City Main Gate Base Camp then head down the steps to the south. The monolith will then be directly ahead. Deciphering it provides a clue to survival cache #23, just north of the base camp. If you need help with this, check the walkthrough. (Click images for more and larger screenshots.)
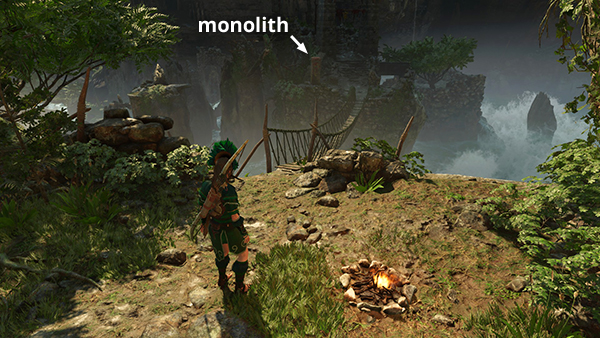
MONOLITH 7 - (Fluent Yucatec)
This monolith is on the island in the gorge east of the city. You first pass it on the way back from freeing Unuratu from prison in the 'Rebellion Lives' chapter. If you missed it, fast travel to the Temple of Kukulkan Base Camp, which becomes available after the Porvenir Oil Fields level. Cross the rope bridge to the island. The monolith is just ahead on the left. Deciphering it leads to survival cache #29, buried at the southeast corner of the island. Details are in the walkthrough. (Click screenshot to enlarge.)
Walkthroughs: First Visit · Second Visit (after Cenote) · Third Visit (after San Juan) | Collectibles Guides | Main SOTTR Page
†UPDATE HISTORY: 9/8/21 - Page first posted online.
WAS THIS WALKTHROUGH HELPFUL? If not, I apologize and invite you to contact me with any questions. If you need help right away, I recommend the r/TombRaider subreddit. Other fan-run forums are listed at tombraiders.net/stella/community.html. If this site was useful, please consider supporting it financially or in other ways. For details, visit tombraiders.net/stella/support.html. As always, I welcome your corrections/suggestions. Thank you!
Copyright © Stellalune (). All rights reserved. Feel free to copy or print this walkthrough for personal use. By all means, share it with friends, but please include this credit line so people can send me their feedback. No part of this walkthrough may be reproduced on another site without permission. Follow this link for details about this site's advertising and privacy policy.
Stella's Tomb Raider Site: tombraiders.net.