Shadow of the Tomb Raider - Hidden City Documents
Updated: 9/8/21(†)
Paititi is a HUGE level, and you must revisit it several times in order to access all areas and find every item. This guide focuses on revisiting the level after completing it. If you are playing through for the first time, you may want to follow the main walkthrough instead to avoid possible spoilers. Collectibles are numbered in the order they appear in the walkthrough and on the annotated level map.
Follow this link for a List of All Artifacts by Story/Dialect.
Treasure Chests · Relics · Artifacts & Photos · Documents · Murals · Monoliths · Survival Caches · Explorer Backpacks · Archivist Maps · Side Missions · Challenges
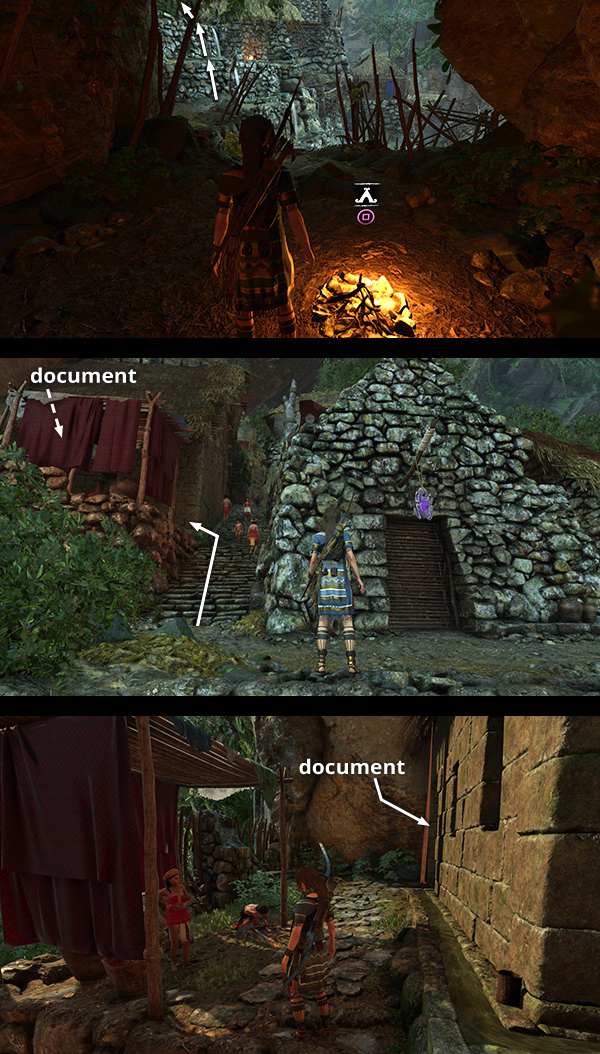
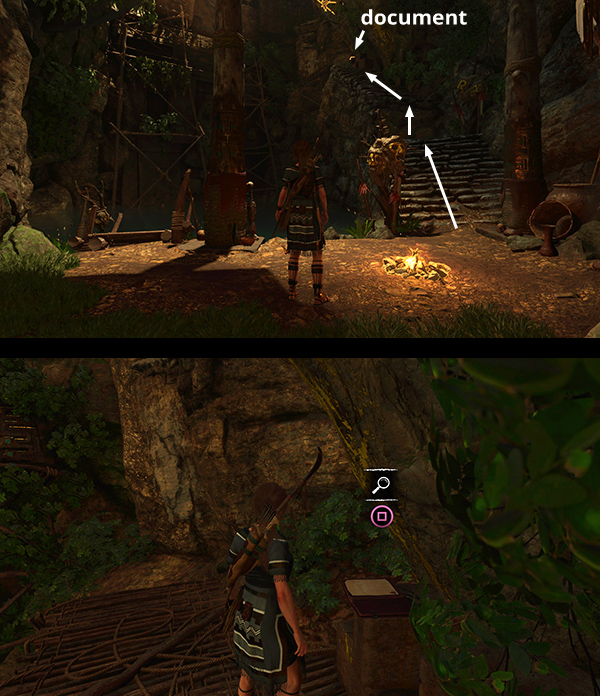
DOCUMENT 1 - Fawcett's Legacy (Search for the Hidden City)
This document is in the Abandoned Village northwest of the city. If you've already discovered the Abandoned Village Base Camp, fast travel there. Otherwise find the Abandoned Village Entrance on the map and/or follow the main walkthrough to reach the base camp. From there, head to the west, down two flights of stone steps, and you'll find the document lying on the ground on the left. (Click image for more and larger screenshots.)
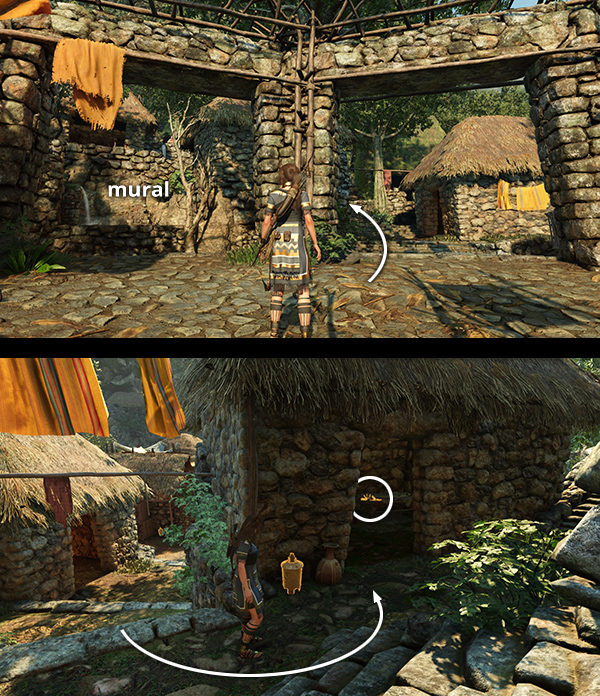
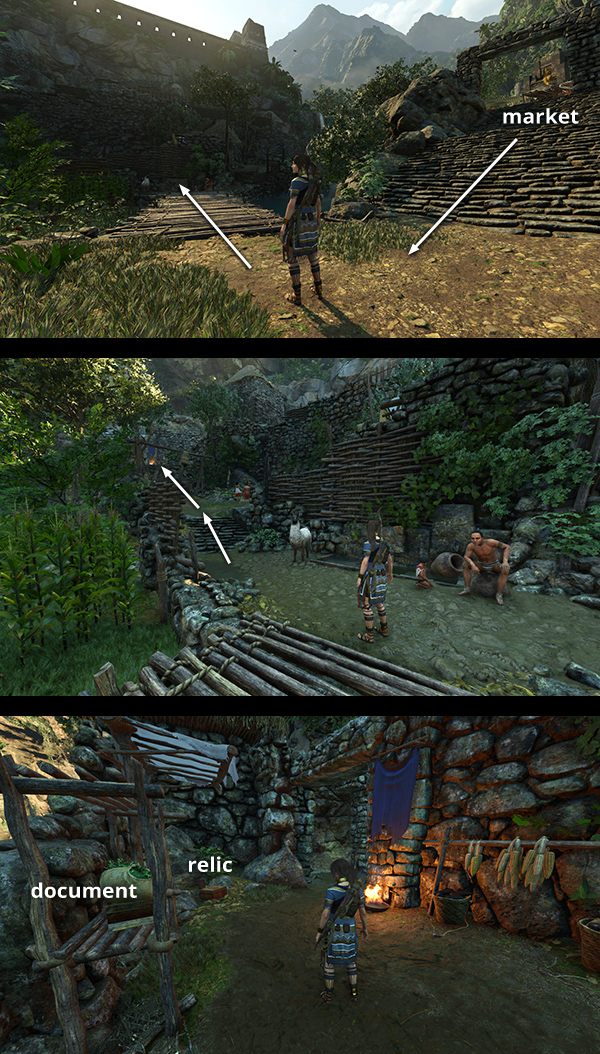
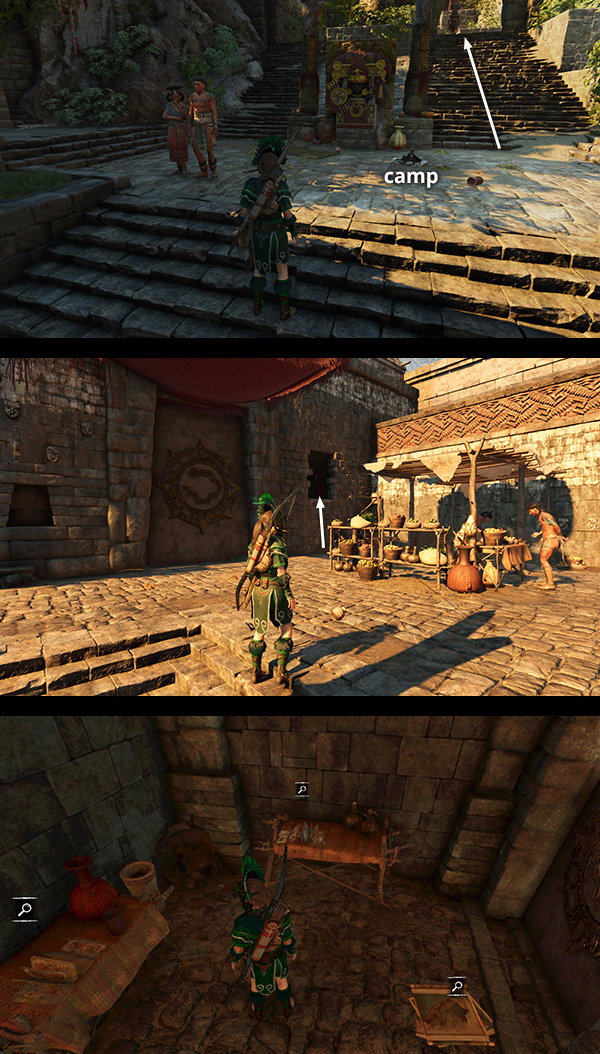
DOCUMENT 2 - Amaru's Grip (Rebellion of Paititi)
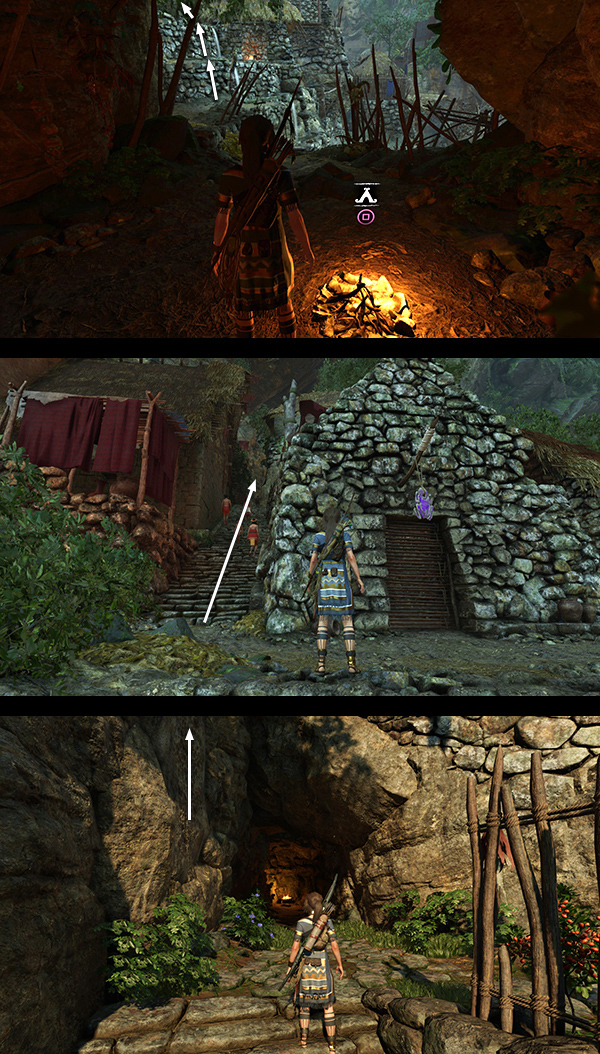
Just outside the western exit from the MARKET in the lower city, in an alcove with a little waterspout, is mural #1. Climb the stairs to the right of the mural. When you reach the third landing, make a U-turn to the left. The document is sitting on a table inside this stone house. (Click image for more and larger screenshots.)
DOCUMENT 3 - Rebirth and Resettlement (Founding Paititi)
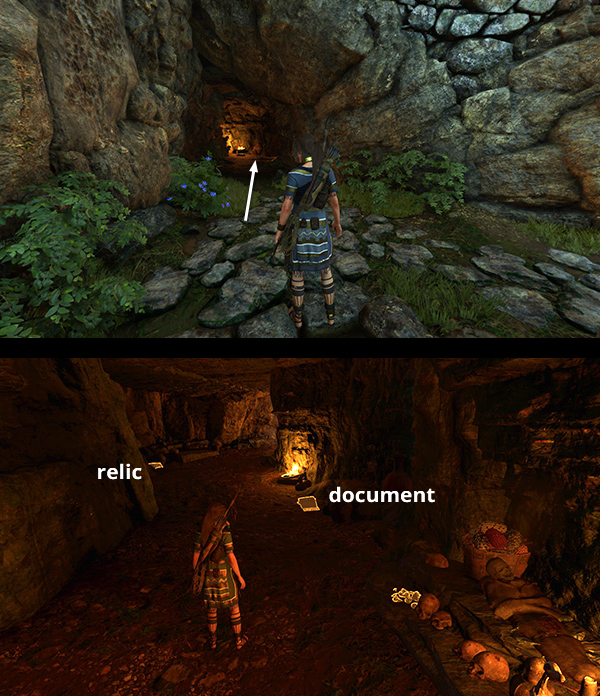
This document is in one of the caves on the southwest side of the city. The cave has openings at both ends, so you can approach from either direction. If you start at the Village Caves Base Camp, exit the cave, and climb the manmade stone ledges with the irrigation channels on the left, you'll end up at the base of a long staircase leading up to the west. Climb all the way to the top of these stairs and the cave entrance will be directly ahead. Inside the cave, you'll find various collectibles, including some gold, relic #7 , and this document. (Click images for more and larger screenshots.)
DOCUMENT 4 - Two Peoples as One (Founding Paititi)
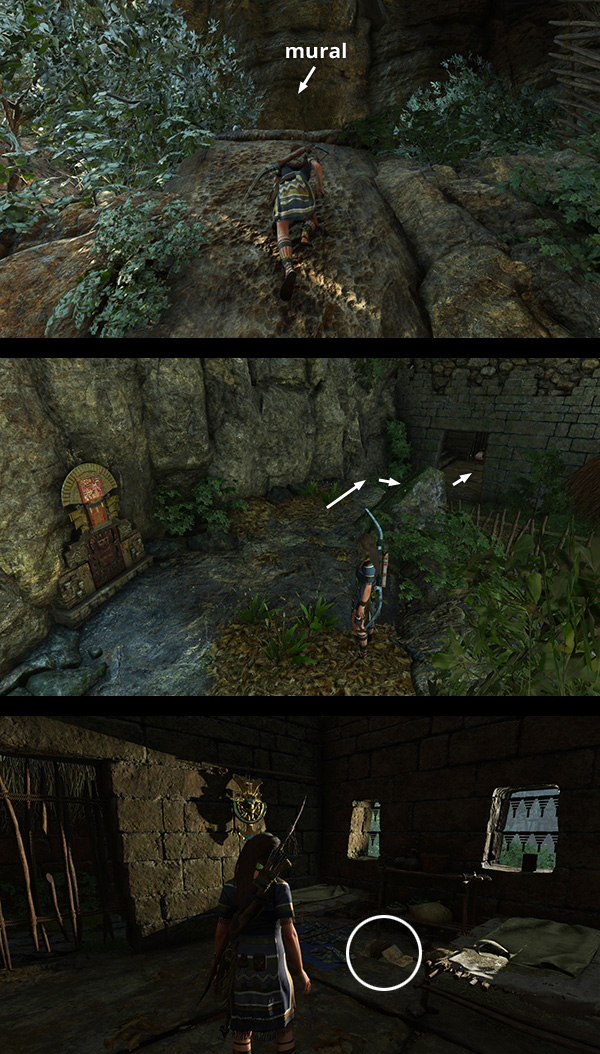
This document is in one of the stone houses on the southwest side of the city. You may discover it during the Widow's Tears Side Mission. If not, fast travel to the Village Caves base camp, exit the cave, and climb the manmade stone ledges with the irrigation channels on the left. Climb the long staircase leading up to the west. At the top of these stairs, scale the climbing wall on the left and you'll end up on the ledge with mural #6. Turn right and hop down into a little yard behind a house. The document is inside the house, on the floor between two beds. (Click images for more and larger screenshots.)
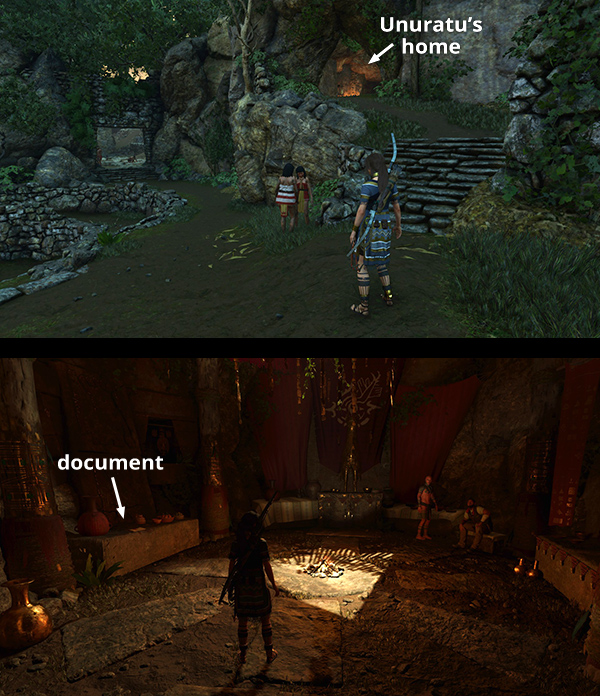
DOCUMENT 5 - Unuratu's Coronation (Rebellion of Paititi)
This document is in the same cave as the Village Caves Base Camp, at the south end of the city. (Click image for more and larger screenshots.)
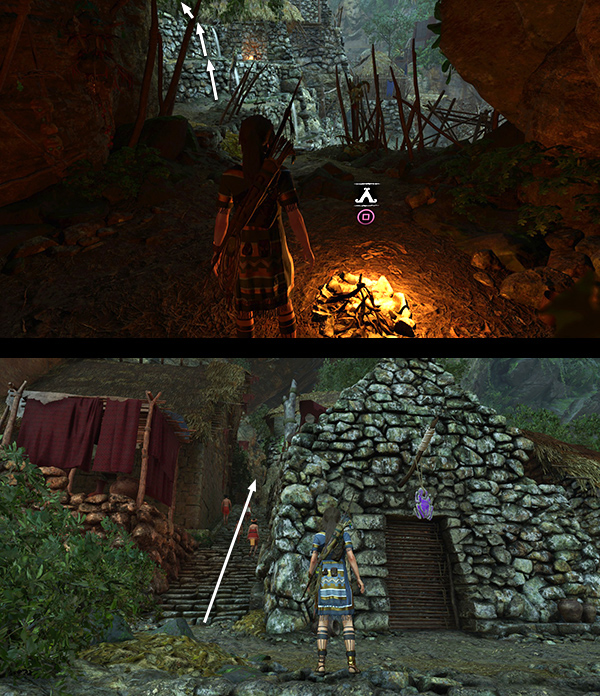
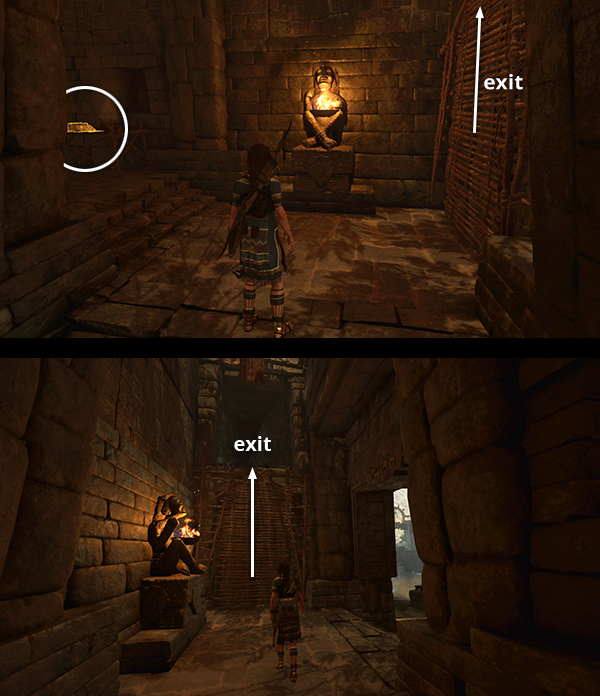
DOCUMENT 6 - Devils in the Dark (Homecoming)
This document is in one of the houses at the south end of Paititi. Start at the Village Caves base camp, exit the cave, and climb the manmade stone ledges with the irrigation channels on the left. Start up the long staircase to the west but stop at the first house on the left. You'll see two women working outside. The document is inside the house, along with a the entrance to a flooded passageway leading to the Temple of the Sun Challenge Tomb. (Click image for more and larger screenshots.)
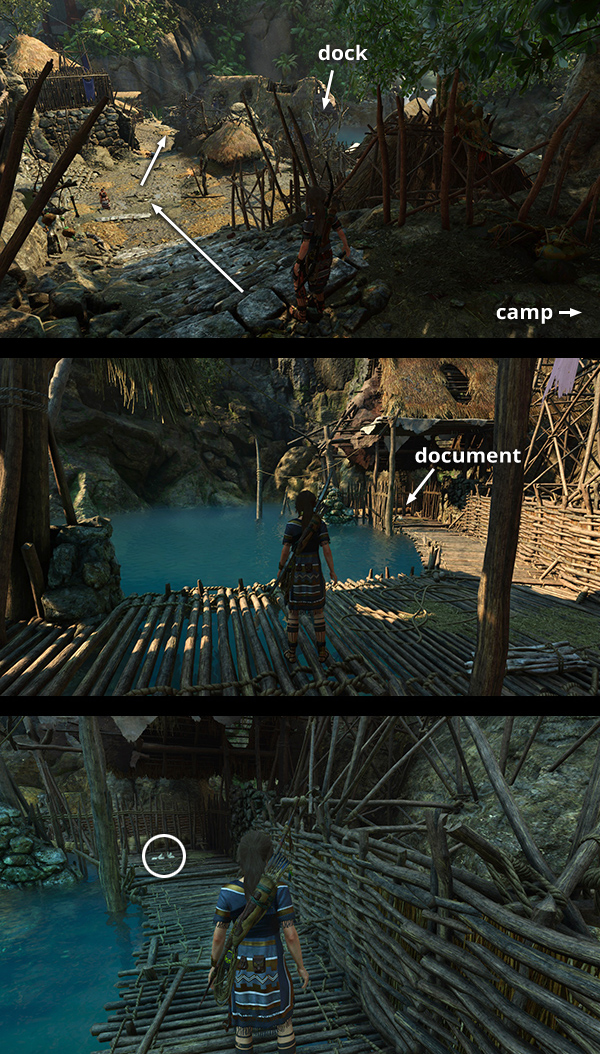
DOCUMENT 7 - Epidemic (Conquerors)
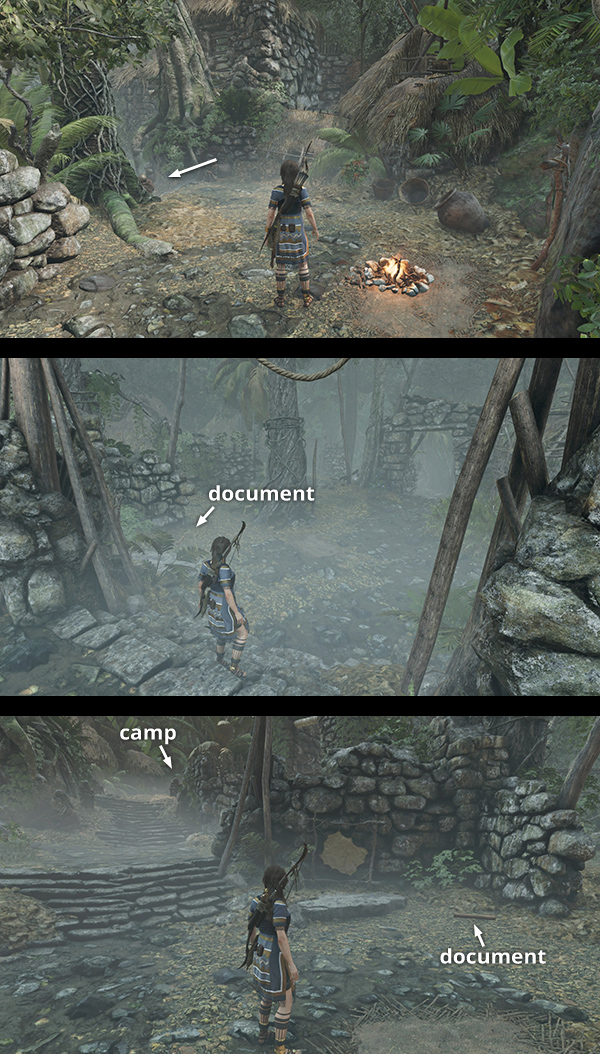
Head down the steps from the Village Caves Base Camp and continue north-northeast to the wooden dock at the riverside. There are several collectibles in this area. If you follow the wooden walkway all the way to the end, you'll find this document sitting under a little shelter. (Click image for more and larger screenshots.)
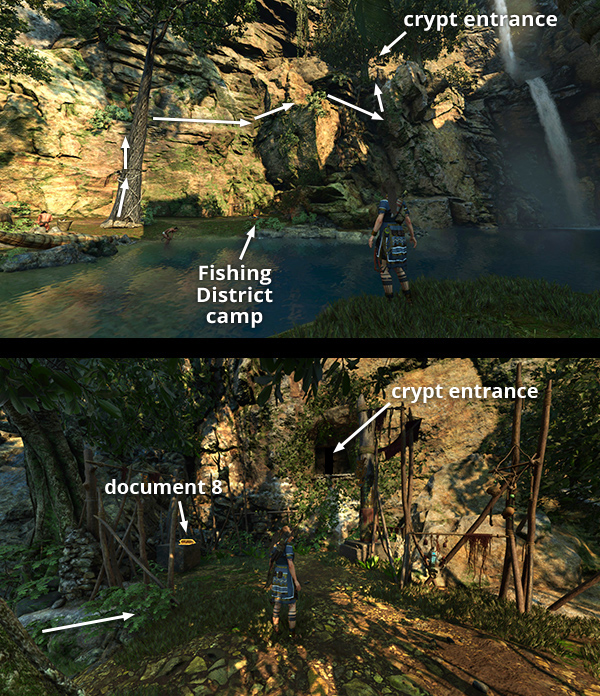
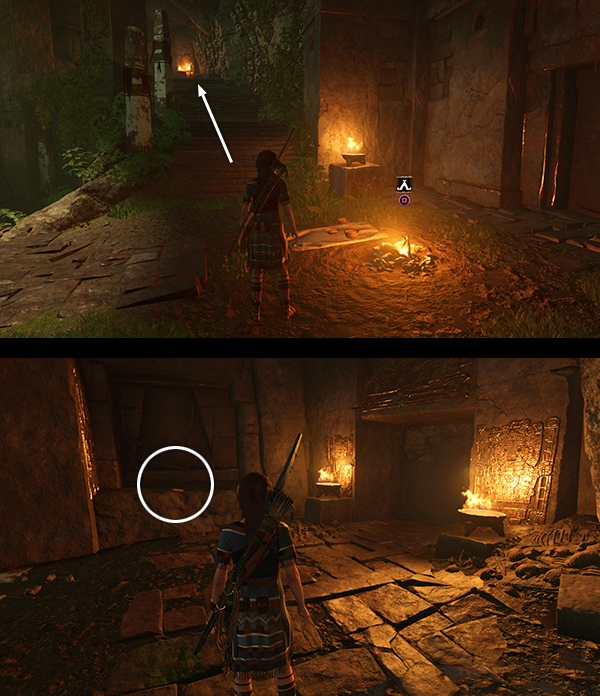
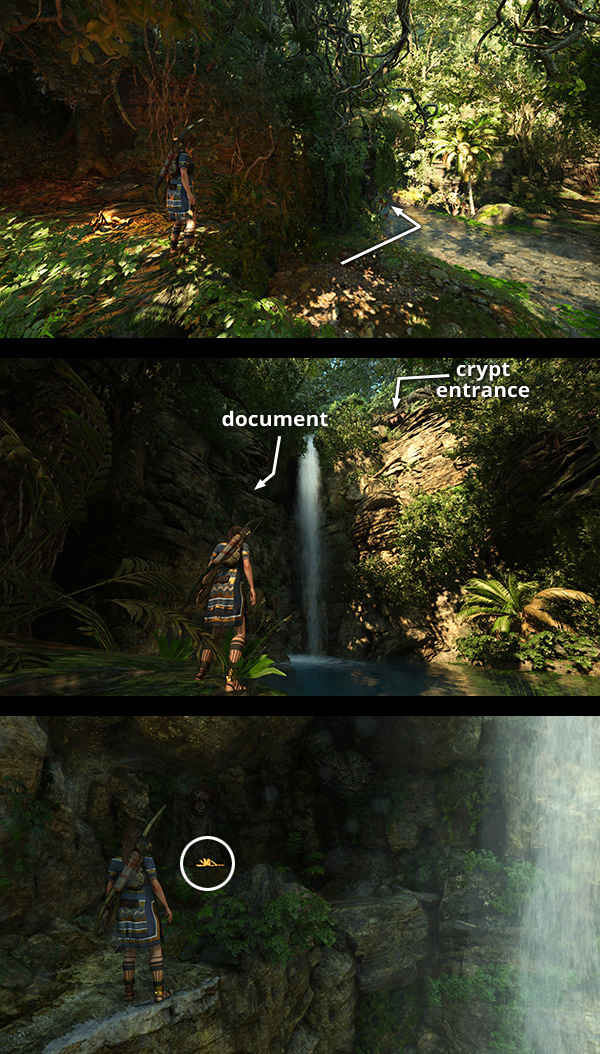
DOCUMENT 8 - The First Emperor (Founding Paititi)
This document is along the path to Manko's crypt, which you explore during the Hearts and Minds: Savior's Amulet side mission. You can also climb up and read the document sooner if you like. Fast travel to the Fishing District Base Camp. Climb the white tree just south of the camp. Then make your way along the cliffside to the north to reach the document just outside the crypt entrance. (Click image to enlarge. Check the mission walkthrough for details and more screenshots.)
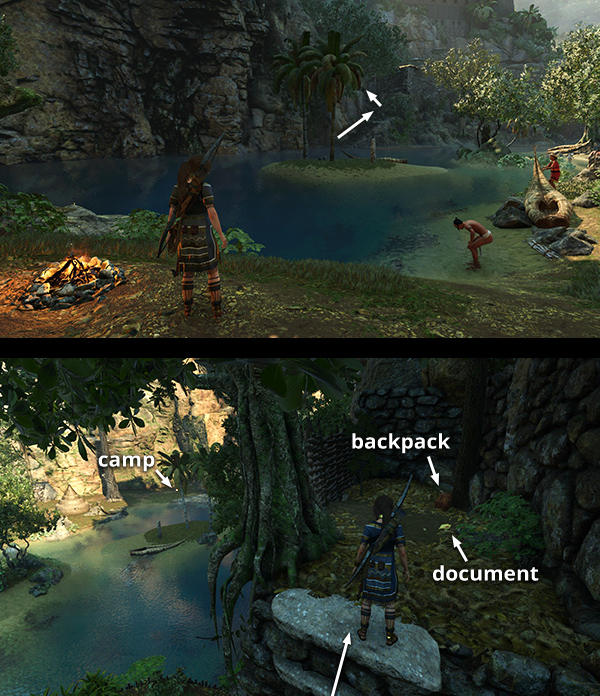
DOCUMENT 9 - El Dorado (Search for the Hidden City)
This document is on the east side of the river, about halfway between the Fishing District Base Camp and Unuratu's Home (and later Skull Cave). To reach it from the Fishing District camp, swim across the river toward the southeast and climb the stone stairs out of the water. Just beyond the first landing, climb onto the ledge on the left to find the document. To reach it from Unuratu's Home, follow the guide for explorer backpack #2. (Click image for more and larger screenshots.)
DOCUMENT 10 - Famine (Rebellion of Paititi)
This document is on the east side of the river in the same general area as Unuratu's Home and Skull Cave. If you're coming from the west, take the small wooden bridge across the river. Then turn left and go up two flights of steps to find the document (and relic #10) in a small alcove near the rope ladder leading up to Unuratu's Home.
Or, head down the steps/zip line from Unuratu's Home to find the document. (screenshots) Referencing the map, the document is just to the left (west) of Skull Cave and the middle of the zip line. (Click screenshots for more and larger images.)
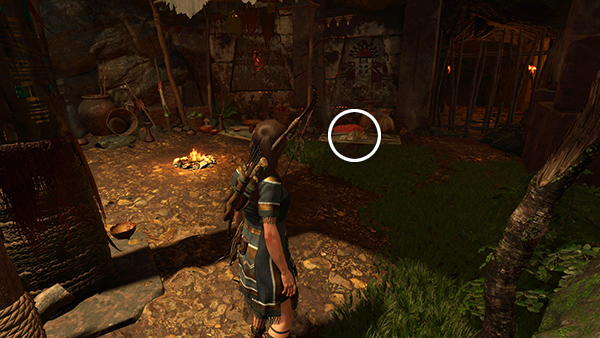
DOCUMENT 11 - Journal of T. Serrano 3 (The Missionary)
This document is inside Unuratu's Home. If you missed it, either fast travel to the Unuratu's Home Base Camp or climb the ledges on the northeast side of the lower city to reach the entrance, marked 'Unuratu's Home Entrance' on the map. The document is on a shelf near the campfire. (Click image for more and larger screenshots.)
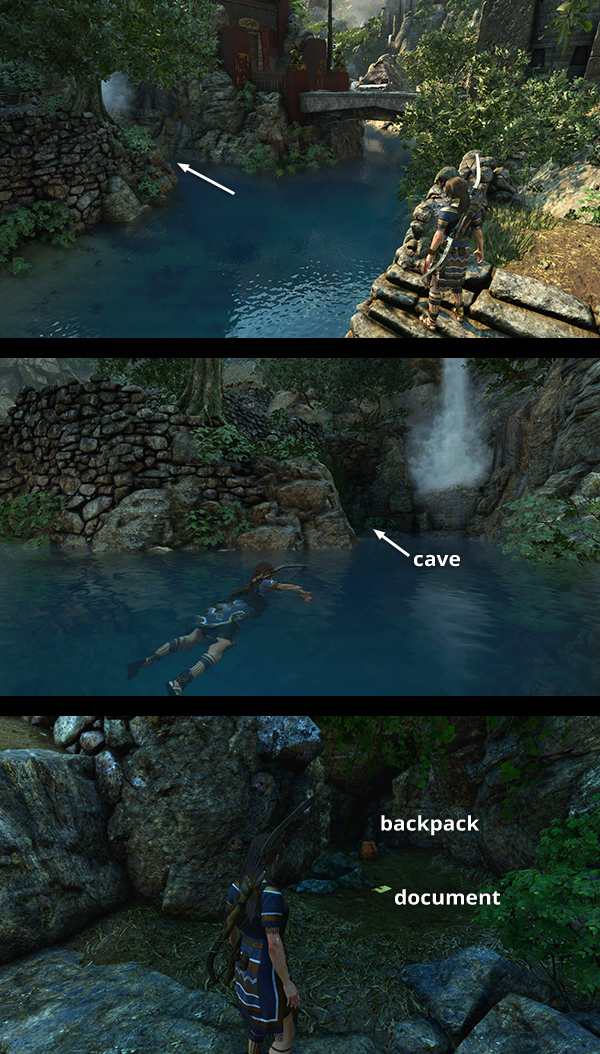
DOCUMENT 12 - Journal of T. Serrano 4 (The Missionary)
This document is in a little cave near the waterfall just northeast of the stone bridge connecting upper and lower Paititi. To find this cave, swim into the inlet below the waterfall, as shown here. Then climb out of the water on the left. The document is lying on the ground near explorer backpack #3. (Click image for more and larger screenshots.)
DOCUMENT 13 - Contract (Day in the Life of a Paititian)
The next 5 documents are found in and around the Temple of the Sun Challenge Tomb on the south side of the city. If you haven't explored this area yet, you can wait until the Freedom Side Mission takes you there or follow the Challenge Tomb walkthrough to find it. This particular document is sitting on the ground near the Temple Path Base Camp. (Click screenshot to enlarge.)
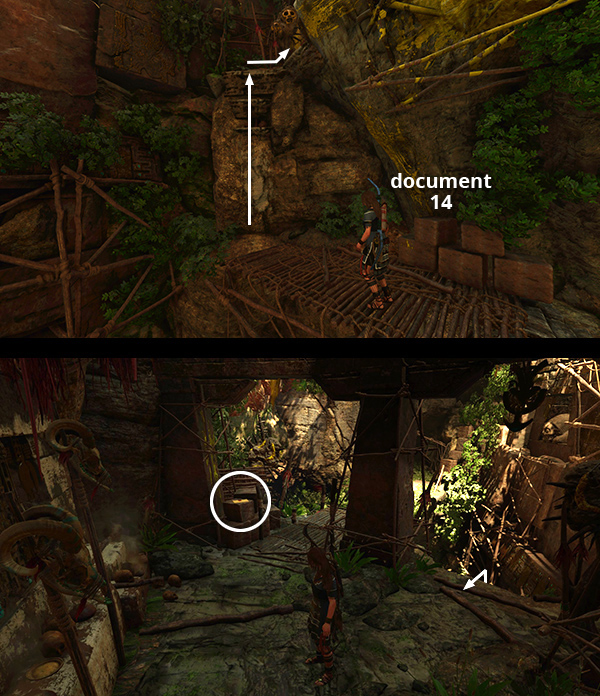
DOCUMENT 14 - Disease and Death (Subjugating Paititi)
This document is in the same area as #13. From the Temple Path Base Camp, climb the stairs to the southeast. The document is sitting on some stone blocks on the right at the top of the stairs. (Click image for more and larger screenshots.)
DOCUMENT 15 - Journal of T. Serrano (The Missionary)
From the top of the stairs where you found document #14 (above), climb the wall ahead on the right to reach the ledge above. The next document is on the right, sitting on one of the stone blocks near the wooden diving platform. (Click screenshot to enlarge.)
DOCUMENT 16 - The Monkey Twins (Legends of the Maya)
If you haven't completed the Temple of the Sun Challenge Tomb, follow the tomb walkthrough. This document is on the right just after you drop into the building containing the tomb. If you cleared the tomb but missed this document, fast travel to the Temple of the Sun Base Camp. Climb down into the hallway to the east (not the one to the west, which leads to the mirror puzzle room). At the bottom of the ladder, turn around and the document will be just ahead on the left. If that's all you need, climb back up to the camp and fast travel away. (Click image for more and larger screenshots.)
DOCUMENT 17 - The Paddler Gods (Legends of the Maya)
This document is also in the Temple of the Sun Challenge Tomb, in the hallway on the east side of the main puzzle room. If it's your first time exploring the tomb, follow the tomb walkthrough.
If you've already completed the tomb but missed this document, see the bug note below. Fast travel to the Temple of the Sun Base Camp and swing/rappel down into the hallway to the northwest. Continue to the west and crawl under the door into the mirror room. Use mirror #1 to rotate the beam on the left. Cross over it to the northeast corner. Use mirror #2 to rotate the second beam, enabling you to reach the doorway on the east side of the room. The document is just inside on the left. If this is all you need, there's no need to solve the rest of the puzzle. Just climb the wooden slats at the south end of the hallway and follow the canyon back to civilization. (Click images for more and larger screenshots.)
BUG NOTE: On returning to the mirror room, I found the rotating beams were missing, making it impossible to continue. Killing Lara by jumping into the pool and reloading the game fixed the issue for me, but you may want to change save slots at the base camp before climbing down into the hallway, just in case.
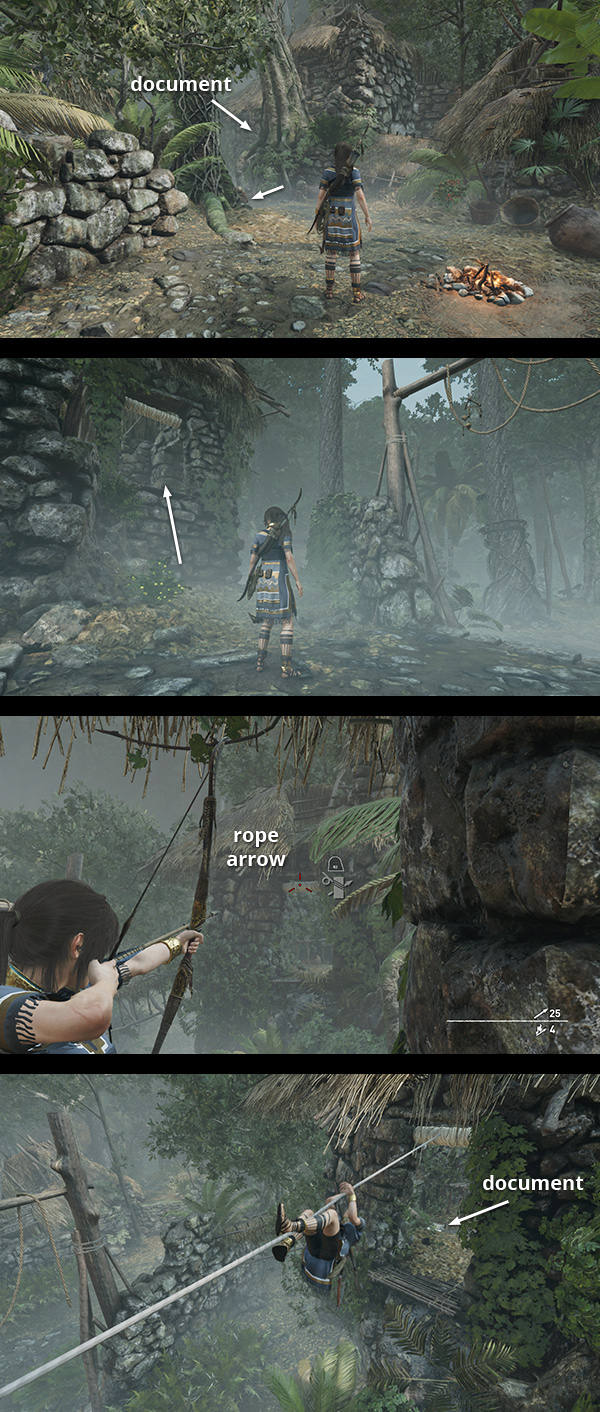
DOCUMENT 18 - Expedition Report (Inside Out)
This document is in the Abandoned Village northwest of the city. If you've already discovered the Abandoned Village Base Camp, fast travel there. Otherwise find the Abandoned Village Entrance on the map and/or follow the main walkthrough to reach the base camp. From there, head down the steps to the northwest. Climb into the building on the left, turn around, and use a rope arrow to run a line over to the opposite building. Climb over and drop down to find the document just inside on the left. (Click image for more and larger screenshots.)

DOCUMENT 19 - Lopez's Arrival (Subjugating Paititi)
This document is also in the Abandoned Village, but you'll need the rope ascender to get it. If you don't yet have that bit of gear, you can buy it from the traveling merchant, Moraekah. Then head for the south side of the Abandoned Village and you'll find a sturdy, wooden door with a rope coil in the middle. Shoot a rope arrow into the coil and hold Interact to use the ascender to pull the door off its hinges. The document is just inside on the right. (Click image for more and larger screenshots.)
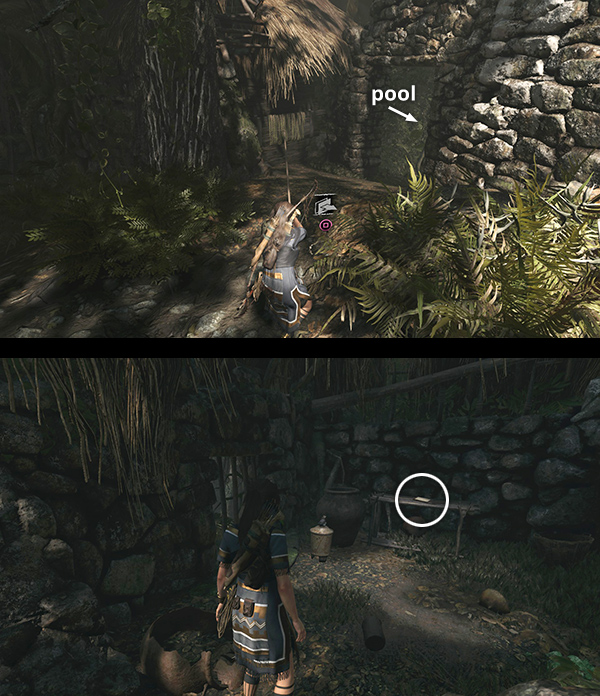
DOCUMENT 20 - Covering the Tracks (Search for the Hidden City)
This document is in the same area as #18 and #19 and also requires the rope ascender. From the Abandoned Village Base Camp, head for the far western corner of the village, just below the large pool indicated on the map. Here you'll find another wooden door with a rope coil. Shoot a rope arrow into the coil and hold Interact to use the ascender to pull the door off its hinges. The document is just inside. (Click image for more and larger screenshots.)
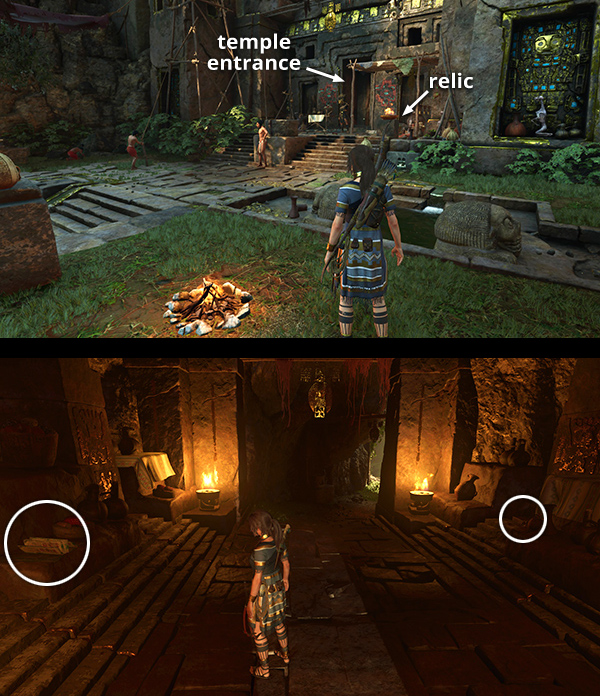
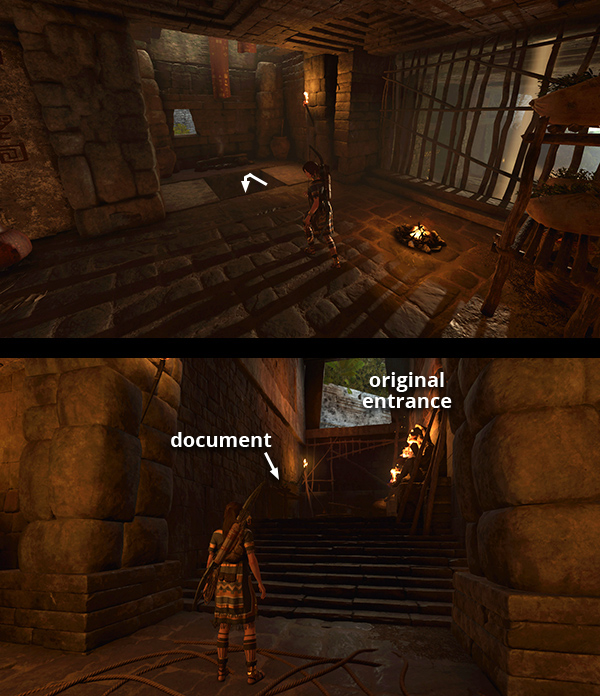
DOCUMENT 21 - Troubled Lands (Founding Paititi)
This document is inside the temple on the west side of the city. You first enter this area during 'The Hidden City' chapter, when Etzli shows Lara the way to the Belly of the Serpent. If you missed it, fast travel to the Temple District Base Camp and go through the temple entrance near relic #4. The document is just inside on the left, and there's some gold on the right. (Click image for more and larger screenshots.)
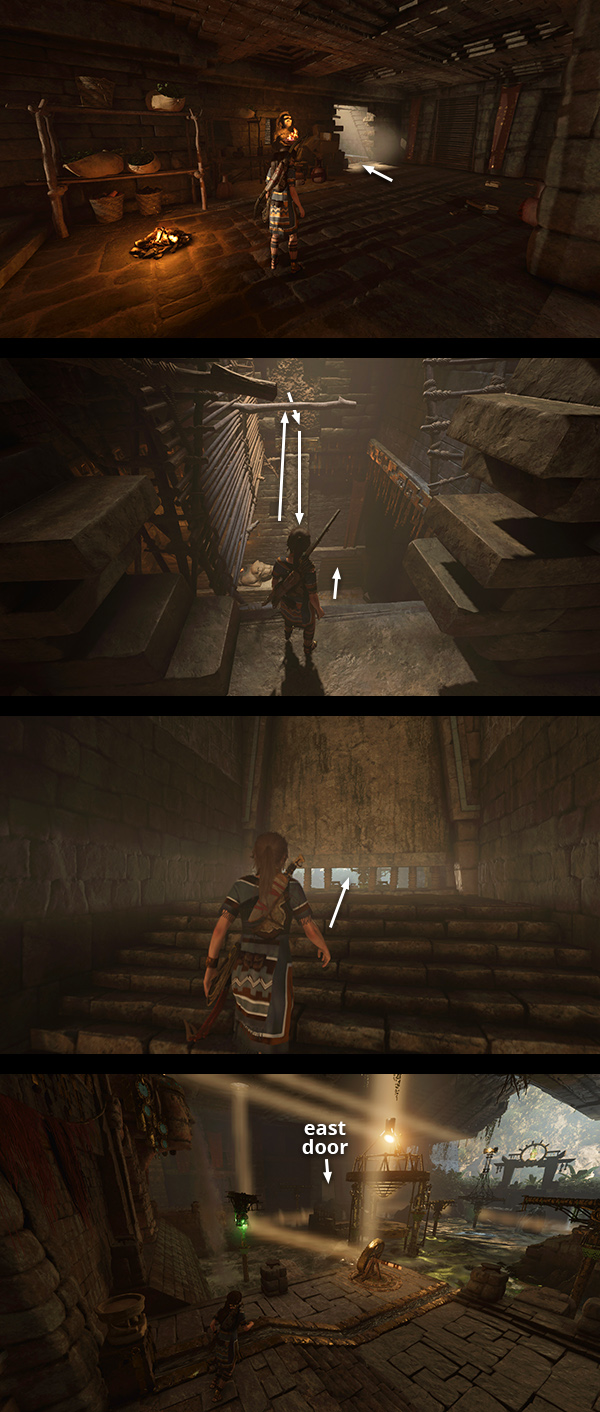
DOCUMENT 22 - Trinity Arrives (Subjugating Paititi)
This document is in the cavern southwest of document #21. If you missed it earlier, fast travel to the Belly of the Serpent Base Camp. Climb the stairs to the southwest and you'll find the document sitting on a stone ledge. If you haven't discovered that camp, instead fast travel to the Temple District Base Camp and follow the route described in the main walkthrough. (Click image for more and larger screenshots.)
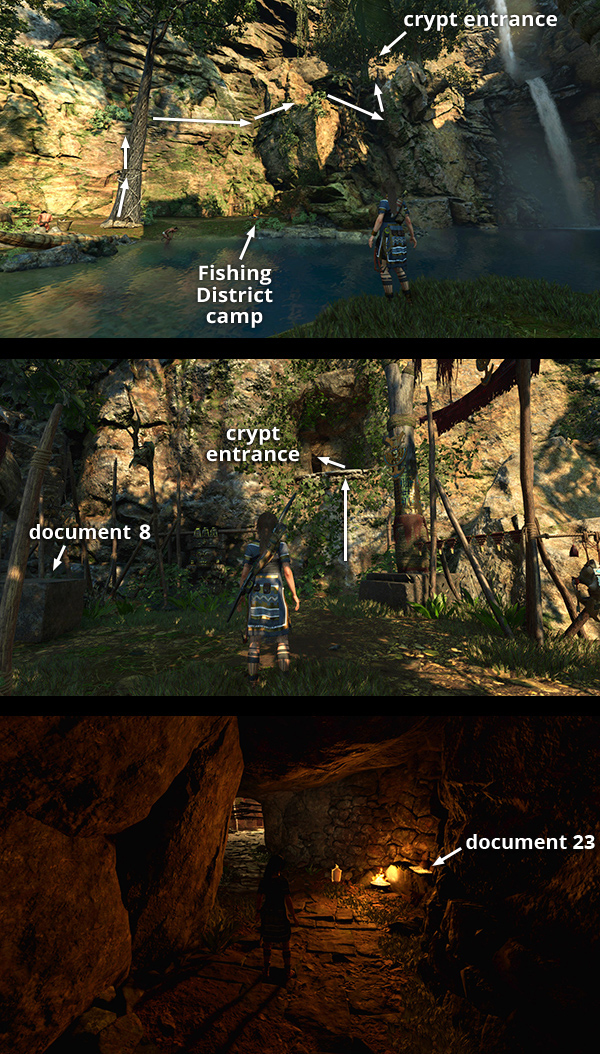
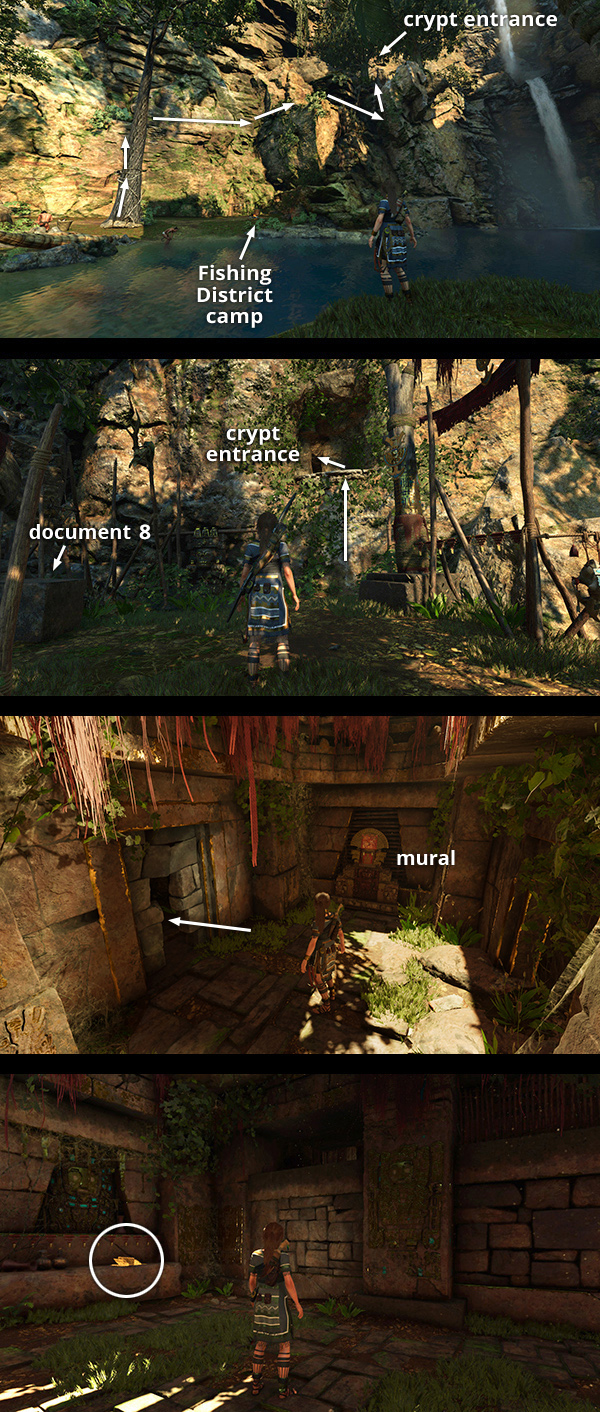
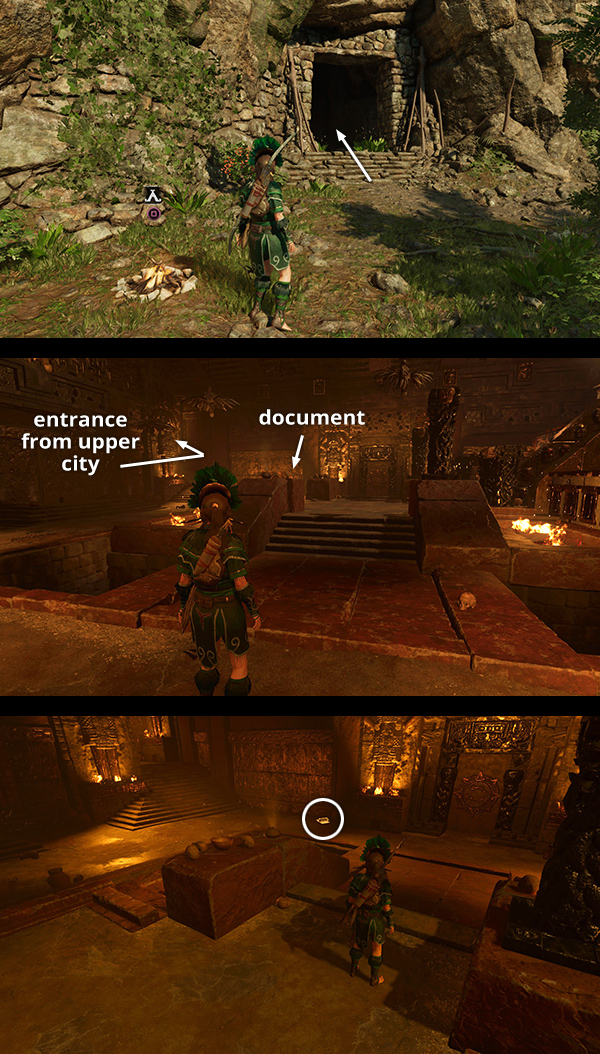
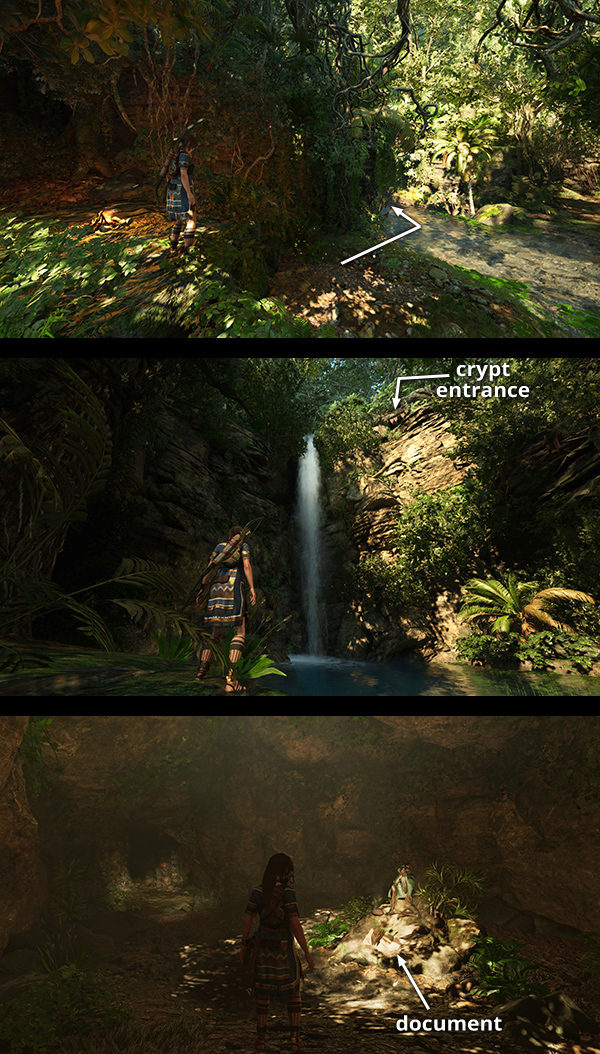
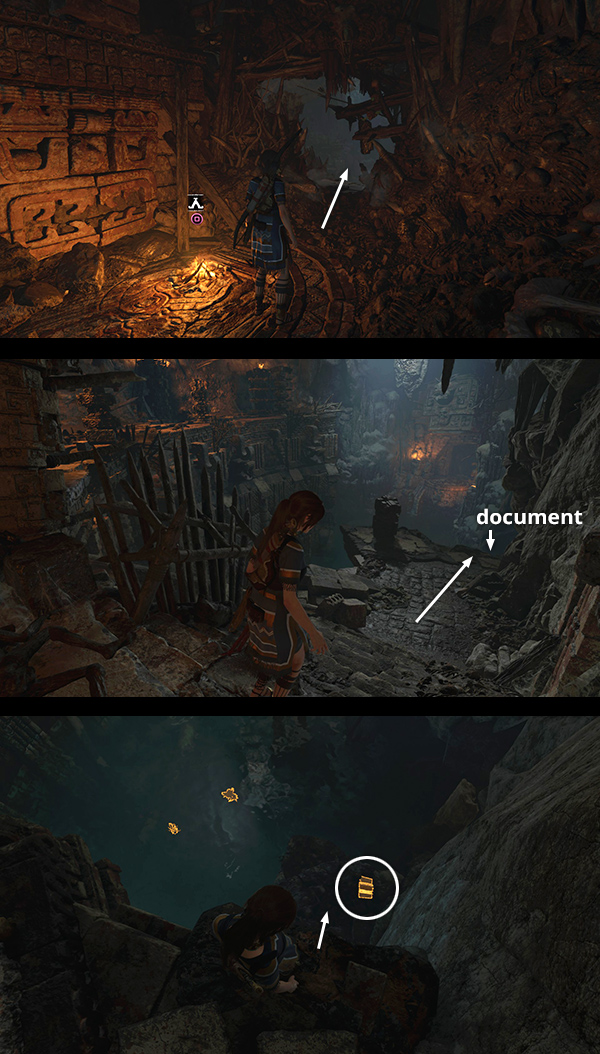
DOCUMENT 23 - The Cult's Control (Subjugating Paititi)
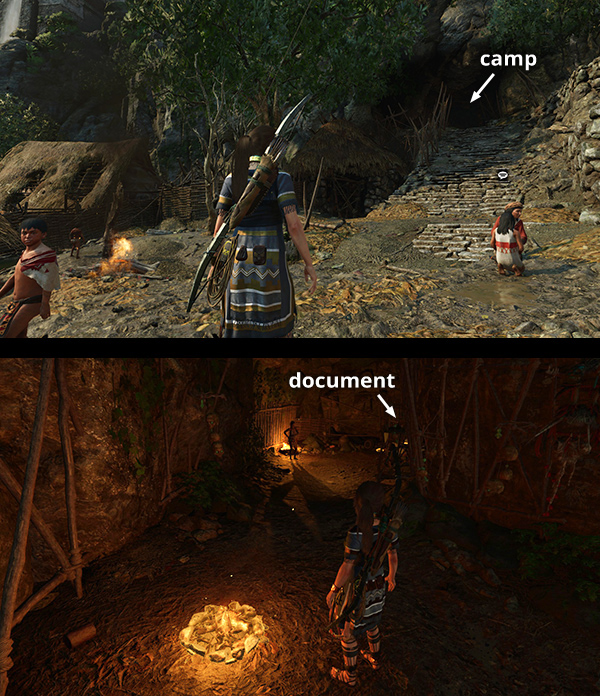
The next two documents are found in Manko's Crypt, near the Fishing District Base Camp at the north end of the river. You explore this area during part 2 of the Hearts and Minds Side Mission, in which Lara must retrieve the Savior's Amulet. If you completed the mission but missed the document, follow the directions for document #8 and/or the mission walkthrough to reach the crypt entrance. Once inside, continue through the trapped tunnels. This document is just beyond the spike pit between two spear traps. (Click image for more and larger screenshots.)
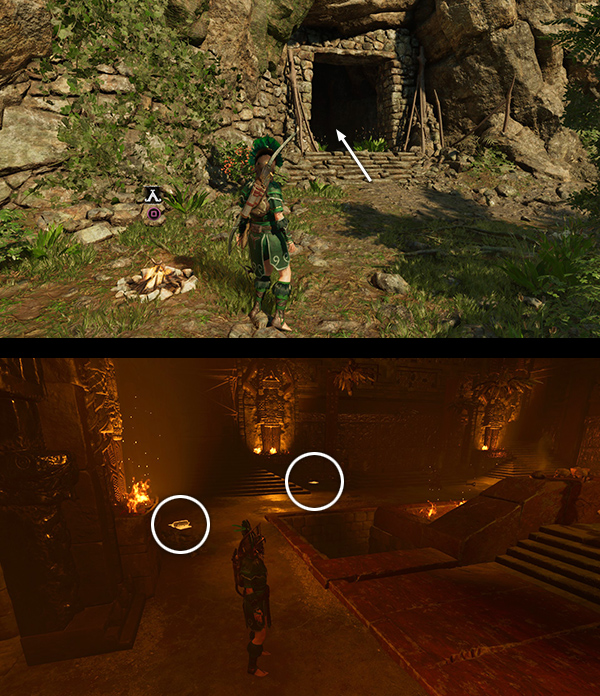
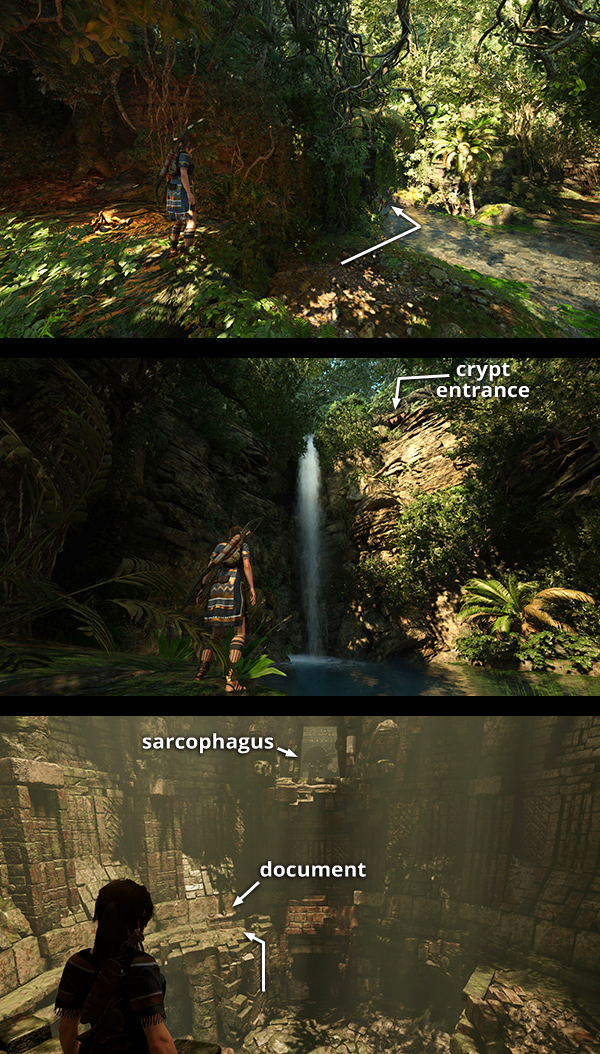
DOCUMENT 24 - Protection (Resistance)
This document is also in Manko's Crypt. Continue through the passageway where you found document #23 into the room with mural #16. Squeeze through the narrow opening on the left and continue along another trapped passageway to a larger room containing relic #17 on the right and this document on the left. Again, check the mission walkthrough for step-by-step instructions. (Click image for more and larger screenshots.)
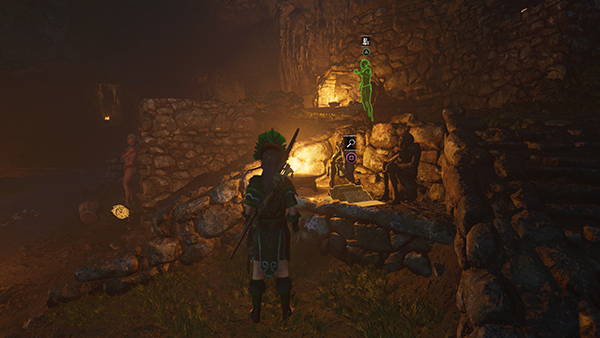
DOCUMENT 25 - Resist! (The Resistance)
This document is inside Skull Cave, which is only accessible after returning to Paititi from the Cenote. Either fast travel to the Skull Cave Base Camp, assuming you've been there before, or look for the Heron-and-Eclipse icon marking the cave entrance on the in-game map south/southeast of Unuratu's Home. The document is on a shelf above and to the west of the campfire. If you haven't yet completed the Freedom Side Mission, the mission giver, Poma, will be standing nearby. He's outlined in green in this screenshot. (Click screenshot to enlarge.)
DOCUMENTS 26 & 27 - Yaaxil (Myth, Magic & Monsters) and The Prophecy (The Resistance)
These are in the upper city, in the northeast corner of the marketplace that surrounds the entrance to the Temple of Kukulkan. If you missed them while playing through the story, fast travel to the Upper City Main Gate Base Camp. Climb the stairs to the north, enter the marketplace, and head for the far right (northeast) corner. Just behind a food vendor's stall, there's a raised opening in the stone wall. Climb inside to find the two documents, along with archivist map #5. (Click image for more and larger screenshots.)
DOCUMENT 28 - Priests of the Sun (Cult of Kukulkan)
The next three documents, #28 - #33, are inside the Temple of Kukulkan. If you missed them on your way to rescue Unuratu from prison during the 'Rebellion Lives' chapter, fast travel to the Temple of Kukulkan Base Camp and re-enter the temple through the doorway to the west. You'll find this particular document lying on the floor near the west wall. (Click image for more and larger screenshots.)
Note that the Temple of Kukulkan Base Camp does not appear until you've completed this area in story mode and reached the Porvenir Oil Fields. You can also re-enter the temple through the doorway at the top of the stairs north of the Upper City Main Gate Base Camp.
DOCUMENTS 29 & 30 - Trinity Recruits Amaru (Rebellion of Paititi) and A King Sacrificed (Subjugating Paititi)
These documents are also within the Temple of Kukulkan. Follow the directions for document #28 to get back to the temple. Once inside, you'll find these documents on either side of the southeast corner. (Click image for more and larger screenshots.)
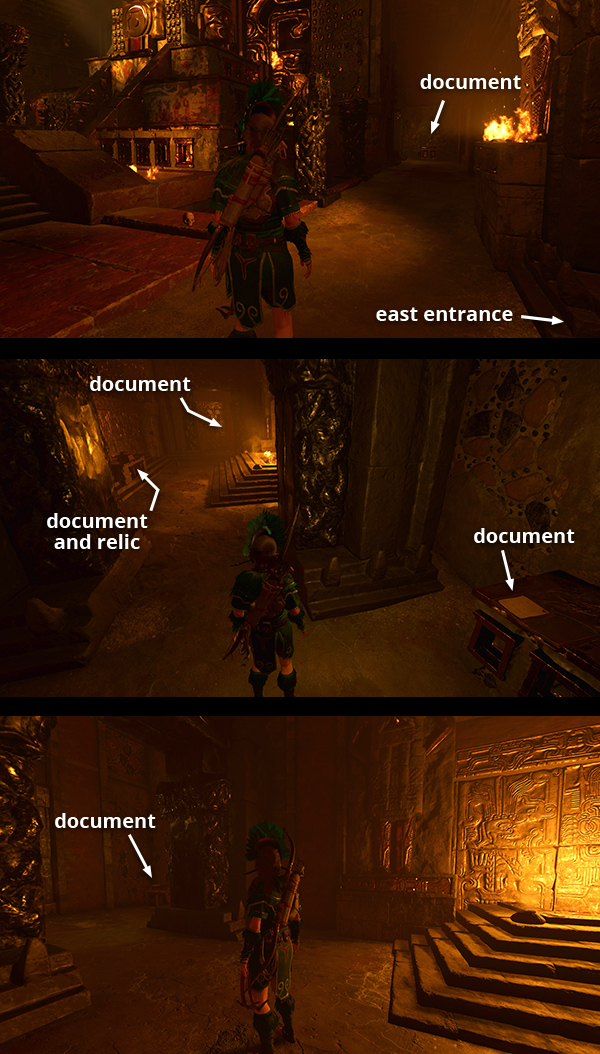
DOCUMENTS 31, 32 & 33 - Conspiracy; No One In, No One Out; and Guidelines (Secrets and Lies)
These three documents are also in the Temple of Kukulkan. Follow the directions for document #28 to get back to the temple. Once inside, head for the northeast corner and you'll find #31 sitting on a small table. #32 is midway along the north corridor, opposite the shallow pit with burning coals. #33 is in the northwest corner. (Click image for more and larger screenshots.)
DOCUMENT 34 - In Name Only (The Resistance)
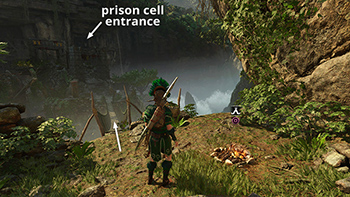
This document is inside Unuratu's prison cell on the far side of the gorge east of the city. If you missed it during the 'Rebellion Lives' chapter, fast travel to the Temple of Kukulkan Base Camp, which appears after you've cleared that area. Cross the rope bridge to the island in the middle of the gorge. Climb the stone steps but instead of crossing the second bridge, head for the southeast corner of the island, grab the rope line, and climb across the river. Drop down off the rope and squeeze through the narrow opening on the right to re-enter the prison cell. The document is sitting on a shelf near the burning brazier. (Click image for details and larger screenshots.)
DOCUMENTS 35 & 36 - Cult of Kukulkan (Cult of Kukulkan Story) and The Cult's Promise (Subjugating Paititi)
These two documents are in the guard room in the gorge east of the city. If you missed them while rescuing Unuratu during the main story, fast travel to the Temple of Kukulkan Base Camp, which appears after you've cleared that area. Cross the rope bridge to the island in the middle of the gorge. Climb the stone steps and cross the second bridge. These documents are in the guard room at the east end of that bridge. (Click image for more and larger screenshots.)
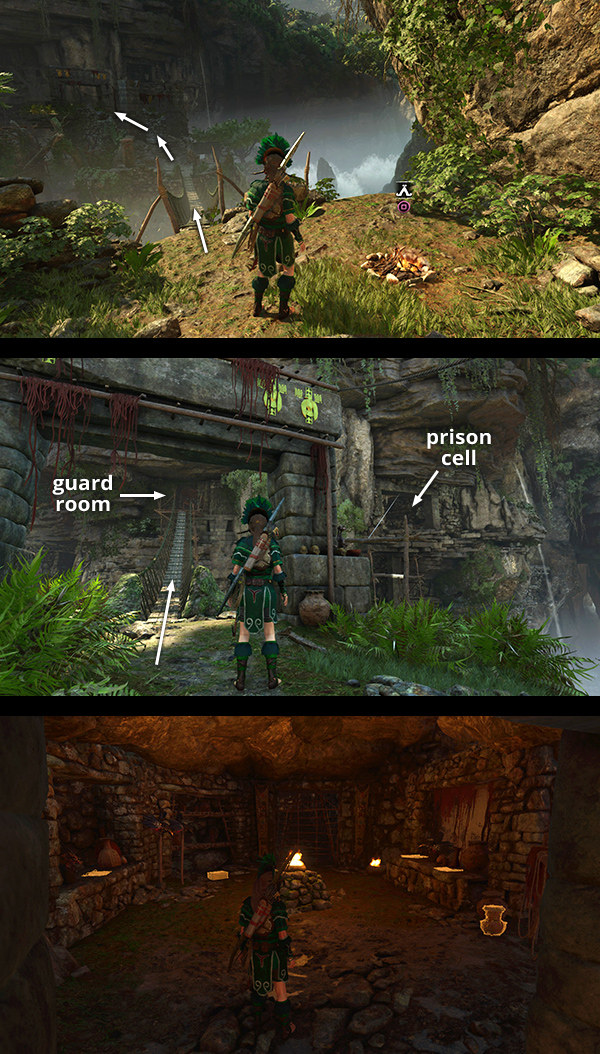
DOCUMENT 37 - Reconnaissance (The Resistance)
This document is in the Crypt of Qispi, The Merchant, on the southwest side of the gorge where Lara frees Unuratu from prison. If you've already completed this part of the story but missed the document (or the entire crypt), fast travel to the Temple of Kukulkan Base Camp. Hang from the edge to the right of the rope bridge and climb/rappel to the crypt entrance, below and to the left (south). Enter the crypt and slide down the muddy slope. This document in the next room on the right. The crypt walkthrough includes details and screenshots for getting in and out. (Click image for more and larger screenshots.)
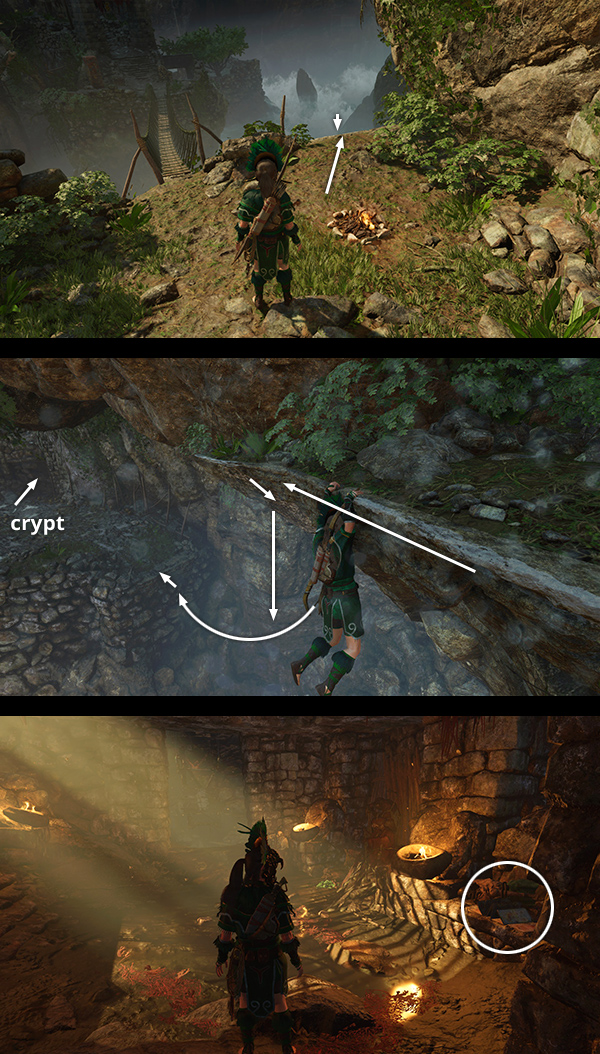
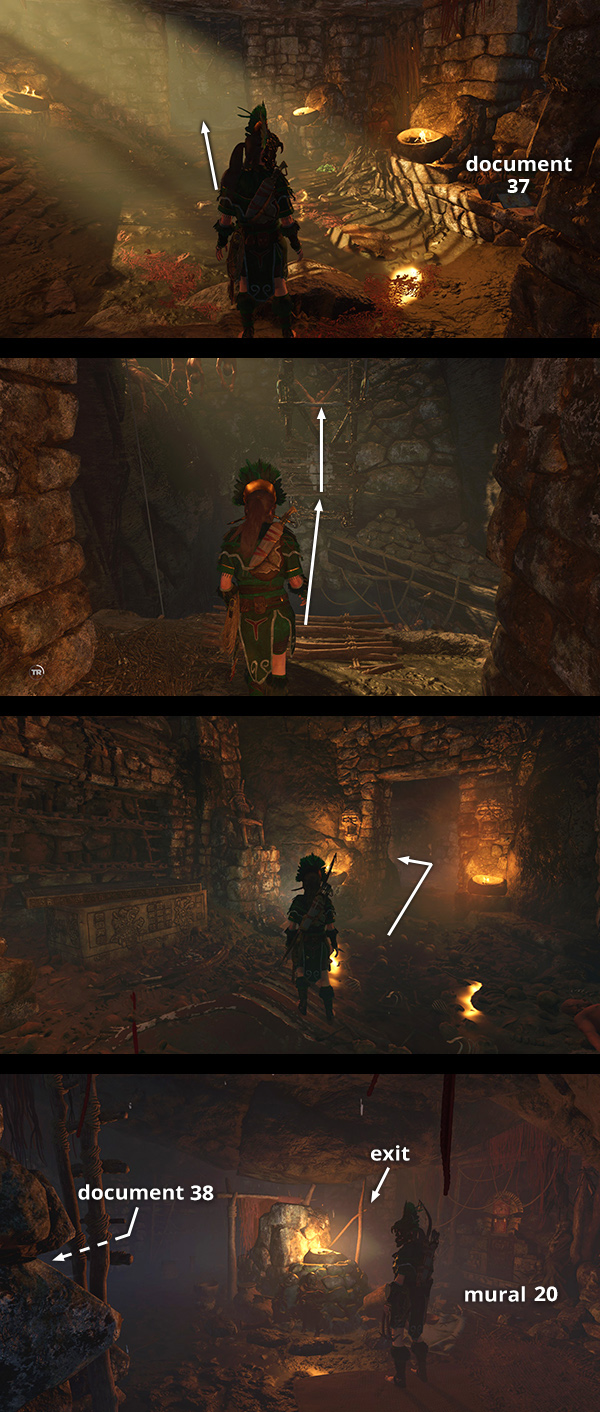
DOCUMENT 38 - Crime and Punishment (Cult of Kukulkan)
This document is also in Qispi's Crypt. Follow the directions for document #37, above. From there, proceed into the next room and ride the dangling wooden platform down to the sarcophagus. Continue through the trapped passageway to the northwest, which leads around to a small room with a lit brazier, mural #20, and this document. Again, see the crypt walkthrough for details and screenshots showing how to exit the crypt once you have what you need. (Click image for more and larger screenshots.)
DOCUMENT 39 - Warning (The Resistance)
This document is on the way to the Crypt of Ollanta, The Potter, west of the city in the same area as the Path of Battle Challenge Tomb. If you've already explored the crypt but missed this document, return to the Wild Jungle Base Camp and follow the stream south to a pool. Then, as you climb the ledges toward the crypt entrance, you'll find this document on a stone shelf to the left of the waterfall about halfway up. The crypt guide includes details. (Click image for more and larger screenshots.)
DOCUMENT 40 - More Questions (Inside Out)
This document is in the Crypt of Ollanta, The Potter. Follow the directions for document #39 and/or the crypt walkthrough to reach the entrance. Inside, just beyond the concealed spike pit, squeeze through a narrow opening and you'll find the document sitting on a mound of earth near a skeleton. (Click image for more and larger screenshots.)
DOCUMENT 41 - Merchant Sacrifice (Metamorphosis)
This document is also inside the Crypt of Ollanta, The Potter. Follow the directions for document #39 and/or the crypt walkthrough to reach the entrance. Proceed through the dark passageways to the large, cylindrical room with many ledges. The document is on a ledge on the southwest side of this room, one level above the floor. (Click image for more and larger screenshots.)
DOCUMENT 42 - Warriors of Kukulkan (Cult of Kukulkan)
This document is in the Path of Battle Challenge Tomb west of the city. If you raided the tomb but missed this document, fast travel to the Ossuary Base Camp. Go through the opening to the southwest into the large cavern with the pool. Move down the slope and stand at the edge, just to the right of the jaguar-head handle. Drop down onto the ledge below to find the document. If that's all you need in this area, climb back up to the base camp and fast travel away. (Click image for more and larger screenshots.)
Walkthroughs: First Visit · Second Visit (after Cenote) · Third Visit (after San Juan) | Collectibles Guides | Main SOTTR Page
†UPDATE HISTORY: 9/8/21 - Page first posted online.
WAS THIS WALKTHROUGH HELPFUL? If not, I apologize and invite you to contact me with any questions. If you need help right away, I recommend the r/TombRaider subreddit. Other fan-run forums are listed at tombraiders.net/stella/community.html. If this site was useful, please consider supporting it financially or in other ways. For details, visit tombraiders.net/stella/support.html. As always, I welcome your corrections/suggestions. Thank you!
Copyright © Stellalune (). All rights reserved. Feel free to copy or print this walkthrough for personal use. By all means, share it with friends, but please include this credit line so people can send me their feedback. No part of this walkthrough may be reproduced on another site without permission. Follow this link for details about this site's advertising and privacy policy.
Stella's Tomb Raider Site: tombraiders.net.