Shadow of the Tomb Raider - Hidden City Explorer Backpacks and Archivist Maps
Updated: 9/8/21(†)
Paititi is a HUGE level, and you must revisit it several times in order to access all areas and find every item. This guide focuses on revisiting the level after completing it. If you are playing through for the first time, you may want to follow the main walkthrough instead to avoid possible spoilers. Collectibles are numbered in the order they appear in the walkthrough and on the annotated level map.
Follow this link for a List of All Artifacts by Story/Dialect.
Treasure Chests · Relics · Artifacts & Photos · Documents · Murals · Monoliths · Survival Caches · Explorer Backpacks · Archivist Maps · Side Missions · Challenges
Explorer Backpacks and Archivist Maps are not required for 100% completion, but examining them highlights other collectibles on your in-game map, so they can be useful.
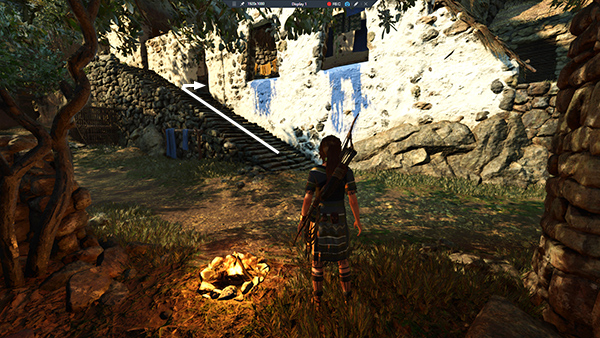
BACKPACK 1
Just south of the Paititi Market Base Camp is a large white building with blue dye dripping from its windows. Go inside and dive into the small, square pool in in the western corner. Swim through the flooded passageway into a cave, where you'll find some jade and the backpack. (This cave is also accessible through a tunnel from the house to the northwest of the dyeing building.) Discovering the pack reveals treasure chest #2, survival cache #2, and survival cache #3 on your in-game map. (Click images for more and larger screenshots.)
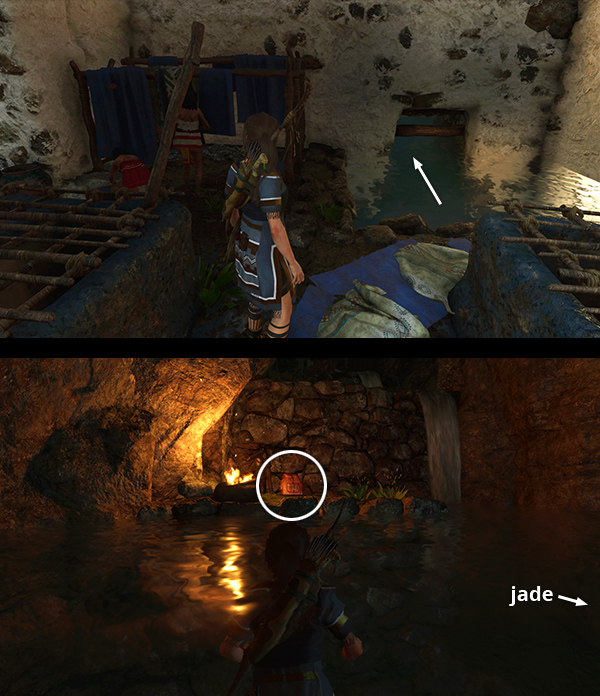
BACKPACK 2
This backpack is on a concealed ledge above the northwest riverbank. If you missed it, fast travel to the Unuratu's Home Base Camp. Exit the cave and head down to the drop-off just below the tattered yellow banner. Climb down the ladder, turn around, then go down the steps to the right. Climb onto the ledge with the two light-colored handholds to find document #9 and the backpack. Examining it reveals 7 survival caches (#1, #8, #10, #15, #17, #33, and #34) on your in-game map. To reach this backpack from the Fishing District Base Camp, follow the guide for document #9. (Click image for more and larger screenshots.)
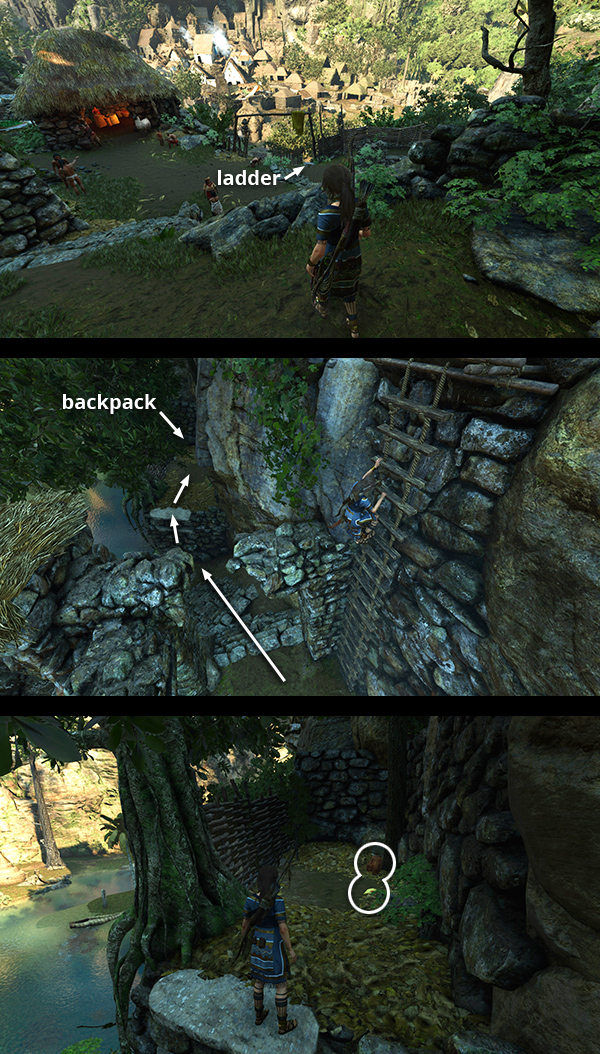
BACKPACK 3
This backpack is in a small cave on the east side of the river, just north of the bridge to the upper city. If you talk to one of the boys sitting near mural #10, he'll tell you about a nearby cave with "all kinds of neat stuff" inside. Look for the small waterfall just a short distance to the south. The cave is on the left when facing the falls. The backpack is inside, along with document #12. Examining the pack reveals 5 survival caches (#4, #7, #9, #12, and #16) and the entrance to the Crypt of Ollanta, the Potter, on your in-game map. (Click image for more and larger screenshots.)
BACKPACK 4
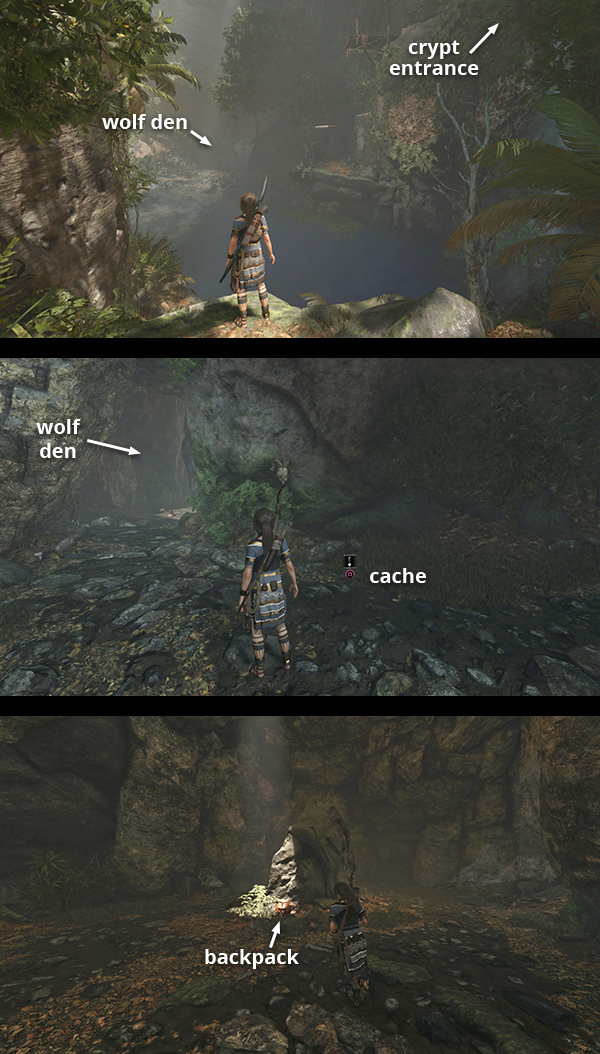
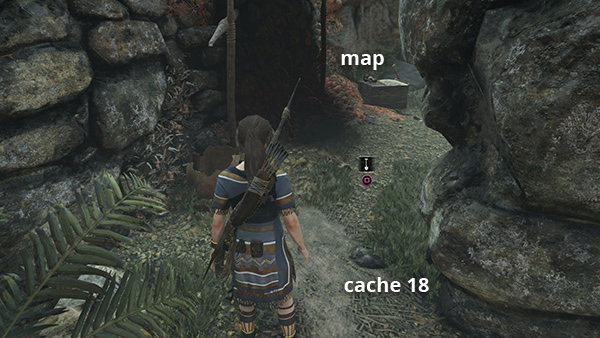
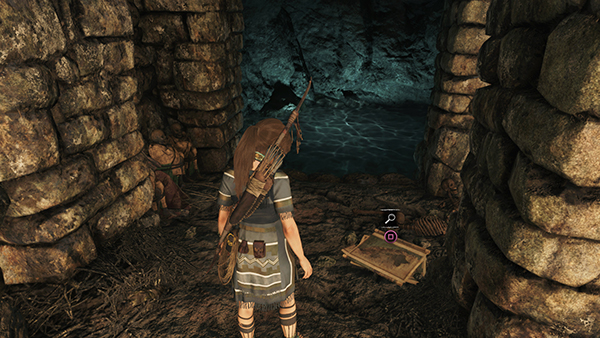
This backpack is in the black wolf den in the Abandoned Village northeast of the city. Follow the main walkthrough if you haven't explored that area yet. If you cleared out the wolves but missed the pack, fast travel to the Abandoned Village Base Camp and return to the den, on the far side of the large pool to the north. Watch out for respawning wolves. The backpack is inside the cave, propped against a large boulder. Examining it reveals the locations of 3 survival caches (#18, #19, and #21) and the nearby entrance to the Crypt of Chuki, the Weaver. (Click image for more and larger screenshots.)
BACKPACK 5
This pack is on the island in the gorge east of the city, where you rescued Unuratu from prison. If you completed the 'Rebellion Lives' chapter but missed the pack, fast travel to the Temple of Kukulkan Base Camp, which appears once you've finished the Porvenir Oil Fields level. Then follow this shortcut to the crypt just as far as the backpack. Examining the pack reveals 6 survival caches (#24, #25, #26, #27, #28, and #30) and the entrances to the Crypts of Uturunku, the Ferryman, and Qispi, the Merchant, on your in-game map.
Once you've examined the pack, you can either make the long climb back to the base camp or jump into the river, which will hopefully reload the game with Lara standing on the island. The shortcut guide also covers this. (Click each screenshot to enlarge.)
BACKPACK 6
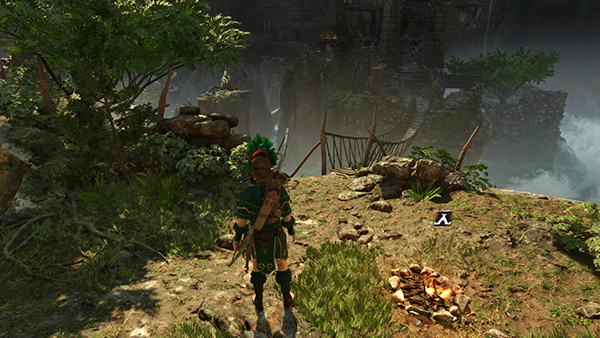
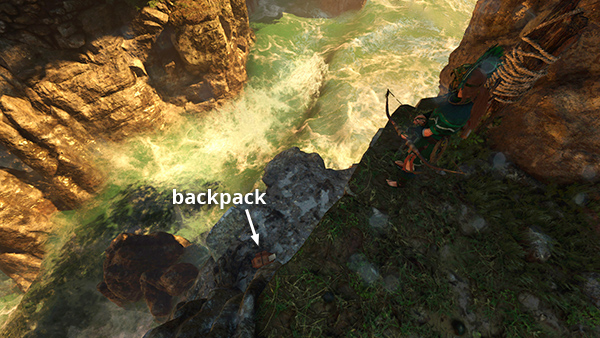
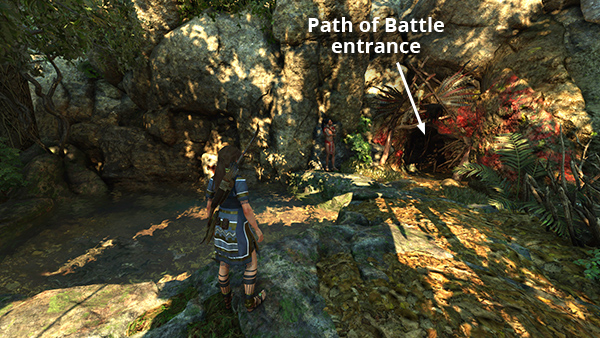
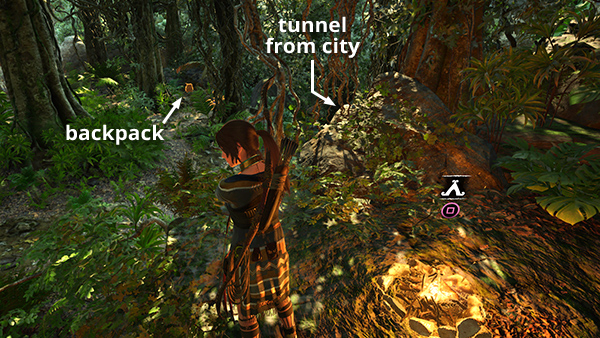
The last pack is in the jungle west of the city, not far from the Path of Battle Challenge Tomb. My walkthrough covers it during the Hearts and Minds: Champion's Bow Side Mission, but you can go after it any time. Either enter the Path of Battle area through the tunnel in the lower city (shown in the first screenshot and marked 'Path of Battle Entrance' on the annotated map) or fast travel to the Wild Jungle Base Camp. From the campfire, head directly north to find the pack propped against a boulder. Examining it reveals 4 survival caches (#6, #20, #31 and #32) and treasure chest #1 on your in-game map. (Click screenshots to enlarge.)
ARCHIVIST MAP 1
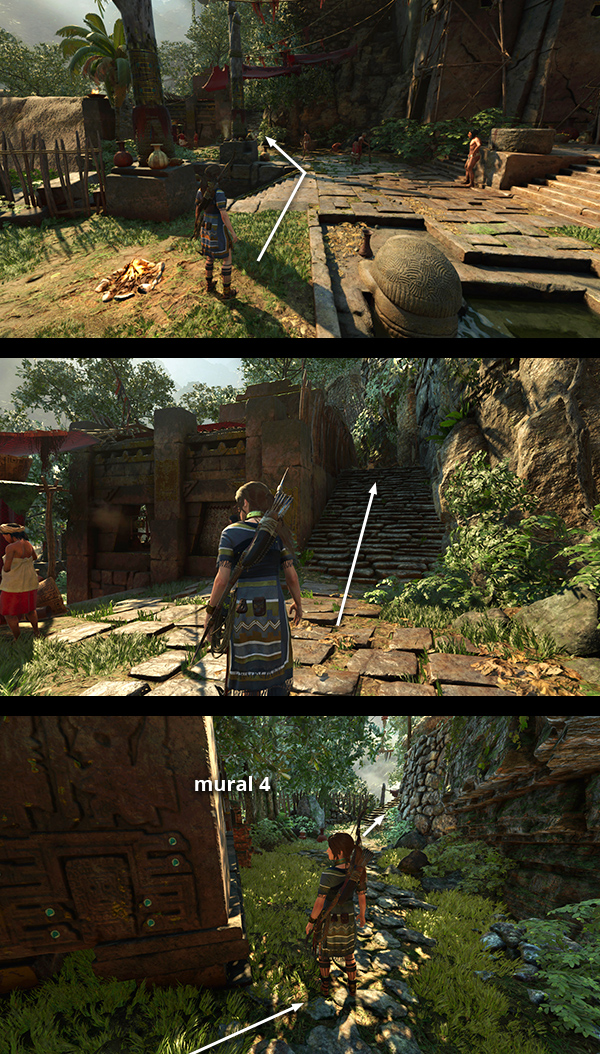
This map is in one of the houses built into the cliffside in the southwest part of the city. Starting at the Temple District Base Camp, head south across the courtyard and up the stairs. At the top of the stairs, bear left, pass mural #4, and climb the next flight of stairs to the southeast. At the top, make a U-turn to the right (northwest) and continue along the elevated path and up another flight of stairs. Here you'll find two houses overlooking the city. The archivist map is inside the second house. Examining the map reveals a number of items on your in-game map: documents #4, #10, #15, and #20; relics #4, #6, #8, #18, #21, and #27; murals #2, #6, #11, and #15. (Click images for more and larger screenshots.)
ARCHIVIST MAP 2
This map is on the way to the Temple of the Sun Challenge Tomb, at the southern tip of the city. If you haven't explored that area yet, follow the challenge tomb walkthrough. If you raided the tomb but missed the map, fast travel to the Temple Path Base Camp. Climb the stairs and handholds to reach the ledge with the High Diving board. The map is spread out just ahead on the left. Examining it reveals a bunch of collectibles on your in-game map: documents #16, #17, #18, and #32; relics #2 and #12; murals #1, #5, #9, #12, #13, and #22. (Click image for more and larger screenshot.)
ARCHIVIST MAP 3
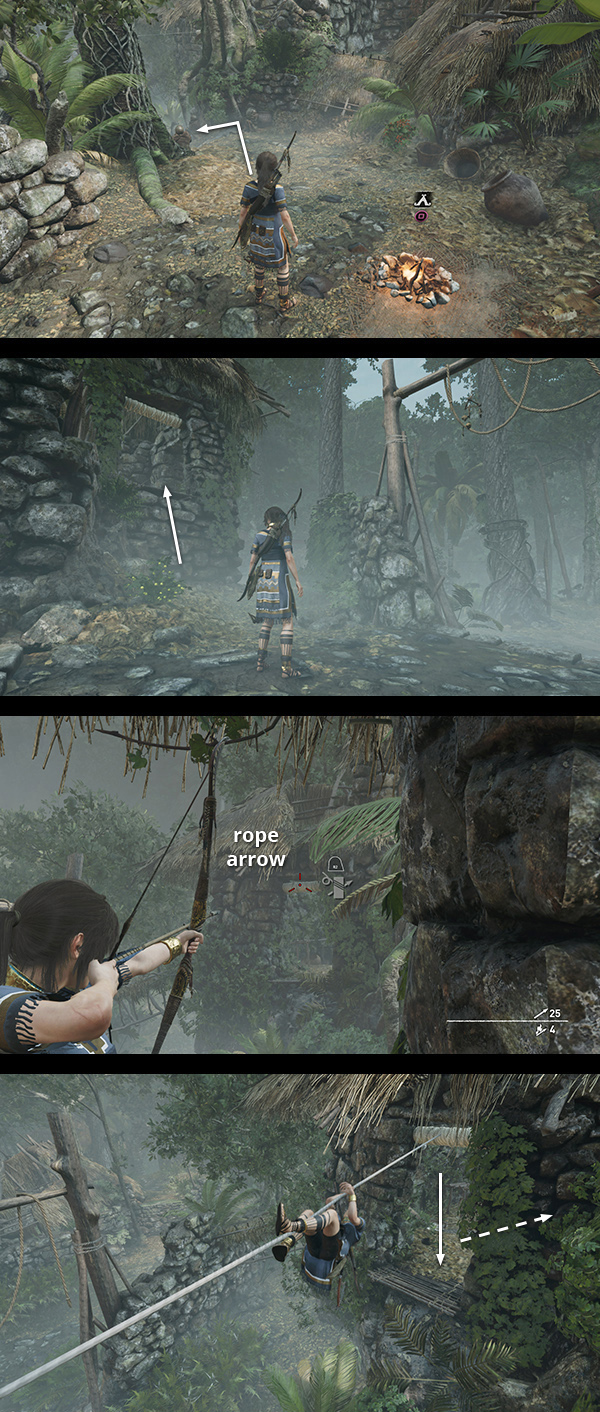
This map is in the Abandoned Village northwest of the city. If you've already discovered the Abandoned Village Base Camp, fast travel there. Otherwise find the Abandoned Village Entrance on the map and/or follow the main walkthrough to reach the camp.
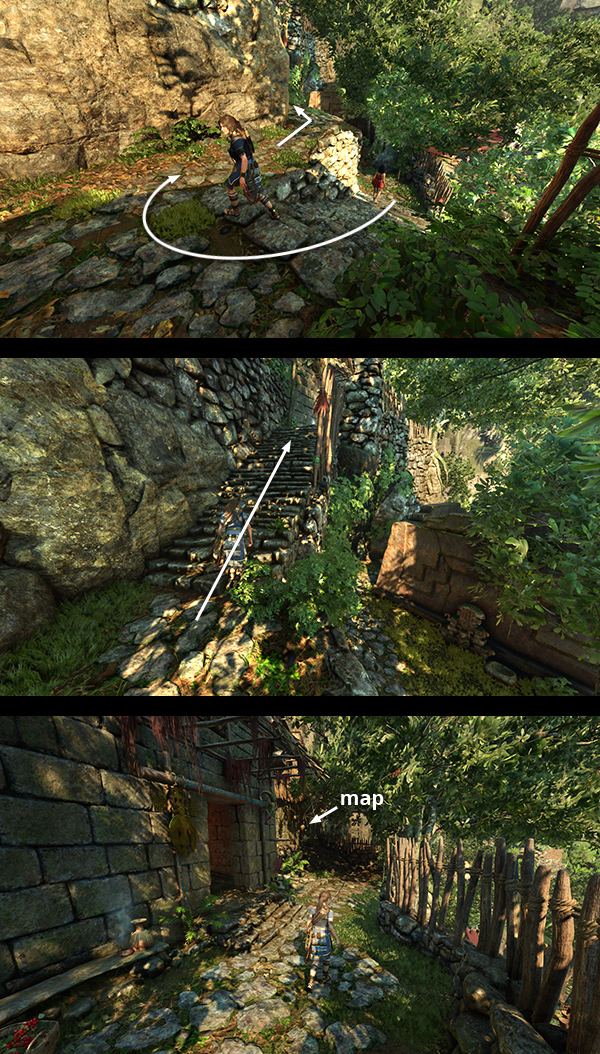
The Archivist Map is just north of the campfire, but you'll need to take a roundabout route to reach it. Go down the steps to the northwest. Climb into the building on the left, turn around, and use a rope arrow to run a line over to the opposite building. Climb the line and drop down in the doorway. Go through the building and up the steps to the right to find the map sitting on a crate outside. Examining it reveals a number of Hidden City collectibles on your in-game map: monolith #5; documents #5, #11, #12, #19, and #30; relics #14 and #16; murals #3, #7, #10, and #16; plus the one mural in the Head of the Serpent area. (Click images for more and larger screenshots.)
ARCHIVIST MAP 4
This map is in the Crypt of Chuki, the Weaver, near the Abandoned Village northwest of Paititi. Whether or not you've already explored this crypt, I recommend following the walkthrough to navigate the underwater area and reach the trapped hallway with the map. This guide also describes how to exit the crypt when you're finished. Examining the Archivist Map reveals the following items on your in-game map: monoliths #2 and #4; documents #1, #8, #9, #21, #23, #25, and #42; relics #1, #7, #10, #11, #17, and #19; murals #8 and #23. (Click screenshot to enlarge.)
ARCHIVIST MAP 5
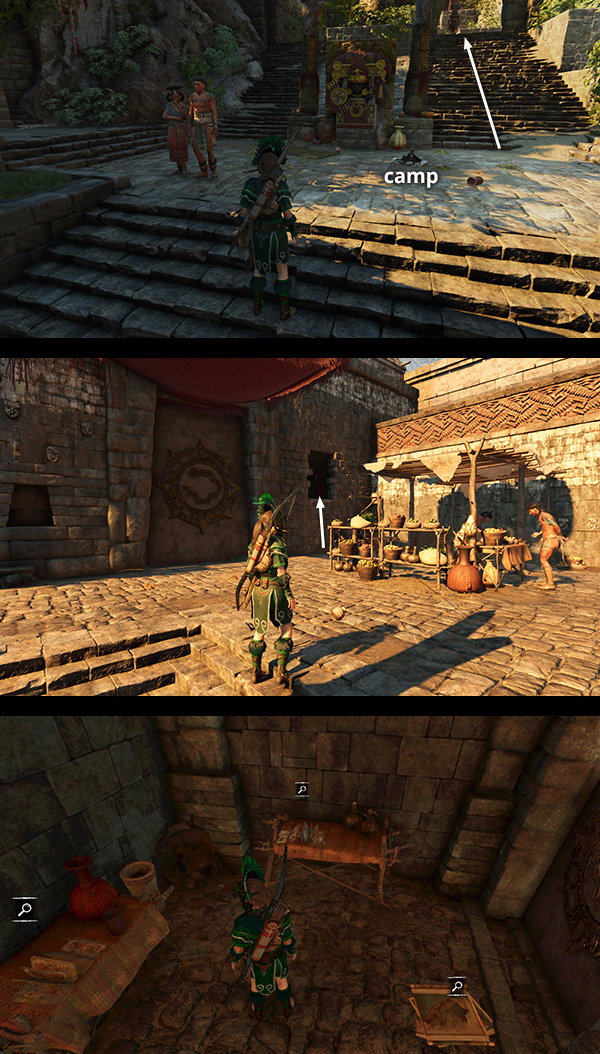
This map is in the upper city, in the northeast corner of the marketplace that surrounds the entrance to the Temple of Kukulkan. If you missed it while playing through the story, fast travel to the Upper City Main Gate Base Camp. Then climb the stairs to the north, enter the marketplace, and head for the far right (northeast) corner. Just behind a food vendor's stall, there's a raised opening in the stone wall. Climb inside to find the map and two documents (#26 and #27). Examining the map reveals additional items on your in-game map: monolith #6; documents #24, #26, #28, #29, #31, #33, #35, and #38; relics #4, #25, and #26; murals #17, #19, and #20. (Click image for more and larger screenshots.)
ARCHIVIST MAP 6
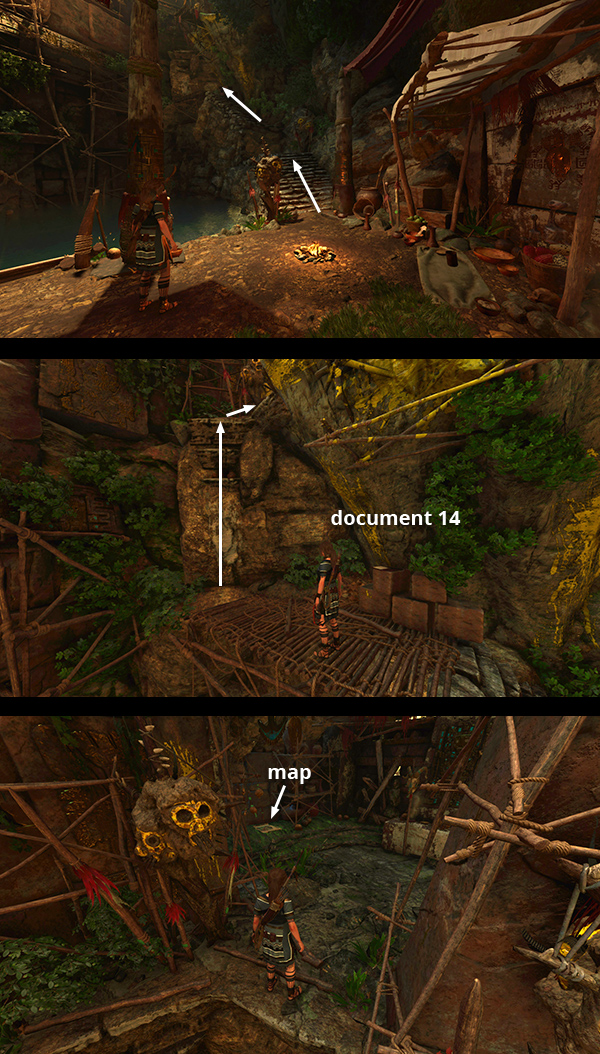
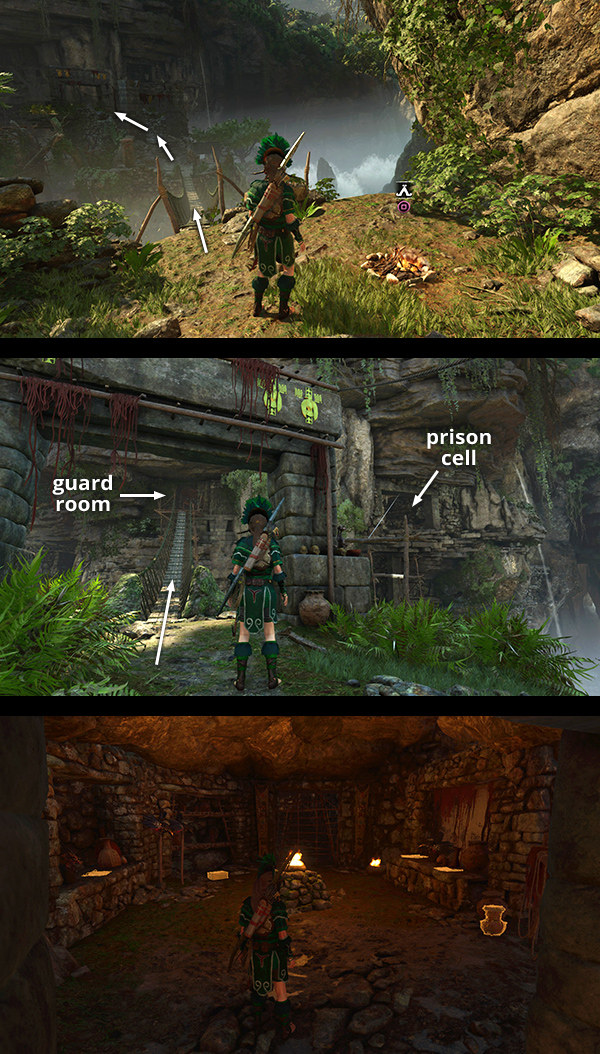
This map is in the guard room near Unuratu's prison cell in the gorge east of the city. If you missed it during the 'Rebellion Lives' story chapter, fast travel to the Temple of Kukulkan Base Camp. Cross the first bridge to the island. Then climb the stairs and cross the second bridge to the guard room on the east side of the gorge. The map is inside, along with several other collectibles. Examining it reveals a number of items on your in-game map: documents #27, #34, #36, and #37; relics #9, #13, #20, #22, #23, #24, and #28; murals #18 and #21. (Click screenshot to enlarge.)
ARCHIVIST MAP 7
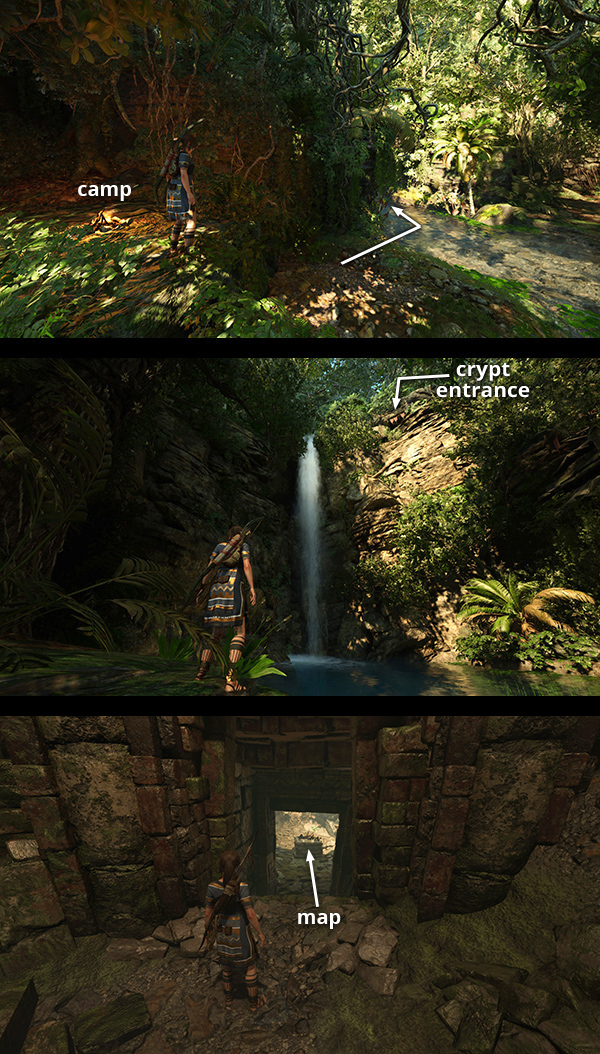
This relic is in the Crypt of Ollanta, The Potter, west of the city in the same area as the Path of Battle Challenge Tomb. Either enter the Path of Battle area through the tunnel in the lower city (shown in the first screenshot and marked 'Path of Battle Entrance' on the annotated map) or fast travel to the Wild Jungle Base Camp. Follow the stream south to the crypt entrance, which is at the top of the waterfall. The crypt walkthrough shows how to climb up, enter the tomb, and make your way down to the side area where you'll find the map. Examining it reveals the following items on your in-game map: documents #2, #3, #7, #13, #14, #16, #39, #40, and #41; relics #3 and #15; murals #4 and #14; monoliths #1 and #3. (Click images for more and larger screenshots.)
Walkthroughs: First Visit · Second Visit (after Cenote) · Third Visit (after San Juan) | Collectibles Guides | Main SOTTR Page
†UPDATE HISTORY: 9/8/21 - Page first posted online. Note that I'm fairly confident but not perfectly sure about the specific collectibles each Explorer Backpack and Archivist Map reveals. It can be difficult to reach the packs and maps without passing close enough to other collectibles to mark them on the in-game map.
WAS THIS WALKTHROUGH HELPFUL? If not, I apologize and invite you to contact me with any questions. If you need help right away, I recommend the r/TombRaider subreddit. Other fan-run forums are listed at tombraiders.net/stella/community.html. If this site was useful, please consider supporting it financially or in other ways. For details, visit tombraiders.net/stella/support.html. As always, I welcome your corrections/suggestions. Thank you!
Copyright © Stellalune (). All rights reserved. Feel free to copy or print this walkthrough for personal use. By all means, share it with friends, but please include this credit line so people can send me their feedback. No part of this walkthrough may be reproduced on another site without permission. Follow this link for details about this site's advertising and privacy policy.
Stella's Tomb Raider Site: tombraiders.net.