Stella's Classic Tomb Raider: Last Revelation Guide
NOTES ON THE REMASTER: This guide has not yet been updated for the remastered game. Revisions are in progress but will take time. I hope this version, based on the classic game, will still be helpful. Thanks for your patience.
LEVEL 10: TOMB OF SEMERKHET
Updated: 1/17/26(†)
LEVEL MAP by VGCartography (used with permission)
Last Revelation Remastered Video Walkthroughby Eldincy‡
Kills: 16 Items: 40, including 2 Torches, Rules of Senet, 2 Cartouche Pieces, and Ra Cartouche Secrets: 7*
NOTES: In the area with the SENET GAME, you must choose between two paths. The totals above are for the path where you LOSE the Senet game in order to obtain all secrets. The shorter, alternative path is covered below the main walkthrough. Also, one of the regular pick-ups will be the UZIS if you didn't find them in an earlier level.
ENTRANCE AND BEETLE ROOMS: Shoot the ceramic jars to get the Uzi clips and large medipack (1-2) inside. (screenshot) Then slide down the ramp.
Cutscene: A swarm of beetles scampers along the hallway toward Lara.
You can't kill the beetles. (So why even bother with the sturdy boots, I ask?) Quickly turn right, run forward, and jump up to grab the handholds on the ceiling. (screenshot) Traverse across the bars to the far end of the hallway. Let go and slide into a room with a climbing pole. (screenshot) Take a standing jump to grab the pole, slide down to the MIDDLE level, then backflip off the pole. Don't go all the way to the bottom yet, since it's all about beetles down there.
As you explore this room, watch out for the gap around the edges. There's a wooden TORCH (3) lying on the step below the lit brazier. (screenshot) If you like, you can pick it up and light it by standing near the brazier and pressing Action. The torch is supposed to protect Lara from the beetles as she explores the room below, but it doesn't work very well and it prevents her from doing anything else with her hands, such as climbing and activating switches. So it's basically useless. You're welcome to experiment, but here's an alternative that works fairly well. Visuals are included on a separate page with screenshots and in this short video.
Save the game first, obviously. Position Lara on the south side of the opening surrounding the climbing pole (i.e., Lara will be facing north with the brazier on her right and the 2 ceramic vases on her left). Jump or run off the edge and grab the pole. Slide almost to the bottom. Don't go all the way down or the beetles on the floor below will start biting. Hang onto the pole for a few moments to let the beetles gather. Then press Jump + Roll (or Jump + Up + Down on the keyboard) to jump off the pole, twist in the air, and land beyond the beetle swarm facing the other way (south). Run/jump to the rectangular niche directly ahead. Quickly press Action to grab the small medipack (4) inside. Immediately roll and take a standing jump over the beetles as they begin to swarm around you. Use a health pack if necessary as you continue to run/jump across the room, veering just a little to the left or right to avoid the pole. (screenshots)
When you reach the second niche, in the north alcove, press Action to reach in and operate the mechanism inside. (This is one of two required to open the exit above.) Roll and jump over the beetles again. Run/jump just to the middle of the room, then turn left and continue taking running jumps to reach the third niche, on the east wall. Use the mechanism inside. (This is the second of the two mechanisms needed to open the exit.) Then roll, jump over the beetles, run a few more steps, and jump forward to grab the pole. Now you're safe. Climb up to the middle level and backflip off the pole. (screenshots)
NOTE: If you want to get away from the beetles more quickly, you can skip the first niche with the medipack, but the extra health can also help heal the beetle damage. Your choice.
The door on the west wall is now open. Shoot the vase to the left of it, jump over the gap in the floor, and retrieve the small medipack (5) that was inside the vase. (screenshot) When you go through the door, it closes behind you.
At the top of the ramp are three orange-and-gold panels. The one on the left, with the vertical seam, is actually a door. Stand close to it and press Action to push it open. (screenshot) Follow the passage to the end and safety drop into the next room.
SENET GAME BOARD: The huge game board is a variation on senet, a backgammon-like game which was actually played by ancient Egyptians. (screenshot) Move to the left end of the ledge (when facing the game board) and take a running jump onto the ledge with the ladder. Climb the ladder and dismount on the right. This is SECRET #1 (31/70), wideshot shells and a small medipack (6-7). There's no need to climb back down the ladder; just safety drop to the ledge below. (screenshots)
NOTE: There are several possible shortcuts and alternate routes in this area. To keep the walkthrough more compact, these are covered on a separate page.
Jump down onto the game board and then go through the doorway beneath the golden face. (screenshot) Inside, ignore the ramp on the right, which leads back up to the entrance. Instead climb the ladder on the east wall. (screenshot) At the top, go forward and climb into the passageway above. Continue around the corner to a doorway overlooking a large room.
ROOM WITH POOLS AND FLAME NICHES: When you drop down onto the ledge just below the doorway, there's a bit of dramatic music, but the 2 jackals (1-2) lurking behind the square pillars don't emerge until you actually touch down on the floor. If you like, you can hop down and quickly climb/flip back onto the ledge. Then shoot the jackals with pistols. (screenshot)
Cross the room to an alcove containing 3 flame niches. The left and right flames oscillate on and off. The center one burns steadily. You'll need to use the niches to lower the pink marble block off to the right. Start by standing just outside the alcove facing the right niche. Any closer and Lara will catch fire. When the flame dies down, run forward and reach into the niche to operate a mechanism that turns off the middle flame permanently. Then immediately hop back twice to avoid being toasted. Reach into the middle niche to operate another mechanism which lowers the marble block, opening up a passageway. Last, wait for the flame in the left niche to go out, then reach in to grab a small medipack (8). Again, hop back twice to avoid the flames. (screenshots)
NOTE: If Lara catches fire, you can jump into either of the pools in the far corners of the room; however, you'll probably need to use a few medipacks just to reach the water without dying. You're probably better off reloading and trying again.
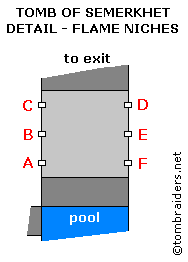
SHALLOW PIT WITH SIX FLAME NICHES: Go through the door you just opened and jump over the shallow pool onto the ledge on the left. The block door closes behind you. Ahead is a shallow pit with 6 flame niches, three on the left, three on the right. I have labeled these niches A through F in the diagram at right. When you enter there is no flame in niche C. Niches B, E, and F have steady flames; A and D have oscillating flames. Hop down into the safe aisle between the flames. (screenshots)
If you just need some quick guidance, the order for using the niches is A, E, F, B, C, D, D again (optional).
Here's the longer version: Stand Lara facing niche A, wait for the flame to die down, then run forward and reach in to operate the mechanism. This turns off the flame in niche E. Hop back twice but no farther to get out of the way. Use the mechanism in E to turn off the flame in F. Use the mechanism in F to raise a golden cage out in the room where you killed the jackals. This also makes the flame in niche B begin to oscillate. (screenshots)
Now face niche B, wait for the flame to die down, then run forward and reach in to operate the mechanism that opens the exit. Reach into niche C for a box of shotgun shells (9). Finally, when the flames in D die down, reach in for a small medipack (10). If you like, you can wait for the flames in niche D to cycle off again. Then reach in once more to operate a mechanism that raises a second golden cage in the other room. Doing so also permanently deactivates the flame in niche D. (screenshots)
Climb out on the west side but don't run forward or Lara will fall into a deep pit. Jump up to grab the handholds on the ceiling, traverse around the corner, and drop down near the exit, which will be open if you used niche B. As you re-enter this room, the marble block door closes behind you. (screenshots)
ROOM WITH POOLS AND FLAME NICHES (again): Climb onto the block next to the golden cage on the west side of the room (i.e., nearest the exit from the niche room) and pull up on top of the cage. Take a running jump to the ledge on the right side of the central structure. Follow this ledge forward. About halfway along, there's another flame niche in an alcove on the left. Wait for the flame to abate and use the mechanism inside to turn off some flames in the room below. (screenshots)
Before climbing down, go after a secret: Exit the alcove and follow the ledge to the left. Turn around so the angled block is on Lara's right and drop back to grab the edge. Traverse to the right and keep going, using the wooden slats like a ladder. (If Lara refuses to traverse from the flat ledge onto the ladder, try hanging from the long side of the ledge, just beyond the corner, then traversing around the corner and continuing on. Or, if you raised both golden cages, jump over to the one near the east wall, turn around, and take a running jump back to the climbable wall.) Keep climbing to the right, around the outside corner, then the inner corner, then up to the alcove at the top right. Inside is SECRET #2 (32/70), wideshot shells and a large medipack (11-12). Climb down the ladder and drop to the floor. (screenshots)
LOWER ROOM – RULES OF SENET: Go down the wide ramp beneath the central structure to the room below. (screenshot) Now that you've deactivated the flames, you can take the RULES OF SENET (13) from the pedestal. This opens a trapdoor in the SENET GAME ROOM. To get back there, return up the ramp, go around to the south side of this room, and climb into the raised opening between the two pools. (screenshot) Follow the passageway back to the SENET GAME ROOM. Climb over the game board, go into the alcove on the west wall, climb the ladder, and backflip onto the balcony behind you. (screenshot)
Cutscene: The giant head of Semerkhet pops out of the wall. Apparently this is to be your AI opponent.
IMPORTANT: The path from here on depends on whether you win or lose the game of senet. You must LOSE THE GAME in order to obtain all the secrets. Unless secrets don't matter to you, be sure to SAVE before playing the senet game so you can reload and try again if necessary.
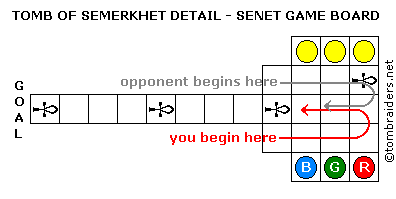
NOTE: If colorblindness makes puzzles like this a challenge for you, the tiles that Lara steps on to move the pieces are red, green, and blue from left to right. The game pieces in their starting positions are blue, green, and red from left to right. You can also download a PC save file for either the winning or losing path.
If you win the game, golden cages rise from the ankh tiles on the game board, opening a new route. (screenshot) If you want to take that shorter path, knowing you'll miss five secrets, pick up the walkthrough below at the section ALTERNATE PATH – WINNING THE GAME OF SENET.
LOSING THE GAME OF SENET – RAMPS AND FIRST SECRET: When you lose the game, 4 trapdoors open in the floor surrounding the game board. All eventually lead to the same place, but there's a secret to be had on the way down, and it's easier to reach if you drop down through either of the openings on the north side (i.e., nearer the last tile on the senet board). Here we'll use the one to the northwest. (screenshot)
Drop down through the northwest trapdoor and position Lara at the top of the slope facing downhill. Save the game in case you miss the secret. Now step off the edge and slide down facing forward. At the end of the first ramp, Lara will land on the perpendicular ramp just below. Continue to slide without jumping. At the end of the second ramp, Lara will take another slight drop and continue sliding. At the end of this third ramp, press Jump to land in the doorway directly ahead. If Lara falls onto the perpendicular ramp below, reload the game and try again. Once you land in the doorway, drop down into the room with the climbing pole. This is SECRET #3 (33/70). Drop into the lower room to find Uzi ammo (14) on the floor plus a small medipack and wideshot shells (15-16) in the breakable urns. When you have everything, climb the pole. Backflip onto one of the ledges and climb/jump back into the doorway. (screenshots)
Save again here because the positioning for the next sequence is fairly precise. Stand in the opening, turn a little to the left, and step off the edge to land in the middle of the slope below. Slide down the ramp and hold Action. If Lara is in the middle of the ramp, she will grab the next pole. If not, she'll land on the ledge below. (If you don't hold Action, or if you slide down facing uphill, she'll fall to her death.) Climb down the pole and backflip onto one of the flat ledges with the items (not the sloping ledges on the other two sides of the pole). Take the Uzi clips and small medipack (17-18). Then slide down the pole or safety drop to the ledge below. (screenshots)
LARGE ROOM WITH TWO DANGLING ROPES: A bat (3) flies in from the southwest corner. Shoot it before it reaches you. Then take a running jump to the L-shaped corner ledge. Climb the stairs.
SIDE ROOM WITH FIRST CARTOUCHE PIECE: When you reach the room at the top, kill 2 jackals (4-5) that emerge from hiding. Go into the alcove and pull the senet piece out into the middle of the room. (Veteran raiders should note that Lara can now do continuous pulling if you hold Action.) When you've pulled it as far as it will go, it will be positioned between the 2 huge hammers. Now use the lever to work the hammers, smashing the game piece so you can get the CARTOUCHE PIECE (19) inside. (screenshots)
Return downstairs to the high ledge overlooking the LARGE ROOM WITH TWO DANGLING ROPES. Take a running jump to grab the nearer rope. (screenshot) Without letting go, slide to the bottom of the rope and turn until Lara is facing the uneven, gray ledge in the northwest corner. Press Sprint/Dash to swing forward and then jump off the rope to land on the ledge. (screenshot) See the rope swinging tips in the footnote if you need a refresher. Climb into the crawlspace on the left and follow the passage to the next room.
SIDE ROOM WITH SECOND CARTOUCHE PIECE: Jump from the doorway onto the elevated walkway. Pull the senet piece out of the alcove and along the walkway. When you can't go any farther, jump over it, aiming slightly to the left or right where its sides slope downward. Now push it once more so it sits between the 2 huge hammers. Immediately hop back to avoid taking damage as the hammers swing down, crushing the game piece. Take the SECOND CARTOUCHE PIECE (20). When you do, a door opens below. (screenshots)
Drop down to the floor and kill the 2 jackals (6-7) that emerge from the small side room. Then go inside and shoot the jars to get shotgun shells and a small medipack (21-22). Return to the far end of the room, climb back onto the walkway, and then take a standing jump with Action into the doorway. Return through the crawlspace the way you came. (screenshots)
LARGE ROOM WITH TWO DANGLING ROPES (again): Climb the ladder on the square column to reach the base of the pole. Turn around and shoot another pesky bat (8). (screenshot) If you like, you can now climb this pole and backflip onto one of the flat ledges with the items (not the steeper sloping ledges). Take the shotgun shells and poison crossbow ammo (23-24), then slide or safety drop back down.
From the base of the pole, take a running jump to the rectangular alcove with the red walls on the left (east) wall. (As long as you set up the jump carefully, Lara can make it, but you could also jump onto the slope, slide back and grab the edge, then traverse to the alcove and pull up.) Push open the red door to find SECRET #4 (34/70), explosive arrows and a small medipack (25-26). Come back out to the big room, turn around to face the door to the secret room, and then flip to the left to land on the slope. Slide back, grab the edge, and drop to the floor. (screenshots)
NOTE: If you climbed down to the floor and missed the secret, you can go after it by climbing the ladder on the north wall. (screenshot) If you are missing either of the cartouche pieces, you can also climb this ladder to reach the upper level. Then follow the walkthrough above to get whichever piece(s) you missed.
BA CARTOUCHE DOOR – OBTAINING THE RA CARTOUCHE: Open your inventory and combine the two CARTOUCHE PIECES to make the BA CARTOUCHE. Use this in the blue-and-gold receptacle near the east door. (It won't work for the other door.) Immediately draw the shotgun and side flip to the left. Shoot the jackal (9) that appears in the corner ahead. Roll and kill a second jackal (10) that approaches from behind. Then enter the east room. (screenshots)
Inside is an elevated walkway with hammers and a senet piece similar to the others you've seen. Only this time there are lit burners preventing you from moving the piece. The black switch high on the south wall turns off the burners but only for a little more than a minute. So unless you really hustle, you probably won't be able to move the senet piece all the way to the hammers without the burners relighting. I found it much less stressful to do it in two stages. Here's the sequence with screenshots:
Take a running jump from the walkway to grab the switch and pull it down, deactivating the burners. If you like, you can set a timer to warn you when the time is almost up. You have 1:15 from the moment the switch is pulled until the burners reignite. After pulling the switch, Lara drops onto the slope below and slides down to the floor. Roll and run forward around either side of the column supporting the walkway and into the next room. Run, jump, and grab either of the two poles and begin climbing. As soon as Lara's upper body has cleared the opening in the floor, backflip off the pole. Turn to face the senet piece, run/jump toward it, grab it, and start pulling. Depending on how well your running and climbing went, you may be able to pull the game piece all the way onto the second burner before the timer runs out. If not, no worries. Just move it as far as you can and get out of the way before the burners reignite. (screenshots)
Once again take a running jump from the walkway to grab the switch. Drop, slide down the short slope, roll, and run/jump to either of the climbing poles just as you did before. Climb up, backflip onto the walkway, and run to the senet piece. Now push it forward between the giant hammers at the end of the walkway. Immediately hop back from the hammers and the burner. The hammers then smash the senet piece revealing an artifact inside. (screenshots)
As long as the burners have not yet reignited, you can step forward to pick up the RA CARTOUCHE (27). If the burners are lit, follow the sloping walkway around to either side to reach the cartouche. Once you have the artifact, exit to the main room. (screenshots)
NOTE: If you accidentally become trapped on the walkway near the climbing poles while the burners are lit, it's no problem. Just safety drop to the floor and head for the south end of the room. In the right corner below the switch is a crawlspace. Crawl in there. A trapdoor opens above, enabling you to climb the ladder to the ROOM WITH TWO DANGLING ROPES. From there, go back through the BA CARTOUCHE DOOR to the walkway.
RA CARTOUCHE DOOR – ROOM WITH THREE DANGLING ROPES: Use the RA CARTOUCHE to open the door on the west side of the LARGE ROOM WITH TWO DANGLING ROPES. Climb the stairs to a wide doorway overlooking a room with a lit brazier and 3 dangling ropes. A fire wraith (11) emerges from the brazier and begins chasing Lara. As long as you keep moving, the heat damage will be minimal, but if you stand still Lara may catch fire.
There are two ways to deal with this little hottie: Drop down into the room with the brazier, where the fire wraith emerged, and use the ramp to reach the high doorway on the right (west) side. Run down into a ROOM WITH A BOX AND LEVER and use the lever to release an ice wraith (12) from the box. The two wraiths will then destroy each other. You can then pick up the 2 small medipacks (28-29) on the ledges in the box-and-lever room. (screenshots)
Alternatively, when the fire wraith emerges, turn around and run/sprint back down the stairs, out the RA CARTOUCHE DOOR and in through the BA CARTOUCHE DOOR. Run off the edge to land on the lower level, run to the left, and jump into one of the pools near the climbing poles. The fire wraith (11) will follow and extinguish itself in the water. Use the crawlspace and ladder in the southwest corner of the room to exit this area. Return through the RA CARTOUCHE DOOR and climb the stairs to the ROOM WITH THREE DANGLING ROPES. If you like, you can climb up to the opening on the right (west) side and follow the hallway down to the ROOM WITH THE BOX AND LEVER to get the 2 small medipacks (28-29). If you must have all kills, you can then pull the lever to release the ice wraith (12) and lure it down to one of the pools like you did with the fire wraith. (screenshots)
NOTES: I'm not sure if the wraiths count as "official" kills, since Lara doesn't destroy them directly. I count them here for the sake of completion. In the classic PlayStation game, the two wraiths do not cancel each other out, but they will start to circle around each other and mostly leave Lara alone. I'm not sure if leading the fire wraith to the pool works in the PS1 version, or which strategies work in the Dreamcast game, so let me know what you discover.
Once you've dealt with the wraiths, return to the ROOM WITH THREE DANGLING ROPES. Drop down to the floor then climb into the doorway at the north end of the room, near the top of the stairs where you first entered this area. Turn around so Lara is squarely facing the three dangling ropes. Then take a running jump to grab the first rope. Swing and jump to the second rope, then to the third rope, then the alcove at the south end of the room. (screenshots)
NOTE: Again, check the rope swinging tips in the footnote if you need a refresher. Or, if you hate rope swinging as much as I do, instead use the corner bug to reach the ledge. This is also shown on the page with screenshots.
Inside the alcove is SECRET #5 (35/70), grenades (30) on the floor to the left, a box of revolver ammo (31) on the right (no REVOLVER yet though), and Uzi clips (32) just around the corner from the revolver ammo. Don't drop down to the floor yet or you'll have to repeat the whole rope-swinging process again. Instead, return to the ledge overlooking the room and take a running jump to grab the third rope again. Now swing and jump over to the opening on the right/east side. (screenshots)
BUG IN THE REMASTER: I'm currently working on Angel of Darkness and haven't started Last Revelation yet, but several players have brought this bug to my attention. Apparently, when you grab one rope, the other two ropes disappear. Hopefully this issue will be patched soon. Meanwhile, you can use the corner bug, as described here, to reach the secret, and/or here, to reach the ledges leading to the next area.
DARK ROOM WITH CLIMBING POLE: Follow the elevated walkway toward the pole. Turn around and shoot the 2 bats (13-14) that drop down from the ceiling behind you. Take a running jump to the base of the pole. Climb the pole until Lara is hanging just above the jutting ledge. Then rotate around the pole so the ledge is behind her and jump back to land there. Shoot another bat (15). (If it doesn't appear right away, just keep going. It'll turn up eventually.) Turn left and take a standing jump to grab the black switch. This raises the hinged ledge behind you. After pulling the switch, Lara falls to the ledge below. Draw pistols and kill another bat (16). Take a standing jump to the base of the pole, climb up, and backflip onto the jutting ledge as you did before. Jump onto the hinged ledge and reach into the niche to get a wooden TORCH (33). (screenshots)
Now you need to get back down to the floor. Lara won't climb while holding the torch, so press the Draw/Holster Weapon button to throw it down first. Try and notice where the torch lands since you'll need to retrieve it. Take a standing jump to grab the pole, slide down, and let go. Then take a standing jump with Action from the base of the pole into the wide opening. Pass under the arch and move to either side of the elevated walkway. Take a standing jump to grab the ledge near the wall and drop to the floor, taking no damage. (screenshots)
Now find the TORCH and carry it back into the ROOM WITH THREE DANGLING ROPES. Use the stone ramp to jump up onto the pedestal with the lit brazier. Press Action to light the torch. Then use the torch to light the 2 wall-mounted torches flanking the doorway to the room with the climbing pole. Doing so opens a trapdoor in the floor nearby. Leave the torch and climb down the ladder on one wall of the hole. (screenshots)
BUG IN THE REMASTER: Once you've opened the trapdoor by lighting the torches, do not save the game until you've climbed down into the corridor below. Saving and reloading can result in a bug in which the trapdoor closes and can't be reopened. Once you're in the rooms below, you should be able to save with no problem. Details are in a footnote.
SECRET AREA BELOW THE ROOM WITH THE POLE: Follow the passage to SECRET #6 (36/70). A bit farther along the passage there's a circular blade trap blocking the way. To get past it without injury, walk forward until Lara is standing very close to the blades without actually touching them. Now observe: The blade opens and closes twice in rapid succession followed by a pause when it remains open for a moment. It's three beats: Snick, snick, pause...snick, snick, pause. If you wait for the pause and then roll, Lara will come through without a scratch. (screenshots)
NOTE: This is my preferred method for clearing this type of trap. You can also use a diving roll (i.e., jump while sprinting), stand a few steps back from the blade and take a standing jump-grab as it opens, or stand on the seam between tiles just before the trap then backflip as the blades open.
In the next room you'll find wideshot shells, flash grenades, flares, and a large medipack (34-37) on pedestals. You can take the shotgun ammo and grenades without anything happening, but once you take the flares or medipack, a swarm of nasty beetles emerges, and you'll need to move quickly. Here's one possible sequence: Pick up the shells and grenades, approach the flares and save the game. Now take the flares, turn to face the pedestal with the health pack, run off the edge, jump up to the pedestal, and grab the medipack. Immediately backflip and roll or, better yet, backflip and roll in the air to land facing the exit. Run and jump into the doorway. Then keep running off the edge into the open trapdoor. The beetles continue to follow, so run/sprint to the end of the passageway and climb up directly ahead. Angle Lara to the right as you run off the next ledge. Run forward and climb up on the left. Now you're safe. Continue to the end of the passageway and climb the ladder to the main area. (screenshots)
Now you need to get back up to the vertical pole. Return to the far right (north) end of the ROOM WITH THREE DANGLING ROPES. (As you pass over the second set of white tiles, the trapdoor closes behind you.) Climb up into the doorway, and use the 3 ropes to swing across to the raised alcove ahead on the left (east) side of the room. (screenshot) Follow the elevated walkway to the end, jump over to the pole, climb up, and backflip onto the ledge like you did before. Now follow the ledges around to the left or right, jumping across the gap, to reach the exit on the opposite side of the room. Watch out for bats here if you didn't kill all of them earlier. (screenshot)
NOTE: If you'd rather not repeat the rope swinging, you can use the corner bug to reach the ledge where you found secret #4 earlier, as shown here. Then you only have to rope swing once to get to the walkway that leads to the pole. Or, even better, use the crawling corner bug to pop directly up to the exit. See these screenshots.
ROOM WITH TWO RAMPS – LEVEL EXIT: Go through the doorway opposite the climbing pole and pull up through the hole in the ceiling into a room with two ramps covered in carved hieroglyphs. There's also a doorway above the ramps and another opening in the ceiling. Turn around and jump to grab the black switch above the hole in the floor. This raises a golden cage between the two ramps. Climb back up through the hole in the ceiling. Go up either ramp and climb onto the cage. Then pull up through the opening in the ceiling above the cage to find SECRET #7 (37/70), the UZIS or Uzi ammo, a large medipack, and explosive arrows (38-40). (screenshots)
Drop back down onto the cage and follow the hallway to a door that opens as you approach. Hop down into the room below. Off to the right is a high crawlspace—the alternate exit if you win the senet game. (screenshot) Enter the room with the red floor to END THE LEVEL.
ALTERNATE PATH – WINNING THE GAME OF SENET: When you win the game, golden cages rise from each ankh square on the game board. Drop down to the floor, go through the doorway below the face of Semerkhet, turn right, and follow the ramp and stairs up to doorway overlooking the game board. (screenshot) Jump across the tops of the cages to the doorway high on the opposite side of the room. (screenshot)
Beyond this doorway, staircases to the left and right both lead down to the level below, so you can go either way. The big double doors with the ankh symbol open as you approach, and 2 jackals charge out. Kill them. (screenshot) Avoid the lit burners and continue downstairs to a small room with 2 ceramic jars. Shoot the jar on the right to get some Uzi ammo. (screenshot) Go down the next set of stairs, stopping on the way to get shotgun shells from the breakable jar between the two sets of stairs. (screenshot) Again, don't get too close to the lit burner.
There are 2 more Jackals at the bottom, so stay sharp. One is sitting on the floor directly ahead. The other emerges from the alcove on the left as you enter. At the back of this alcove is a hole in the floor. (screenshot) Drop through it onto a ledge above a room with more vicious beetles. Hop down and run/sprint to the far end of the room, either jumping over or steering around the angled block in the middle of the room. Jump up the short slope. Then jump to grab the pole and climb to safety. (screenshot) Backflip off the pole to land in a room with 2 breakable jars on shelves. Jump in place while shooting to smash the jar on the right and get the large medipack inside. (screenshot) Continue to the next room.
ROOM WITH MIRRORS REFLECTING LIGHT BEAMS: The jackals don't awaken at this time, so no need to worry about them yet. Go through the mirror room and exit at the far left (southeast) corner. (screenshot) Approach the climbing pole and run around the base of it until 2 bats fly down. Shoot them. (screenshot) Then climb the pole. Near the top there are two ledges. Rotate so Lara's back is toward the room with the two rectangular boxes (coffins?), climb up/down so her body is level with or just above the wide stripe on the wall, and then backflip to land on the ledge. (screenshots) Pick up regular and poisoned arrows from behind the coffins. Then jump across the open shaft to the sloping ledge.
The door to the next room opens as you approach then closes behind you. Push/pull the 3 senet pieces onto the corresponding colored squares, blocking the light beams. (Veteran raiders should note that Lara can now do continuous pulling if you hold Action.) If colorblindness prevents you from distinguishing the red/blue/green game pieces and tiles, check these screenshots.
Cutscene: A brief cutscene after each move shows the state of the MIRROR ROOM below. When the final piece is moved, the crypt with the golden crystal slides aside revealing an opening in the floor, and the jackals awaken. (screenshot)
Solving the puzzle also re-opens the door where you came in. Jump from the small ledge to grab the doorsill. (screenshot) Pull up and return to the pole. Take a standing jump from the edge of the opening to grab the pole then slide down. Return to the MIRROR ROOM, kill the 2 jackals, and drop through the hole in the floor. Crawl through to the end and drop down.
Off to the left is a small, square door, now closed. (screenshot) This is the alternate exit if you lose the senet game. Enter the room with the red floor to end the level.
FMV sequence: Lara enters the tomb, switches on her flashlight, and begins to read the hieroglyphs. We then see the masked priest Semerkhet, and hear his voice describing the ritual required to return Seth to his prison. Details and transcript are included in the separate Cinematics, the next level begins.
*NOTE ON SECRETS: There are 70 secrets in the entire game. These are marked "(x/70)" in this walkthrough. To check your progress in-game, press Pause (P on keyboard, Start on PlayStation or Dreamcast controller) then choose Statistics. At the end of this level, if you took the longer route and retrieved all 7 secrets, you should have 37/70.
†UPDATE HISTORY: 5/16/00 - Previous edit, details not available.
5/5/19 - First major update since this walkthrough was created in 1999. This revision includes many new screenshots as well as various other corrections and clarifications.
11/2/20 - Minor tweak to the area with the 3 dangling ropes.
1/23/25 - Added running item and kill counts, which hopefully will be useful in the upcoming Remaster.
2/18/25 - Added bug note about missing ropes in the remaster, thanks to a heads up from Aimee (GeekyGoneWilds).
2/21/25 - Added VGCartography's level maps, with permission. Visit VGCartography on DeviantArt and follow on Twitter/X and YouTube for more fantastic game maps.
1/17/26- Added the trapdoor bug note, thanks to a heads-up from FilmFearless5947 on the r/TombRaider subreddit.
ACKNOWLEDGEMENTS: Special thanks to the participants in the alt.games.tombraider newsgroup and the old tombraiders.com forum, without whom parts of this walkthrough could not have been written. Thanks also to Andrew, Bruce, Carol, CMB1988, CroftsMan, derr, Helena, John, Larry, Linda, Luis, Mark S., Niels, Pernille, Rardraider, Slabbie, Thomas Y., and Tina for their tips/corrections for this level.
ROPE SWINGING TIPS: After grabbing onto a dangling rope, continue holding Action to hang on and wait for Lara to stop swinging. Then press Down to slide to the bottom of the rope. This will give you the longest possible swing. Press Left/Right to rotate as needed and then briefly press Look to check your orientation. If you're aiming for a ledge, there's a little more leeway, but if you're trying to swing and grab a second rope, you'll need to be very precise. Press Sprint/Dash once to take a practice swing without letting go. Then wait for Lara to stop swinging and adjust her angle with the Left/Right buttons as needed. Once you have the angle right, press Sprint once to swing forward. Then press Jump at the farthest point in the swing to leap off the rope. If you're trying to grab a second rope, continue holding Action to grab and hang on. Then repeat these steps as needed. In the area where there's a third rope, you shouldn't need to adjust the angle to jump from the second rope to the third. Just shimmy down to the bottom of the second rope, press Sprint to swing forward, then jump and grab.
TRAPDOOR BUG IN THE REMASTER: If you save the game after using the torches to open the trapdoor leading to secret #6, then reload, you may encounter a bug in which the trapdoor closes and can't be reopened. This appears to happen only if you save in certain spots. Specifically, if you light the torches then save the game near the open trapdoor, or in the room below the climbing pole, then reload, the trapdoor should remain open. However, if you move into the room with the dangling ropes (or farther in that direction), save, then reload, the trapdoor will be closed. The torches remain lit, so there's no way to reopen the door. I recommend climbing down into the secret area immediately after opening the trapdoor. You should then be able to save freely in the rooms below. This is apparently a problem in the Steam and Switch versions. I'm not sure about the others.
FYI: According to an article about senet on the Israel Museum web site: "During the New Kingdom [ca. B.C. 1550-1070], tomb walls bore representations of senet players, for the game had acquired a religious-magical meaning, symbolizing the passage of the deceased through the netherworld, his resurrection dependent upon his winning the senet game. The last five squares were given new markings, reflecting the desired arrival in the divine domain of eternity."
Senet Links:
- Wikipedia entry on Senet.
- The Metropolitan Museum of Art's Senet page.
- To play online, check out this interactive senet game for the Chrome browser. There are also several Senet mobile apps in the Play Store and App Store.
For more information about the real-life Semerkhet, a king from Egypt's 1st Dynasty, visit Tomb Raider Horizons.
‡NOTE ON VIDEO GUIDES: Eldin's videos don't always follow the same strategies I use in my walkthroughs, but if you prefer that format, I think you'll find them very useful.
WAS THIS WALKTHROUGH HELPFUL? If not, I apologize and invite you to contact me with any questions. If you need help right away, I recommend the r/TombRaider subreddit. Other fan-run forums are listed at tombraiders.net/stella/community.html. If this site was useful, please consider supporting it financially or in other ways. For details, visit tombraiders.net/stella/support.html. As always, I welcome your corrections/suggestions. Thank you!
Copyright © 1999- Stellalune (). Feel free to copy or print this walkthrough for personal use. By all means, share it with friends, but please include this credit line so people can send me their feedback. No part of this walkthrough may be reproduced on another site without permission. Follow this link for details about this site's advertising and privacy policy.
Stella's Tomb Raider Site: tombraiders.net.