Stella's Classic Tomb Raider: Last Revelation Guide
NOTES ON THE REMASTER: This guide has not yet been updated for the remastered game. Revisions are in progress but will take time. I hope this version, based on the classic game, will still be helpful. Thanks for your patience.
LEVEL 11: GUARDIAN OF SEMERKHET
Updated: 2/21/25(†)
LEVEL MAP by VGCartography (used with permission)
Last Revelation Remastered Video Walkthrough by Eldincy‡
Kills: 6 Items: 17, including Torch, Golden Vraeus, and Guardian Key Secrets: 3*
NOTE: I have not included the Guardian in this total because he cannot be killed. Also, there are 16 items in the level (not including the torch and 2 artifacts), but 14 is the maximum you can actually retrieve. Details are in the section on secret #3.
Drop through the hole in the floor directly ahead of the starting position. (screenshot) Slide down the ramp into a hallway with a circular blade trap. To get through, stand Lara as close to the middle of the trap as possible without actually touching the blades, then roll as they open. (screenshot) (Other methods are included in the previous level where you first encounter this type of trap.) Continue around the corner, pass through a second circular blade trap, and then slide down another ramp.
MAP ROOM: Here we have a three-dimensional map, reminiscent of the one in Raiders of the Lost Ark, laid out on the floor. The map includes models of the Pharos of Alexandria, the Sphinx, and several pyramids and other landmarks. Note the 2 golden receptacles on the walls. (screenshot) You'll need to find artifacts to fill them. For now, climb into the opening on the west side. (The other ramp is too steep to climb.) Go through the crawlspace to the next room. (screenshot)
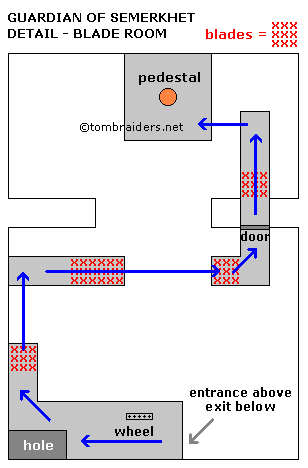
GOLDEN VRAEUS ROOM WITH LEDGES, BLADES, AND TIMED DOOR: This area is shown in the diagram at left and in a series of screenshots. The goal is the artifact on the pedestal on the far side of the room. You'll need to turn the wheel to open the door ahead on the right and then jump across the ledges to get through the door before it closes. To complicate things further, slashing blades pop up from beneath the ledges in the areas marked with red x's in the diagram. As long as you keep moving, you can reach the door in time without being sliced to bits.
BUG NOTE: If you arrive in this room only to find the wheel that opens the door is missing, I've included a possible solution on a separate page.
ADDITIONAL NOTE: If you like, you can do a test run from the wheel to the door without first turning the wheel. The blades will still pop up as you pass, but if you then make your way back to the start, none of them will pop up again. You'll still need to watch out for the ones just beyond the door, however.
Here's the sequence for the timed run: Approach the wheel edge-on and hold Action to crank the wheel 5 times, raising the door on the ledge to the right. (Cranking the wheel 5 times raises the door as high as it will go. Cranking more than 5 times is fine but it doesn't keep the door open any longer.) The door begins to close as soon as Lara lets go of the wheel. So run forward around the left side of the wheel or take a standing jump over the left side of it. Run/jump forward and around to the right to avoid the hole in the corner. As you approach the wall, turn right, keep running to the end of the ledge, and jump across the gap to the next ledge. If possible, veer to the right while Lara is in the air so she's ready to go when she lands. Run along the narrow ledge and jump the next gap to land on the L-shaped ledge ahead. Veer left and run (or or sprint and dive, or crawl, or roll) under the closing door. Don't stop until you reach the end of the walkway beyond the final set of blades, but also take care not to run off the edge. (screenshots)
If you fall off the walkway while attempting the timed run, either reload your last save or make your way back to the south end of the room, avoiding the square depressions in the floor, some of which contain concealed blades. Go through the opening behind the pillar that supports the wheel. (screenshot) Climb the ladder and go through the crawlspace to get back to the wheel so you can try again.
Once you make it through the timed door, jump over to the ledge with the pedestal. Approach the pedestal from the rear to avoid the 3 blades that shoot out from the front and sides when you take the GOLDEN VRAEUS (1). (Or grab the artifact and immediately hop back.) Run off either side of the ledge land on the slope below and slide down to the floor. Now make your way back to the other side of the room, avoiding the square depressions since some of them contain concealed blades. Climb into the small opening behind the pillar that supports the wheel. (screenshots)
Follow the short passageway to a ladder. Climb up, then go through the raised crawlspace to get back to the ledge with the wheel. Go through the doorway near the wheel, then the crawlspace beyond, which leads back to the MAP ROOM.
Use the GOLDEN VRAEUS in the triangular receptacle on the south side of the room. (screenshot)
Cutscene: The mechanism on the ceiling activates, tracing a path over the map with a beam of golden light. When the beam alights on one of the pyramids, it opens revealing a pyramid-shaped key. (screenshot)
Step onto the map, take the GUARDIAN KEY (2), and use it in the other receptacle to open the nearby trapdoor. Drop in and slide down the long ramp to the hall below.
GUARDIAN HALLWAY: At the end of the hall to the left is a barred door. You'll return here later. For now, go to the right. (screenshot) As you pass the two smaller barred doors, you can hear something banging on the other side. (EEK!) Continue to the slight hump in the floor and pick up a small medipack (3). (screenshot) Do not continue along this hallway toward the lever. Doing so will release the GUARDIAN. It's possible to complete the next bit of business with him running around but much easier without.
Jump to grab the handholds on the ceiling and monkey swing back the way you came. Just beyond the ramp where you came in, 2 bats (1-2) will attack. If you don't mind taking a little nibbling damage, just keep going. Otherwise, drop to the floor to kill them. Then go back to the corner where you found the medipack, grab the bars on the ceiling, and start monkey swinging again. Just before the end of the long hall, you'll come to a small opening high on the left wall. Swing toward it so Lara is hanging right up against the wall, drop and grab the edge, then pull up into the opening. Crawl through a fairly long passage to the next room. This is SECRET #1 (38/70). (screenshots)
ROOM WITH FLAME NICHES: If you haven't already killed the 2 bats (1-2), do that now. Just be careful not to fall off the ledge as you fight. Now drop down, taking care not to land in front of any of the 4 flame niches. Retrieve the shotgun shells (4) on top of one of the chests near the west wall. Wait for the flame to cycle off. Then reach into the west niche twice: once to get a box of wideshot shells (5), then again to operate a mechanism. This makes the flame in the opposite (east) niche begin to oscillate. Take the explosive arrows (6) sitting on another chest. Wait for the flames to cycle off. Then use the east niche twice to get Uzi clips (7) and operate another mechanism. This turns off the flame on the north wall permanently and causes the flame in on the south wall (near the ladder) to oscillate. Again, wait for the flames to cycle off. Then reach into the south niche to get a large medipack (8). Do not use the north niche. There are no goodies inside, only a mechanism that releases a swarm of beetles. When you have everything, climb the ladder and dismount on the right. Return through the crawlspace the way you came and drop down into the GUARDIAN HALLWAY. (screenshots)
GUARDIAN HALLWAY (again): Follow the hallway around the corner toward the lever near the barred doors. You should not need to pull the lever. Just stand on either side of the doors and wait a moment for the GUARDIAN to burst through. If that doesn't work, then go ahead and pull the lever to let him out. (screenshots)
The GUARDIAN is an armored bull. He can't be killed, so don't bother shooting at him. He does, however, pack quite a punch when he gores Lara with his horns. So try to avoid him as you explore the rest of this area. Start by running through the door where the bull came from. Follow the passageway to the end. If you sprint or taking running jumps on the straightaways, you can easily outrun the bull. On the way you'll pick up an escort of 3 bats (3-5). You can shoot them while running or ignore them for now. In the room at the end of the hallway, grab the small medipack (9) in the middle of the floor. Then hop up onto the low ledge near the rectangular niche. Now you can shoot the bats and the GUARDIAN will basically ignore you. (screenshots)
OPENING THE SECRET DOOR: Notice the 2 unlit sconces mounted on the side walls. You'll need to light them in order to open the door in the corner. Reach into the niche to grab a wooden TORCH (10). Run back down the hallway to the bend just before the open doors and lever. Jump onto the small platform (another safe spot) and use the flaming sconce mounted on the wall to light your torch. Wait here on the platform for the GUARDIAN to approach. He should then ram into the wall next to where Lara is standing, giving her a little head start while he sorts himself out. Run back to the room with the 2 sconces and use your torch to light them. This opens the closed door near the torch on the right. (screenshots)
SECRET BASEMENT ROOM: Drop down through the door you just opened. You don't need the torch but you can bring it with you to conserve flares. The GUARDIAN can't follow you here, so you're safe for now...and you've found SECRET #2 (39/70). Continue along the passageway, which leads underneath the GUARDIAN HALLWAY to a small room with shotgun shells, a large medipack, and normal crossbow ammo (11-13) on pedestals. Drop the torch if you're still holding it. Then approach each pedestal on a diagonal to avoid the blades that slash out when you take the item on top. (Or grab each item and quickly hop back.) When you take the medipack, a spiked ball drops down from a the ceiling, so avoid it as well. Return along the passageway and climb back up to the room with the niche and sconces. (screenshots)
GUARDIAN HALLWAY (again): Run all the way down the hall, past the lever, past the hump in the floor at the corner, past the ramp where you slid into this area, and past the secret crawlspace, to the barred door at the far end of the hall. Again, try to avoid the GUARDIAN when you encounter him, and keep an eye out for another bat (6) near the end of the hall. Position Lara in front of the barred door, but outside the narrow alcove so you have room to maneuver, and wait for the GUARDIAN to charge. When he's nearly upon you, jump to the side out of the way. He should then break the door down for you. (screenshots)
BIG ROOM WITH FLAMING CHANDELIER AND EYE SYMBOLS: Run through the busted door, then sprint down the ramp and up into the middle of the next room. Note the 3 eye symbols on the square blocks—one directly ahead as you enter, two flanking the entrance behind you. You'll need to play matador again, positioning Lara in front of each symbol so the GUARDIAN charges and smashes it. Use the Look button so you can see the bull coming and try to jump out of the way as late as possible without getting gored. Use medipacks as needed. (screenshots)
You only need to have the bull break two of the symbols to start: the single eye on the west side of the room and the one to the left of the entrance when facing it. When these two are broken, a door opens to the right of the single symbol. Run through this door. At the end of the hall make a U-turn to the right and climb the ladder to the upper level. (screenshots)
NOTE: If the guardian charges but doesn't smash the first symbol, immediately run across the room to the next symbol. You want to give him a nice long run-up so there's power behind his charge. If the guardian smashes the first symbol but misses the second one, run back to the first symbol, even tough it's already broken. Lure the guardian to it, then run back across the room to the second symbol and try again. Also, if you don't care about getting all the secrets, you can just have the bull smash the first symbol, then the third, to open the door the left of the first symbol. (screenshot) This leads directly to the level exit.
Once you reach the upper level of the ROOM WITH THE CHANDELIER AND EYE SYMBOLS, climb the steps and head to the left (north) side of the room. Vault up onto the low ledge and climb another short flight of steps leading up to the left. Enter the room at the top cautiously, avoiding the spiked ball that drops from the gray trapdoor in the ceiling. Pick up Uzi clips, shotgun shells, and a small medipack (14-16) from the ledge. Then return downstairs to the upper level of the EYE SYMBOL room. (screenshots)
Follow the walkway around to the opposite (south) side of the room. Climb through the hole in the ceiling above the hump in the floor to discover SECRET #3 (40/70). Again, move forward carefully to avoid another spiked ball that drops from the ceiling. On the pedestals are a small medipack, shotgun shells, and a large medipack (17). Take your pick because you'll only get one. When you take the first item, the other pedestals ignite, so you can't get the items without catching fire. Be careful on the way out. Another spiked ball drops from the gray trapdoor above the hole in the floor. If you crouch and crawl backwards to the edge, you can drop down safely. (screenshots)
If you haven't already made the GUARDIAN break the third eye symbol, you can do this fairly easily from above. Go around to the southeast corner of the walkway and jump on top of the pillar with the symbol. Dangle Lara from the edge of the pillar above the symbol and wait for the GUARDIAN to approach. Traverse around the corner to whichever side is nearest the bull. Then traverse back to the side with the symbol. The bull should then charge and smash it. If this tactic doesn't work for you, drop down, lure the bull away from the symbol, and then lure him back to it just as you did with the others. (screenshots)
When the third symbol breaks, a door opens on the opposite side of the room, just to the left of the first symbol. Drop down, roll, and run/sprint through that door. Continue forward, then right, to the end of the hallway. Climb the ladder to end the level. (screenshots)
The subsequent FMV sequence, in which Lara confronts the treacherous guide and hops a train heading to Alexandria, is covered in the separate Cinematics section.
BUG NOTE: Some PC users have experienced a game crash following this movie. Some possible solutions are included on a separate page.
*NOTE ON SECRETS: There are 70 secrets in the entire game. These are marked "(x/70)" in this walkthrough. To check your progress in-game, press Pause (P on keyboard, Start on PlayStation or Dreamcast controller) then choose Statistics. At the end of this level, you should have 40/70.
†UPDATE HISTORY: 5/17/00 - Last edit I began tracking individual updates.
4/18/11 - Added notes on bug involving missing wheel in the Golden Vraeus room.
5/5/19 - First major update since this walkthrough was created in 1999. This revision includes many new screenshots as well as various other corrections and clarifications.
1/23/25 - Added running item and kill counts, which hopefully will be useful in the upcoming Remaster.
2/21/25 - Added VGCartography's level maps, with permission. Visit VGCartography on DeviantArt and follow on Twitter/X and YouTube for more fantastic game maps.
ACKNOWLEDGEMENTS: Special thanks to the participants in the alt.games.tombraider newsgroup and the old tombraiders.com forum, without whom parts of this walkthrough could not have been written. Thanks also to Chris M., Frances, Jay P., and Nick for their help on this level.
FYI: The Uraeus (written "Vraeus" in the Roman alphabet) is a stylized depiction of a rearing serpent, which in ancient Egypt symbolized sovereignty, royalty, and divine authority—concepts that were very much intertwined. The particular winged cobra symbol used for the in-game artifact resembles one of the treasures found in the tomb of Tutankhamun. For more information, check out the Uraeus entry on Wikipedia and this page on the Tour Egypt site.
‡NOTE ON VIDEO GUIDES: Eldin's videos don't always follow the same strategies I use in my walkthroughs, but if you prefer that format, I think you'll find them very useful.
WAS THIS WALKTHROUGH HELPFUL? If not, I apologize and invite you to contact me with any questions. If you need help right away, I recommend the r/TombRaider subreddit. Other fan-run forums are listed at tombraiders.net/stella/community.html. If this site was useful, please consider supporting it financially or in other ways. For details, visit tombraiders.net/stella/support.html. As always, I welcome your corrections/suggestions. Thank you!
Copyright © 1999- Stellalune (). Feel free to copy or print this walkthrough for personal use. By all means, share it with friends, but please include this credit line so people can send me their feedback. No part of this walkthrough may be reproduced on another site without permission. Follow this link for details about this site's advertising and privacy policy.
Stella's Tomb Raider Site: tombraiders.net.