STELLA'S TR2: GOLDEN MASK REMASTERED WALKTHROUGH
The Golden Mask Remastered guide is now complete. It includes all achievements/trophies. For the other guides that have not yet been updated, I will continue to link to the ORIGINAL WALKTHROUGHS, which cover all the basics. Please check the TR2 introductory notes for info on my process, modern vs. classic tank controls, etc. Follow this link for the archived classic walkthrough.
TO START A GOLDEN MASK PLAYTHROUGH, open the Passport, turn the page to the New Game screen, and select Golden Mask. You do not have to complete the main game first, but these levels are designed to be more challenging.
BACKSTORY: Our intrepid heroine, Lara Croft, always on the lookout for a new challenge, comes across information that leads her to Melnikov Island, part of the Aleutian chain in the Bering Sea. These clues—a faded photograph of an Inuit whale hunter holding what looks like an ancient gold mask; a newspaper clipping from 1945 describing the conflict over gold discovered in Alaska; and a Russian blueprint detailing a fortified mining base—are shown on the game's intro screen. Naturally Lara's interest is in the artifact, rumored to be the famed Golden Mask of Tornarsuk. According to legend, the mask is a "greater spirit," an object that bestows the power of reanimation on its wearer.
In this first level, Lara reaches Melnikov, only to discover that treasure hunters have arrived first. These mercenaries are part of an organization known only by the acronym A.V.A.L.A.N.C.H.E. (Your guess is as good as mine as to what the initials stand for.) Now Lara must outwit and outfight her rivals in order to access the heart of the old complex.
LEVEL 1: THE COLD WAR (Remaster)
Updated: 10/17/26(†)
Starting Inventory: small and large medi packs, 2 flares, shotgun (with 2 shells), and pistols (unlimited ammo)
Pickups: 71, including harpoon gun, M16 assault rifle, automatic pistols, Uzis, 2 keys, and 3 secrets*
Kills: 39 (44)
NOTE: 44 is the maximum number of kills. There are 39 if you count only hostiles. The spirit warriors are similar to the monks in Barkhang Monastery. If you don't attack them, they will help you fight the bad guys, and you'll unlock an achievement/trophy for your trouble. (See below.) However, if you shoot one of them, even by accident, you'll have to fight them all.
LEVEL MAP by VGCartography (used with permission)
The Cold War Video Walkthrough by Eldincy‡
ICY POOL: The level begins with a long drop into cold water. There's a great white shark (1) in the pool. So you'll probably want to head for dry land immediately. From the spot where Lara splashes down, swim forward and slightly right, toward the snowy ledge that slopes down to the right and has a pack of flares (1) sitting on top. Quickly swim around to the right side of that ledge and climb out of the pool, as dramatic music plays and the shark closes in. Shoot the shark from above with pistols. There's also a snow leopard (2) prowling around in the cave. You can take care of it now if you like. (screenshots)
Or, if you'd rather fight the shark in the water, from the starting position where you first drop into the pool, swim straight down. You'll find some harpoons (2) on the bottom. (Ignore the harpoons on the nearby crate. Approaching them spawns the shark, and you're not ready yet.) Once you have the first bunch of harpoons, get air if you need it, then turn so the harpoons on the crate are behind and to the left. Then swim down into the deeper area strewn with crates and barrels. Pick up 2 more bundles of harpoons (3-4) on the bottom and the loaded HARPOON GUN (5), sitting on a box in the corner. Once you have it, get air, then swim back toward the crate with the harpoons you ignored earlier. Approach it to spawn the shark, then quickly roll and swim away to get some distance. Roll again and harpoon the shark as it approaches. It takes 4 harpoons if you don't miss. (screenshots)
Once the shark goes belly-up, retrieve any remaining pickups. In addition to the flares (1) on the snowy ledge, there are 5 bundles of harpoons and the loaded HARPOON GUN (2-7). These screenshots show all.
NOTES: If you find all four hidden weapons in this level, you'll unlock the "Capitalist Accumulation" achievement/trophy. The HARPOON GUN is the first. Also, the dramatic music may restart several times as you explore, but there's only one shark.
The first secret is in an underwater tunnel in the far left corner of the pool (i.e., left when Lara's back is toward the wide cave opening). If you're having trouble locating it, begin by treading water with the cave behind Lara. Swim forward along the left side of the pool. Dive down and swim straight ahead, through an icy tunnel with rusted barrels at the end. As you emerge from that tunnel, make a U-turn to the left into a small, rectangular opening in the ice wall containing SECRET #1, the gold coins (8). Grab the treasure and return to the surface. (screenshots)
Again, climb out of the pool onto the small, angled ledge on the left side of the cave opening. Get the flares (1) and shoot the leopard (2) in the cave if you didn't do so earlier. Then hop over to the area where the leopard fell. (screenshots)
CONSERVING FLARES: This area is dimly lit but fortunately not pitch-black. I brighten the screenshots in Photoshop and use more flares than you'll probably need. The remastered game now includes the option to increase brightness (under Controls > Brightness Default). But if you prefer playing with atmospheric lighting and flares, you can conserve flares if you save before entering dark areas. Then use as many flares as you like during your initial exploration. Once you know where to go, reload and proceed, using only as many flares you need.
LEOPARD/SNOWBALL CAVE: Just inside the cave is a slope with 2 boxes of shotgun shells (9-10). You can pick up the first box without any trouble. But when you take the second box, a huge snowball rolls down from the right. Backflip out of the way to avoid it. On the left is a movable crate. Push it once to find a small medi pack (11) underneath. (screenshots)
Vault up onto the low ledge separating the two sides of the cave, but don't hop down on the other side yet, or you'll trigger another avalanche. Two more leopards (3-4) emerge from the connecting passageways on the right. One cat prances around ahead, near the two stone doorways. The other appears in the in the area where the first snowball originated. You can shoot both from this safe ledge. (screenshots)
To trip the next 2 rolling snowballs, walk to the edge of the low ledge facing the two stone doorways. Hop back. Then take a standing jump forward and immediately backflip onto the ledge as the snowballs roll down from the left. Once they've settled, step down off the ledge and approach the left doorway. Take just one step into the doorway to spawn another leopard (5) in the next cave. Hop back once, backflip onto the ledge where you started, and shoot the leopard. (screenshots)
Now you can explore the caves at your leisure. Go through either stone doorway and turn left to find a box of shotgun ammo (12). Return to the area where the 2 snowballs landed and pick up some flares (13). Approach the snowball on the right. Then turn left and you'll spot more shotgun ammo (14) near the end of the tunnel. Turn around and follow this wide tunnel straight ahead, past the snowball and into the ice-walled area where the first snowball originated. When you can't go any farther, turn left and follow the rocky tunnel to another box of shotgun shells (15). You should now have everything. (screenshots)
Return to the snowy slope where the last 2 snowballs originated and start up the hill. The pit ahead isn't deep; you can jump across or go around it on the left side. Beyond the pit, keep left as you continue toward the top. Quickly move past the snowy alcove on the left to avoid 2 clusters of snowballs rolling in from ahead and from the right. At the top of the slope are more shotgun shells (16). Turn around, come back down the slope a bit, and then turn left into the doorway where the the snowballs came from. Dramatic music plays, but the drama happens in the room above, so no need to panic. Climb the ice ladder to the top. (screenshots)
MINE COMPOUND - FIRST AREA AND MOVABLE CRATES: When you approach the large medi pack (17) at the top of the ladder, a door at the upper end of the room opens, and an enemy in a white snowsuit (6) makes his way down toward you. Shoot him as he approaches along the right wall. Then climb onto the ledge above where you found the medi pack. From here you should be able to shoot the mercenary in the orange parka (7) at the top of the room without him returning fire. Search the bodies for 2 sets of M16 clips (18-19). (screenshots)
Exit through the door where the mercenaries came in. Jump over the snowbank at its lowest point. Grab the movable crate on the right. Pull it once, go around or over it, and push it once from the other side. Behind it is a second movable crate. Pull it once. Then climb over it to find a little tunnel containing a small medi pack and shotgun shells (20-21). Return to the first crate and climb on top of it. Then climb the ice ladder to the top. (screenshots)
ZIP LINE: Walk forward underneath the zip line to the edge of the cliff for a nice view and a pack of flares (22). Turn around and head back toward the opening where you climbed up from the caves. Ahead on the left is a small medi pack (23) sitting on a rock. Grab it and then climb up to the zip line handle. If you stand here for a little while, an eagle (8) will fly up from the chasm. Kill it now to avoid tangling with it later on. (screenshots)
Hold Action to grab the zip line handle and ride it down across the deep chasm. Let go a little before the end to land on the icy slope and slide safely into a shallow trench. (screenshots)
FAR SIDE OF CHASM: Kill 2 more eagles (9-10), plus the first eagle (8) if you didn't meet it at the top of the zip line earlier. Follow the trench toward the building. A leopard (11) patrols the path above on the right. While standing in the trench, get a lock on it with your pistols and jump up and down while firing to kill it without taking any damage. Or, climb onto the ledge near the frosty window and shoot the leopard from there. (screenshots)
NOTE: You'll need a key to open one of the doors in the area behind the window. I recommend waiting until you've obtained the key to explore there.
Climb onto the ledge near the frosty window (if you haven't already done so). Turn to face out over the trench where you killed the eagles. Then angle Lara a bit to the right and jump over to the flat ledge set into the the ice wall. Do not rush forward. Beyond this ledge is another trench that runs parallel to the first trench. This is a snowball hazard. Hop down, turn left, and walk forward slowly. As soon as Lara steps on the second tile on this path, the snowball will roll from above and behind. Immediately hop back as the snowball sails overhead. (Or, if you're having trouble hopping back in time, try approaching the trigger tile at the left corner. Step forward to trip the snowball. Then hop back out of the way. Or, approach straight on and backflip instead. Lara will take some damage but should survive.) Follow the rolling snowball into the pit to find the M16 ASSAULT RIFLE (24). (screenshots)
NOTE: The M16 is the second of four hidden weapons needed for the "Capitalist Accumulation" achievement/trophy.
Climb out of the pit, turn right, jump over the ice wall, and slide down into the trench where you killed the eagles earlier. Jump up the icy slope on the other side of the trench and pick up more shotgun ammo (25). (screenshots)
DESCENDING TO THE BOTTOM OF THE CHASM: Turn slightly to the left and jump into the depression ahead. Climb onto the ice block ahead on the left. (You can also get here by walking up the path alongside the building.) On the other side of the low hill of ice is the deep chasm you zipped over earlier. Step down onto the ledge at the rim of the chasm. Then turn around, hang from the ledge, and climb the long ice ladder to the bottom. (Quickly press and release Action to descend ladders faster.) Follow the long tunnel, killing a leopard (12) along the way. At the end of the tunnel, climb onto a ledge where you'll find SECRET #2, the gold bars (26), plus 3 boxes of shotgun shells (27-29) in one pile. (screenshots)
Turn around, follow the long passageway back to the ice ladder. Then climb to the top. (screenshots)
NOTE: You can also drop down through the opening with the wooden sides, near where you found the gold bars, but you'll end up all the way back in the LEOPARD/SNOWBALL CAVE, at the top of the slope where the 2 rolling snowballs originated. Head down the slope and turn left into the cave with the first ice ladder. Climb back to the top, go through the room where you killed the 2 mercenaries. Then climb back up to the zip line and ride it down again.
BUILDING COMPLEX - GUARDROOM KEY: At the top of the ice ladder leading out of the chasm, vault up onto the ledge straight ahead, go forward over the low rise, then turn right and approach the building. Turn right again and follow the icy path that runs along next to the building. At the end of this path, hop down, turn left, and enter a room with one wall made of bars. Another guy in white (13) approaches as you round the corner to the right. Kill him and take his M16 clips (30). (You'll also see a small medi pack on the other side of the bars, but you can't get it yet.) (screenshots)
In the next room, behind some rusty barrels, you'll find the GUARDROOM KEY (31). Take it and return to the lower end of the room, where you came in. Pull the switch in the barred alcove to open the door on the other side of the bars. Another orange-jacketed mercenary (14) comes through, but he's not smart enough to shoot through the bars. So you're safe for now. (screenshots)
Turn so the switch is behind Lara then head back outside. Climb up on the right—not straight ahead or you'll fall into the chasm. Follow the path alongside the building to the end. Turn right and shoot out the frosty window with your pistols. Step inside and use the key you just found in the lock. This opens the GUARDROOM door, just to the left. (screenshots)
GUARDROOM: Enter and kill the orange-jacketed mercenary (14) you let in earlier. Pick up automatic pistol clips and shotgun shells (32-33) from the floor of the GUARDROOM. (screenshots)
For now, ignore the door where the mercenary entered and return through the door you just unlocked. Straight ahead in the rocky cave is a movable crate. Push it once to open up a dark, snowy passageway to the right. Take a standing jump up the slope, then a running jump across the deep pit to grab the opposite edge. Pull up. Vault onto the step ahead, turn right, jump over the icy slope, and slide down the other side into a depression containing the AUTOMATIC PISTOLS (34). (screenshots)
NOTE: The AUTOMATIC PISTOLS are the third of four hidden weapons for the "Capitalist Accumulation" achievement/trophy.
Move to the top of the slope opposite the one you just slid down. Climb back into the building there. You'll find yourself in a small, low-ceilinged room with barred windows. Take the automatic pistol clips (35) from the ledge on the left and exit through the other doorway. Cross the snowy area between the buildings and enter the rocky tunnel ahead on the right. (This is the same area with the keyhole and wooden crate from before.) Turn left into the GUARDROOM. Go through and out the other side. Then follow the walkway to the end to find the small medi pack (36) you saw earlier through the bars. (screenshots)
SECOND CHASM WITH TWO RAMPS: Turn around and backtrack about halfway along the walkway. On the right is a snowy ledge that dips down in the middle. Step up onto this ledge for a panoramic view of the chasm below and a little sniper action. Hold Walk so Lara doesn't slide off the edge. There are 2 mercenaries (15-16) below, one on the left and one on the right end of the chasm. Go for the one on the left first using pistols or M16. It may take a little while, since he runs in and out of the cave. When he falls, walk up the snowy ledge toward the right end. From there, you should be able to kill the guy in white down below using the M16. (screenshot)
You may also be able to target a third mercenary (17) on the roof of the building above the white-suited guy. (screenshot) But if you get bored waiting for any of these enemies to emerge, use the alternative tactics described, use the alternative tactics below.
Return to the lowest part of the snowy ledge. The camera shifts to indicate the path forward. Stand near the lowest point of the ledge, step off the edge, and slide without jumping to land safely on the long ramp coming out of the cave. Turn so Lara's back is toward the cave and shoot the eagle (18) that soars in from above. You can back up a little, but don't go too far into the cave yet. If the third mercenary (17) on the far roof is still alive, you can target him from the end of the walkway using the M16. Or, wait and deal with him later. (screenshots)
Alternatively, instead of shooting the mercenaries from above, slide down the chasm wall onto the ramp, as described above. Shoot the enemy in the orange parka in the cave on the left, then the eagle, then the one in white on the other side of the gap. You should be able to target him with pistols. Switch to the M16 and take out the mercenary on the roof above where the white-suited guy fell.
Enter the cave with shotgun ready. A leopard (19) springs out from behind the manmade column as you approach. Two well-placed shots will bring it down. Pick up M16 clips (37) from the fallen mercenary and a small medi pack (38) lying in the back right corner of the cave. Pull the switch at the back left to open a door on the other side of the chasm. (screenshots)
IMPORTANT: There's a SnoCat parked in a side room off the cave with the switch. The "Snow March" achievement/trophy requires you to finish the first two levels without using snowmobiles. So we'll proceed on foot. If you'd rather ride, follow the classic guide instead.
CROSSING THE CHASM (ON FOOT): Return to the mouth of the cave and step down onto the small ledge to the left of the long ramp. There's another leopard (20) below. Shoot it with pistols from above. Then turn around, hang from the edge, and climb down the long ice ladder. Grab some shotgun shells and flares (39-40) at the bottom. Cross the chasm floor and climb the other ice ladder. If you didn't deal with the orange-jacket guy (17) earlier, he'll be waiting at the top. Kill him quickly. Grab his automatic pistol clips (41). Then carefully drop onto the ramp where the white-suited enemy fell and take his M16 ammo (42). (screenshots)
NOTE: There is another passage beyond where the orange-jacket guy fell. Ignore it for now. We'll return that way shortly.
OPEN AREA WITH THREE WOODEN BLOCKS: Exit through the wooden door you opened earlier using the switch in the cave. Run out into the open, climb onto the nearest raised wooden block, and await the arrival of a goon on a snowmobile (21) with mounted guns. Stay on top of the block, so he can't run Lara over, and use the automatic pistols or M16 to take him out quickly. Pick up the M16 clips (43) on top of the first block, automatic pistol ammo (44) on a snow ledge to the right of the door where you came in, and more M16 ammo and a large medi pack (45-46) on the third block. (screenshots)
Again, if you're after the "Snow March" achievement/trophy, ignore the enemy's snowmobile and continue on foot. Go through the doorway opposite the third wooden block. Proceed through the building to emerge on the ledge above the chasm with the two ramps, where you killed the guy in the orange jacket earlier. (screenshots)
SNOWMOBILE AREA WITH ICY WINDOWS: Move to the outer corner of the ledge and jump across the gap onto the slope below the 3 frosty windows. Take a standing jump up the slope. Use pistols to shoot out one of the windows. Then switch back to the M16 or auto pistols. Run across the open area and climb into the wide opening on the left. Soon another armed snowmobiler (22) rides in from the far side of this area. You can shoot him from here without being run over. He can still fire back, though, so try to kill him quickly. (screenshots)
FROZEN POOL AND CORRUGATED METAL SHACK: Turn around and enter the area beyond the wide opening. Here you'll see a frozen pool and a little shack. Find the switch in the dark corner on the left. Use the switch to cause an avalanche that breaks the ice on the surface of the pool and alerts a mercenary (23) inside the shack, who comes out to investigate. Kill him and take his small medi pack and M16 clips (47-48). You can then investigate the SHACK, but this is not necessary. (screenshots)
NOTE: There's no cutscene when you pull the first switch, but in addition to triggering the avalanche, it also removes one of the walls of ice outside in the SNOWMOBILE AREA. (screenshots) The second switch, inside the shack, doesn't seem to do anything. You can use it if you like, but it isn't necessary to complete the level. When you do, a cutscene shows the closed wooden gate on the far side of the SNOWMOBILE AREA (screenshot); however, this gate doesn't open now, nor does the metal door near the switch. Both will open later. Maybe this cutscene was meant to play when you use the first switch.
FLOODED PASSAGEWAY: Jump into the deep end of the pool outside the shack. Swim down and follow the underwater passageway. When you come to the concrete opening with the Soviet hammer and sickle, check your air supply. If necessary, you can swim straight up on the left side of the passage to an air pocket. Otherwise, continue through the square opening in the concrete wall, then onward and upward to surface in an icy pool. (screenshots)
NOTE: There are some items on a high shelf at the back of this dark cave. You can't reach them yet, but you'll return shortly.
ICE CAVERN: Wade out of the water and head toward the far side of the cave. Don't worry; the ice floor is safe to stand on. Ahead is a large medi pack (49) up on a tall pillar of ice. There are several ways to reach it. The easiest (using classic tank controls) is to position Lara with her chest against the pillar and her back toward the snowy slope on the left. Then backflip onto the slope, quickly jump and grab the edge of the pillar, then pull up. (screenshots)
Alternatively, after wading out of the pool, move into the middle of the cavern until Lara is standing beneath the elevated walkway made of ice. Turn left and move between the two walls of snow. Climb onto the flat ledge straight ahead. Make a U-turn to the left and climb up to the beginning of the ice walkway. Take a running jump across the fragile ice tiles to land on top of the angled pillar between the first and second sections of the walkway. Turn right and run off the edge onto the next ice walkway. Keep running forward as the ice collapses under Lara's weight. The column at the corner of the walkway is solid, so you can pause there if you like. Then run across the last section of ice tiles to the medi pack (49). (screenshots)
As you cross the ice walkway, a transparent human figure (1) appears on the block above the medi pack. More of them patrol the cavern floor far below. I called them "ice men" in the original guide, but the level designers referred to them as "restless spirits." These spirit warriors are allies so don't harm them. Like the monks in the Barkhang Monastery in TR2, they won't attack unless Lara shoots first. They'll even help her fight enemies. You will also unlock the achievement/trophy "Na Zdorovye!" ("To Your Health!") if you don't provoke them.
NOTE: If you insist on getting all the kills and don't care about harming benevolent beings, you can fight the spirits instead. There 4 in this level: one on the pillar with the medi pack and 3 more below. They are tough opponents in close combat, but you can take them out easily with pistols from a safe distance. Shoot the first from the solid column halfway along the ice walkway and the others later from the ledges alongside the long ice slide on the other side of the cavern. (screenshots)
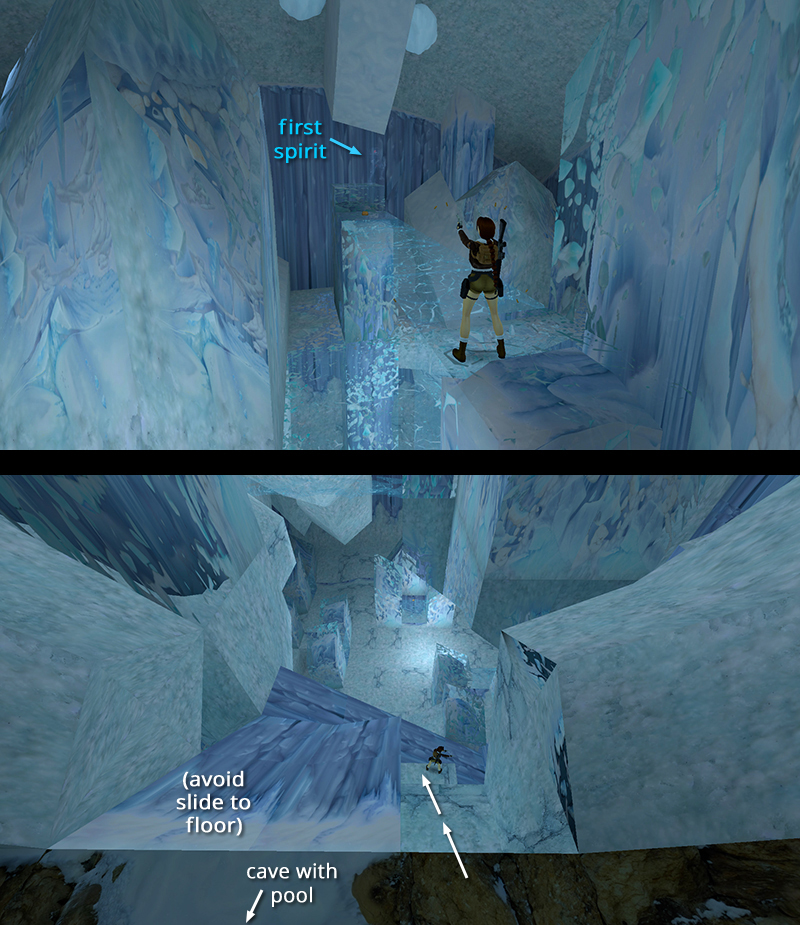
CLIMBING DOWN TO THE ICE CAVERN FLOOR: When you take the large medi pack (49) on the tall ice block, two giant snowballs crash through the floor, opening up the lower area of the cavern. If he's still alive, the first spirit warrior (1) drops down to the floor. For whatever reason—wind chill...magic?—the pool where you entered also freezes over so you can reach the pickups on the high shelf. So, before descending, take a little detour to get them. (screenshots)
If the ice tiles are still intact, you can take that route. It's a lot more exciting now with the hundred-foot drop! First run straight from the pillar where you found the medi pack to the corner block, which is solid. Then turn right and run across the next section of ice tiles. As you cross the third tile, veer to the left and jump toward the shorter, perpendicular walkway, in order to land on the solid snowbank below it. From there, move forward toward the cavern wall, turn left, and make your way around the outer wall of the cavern. This will lead you back to the pool. (screenshots)
If you shattered the ice tiles in order to reach the medi pack, you can't go back that way. Instead, turn so the open cavern is on Lara's left and take a running jump to the snowy ledge ahead. Go around the mound of clear ice on either side. When you reach the cavern wall, turn left and follow the wall around to the pool. (screenshots)
Cross over the frozen surface of the pool and climb onto the ledge to get some Uzi ammo and grenades (50-51). Return across the frozen pool and slide down the slopes made of bluish ice to the bottom of the cavern. (screenshots)
NOTE: Again, if you're planning to fight the spirit warriors, instead of sliding all the way down, climb down the flat ledges to the right of the slide and shoot from there. (screenshot)
CAVERN FLOOR: There are 3 more spirit warriors (2-4) here, along with the one you met above. Pay attention and they'll lead you to points of interest. SECRET #3, the gold skull (52), is behind some panes of ice near the middle of the cavern. Shoot the ice to get at it. When you pick up the skull, 3 mercenaries (24-26) appear near the bottom of the ice slide. The spirits will help you fight them. If you like, you can hide until everything shakes out. Then kill any remaining enemies. Afterward, search among the bodies for shotgun shells, 2 sets of Uzi clips, and a small medi pack (53-56). (screenshots)
NOTE: Unlike "The End Doesn't Justify the Means" in Tomb Raider 2, the "Na Zdorovye!" achievement/trophy doesn't require you to keep all the spirit warriors alive. You just can't harm them yourself.
CLIMBING OUT OF THE ICE CAVERN: In the corner of the cavern near the base of the ice slide there are two square ice windows. Shoot out the one on the right. (The other is unbreakable.) As you start up this long tunnel, a leopard (27) will charge, but you should have plenty of time to bring it down before it gets to Lara. Just be careful not to shoot the spirit warriors patrolling here by mistake. If necessary, you can run back out of the tunnel and climb onto the ledge on the left. The big cat can't reach Lara here and she can shoot it when there are no friendly NPCs around. (screenshots)
Continue up the long tunnel to the top. Turn right into a small alcove with ice ladders straight ahead and on the right. Climb the ladder on the right into a small, dark hallway. The door on the left opens as you approach. It leads back into the CORRUGATED METAL SHACK. (Again, the switch here doesn't seem to do anything.) Exit through the other door, cross the pool, and climb through the raised opening into the SNOWMOBILE AREA. (screenshots)
SNOWMOBILE AREA (again): Move straight across the open area to the ramp that was previously concealed behind the ice wall. When you pass under the concrete archway, 2 mercenaries (28-29) appear on the ledges ahead: one in orange on the right, one in white on the left. Run up the slope just far enough to get their attention. Then run or backflip down the hill. Use the left side of the archway for cover as you shoot the guy on the right. Afterward, move in along the left side of the opening, turn to face the ledge where the white-suited guy is standing, and jump up and down while firing until he falls. Climb up and steal their stuff: M16 and automatic pistol ammo (57-58), plus some flares (59) sitting on a wooden block partway up the slope. Ignore the wooden gate and switch for now. We've got a date with twin submachine guns. (screenshots)
INTO THE PIT FOR THE UZIS: If you look over the edge near where the white-suited mercenary fell, you'll spot some goodies at the bottom of the deep pit. This area is pitch-black in the classic game, so the pickups stand out more, but it's also more challenging to retrieve them. You'll need to line up the next jump carefully. So follow the screenshots or refer to this short video if necessary. (The video was made in the classic game, but if you're using tank controls, the moves are identical in the remaster.)
Hold Walk as you maneuver Lara into position. Move to the right side of the wooden ledge, turn so the pit is on Lara's left and she's facing the pointed snowbank. Then step forward toward the snowbank and left toward the pit as far you can. Walk one step back from the snowbank. Pivot just slightly to the left so Lara is facing out past the left edge of the snowbank. Release Walk and hop back once to set up the next jump. (screenshots)
Make sure Lara has full health and save before continuing. Now take that running jump and steer to the right while Lara is in the air, so she veers around the pointed snowbank and lands on the slope just beyond it facing uphill. Hold Action as she slides back to grab the edge. Let go, slide, and grab the edge of the second icy slope below. Now traverse to the right into the V where the two adjacent slopes meet. This spot is slightly lower than the rest of the ice wall. As long as you started with nearly full health, you can let go and drop into the pit without dying. Pick up Uzi ammo, a large medi pack, and the UZIS (60-62)! If you found the other 3 hidden weapons earlier, the "Capitalist Accumulation" achievement/trophy will pop when you pick up the guns. (screenshots)
NOTE: While not technically a "Secret," the UZIS are very well hidden. If you miss them or can't manage this sequence, you will have another chance to get them in the next level. The classic guide includes alternate methods for descending into the pit.
Climb the ice ladder near where the UZIS were lying, and you'll emerge back in the SNOWMOBILE AREA. The window you just ghosted through solidifies behind Lara, so you can't go back down the ladder. Turn left, go over the rise and down the other side. Then turn left again to get back to the snowy ramp with the wooden gate at the top. (screenshots)
BEYOND THE WOODEN GATE: Climb onto the wall on the right side of the ramp. Turn to face the concrete archway you just passed under and you'll see a switch in the left corner. Pull the switch to open the wooden gate. Then advance slowly up the slope with pistols drawn. This should allow you to target the white-suited enemy (30) beyond the gate before he spots Lara. If he does start shooting back, side flip from left to right while firing through the doorway. When he's dead, steal the small medi pack (63) he dropped. (screenshots)
MINING COMPLEX TUNNELS - SHAFT 'B' KEY: The next section can be done on a snowmobile, but if you're after the "Snow March" achievement/trophy, continue on foot. Run along the top of the stone wall on the left side of the steep slope. When you can't go any farther, jump over to the top of the slope. Enter the low-ceilinged tunnel and jump across the shallow pit a little way in. Continue past the wooden crate, but don't step down off the edge. There's a snowball trap ahead. Walk to the edge of the wooden opening, hop back once, then take a standing jump to land in the middle of the perpendicular slope. Two clusters of snowballs drop from the ceiling, roll past, and settle on either side of the doorway. (screenshots)
As you move through the doorway into the next room, another mercenary in white (31) appears ahead. If you run to either side of the tunnel you can get a pistol lock. Then shoot while flipping side to side as he approaches. He's carrying automatic pistol clips (64). Continue forward to a large medi pack (65) lying on the ground. When you pick it up, a guy in an orange jacket (32) approaches from the snowball trap area. Roll, dispatch him, and take some grenades and the SHAFT 'B' KEY (66-67) off his body. (screenshots)
Proceed along the tunnel to a wooden door with a keyhole. It's on the right just before the tunnel ends. Use the SHAFT 'B' KEY to unlock this door. (You'll open the metal door at the end of the tunnel shortly.) There's a leopard (33) just inside. I recommend vaulting up into the doorway and immediately hopping back into the tunnel to shoot, rather than running out onto the walkway. If you accidentally fall, it's not a long drop, but it puts you way back at the GUARDROOM. (screenshots)
SHAFT 'B' - LEVEL EXIT: Cross the elevated walkway to the room beyond. Admire the view, then pull the switch to open the metal door you saw earlier. Return across the walkway, re-enter the tunnel, and turn right to get back to the metal door. There's another angry merc (34) inside on the right. If you back away, he tends to retreat and hide, so you may want to use the shotgun at close range to put him down quickly. He drops grenades (68). (screenshots)
Continue into the next room. There are shotgun shells (69) sitting on a box, but before you pick them up, take care of the 2 enemies (35-36) outside on the left. There isn't much room to maneuver, due to the boxes and low ceiling. So break out the heavy weapons if necessary. You can also run out into the open to meet them, but you'll have to deal with an eagle (37) at the same time. When it's safe, take the shells (69) from the box and relieve the mercenaries of a small medi pack (70) and more shotgun ammo (71). (screenshots)
Move out into the open area where the enemies came from. Shoot down that eagle (37) if you didn't already do so. Then continue forward along the alley to the left of the covered, central structure. There is a sniper (38) on top of the high walkway ahead. If you draw pistols as you slowly approach the far corner of the covered structure, Lara will target him, and he probably won't shoot back. If he does, just hop back out of range and try again. (screenshots)
When he falls, go into the covered structure and pull the switch to open the nearby trapdoor. Approaching the switch also triggers the appearance of a second sniper (39) on the catwalk. Deal with him as you did the other. Or, if you're not interested in getting all the kills, ignore both snipers and just pull the switch and run to the trapdoor. (screenshots)
NOTE: If you're not interested in getting all the kills, ignore both snipers and just pull the switch and run to the trapdoor. Just make sure you have all pickups before dropping through the trapdoor, since this is the "point of no return."
Drop through the open trapdoor into an icy pool. Surface and swim through the large, concrete opening. Approach the spirit warrior (5) on the ledge to end the level. (screenshots)
NOTE: If you must have all the kills, don't get too close to the spirit, or the level will end before you can kill him. Instead swim to either side of the tunnel, where Lara can stand. Draw pistols and shoot him. Then continue forward. (screenshot) The "Na Zdorovye!" (don't harm Inuit warriors or spirits) and "Snow March" (don't use snowmobiles) achievements/trophies continue in the next level.
†UPDATE HISTORY: Updates made prior to the Tomb Raider I-II-III Remastered release, including credit for tips sent in by other players, are tracked in the archived classic walkthrough.
10/17/26 - Remastered guide posted. Includes various minor strategy tweaks, many new screenshots, and notes on achievements/trophies. I've also updated the note on the switch inside the WOODEN SHACK (i.e., it doesn't to do anything). With Photo Mode, it's easier to see what happens, or in this case, what doesn't happen.
*NOTES ON PICKUPS, SECRETS, AND KILLS: Like the main game, each level includes three secrets. These take the form of gold coins, gold bars, and and gold skulls. Sometimes they're well hidden, sometimes in plain sight. There is no reward for finding three secrets in a level; however, if you find all 12 secrets in the first 4 levels, you'll unlock a fifth bonus level: Nightmare in Vegas. There's also an achievement/trophy ("Codex of Melnikov") for finding all secrets in a single playthrough, including the 3 secrets in the bonus level, and one for finding all pickups ("Harvest Plan Implemented"). To check your progress, pause the game and select the Stopwatch to open the statistics screen, which shows the running secret, pickup, and kill count. A summary is also displayed when you complete each level.
The game tracks the number of kills but does not indicate the total number possible, and there is no reward for max kills. You'll unlock the "Na Zdorovye!" achievement/trophy if you don't harm any of the friendly NPCs. Notes are included in the relevant sections of the guide.
NOTE ON LEVEL MAPS: Special thanks to VGCartography for the excellent level maps, which are used here with permission. Visit VGCartography on DeviantArt and follow on Twitter/X and YouTube for more fantastic game maps.
‡NOTE ON VIDEO GUIDES: Eldin's videos don't always follow the same strategies I use in my walkthroughs, but if you prefer that format, I think you'll find them very helpful.
DARK MODE: I plan to add optional dark mode for these pages, but my current priority is updating the walkthroughs. Meanwhile, may I suggest a reputable dark mode browser extension, such as Dark Reader? (Download only from trusted sites, like darkreader.org or your browser's official add-on/extension site.)
WAS THIS WALKTHROUGH HELPFUL? If not, I apologize and invite you to contact me with any questions. If you need help right away, I recommend the r/TombRaider subreddit. If this guide was useful, please consider supporting my work financially or in other ways. For details, visit tombraiders.net/stella/support.html. As always, I welcome your corrections/suggestions. Thank you!
Copyright © 1998- - Stellalune (). Feel free to copy or print this walkthrough for personal use. By all means, share it with friends, but please include this credit line so people can send me their feedback. No part of this walkthrough may be reproduced on another site without permission. Follow this link for details about this site's advertising and privacy policy.