STELLA'S TOMB RAIDER 2 REMASTERED WALKTHROUGH
The TR2 Remastered guide is now complete. For the other guides that have not yet been updated, I will continue to link to the ORIGINAL WALKTHROUGHS, which cover all the basics. Please check the introductory notes at the start of the first level for info on my process, modern vs. classic tank controls, etc. This guide covers most but not all possible achievements/trophies. Follow this link for the archived classic guide.
CONSERVING FLARES AND AMMUNITION: This level is DARK. Consequently, I brighten the screenshots in Photoshop and use more flares than you'll probably need. To conserve flares, save before entering dark areas. Then use as many flares as you like during your initial exploration. Once you know where to go, reload and proceed, using only as many flares you need. If you run out of flares, try turning up the brightness in the Controls menu, or fire your unlimited-ammo pistols to light the way.
If you're achievement/trophy hunting, I recommend you hoard a few thousand Uzi rounds for the next level. You'll need to defeat certain tough enemies quickly, and having Uzi ammo to spare will help immensely. If you don't mind spoilers, see here. You may also want to save 10-15 grenades for the final boss fight.
LEVEL 15: TEMPLE OF XIAN (Remaster)
Updated: 8/27/26(†)
Pickups: 40, including Dragon Seal, 3 keys, and 3 secrets
Kills: 37
NOTE: The number of pickups includes the three dragon statuettes and the bonus items awarded for finding all three secrets.
LEVEL MAP by VGCartography (used with permission)
Temple of Xian Video Walkthrough by Eldincy‡
OBJECTIVES: This is another complicated level with lots of deadly traps, side areas, and backtracking. From the pool near the start, swim through an underwater tunnel to a cave with two locked temples. Find a hidden switch to open a trapdoor back at the pool. Go through this trapdoor and navigate several trappy areas to find the switch that opens one of the temples. Return there and pass through more hazards to reach a large room with a dragon statue, where you'll obtain the Dragon Seal. Return to the first temple, where you can use the seal to reach a new area. Explore there to find a Gold Key, which opens a small gate in the pool where you started. Swim through the flooded area behind this gate to reach the spider cave, which in turn leads to the Silver Key. This key unlocks the second temple in the cave near the start. Go through the second temple to reach the main chamber and the end of the level.
THE DAGGER...ALMOST: Proceed past the dragon-head torches and approach the pedestal. There it is: the Dagger of Xian! But of course it's not that easy. The floor collapses, and Lara slides down a chute and is spat out into a pool. Here's how to minimize injury and nab a secret in the process: Approach the pedestal and stop just before the last tile in the walkway. Save the game, light a flare if you like, and step forward. When the floor drops away, fall onto the wooden slope below, slide, and grab the edge. Let go and slide some more. Press Look to get Lara's perspective back. Then jump over the horizontal blade and continue sliding. (A boulder rolls down behind you but won't follow you all the way.) When the brick chute ends, and Lara falls onto the wet, gray slope, press Jump + Roll to land facing uphill. Continue sliding and grab the end of the chute. Traverse to the left and pull up into an alcove with SECRET #1, the Gold Dragon (1). (screenshots)
NOTE: When you look out across the pool, you'll notice a long ladder off to the left. (screenshot) This leads up to small room with a large medi pack. In the classic game, there was no way to get there, short of using a flight patch or position editor. In the remastered game, the ladder is actually climbable. You'll even get an achievement/trophy, "Hero of Reaching Unreachable Supplies," for collecting the medi pack. If you're playing with modern controls, you can go after it from the gold dragon alcove. There are a number of YouTube videos showing how. Once you have it, drop into the pool and continue as usual. If you're playing with tank controls, it's much easier to get it when you reach the WOODEN BRIDGE WITH THE ROLLING BLADE, later.
SHORTCUT: A major shortcut from the secret alcove lets you skip most of the level. Details are in a footnote.
POOLS AND WATERFALLS: Once you have the Gold Dragon, dive into the water and allow Lara to be swept over the falls. Quickly swim to the far right corner of the lower pool (i.e., right when Lara's back is to the waterfall). Climb out on the wooden ledge and shoot 2 carp (1-2). Note the keyhole here, the gate on the left, and the ladder leading up to a closed trapdoor. Apparently you'll need a key. (screenshots)
There are two underwater openings in the rock wall across the pool. Both lead to the next area, but there's a pickup in the one on the right. So swim down into that opening. Before the tunnel slopes upward, look for a tunnel on the right. Swim inside to find a small medi pack (2) and a glimpse of a GOLD KEY you can't reach yet. Return to the wider tunnel, turn right, and head for the surface. (screenshots)
TEMPLE ENTRANCE: There are two buildings here: a larger one with wide steps straight ahead and a smaller one on the right. You don't have the key for the second building yet. Pick up some shotgun shells (3) on the rocks on the left side of the pool. Then ready weapons. As you approach the temple, 2 tigers (3-4) emerge. The first charges out from the left; the second appears at the top of the stairs on the right as you come up. If you like, you can draw them out one at a time, and backflip into the water, where they can't reach you. Then wade in toward the shore just far enough so you can stand and shoot. (screenshots)
Go around the left side of the building. Stand in the corner facing the red wall and run onto the springboard, holding Action to bounce up onto the roof. Cross the roof and throw the switch to open the trapdoor back in the waterfall area. Kill an eagle (5) that flies in from the far side of the cavern. Then drop down, swim back through either underwater opening to the pool below the falls, and climb out on the ledge with the ladder and keyhole. (screenshots)
NOTE: I'm not sure if this bird is modeled on any real-life species. It looks like it could be a Steppe eagle.
CAVE WITH STONE LEDGES AND LAVA: Climb the ladder, kill a spider (6) in the passage above. (screenshots)
NOTE: There's an achievement/trophy which involves avoiding damage from spiders. This applies only to the spiders in one particular area (below). It's OK if you happen to be bitten by any of the first four small spiders you meet (i.e., enemies 6, 7, 11, and 12).
Continue to a ledge overlooking a room with a large wooden pillar in the center and lava below. Turn around, hang from the edge. and climb down the ladder as far as Lara will go. (She should be hanging with her hands on the bottom rung.) Then drop and grab the ledge below. The ladder continues, and you can see the Silver Dragon below, but it's too far to fall and grab. Instead, traverse to the left along the ledge, which soon narrows to a small crevice. (If Lara's feet come up onto the ladder, you'll first need to pull up, move to the left, and then drop and hang where there are no rungs.) Where the crevice widens again, pull up onto the ledge and walk around the corner to the left. Climb down the next ladder as far as you can. Again, drop and grab the ledge below. Pull up and walk around the corner to the right. Hang from the edge, traverse to the right, and pull up into the alcove with SECRET #2, the Silver Dragon (4). (screenshots)
Hang from the ledge once more and traverse back to the left. Pull up and follow the ledge around the corner. Move toward the end of the ledge, roll, and shoot another spider (7) that skitters out of the narrow crevice. Then take a standing jump across the lava to grab the ladder on the stone pillar. Climb to the top. Climb another shorter ladder. Then follow the passageway to a room with ladders and spikes below. (screenshots)
SMALL ROOM WITH SPIKES AND CLIMBABLE WALL: Drop into the room, go around the spike pit, and grab onto the wall of ladders. (Or take a running jump over the spikes and grab on.) Climb up until a horizontal gap prevents you from going any farther. Traverse to the right so Lara is hanging below the safe part of the ledge above, rather than below the spikes. Then backflip onto the slippery slope behind and immediately jump forward to land on the ledge above where you were just hanging. (screenshots)
LAVA POOL WITH BREAKAWAY TILES: Walk over the rise and position Lara in the middle of the ledge facing out over the breakaway tiles and lava pool. Run across the tiles and stop on the last one. When they break, Lara will fall onto the pedestal below, where you'll find some shotgun shells (5). (screenshots)
SMALL CAVE WITH SPIKES: Take a running jump from the pedestal over the lava and into the doorway. Lara will immediately start to slide into a little cave with spikes on the floor. Jump just before the end of the slope to land on the angled block ahead. Almost immediately jump again to clear the second set of spikes and grab the ledge above. Pull up, then slide down the angled block on the right to land safely near the grenades (6). To get out, pull up onto the brick ledge next to the slope where you slid into the room. Then climb onto the next block on the left. Grab the horizontal crevice, traverse to the left, and pull up onto the ledge. Use the switch to open the main doors back at the FIRST TEMPLE. Follow the short passageway to the left of the switch, dive into the water, and swim back through either of the underwater openings to the TEMPLE ENTRANCE. (screenshots)
INSIDE THE FIRST TEMPLE - ROOM WITH MECHANICAL WARRIORS: Enter through the doors you just opened and head for the back of the room, keeping to the middle to avoid the mechanical guards. They don't move from their stations, but if you get too close, their swords will activate. You'll see some M16 clips (7) lying on the floor. Approach them from the back to avoid being sliced by the mechanical warrior's sword. Go through the right doorway in the rear wall. (The door on the left requires an artifact to open.) Inside is a grillwork door, which also doesn't open yet. Climb the stone ledges to a room with many angled blocks and a lava pool below. (screenshots)
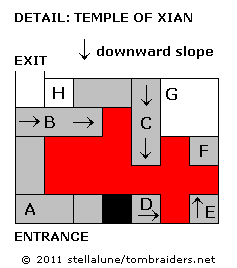
CAVE WITH ANGLED BLOCKS ABOVE LAVA: You'll need to make a complicated series of sliding jumps to get through. If necessary, refer to this diagram and the linked screenshots. Here's the sequence:
Position Lara in the doorway (A) so she's facing the long slide that slopes down to the right (B). Walk to the edge and then hop back once. Turn just a little to the right to make sure Lara will land on slope B facing downhill. Save the game. Now take a running jump across the room and onto the slope. Slide almost to the bottom and then jump onto the next slope (C). (C is perpendicular to B and angles down to the right.) Slide almost to the bottom of slope C and jump across the lava onto the small angled block ahead (D). Slide just a little if necessary, then as you jump onto the fourth sloped block (E), hold Jump and Action to immediately jump and grab the final angled block (F). Pull up and climb the blocks ahead to the top of the room (G). Turn left so the long cave wall is on Lara's right. Then take a running jump and grab the ledge below the exit (H). Pull up and climb to the doorway above.
SPIKED WALL TRAP ROOM: Do not rush into the alcove ahead. The switch there is a decoy. No matter how you approach it, the floor collapses, and you slide into the room below, where spiked walls begin to encroach. Grabbing the small medi pack (8) on the floor and getting out alive is a challenge, but it's possible. Top up Lara's health if necessary. Stand in the middle of the doorway and run onto the collapsing floor. Don't press any other controls as you slide down the chute. When Lara lands, she should be positioned in the middle of the walkway facing the medi pack and skeletons. Hold Action as you jump forward. Lara should land on top of the medi pack and pick it up without hesitation. As soon as she stands up again, jump forward, run the last few steps to the real switch, and pull it to open the exit, which is directly behind her. Immediately do a backflip with a midair twist (Jump + Back + Roll) to land facing the exit. Take a running jump, then keep running through the door as the spikes close in. (This sequence is shown in both screenshots and a short video.)
NOTE: If you don't care about getting all pickups, just slide down the chute, run/jump to the far side of the room, flip the switch to open the exit, roll, and run/jump through.
ROOM WITH RAMPS AND METAL BOULDERS: Continue to the next room, which contains a long, stone ramp and two shorter ramps above, each with a giant metal ball perched above it. If you advance cautiously, you can trigger each one and get out of the way without being flattened. Start up the first ramp, then quickly hop back and jump to the left to avoid the first ball as it rolls down toward you. (Or, run up the first ramp into the alcove on the right, and wait there for the ball to pass.) Continue to the top of the first ramp. Here a shorter ramp slopes down to the right. To trip the second ball, step up onto the first section of the ramp. (It's safe.) Turn left. Then run up the ramp and off the left edge into the shallow pit as the ball drops and rolls by. Then pull up out of the pit onto the third ramp. (The first tile is safe.) To trigger the third ball, either run forward and off the left edge, so Lara lands on the first ramp, or step forward to trip the ball. Then hop back twice, grab the end of the ramp, and hang there as the ball passes harmlessly overhead. Pull up. Then climb the ladders at the top of the ramp. (screenshots)
DARK ROOM WITH SWITCH: Light a flare and hop down into a small room with four square columns. Cross to the far right corner and throw the switch to open the grate on the left and also spawn a tiger (8) that charges from behind. Roll and kill it quickly. Then climb up through the grate you just opened to a ladder rigged with slicing blades. (screenshots)
LADDERS WITH BLADES AND SMALL ROOM WITH ROLLING BLADES: Walk to the edge of the opening. If you need a flare, light it now, since Lara can't do this while climbing. Then take a standing jump and grab the ladder. Climb down two rungs, so Lara's feet are still above the first blade. Then, just as the blade snaps in toward the ladder, release Action to fall past the blade as it re-opens. Quickly press Action again to grab the ladder below. Repeat for the second blade and drop/slide into the room below. (screenshots)
To get past the 2 perpendicular rolling blades, take them one at a time. Stand facing one blade with the other on Lara's left. Wait for the blade ahead to roll to the right and then run past it to the wall. Turn left, wait for the other blade to roll to away, then run into the doorway. You emerge in the the rafters above the MECHANICAL WARRIORS. Kill the 2 eagles (9-10) that fly in from the right. (screenshots)
NOTE: If you fall off the edge while fighting, or during the next timed run, return to the right doorway on the back wall of the room with the mechanical warriors. Now, the grillwork door just inside on the right is open. (screenshot) Follow this passageway back up to the rafters.
ROOM WITH MECHANICAL WARRIORS - UPPER LEVEL - TIMED RUN: Jump over to the button on the back wall of the upper level. Pressing it opens the big doors at the opposite end of the room. They only stay open for about 10 seconds, so you'll need to hurry. Press the button, roll, then do a series of running jumps across the wide, wooden beams: The first two can be taken at a smooth run, the third needs a slightly longer run-up. That is, hold Forward and Jump for the first two running jumps. When Lara lands on the second wide beam, release Jump but continue holding Forward, so she runs a few steps. Then jump again at the edge to clear the third gap. Keep running through before the doors close. (screenshots)
MORE TRAPPED ROOMS: Beyond the timed doors is a room with a narrow walkway over lava. Four spiked balls swing from the ceiling. For the "Wipeout Master" achievement/trophy, you'll need to get past them without slowing down or getting hurt. Start on the right side of the walkway just inside the open door. Press Look to make sure Lara is squarely facing the right side of the doorway at the end of the walkway. Then you won't accidentally run off the edge. Save the game. Wait for the first spiked ball to swing to the right. Then, as soon as it begins to swing back to the left, start running and just keep going. If you time it right, the rest of the spikes should miss you. The achievement should pop when you reach the far doorway. Take care not to run on into the lava. (screenshots)
NOTE: If you aren't interested in achievements, instead stand at either side of the walkway and run past each ball in turn as it swings away. Then stop just beyond it. The shadows on the floor can help to gauge each ball's position so you don't accidentally run into the next one. They're easier to see using classic graphics. Or, run past the first ball and stop. Then hang from the edge of the walkway and traverse past the middle two, pull up, and run past the fourth. (screenshots)
Beyond the next doorway is a lava-filled passageway with breakaway floor tiles. Two buttons flank the doorway. The button on the right raises a grate between the solid floor and the cracked tiles; the one on the left opens the door beyond. Both are timed. To get through, press the right button, side flip, press the left button, and run through the doorway and across the breakaway tiles onto the solid walkway. At this point, a metal boulder rolls down from above and behind. Rather than try to outrun it, stop immediately on the first solid block. Then quickly hop back, grab the edge of the floor, and hang above the lava as the boulder passes. Pull up and continue at a leisurely pace. (screenshots)
LARGE ROOM WITH LAVA POOL AND DRAGON STATUE: At the end of the long walkway, take a running jump over the lava to grab the small ledge ahead. Pull up and take the DRAGON SEAL (9). Then turn right and take a running jump to the flat ledge next to the dragon. Climb up to the room above and behind the huge statue. Grab some automatic pistol clips (10) on the step near the doorway. Then enter the dark room, pick up 2 more sets of automatic pistol clips (11-12) and pull the switch. This causes part of the walkway to disappear and raises blocks in the lava out in the main room. (You also get a glimpse of the Jade Dragon secret on a high ledge.) Exit through the doorway on the far side of the dark room. Two spiders (11-12) appear behind you. Shoot them on the way out. (screenshots)
Climb down the block ledges along the right wall (i.e., right when facing in the same direction as the dragon) and slide down onto the flat ledge just above the lava. Take a running jump across the lava to the small, square ledge just ahead and another running jump the next small ledge. Turn left to face the short, angled block near the stone pillar supporting the walkway. Carefully set up the next running jump by walking to the edge, hopping back once and then turning just slightly to the left. (This will ensure that Lara lands on the sloping block facing downhill.) Then take the running jump onto the slope and immediately jump again to grab the edge of the taller angled block ahead. Pull up, and before Lara can slide too far, jump onto the next tall, flat block. Turn right and take a running jump to grab the taller block against the wall. Pull up. (screenshots)
NOTE: Alternatively, after exiting the dark room with the switch, you can take a little shortcut over the dragon's back: Save first, since this can be a little glitchy. Hop down to the ledge just below the doorway. Jump over to the flat spot on the dragon's shoulder. Step back to the outside edge and take a standing jump forward, with Action, to clear the ear/horn and land on the dragon's back. Turn to face out over its head and step forward to bounce off the dragon's head and fall onto the small, square ledge where you found the DRAGON SEAL earlier. From there, take a running jump to the tall, brown pillar against the left wall. (screenshots)
Once Lara is standing on the tall, brown pillar in the lava pool, turn so the wall is on her left. You should now be facing the sloping wall with various ledges, where you first entered this area. Take a running jump down to the next brown block below. The ornate square ledge in the lava just ahead, which was a burner when you entered, is actually a springboard. Walk to the edge of the brown block nearest the springboard. Hop back, then do a standing jump onto the springboard. Continue to hold Jump and Forward while Lara is in the air so the springboard propels her onto the ledge above. Immediately hop back and grab the edge to avoid the metal ball that rolls down the slope toward you. After it passes, pull up onto the ledge. (screenshots)
Now you need to make your way across the slope to the upper right corner. Begin by taking a standing jump across the tan slope to land on the flat area above and to the right. Immediately run and jump onto the brick ledge ahead and a little higher up the slope to avoid another rolling ball. Walk to the far edge of this ledge and jump across the next slope to the slightly higher brick platform ahead. (This one is set against the side wall of the room.) Turn around and jump back across the slope to the next higher ledge. Kill the bird (13) that flies in from in from the doorway at the top of the slope. Then turn to face uphill, walk to the upper right corner of the ledge and take a standing jump to grab the edge of the brick ledge above and to the right. Pull up. (screenshots)
Turn around to face down the slope. From here, you can see the Jade Dragon on a high wooden ledge on the right side of the room. Step off the edge and slide down the tan slope onto the springboard at the bottom. Hold Action as you slide and Lara will spring into the air and land on the wooden ledge high above. Turn right and take a running jump to grab the ledge with SECRET #3, the Jade Dragon (13). It comes with a bonus of 8 sets of Uzi clips (14-21) if you found the other secrets. (screenshots)
IMPORTANT: See the note about conserving Uzi ammo above.
Stand near the left wall facing the slope below and take a running jump down to the long brick ledge on the left side of the slope. Take a standing jump from the middle right edge of this ledge to grab the brick ledge just up the slope on the right. Pull up, taking care not to run on into the spike pit. Turn right and take a running jump across the slope to the next ledge on the same level. Then turn to face uphill, walk to the right corner, and take a standing jump to grab the edge of the brick ledge above and to the right. Pull up. This is the same ledge where you stood earlier just before sliding down onto the springboard. This time, instead of sliding down, turn left and take a running jump across the slope to the other flat ledge on this same level. Walk to the corner and take a standing jump up to the ledge near the doorway at the top of the room. (screenshots)
RETURNING TO THE TEMPLE: Pull or push the movable block with the golden face out of the doorway. Use the switch in the next room to open a trapdoor in the floor and drop in. There's a ramp below with a metal ball at the top. It doesn't roll until Lara moves down the ramp a bit. So run/jump down ahead of the ball, and when you reach the bottom of the slope, turn left. The ball stops at the corner as you slide down the next ramp and emerge in the rafters above the MECHANICAL WARRIORS. (screenshots)
NOTE: If you don't care about getting all kills, skip the next paragraph.
If you must have all the kills, you'll need to make a detour back through the big doors opposite the button. Do that the same way you did before (see the "UPPER LEVEL - TIMED RUN" section above). Beyond the timed doors, head to the left and you'll see things have changed here. Climb up into the area above the swinging spiked balls. Follow the narrow walkway forward and kill the tiger (14) that charges from the next room. Then continue into the DRAGON STATUE ROOM. Use the flat brick ledges to climb back up to the room at the top left corner of the slope. Return past the movable block, through the trapdoor, and down the ramps. (screenshots)
ROOM WITH MECHANICAL WARRIORS (again): When you re-emerge in the rafters above the room with the mechanical warriors (whether or not you've made the detour to kill that extra tiger), there will be 2 more tigers (15-16) lurking below. If you dangle Lara from the beams to get their attention, you can shoot them before dropping down. Use the DRAGON SEAL in the receptacle at the the back of the room to open the door on the left. (screenshots)
ROOM WITH SPIKED CEILING AND MANY SWITCHES: Enter and follow the passage to a rolling blade. Follow the blade down the hallway, ducking into the alcoves as needed. The last alcove on the right is actually a slide leading down to a room with shallow water on the floor. If you like, you can save on the way down. When you hit the floor, the spiked ceiling descends, and you need to flip 3 switches to open the exit. There are also a number of decoy switches, but if you look carefully, these aren't realistic enough to trip you up. The exit is the panel with the face to the left of the waterfall. There is also a small medi pack (22) on the floor near the other skeleton. You should have time to pick it up if you move quickly. (The page with screenshots shows one possible sequence.)
POOL WITH SIDE TUNNELS AND LEVERS: In the next small room, water cascades from a pool above. Climb onto the block on the right and take a running jump to grab the higher block. Pull up. Then climb onto the ledge above. Kill the carp (17) in the pool before proceeding. (You may have to take a dip to draw it out.) (screenshots)
This next section has a complex series of underwater levers and gates. On the left side of the pool is a wide opening with a strong current keeping you out. On the right is a closed gate and the first of 5 levers in this area. Let's be original and call it lever #1. Swim down and pull it to close a door at the end of the passage with the current, raising the water level in the pool and slowing the current. Then swim up to the ceiling where you'll find 2 air pockets. Use the one just above if you need it. Then swim to the second air pocket on the far side of the room (i.e., above the entrance). Climb out of the water and collect a large medi pack and grenades (23-24). (screenshots)
Now swim down into the wide tunnel previously blocked by the current. (If you like, you can get air at the other hole in the ceiling first.) The tunnel slopes upward then down again. When you come to the door with the face, ignore lever #2 on the left for now. Instead swim through the little opening on the upper right, opposite the lever. Swim forward past lever #3, pick up a small medi pack (25), and roll. (screenshots)
NOTE: If your breath meter is less than half full at this point, swim back out to the main tunnel and pull lever #2 (the one you passed a moment ago). It's on the far wall, just below and to the left. This lowers the water level and sweeps Lara back into the big pool so she can breathe. Use lever #1 again to raise the water level, get air above if you like, then swim back to the narrow passageway where you found the medi pack. (screenshots)
In the same narrow passage where you got the medi pack, pull lever #3 to open the gate directly opposite. Roll, swim forward, and pull lever #4. This opens the gate out in the big pool. Roll, swim out of this tunnel, and turn left at lever #3. When you come to the wide tunnel, swim across to the opposite wall and use lever #2 to open the door with the face once more. This restarts the flow, sweeping Lara back into the big pool and lowering the water level so she can breathe. (screenshots)
The gate you just opened using lever #4 is on the other side of the pool, to the right of lever #1. Swim through and locate lever #5 on the right wall of this dark room. Pull it to open the exit, high in the ceiling of the pool room. Swim back out to the pool. Use lever #1 once more to raise the water level. Roll, swim up to the air pocket in the ceiling, and climb out of the water at the gate you just opened. (screenshots)
ANOTHER SPIKED WALL AND THE GOLD KEY: You're now in the room below the one with the encroaching spiked walls. Kill another fish (18) in the pool before retrieving 2 boxes of shotgun shells (26-27) underwater and some M16 clips (28) at the top of the wooden ramp. (screenshots)
In the next room, a spiked wall comes from the right. Run into the room and immediately head for the switch opposite the entrance and a bit to the left. Pull it to open a nearby trapdoor. Side flip to the left twice and then backflip into the open trapdoor. Lara will slide into a flooded tunnel, and the current will carry her to the GOLD KEY (29). Pick it up and swim straight on through the gate, which opens as you approach. Grab the small medi pack (2) on the bottom of the passage if you didn't notice it at the beginning of the level. Then swim out of this tunnel and up to the left to surface in the pool at the foot of the waterfall near the level start. (screenshots)
NOTE: The pool near the TEMPLE ENTRANCE is above on the right, but you don't need to return there yet.
UNDERWATER AREA BEHIND THE LOCKED GATE: Climb out of the water on the ledge with the keyhole and ladder. Use the GOLD KEY to open the gate on the left. You may be able to complete the next underwater area in one go. Here, we'll do it in two breaths to make things easier. Start by swimming through the gate along the surface until you can't go any farther. With full lungs, swim down and forward. Where the tunnel widens, make a U-turn to the right. Swim through the opening to the left of the face panel into a small, dark room with closely spaced pillars. The gate closes behind you, and another pesky fish (19) appears. You may be able to kill it with harpoons, but this takes time (and air) so ignore it for now and heal as needed. (screenshots)
Swim between the two wooden pillars with the faces. Find the lever on the back of the first pillar and pull it to open the exit and a trapdoor elsewhere. Continue around the first pillar and through the exit, which is located on the same wall as the entrance. Outside, make a U-turn to the left and return up the wide, sloping passageway to the pool below the waterfall. Climb out on the ledge with the keyhole and shoot that fish (19). (screenshots)
Swim back down to the room with the lever. This time, head for the back left corner and pick up the small medi pack (30). (It's a lot easier when you aren't being nibbled by an aggressive carp.) The left gate closes behind you, but the other gate remains open. Swim out of the lever room. Continue straight ahead then upward through the open trapdoor. As you near the surface, aim for the right side of this large pool, and climb out of the water in the cave opening with wooden support pillars. (Do not enter the cave yet, or you'll start spawning spiders. These are covered below.) Shoot a second fish (20) from this doorway. (screenshots)
IMPORTANT: If you're hunting achievements/trophies, save the game before entering the dark cave and do not overwrite this save until you clear this area. (You can save in new slots as you go.) For the "Silk Cave" achievement/trophy, you'll need to "clear the spider cave without a scratch using only Lara's guns." This means pistols only, no damage. You may want to start with full health, so it'll be easier to tell if Lara has been bitten. There seems to be some confusion about this, but based on my playtesting, its OK if you happen to be bitten by the small spiders earlier in the level. Only the ones in this area matter. Also, this section is very dark. Try turning up the brightness in the Controls menu, or fire your unlimited-ammo pistols for light.
SPIDER CAVE: Enter the dark, web-spangled cave with guns drawn. (Lara is able to spot those spiders better than you can.) There'll be 2 small spiders (21-22) to start—one just inside the tunnel, one at the first corner, where the tunnel widens and turns left. Beyond the bend, approach the flares (31) on the ground. Two more spiders (23-24) drop down from the alcove on the right. Kill them then take the flares. Turn so the alcove is behind Lara and advance slowly toward the alcove on the other side of the cave. Two more small spiders (25-26) drop down there. Shoot them as they approach. (screenshots)
Now turn right, so the alcove where the last pair of spiders came from is on Lara's left. Move down the path into the open area below just far enough to trigger the appearance of a giant spider (27) in the opening ahead on the left. Then hop back up the path shooting. (It takes about 45 pistol rounds to put it down.) When the giant spider is dead, grab the Uzi ammo (32) lying on the ground in the far right corner. Then approach the opening where the giant spider came from. Another small spider (28) drops from the alcove to the left of that opening. Kill it and proceed. (screenshots)
Enter the tunnel where the giant spider came from. A little way in, another giant spider (29) drops from the ceiling of the tunnel. Get a lock on it and keep firing as you back up into the cave where you came from. (This one can be challenging. The screenshots show one possible approach.) Now return to the tunnel and follow it to an opening overlooking a cavern with a huge, glowing egg sac. (Saint Lara preserve us!) As soon as you hop down off the ledge, another giant spider (30) drops from the ceiling ahead on the right. Shoot it as it moves toward you and/or backflip onto the ledge and continue firing. The fourth giant spider (31) drops from the ceiling as you approach the far side of the cavern. So light a flare and run forward past the tall, angled pillar. As you near the far wall, roll and run back to the entrance. Jump up onto the ledge and shoot the spider from relative safety. (screenshots)
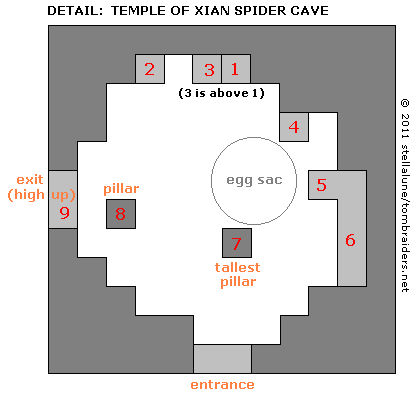
Now you must climb the ledges around the edge of the cavern to reach the doorway high above. The steps are also indicated with numbers in the diagram at right. Begin by climbing onto the one stone block you can reach (number 1 in the diagram). It's against the wall on the far side of the cavern from the entrance. Turn so the cave wall is on Lara's right. Take a running jump to grab the next higher block (2). Pull up, turn around, walk to the edge and take a standing jump to grab the thin ledge jutting out from the wall above (3). Pull up. (screenshots)
You should now be level with the egg sac, which is on Lara's right. Take a running jump to the next small, square ledge (4). Walk to the far corner. Then take a standing jump to the next ledge, which is L-shaped (5). Immediately backflip onto the previous ledge (4) to avoid the next giant spider (32), which drops from the ceiling. Shoot the spider across the gap. If you haven't been bitten by any of the spiders in this area, the "Silk Cave" achievement/trophy should unlock when this last one dies. (screenshots)
Jump back over to the L-shaped ledge (5), walk around the corner, and turn to face the egg sac. Now take a running jump from the middle of the longer section of the L-shaped ledge (6) down to the tall pillar in the middle of the cavern (7), almost directly under the egg sac. Take another running jump along the right side of this pillar to grab the angled pillar (8) below the doorway. Pull up and walk to the higher edge. Take a final standing jump to grab the doorsill (9) and pull up. (screenshots)
ROCK FORMATION IN POOL AND SILVER KEY: At the top of the slope is an opening overlooking the pool near the SPIDER CAVE entrance. Take a running jump across the wide gap and grab the rock formation ahead. Climb up and take the SILVER KEY (33). Dive into the pool, swim down through the trapdoor where you came in, and follow the tunnel back to the pool with the waterfall. From the trapdoor it's down and forward, right, then left, and finally up the sloping tunnel to the surface. Take a breath if necessary. Then swim through either of the tunnels on the right side of the pool to get back to the TEMPLE ENTRANCE. (screenshots)
Now that you have the SILVER KEY, you can use it in the keyhole to open the door of the building on the right. (screenshots)
INSIDE THE SECOND TEMPLE: Enter and climb up on the lowest block. Stand at the back left corner, and jump forward to grab the front right corner of the next higher block. There's no danger yet as long as you don't pull up onto the block. When you do, a metal ball rolls down from above. To avoid it, turn just slightly to the left and immediately jump forward and grab the left corner of the next higher block. Again, you're safe here until you pull up. When you do, immediately pivot left and jump forward to get out of the way of a second rolling ball. Continue forward and pick up some automatic pistol clips (34) on the floor where the boulders originated. (screenshots)
NOTE: If you can't manage the quick timing here, instead take it in stages. Start on the lowest block, jump to grab the second block, pull up, and run to the right to avoid the first ball. Climb back up to the second block, jump to grab the third, pull up, and run to the left to avoid the second ball. Then climb all the way to the top.
Climb into the opening at the top of the slope. Step out onto the wooden bridge and kill a tiger (33) that emerges from the room on the other side, then an eagle (34) that flies in from the right when Lara reaches the middle of the bridge. Keep your weapons ready as you enter the red room on the other side of the bridge. There's a second tiger (35) just inside on the left. When you've dealt with it, climb onto the lower of the two angled pillars and backflip onto the higher pillar. Turn around and jump over to the next flat ledge. Climb onto the red ledge on the left. (On the right is a STEEP SLOPE WITH SPRINGBOARDS. The doors at the top are closed now, so don't bother going up there yet.) (screenshots)
Enter the red room with the rolling blade moving back and forth along the ledge. Watch out for the hole in the floor; there's a lava pool below. If you want all items, you'll need to take a slight detour here. Otherwise, skip this paragraph and continue past the rolling blade. To get the next pickup, position Lara at the edge of the hole above the lava and jump forward to land on the slope ahead on the right. Slide back and grab the edge. Climb down the ladder until Lara's hands are on the bottom rung, let go, and catch the ledge below. Pull up and take the Uzi ammo (35). (The honorary fourth secret!) Then continue to the end of the hallway and drop into the pool outside the temples. Re-enter the SECOND TEMPLE, where you just were, and return up the ledges, across the wooden bridge, and up to the rolling blade. (screenshots)
With careful timing, it's possible to jump up the ledges past the rolling blade. Or, move to the far end of the room. Grab the ledge on which the blade is rolling and traverse as far to the right as possible. Wait for the blade to roll away and then pull up. Lara is safe here at the corner of the ledge. Wait for the blade to roll toward you and away again. Then take a standing jump onto the ledge above. Climb into the doorway on the right. (screenshots)
WOODEN BRIDGE WITH ROLLING BLADE: Enter the next room and pick up 2 sets of Uzi clips and a large medi pack (36-38) near the skeleton. The blade doesn't start rolling until you move out onto the wooden bridge. The first section of bridge is safe, so you can step out and take a look around. (screenshots)
NOTE: If you already obtained the "unreachable" large medipack at the beginning of the level using modern controls, skip the next paragraph and pick up the walkthrough below.
Off to the right of the bridge, there's a ladder on the cavern wall and a little room at the top containing a large medi pack (39). This item is inaccessible without cheating in the classic game but easily obtained in the remaster. To get it, take a standing from the bridge to the nearest stone ledge. Run forward off that ledge to land on the block far below, losing a little health in the process. Then take a running jump to grab the ladder. Climb to the top, then up into the room with the medi pack. Taking it unlocks the "Hero of Reaching Unreachable Supplies" achievement/trophy. To get back up to the bridge, dive into the pool, allow the current to sweep Lara over the waterfall, swim through either of the underwater openings on the left, and surface near the TEMPLE ENTRANCE. Re-enter the SECOND TEMPLE (i.e., the one on the right that you unlocked using the SILVER KEY) and retrace your steps through the building, across the first wooden bridge, and through the next building (with the rolling blade) to the room with the skeleton and not-yet-moving blade. (screenshots)
Step out onto the long wooden bridge. Run across ahead of the blade and move to the left side of the ledge to get out of its way. Press the button to open the doors at the top of the STEEP SLOPE WITH SPRINGBOARDS back inside the SECOND TEMPLE. Kill another bird (36) that flies in from the other end of the bridge. (screenshots)
Now return across the bridge to the room with the skeleton. There are several ways to do this: You can follow the blade as it rolls away, taking a running jump or two to go faster. Then veer left into the room at the end of the bridge before the blade has time to reverse. Or, stand on the ledge near the button, angled toward the middle of the bridge. Wait for the blade to emerge from the doorway moving toward you. Just as rolls out onto the bridge, hop back once. Then immediately take a running jump past the oncoming blade onto the middle of the bridge. Continue running into the room ahead and veer left to get out of the blade's way. Go through the room with the skeleton to the one with the rolling blade on the ledge. Carefully jump down past the blade to the floor below. Then move out onto the ledge overlooking the room where you killed that last tiger. (screenshots)
NOTE: If you can't abide the rolling blade on the bridge, or if you fall in the water after pressing the button and don't have a convenient save, you can take the longer but less dangerous route back to the temple. Let the current carry Lara over the falls, swim through one of the tunnels on the left and surface near the TEMPLE ENTRANCE. Return through the door you unlocked earlier with the SILVER KEY and make your way up the ledges and across the first bridge to the red room with the angled blocks. Climb up to the level just below the first rolling blade the same way you did before. (screenshot)
STEEP SLOPE WITH SPRINGBOARDS: Stand on the ledge facing the first in a series of springboards, at the base of the steep slope. Walk to the edge, hop back once, then take a running jump onto the springboard. Release Jump but continue holding Forward, and Lara should bounce up the slope using all 4 springboards. Hold Forward and Action as she lands on the fourth springboard to grab the ledge high above. Pull up, turn around, and shoot another eagle (37) that dive-bombs you at the top. Then climb into the doorway above. The big doors will be open if you pressed the button at the end of the WOODEN BRIDGE WITH THE ROLLING BLADE. (screenshots)
MAIN CHAMBER: Enter this large, lava-filled room. Move to the end of the walkway and jump over to the small, square ledge near the keyhole. (You'll get the key shortly.) From there, jump to the larger ledge on the right. As you cross this area, the spiked wall moves in from the right. Run forward, jump onto the raised block below the ladder, and quickly move to the left side of the block before the spikes arrive. If you then climb the left side of the ladder, the spikes won't touch Lara. Continue climbing up, then right, and dismount on the ledge above. (screenshots)
Climb the ledges just beyond the ladder. There's another spiked wall in the small, dark room above, but it doesn't start to move immediately. Light a flare, turn right, then run forward, staying close to the right wall. The spiked wall will follow, but you should have time to run forward, jump across the spike pit, and grab the ladder on the far wall. Lara is safe here. Climb up. (screenshots)
At the top of the ladder, turn right and follow the passageway past several barred openings and a a trapdoor, all closed now. At the end of the passageway, on the right, use the switch to open one of the small gates you just passed. It's back the way you came, up the little ramp, on the right. Step through onto a ledge overlooking the lava pool. Directly ahead is a giant dragon statue surrounding a tall, square column with a shiny key on top. (screenshots)
FIRST DRAGON COLUMN: Turn left and take a running jump to grab next small, square ledge; pull up. Move to the outer corner and take a standing jump onto the ledge ahead on the right. Turn right, walk to the edge, and take a standing jump to grab the top of the tall column. Pull up and take the MAIN CHAMBER KEY (40). (screenshots)
Drop down on the left to land on the flat part of the dragon's neck. Step off onto the slope so Lara slides down the dragon's twisting back facing downhill. When she lands on the last and shortest slope, immediately press Jump and Action to leap across lava and land on the stepped blocks below. Hop down to the lowest step and from there take a running jump to the wide ledge hear the entrance. This jump can be tricky. Walk to the edge and aim just to the right of the open door. (Use the Look button to check your angle and adjust if necessary.) Then hop back once before taking the running jump, and you shouldn't have any trouble. (screenshots)
Again, go to the end of the walkway, jump across to the keyhole, and use the MAIN CHAMBER KEY. This opens two trapdoors: one near the switch you used earlier and one elsewhere. It also opens the other small gate near the switch and raises a metal ledge on the stone column behind you. Jump back to the wide walkway by the entrance. Jump back onto the wide walkway by the entrance. Take a running jump to grab the metal ledge. Pull up. Then jump over to the block below the ladder. Climb up and dismount on the right, since there's a lit burner on the left. (screenshots)
NOTE: You can also backflip off the ladder onto the ledge behind you. The switch there turns off the burners temporarily, allowing you to jump across the other small ledges to get back to the top of the ladder. This is unnecessary and takes longer.
Turn around. Then jump over the spikes and grab another ladder. Climb to the top to emerge back in the small, dark hallway, this time through the trapdoor in the floor. Go forward up the little ramp and turn left. Now the second gate here is open. (screenshots)
SECOND DRAGON COLUMN: Step out onto a ledge overlooking another square column with a dragon statue twined around it. (In case you get disoriented, you want the dragon with the column extending all the way to the ceiling. The other has the shorter column where you found the key.) Turn left and take a running jump to grab the next ledge; pull up. Take a standing jump to the corner ledge. Then turn right to face a ledge that slopes down toward the dragon. Take a running jump onto it and immediately jump again to land on the flat area on the dragon's neck. (screenshots)
VERTICAL SHAFT WITH LADDERS AND BLADES: Climb the ladder on the square column, up through the open trapdoor, until you come to a horizontal blade. Position Lara's hands two rungs below the blade, then backflip onto the angled block behind. Before Lara can slide off, immediately jump and grab the ladder on the opposite wall. Climb to the next blade, position Lara's hands two rungs below it, and press Jump + Roll, then hold Action to make Lara leap from the ladder, twist in the air, and grab the ladder behind. Continue climbing nearly to the ceiling. Dismount in the red hallway on the right and approach the doorway to finish the level. (screenshots)
Cinematic: Lara emerges above the chamber where the Dagger of Xian rests, only to find that Marco Bartoli has beaten her to it. She watches from the shadows as the cult members perform some sort of ritual. Lara stifles a gasp as Bartoli raises the dagger and plunges it into his chest. He collapses and his henchmen carry him out on their shoulders. Naturally, Lara follows.
†UPDATE HISTORY: Updates made prior to the Tomb Raider I-II-III Remastered release, including credit for tips sent in earlier by other players, are tracked in the archived classic guide.
8/1/26 - Remastered guide posted. Better late than never. :D
8/27/26 - Updated the note on increasing brightness in the Controls menu, included in the August 20 patch.
SHORTCUT: There's a major skip that takes you from the alcove with the Gold Dragon secret directly to the WOODEN BRIDGE WITH THE ROLLING BLADE. This is great if you're going for the "Only Play for Sport! Still!" achievement/trophy (complete the game in less than 6 hours). You will, of course miss many pickups, including the other 2 secrets. Beginning in the alcove where you found the first secret, you'll take a running jump with a curve around to the right to land on the sloped block near the wooden bridge facing uphill. Slide back and grab the edge. Traverse left. Then pull up and press Jump + Roll + Right, to backflip, somersault in the air, and land on the bridge. The setup and execution are detailed on this page with screenshots and in this short video. Once Lara is standing on the bridge, pick up the main walkthrough at the WOODEN BRIDGE WITH ROLLING BLADE section here. (As with all my guides, I use classic tank controls. If you're using modern controls, check out this alternative from Eycore on YouTube.)
‡NOTE ON VIDEO GUIDES: Eldin's videos don't always follow the same strategies I use in my walkthroughs, but if you prefer that format, I think you'll find them very helpful.
DARK MODE: I plan to add optional dark mode for these pages, but my current priority is updating the walkthroughs. Meanwhile, may I suggest a reputable dark mode browser extension, such as Dark Reader? (Download only from trusted sites, like darkreader.org or your browser's official add-on/extension site.)
WAS THIS WALKTHROUGH HELPFUL? If not, I apologize and invite you to contact me with any questions. If you need help right away, I recommend the r/TombRaider subreddit. Other fan-run forums are listed at tombraiders.net/stella/community.html. If this site was useful, please consider supporting it financially or in other ways. For details, visit tombraiders.net/stella/support.html. As always, I welcome your corrections/suggestions. Thank you!
Copyright © 1998- - Stellalune (). Feel free to copy or print this walkthrough for personal use. By all means, share it with friends, but please include this credit line so people can send me their feedback. No part of this walkthrough may be reproduced on another site without permission. Follow this link for details about this site's advertising and privacy policy.
Stella's Tomb Raider Site: tombraiders.net.