Stella's Classic Tomb Raider: Last Revelation Guide
NOTES ON THE REMASTER: This guide has not yet been updated for the remastered game. Revisions are in progress but will take time. I hope this version, based on the classic game, will still be helpful. Thanks for your patience.
LEVEL 28: UNDERNEATH THE SPHINX
Updated: 2/21/25(†)
LEVEL MAP by VGCartography (used with permission)
Last Revelation Remastered Video Walkthrough by Eldincy‡
Kills: 27 Items: 12, including Scrap of Paper, Stone of Maat, Stone of Khepri, Stone of Re, Stone of Atum, and 4 Holy Scriptures Secrets: 1*
NOTE: The guardians can't be killed so are not included in the total above. The regular pick-ups include the GRENADE GUN if you didn't find it earlier.
BUG NOTE: There are several potential bugs in this level. I recommend saving the game at the beginning, then switching to a different save slot and not overwriting that first save until you complete the level.
HALL WITH BULL GUARDIANS: Follow the wide passageway to the bottom. Go through the gate into the hall.
Cutscene: The camera moves through the area, drawing attention to three large hieroglyph tiles on the far wall guarded by two dozing bulls. We then see the the gate closing ominously behind Lara.
First get the lay of the land: 2 BULL GUARDIANS, 2 sturdy cages on the left and right sides of the hall. There's a certain symmetry there. Each cage has a switch outside which lowers and raises the bars. Approach one of the bulls at a time to awaken it. Run back to one of the cages with the bull hot on Lara's tail. Run inside the cage and stand just inside the doorway on the opposite side from the switch. The bull will paw the ground outside then charge in. Then you can run out to the switch and quickly use it to trap him. Repeat the process for bull number two. Now you can explore freely. (screenshots)
BUG NOTE: It is possible to avoid waking the guardians by moving around the edges of the room to reach the puzzle. The bulls only awaken when you walk in front of or between them. However, some players have reported bugs later on in this level (specifically in the WATER MAZE section) which may be linked to avoiding the bulls. You're welcome to try this, but you may want to save first, as recommended above, and not overwrite that save until you've cleared the level.
HIEROGLYPH TILES: Return to the dais where the bulls had been sleeping. On the back wall are 3 tiles decorated with hieroglyphs. When pressed in different combinations they open the various gates in this area—three to the east and three to the west—not the cage doors, though, thank goodness!
Off to the left are the remains of another explorer (perhaps someone who didn't have this walkthrough). Pick up the flares (1) and SCRAP OF PAPER (2) he or she dropped. (screenshot) The paper is apparently a clue to the hieroglyph puzzle, but it's a bit obscure. (screenshot) The three tiles, from left to right, show two reeds (equivalent to the letter I, according to the clue); a shape that looks like a right triangle with the top point lopped off, representing a sandy hill (Q according to the clue); and a bird, specifically a vulture (representing the letter A). So we have I, Q, and A. What to make of this? There doesn't appear to be an inscription or other hint nearby. But if we arrange the symbols in alphabetical order according to their modern equivalents (which the ancient Egyptians of course couldn't know), we have A, I, Q—bird, reeds, hill. And, in fact, this combination opens the gate you want. So press the 3 hieroglyph tiles in that order: right, left, middle. (screenshot)
You must first press the tiles in the correct sequence (bird, reeds, hill) in order to open the west gate and gain access to further clues to the puzzle. You don't actually have to look at the clues, but pressing the tiles is necessary. If you press any other combination before doing this, you will only open the northeast gate. You'll then have to enter that area, navigate the TRAPPED HALLWAY, and use the switch at the end to reset the puzzle. (See that section of the walkthrough below, which includes a bug note.) After pressing bird, reeds, hill, and opening the west gate, you can then use different combinations to open the other gates.
WEST GATE – ROOM WITH BASALT STATUES AND COLORED LIGHTS: After pressing the tiles in the order noted above—bird, reeds, hill (right, left, middle)—go through the gate at the west end of the hall, beyond the skeleton. Proceed through the cave, taking a running jump across the first deep pit near the middle. Kill a couple of bats (1-2). Then continue around the corner to a second deep pit. Jump across on the left side and enter a small room with a pair of basalt statues and 2 more bats (3-4). (screenshots)
The statues don't move. The gate doesn't open yet. The clues you want are inside the chutes high on the side walls. Each chute is lit with a different color (red, green, blue, and purple). Select the BINOCULARS from your inventory, look up each chute, and press Action to activate the the light. Inside each chute you'll see an inscription showing a different combination of hieroglyphs corresponding to the puzzle tiles back in the other room. The table below shows each possible combination of tiles along with what it does. Use the Draw/Holster Weapons button to stow the binoculars when you're done. (screenshots)
After examining the clues, return through the cave, jumping over the deep pits, to the HIEROGLYPH PUZZLE. You can then explore the other areas in any order you like.
| Hieroglyph Combination | Gate Opened (walkthrough link) |
Color Light & Stone (if any) |
Stone Found in Area (if any) |
| bird, reeds, hill | west | must use this combination first to access the clues | |
| bird, hill, reeds | northwest | red | Stone of Maat |
| hill, reeds, bird | southwest | green | Stone of Khepri |
| reeds, hill, bird | east | blue | Stone of Re |
| hill, bird, reeds | southeast | purple | Stone of Atum POSSIBLE BUG (see below) |
| reeds, bird, hill | northeast | traps only, no stone POSSIBLE BUG (see below) |
|
NORTHEAST GATE – TRAPPED HALLS (OPTIONAL): There is no artifact to be found in this area, so you can avoid it completely if you find and follow the clues in the west room. If you press a wrong combination of tiles before discovering the clues—or if, after opening the west gate and getting the clues, you press the combination reeds, bird, hill—you will need to go through this area to use the switch that resets the puzzle. You'll also need to explore this area if you want all the kills.
BUG NOTE: Some PlayStation players have reported a bug here, in which the hieroglyph puzzle will not reset even after pulling the switch in the TRAPPED HALLS. PS1 players should consider avoiding that area entirely. If you encounter this bug, you will have to revert to an earlier save or use the level-skip cheat. If you skip the level, you won't have the 4 HOLY SCRIPTURES, which you need to finish the game, so you will also need to use the all special items cheat. If you encounter this bug on PC, you can download a save file.
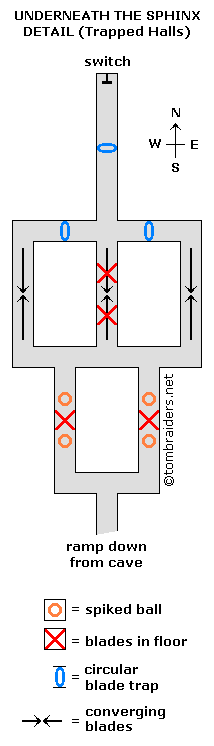
When you go through the northeast gate, it closes behind you. You'll then need to kill a couple of bats (5-6) before proceeding. Take a running jump across the deep pit along the left side. Go through the doorway surrounded by carved skulls (holy foreshadowing, Batman!) and down the ramp. This diagram shows the next area, as do these screenshots.
It doesn't matter whether you go left or right at the first intersection. In either case, when you round the next corner, you'll come to a trapped hallway. You'll be safe if you crawl along the floor close to either wall. First comes a spiked ball, which drops down from a trapdoor in the ceiling. The next floor tile contains an X-shaped set of concealed blades. If you crawl slowly forward, staying close to the wall, stop when the the blades pop up, then wait for them to retract before crawling on, they won't hurt Lara. Just beyond the blades is another spiked ball that drops from above. Just keep crawling past it. After this, you can stand up. (screenshots)
A few steps ahead is a hallway running east to west, with 3 passageways leading off to the north. They all end up in the same place, so which path to take depends on which traps you prefer. If you take either of the outside hallways, you'll first pass a set of converging horizontal blades. These sweep along the length of the hallway, meeting in the middle, and will cut Lara down at the waist if she walks through them, but she's perfectly safe crawling. Around the next corner is a circular blade trap like the ones you first encountered in the TOMB OF SEMERKHET. To get through, stand Lara facing the middle of the circle, as close as possible without injury, then roll as they begin to open. Remember the trick: snick, snick, roll. Then turn around and continue to the four-way intersection just ahead. (screenshots)
If you opt for the middle hallway instead, there are 2 X-shaped sets of concealed blades in the floor and a set of converging horizontal blades at waist level. Crawl forward, staying close to either wall. Stop when the the X-shaped blades pop up and wait for them to retract before crawling on. As you do this, the horizontal blades will also pass above, missing Lara completely. (screenshots)
All three passageways converge again here. Continue to the north through one circular blade trap to the switch at the end of the passageway. Use it to reopen the gate at the entrance to this side area and reset the hieroglyph puzzle. (screenshots)
Return through the maze following whichever route you prefer. The traps are not disarmed after using the switch. So even if you go back the same way you came in, you'll still encounter the same hazards. Follow the south ramp back up to the cave. At the deep pit, save before trying this next tricky jump. Walk along the angled edge at the right side of the pit until Lara reaches the wall and can't go any farther. Turn to face the angled block directly across the pit. Hop back once and take a running jump to grab the block. Pull up and return through the gate. Turn right to get back to the main area and the HIEROGLYPH PUZZLE. All that effort and no goodies...sigh! (screenshots)
NORTHWEST GATE – CAVE WITH MAZE OF TUNNELS: After getting the clues behind the WEST GATE (above), press the hieroglyph tiles in the order bird, hill, reeds. The gate at the northwest end of the hall opens. When you enter, the gate closes behind you. Kill a pair of bats (7-8) and follow the tunnel to a deep pit. Proceed along the right side of the pit. Take a standing jump up the slope and stop so you don't run off the edge. Now either take a running jump along the right side of the angled ledge to the ledge directly ahead against the north wall, or take a running jump to the ledge ahead on the left, walk to the outer corner and take a standing jump to the north ledge. Jump up the next slope and shoot 2 more bats (9-10). (screenshots)
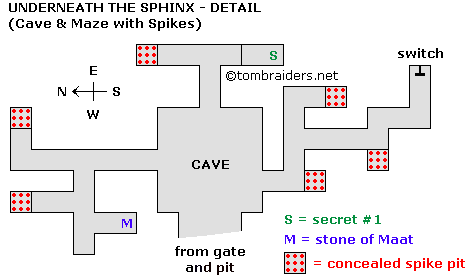
The cave and network of tunnels is shown in this map. There are three tunnels leading away to the left (north), right (south), and straight ahead (east). It doesn't matter which you explore first. As you go through the tunnels, avoid the boarded-up floor tiles, most of which conceal deadly spikes. There is one pit that hides a secret. (screenshots)
NOTE: You'll probably need to use flares here or turn up your monitor brightness all the way. If you need to light another flare while crawling, first press the Draw/Holster Weapon button so Lara comes up on one knee. Then press the Flare button.
NORTH TUNNEL: Crawl in and take the first turn to the left (west). (If you continue forward, you'll come to a collapsing floor above a spike pit.) Continue straight (west) past a short passage to the right (north), which ends at another spike pit. Turn left (south) a little farther on and you'll find the STONE OF MAAT (3). Take it and crawl back out the way you came. (screenshots)
EAST TUNNEL: Crawl forward a short distance to where the passage forms a T. Avoid the left (north) branch, which leads to a spike pit. Instead, turn right (south). Crawl up the slope and onto the boards. Fall through to find a SECRET (64/70), the GRENADE GUN (4) (or normal grenades if you already have the weapon). Climb out of the pit, crawl down the slope, then turn left to get back to the cave. (screenshots)
SOUTH TUNNEL: Crawl into the tunnel and immediately turn left (east) to avoid the spike pit ahead. Make the next right (south). (If you continue to the east, you'll come to another spike pit.) Crawl up the long slope to the south. At the top, avoid another concealed spike pit on the right and instead turn left, right, then left again into a dead-end passageway where you can stand and use the switch to open the exit. Then crawl back out of the tunnel the way you came. (screenshots)
Return to the edge of the deep pit. Slide down onto the square ledge on the right side. Turn left to face the torch-lit area near the gate. Then take a running jump to the ledge near the left wall, aiming for the left side. (The right side slopes downward. If Lara lands there she'll slide into the pit.) Continue forward, slide down the back of this ledge, and return through the gate to the HIEROGLYPH PUZZLE. (screenshots)
SOUTHWEST GATE – SQUARE POOL WITH ISLAND: This time, press the hieroglyph tiles in the order hill, reeds, bird. Now head for the gate at the southwest end of the hall, just beyond the dead adventurer. When you enter, the gate closes behind you. Kill 2 more bats (11-12) and continue forward toward the deep pit. Take a running jump across the pit on the left side. As soon as you land, turn right and start firing as 4 crocodiles (13-16) come up the hill from the pool below. They may get stuck in a little hollow on the left side of the slope, giving you plenty of time to snipe away with pistols, but if things get rough, don't be afraid to pull out the shotgun or grenade launcher. (screenshots)
NOTE: You can jump back across the pit to safety if necessary, but you need to take a fairly precisely angled running jump along the right side of the pit to grab the ledge on the other side. If you take the time to set it up correctly, Lara could lose a few toes to the crocs.
After dispatching the crocodiles, go around the edge of the pool, activating the mechanisms inside each of the 4 niches and pulling the switch on the wall opposite the entrance. The switch opens the gate. The niche mechanisms open the trapdoor in the middle of the little island. Drop through that opening and take the STONE OF KHEPRI (5). (screenshots)
Watch out for 2 more bats (17-18) in the tunnel on the way back to the pit and gate. Take a running jump across the pit along the right wall to grab the block on the other side. Pull up and return through the gate to the HIEROGLYPH PUZZLE. (screenshots)
EAST GATE – SECOND HIEROGLYPH PUZZLE: This time, press the hieroglyph tiles in order from left to right: reeds, hill, bird. The gate at the east end of the hall opens. When you enter, the gate closes behind you. You'll need to kill 3 more bats (19-21) between the gate and the deep pit. Jump across the pit and continue to a small room with another hieroglyph puzzle. (screenshots)
Here, there are 9 tiles with symbols and 9 niches below. Again, I'm not sure about the logic of this one, but the solution is to reach into the 2 niches labeled with the mirror-image snake symbols (rightmost niche on the east side and rightmost niche on the north side). Inside one of these niches is the STONE OF RE (6). Inside the other is the mechanism that opens the gate so you can exit. Every other niche releases a swarm of beetles, so avoid them. If you accidentally trigger the beetles, you'll need to jump across the pit and back to get rid of them. Return across the deep pit and through the gate to the first HIEROGLYPH PUZZLE. (screenshots)
NOTE: A few people have let me know that the hieroglyph above the safe niches depicts a horned viper and represents F and V, which are unvoiced and voiced versions of the same sound. As far as I know, the Egyptians used the same symbol (the left-facing viper) for both sounds. So, while this is an interesting side note, it doesn't shed much light on the puzzle solution.
SOUTHEAST GATE – WATER MAZE: This time, press the hieroglyph tiles in the order hill, bird, reeds. The gate at the southeast end of the hall opens. When you enter, the gate closes behind you. Approach the deep pit. Take a standing jump down to the ledge inside the pit on the right. Take a running jump to the ledge ahead (south), then a standing jump out of the pit. Now you'll meet the traditional welcoming committee of 2 bats (22-23). (screenshots)
SMALL ROOM WITH WATER-FILLED OPENING: Next comes a complicated sequence involving an underwater maze. You must swim from one room to the next, using a switch in each one to open the door to the next. The diagram below provides a visual to go with the text and screenshots. It's easy to get disoriented and drown poor Lara, so you'll probably want to save the game after each successful swim. Just be sure to read the bug note below first.
NOTE: You may notice that the hieroglyph tiles near each opening come in alphabetical order based on your SCRAP OF PAPER clue. However, since there are a few different paths to some of the doors, you may not even pass one of these "clues" on your way.
BUG NOTE: Be careful about just when you save the game in this area. A few people have reported a bug in which they completed the entire maze then returned to the hieroglyph puzzle and the tiles were not reset. One player on the old tombraiders.com forum suggested saving before using each of the switches in the maze. My suggestion would be to save before entering the water. Then save in a new slot when you reach the first switch. When you reach the second and subsequent switches, go ahead and overwrite that second save, but keep the first save, from before entering the water, just in case. Also, if you have not yet awakened the bull guardians and trapped them in the cages, you may want to do that now. Avoiding the guardians may be linked to this bug. If all else fails, you can use the level-skip and all special items cheats to continue or download a save file.
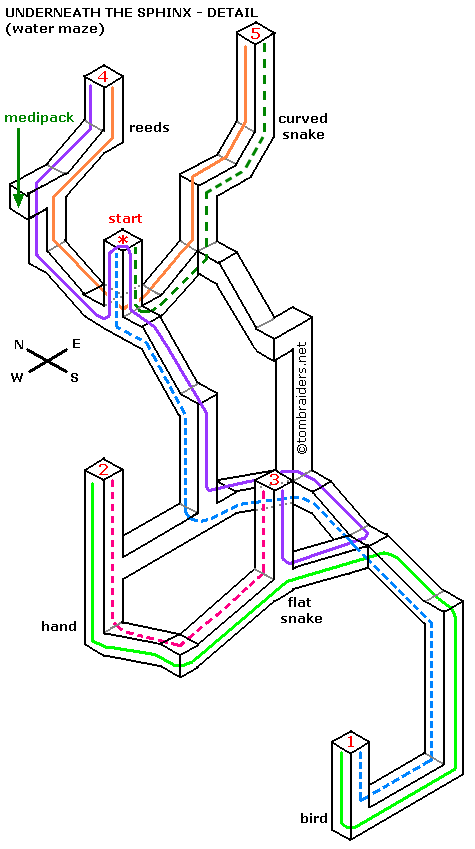
START TO ROOM #1 (broken blue line on diagram): Stand at the opening above the first water-filled tunnel facing east (toward the two statues). Jump in and swim down to a three-way intersection. Here you have a choice to go forward (east), left (north), or right (south). Turn right and follow the tunnel forward and down. There are a few turns but no side passages. At the bottom, you can turn left (east) or right (west); turn left. At the next intersection you have a choice of upward or right (south); turn right. At the next intersection you have a choice of right (west) or forward (south). Continue forward. The tunnel slopes downward then descends sharply. At the bottom you must turn right (west). Continue straight on to a tile with a bird symbol. Then follow the tunnel upward (the only choice) to ROOM #1, where you can get some air. Pull the switch between the statues to open the trapdoor to the next room (#2 in the diagram). (screenshots)
ROOM #1 TO ROOM #2 (solid green line): Now, on to the next room. Stand at the tunnel opening facing east (switch behind Lara). Jump into the water and swim down then forward (east), up, then left (north). So far there are no choices; you're just following the tunnel. At the first intersection you can go left (west) or straight (north). Go left. The tunnel slopes upward and you'll pass a tile with a snake symbol and a passage leading straight up. Don't go up; instead continue on straight (west). Follow the tunnel as it slopes down then turns right (north). Approach the tile with the hand symbol and swim straight up. Ignore the tunnel leading off to the right (east) and continue upward to surface in ROOM #2. Pull the switch to open the trapdoor to the next room (#3 in the diagram). (screenshots)
ROOM #2 TO ROOM #3 (broken pink line): Stand at the tunnel opening facing south (switch behind Lara). Jump into the water and swim down. Halfway down the shaft you'll pass an opening on the left (east). Ignore it and continue to the bottom. Pass the hand symbol at the bend and continue forward (south). A little farther along you must turn left (east) as you follow the tunnel. At the top of the next slope is the tile with the snake symbol. Here you can either continue forward (east) or upward. Swim up to surface in ROOM #3. Pull the switch to open the trapdoor to the next room (#4 in the diagram). (screenshots)
ROOM #3 TO ROOM #4 (solid purple line): The swim to the next room is a long one, so you'll probably want to stop off for air in the cave where you started. Position Lara facing south at the opening (switch behind her). Jump in and swim down to the snake tile. Here you'll have a choice to go left (east) or right (west). Either one is okay, but I'll only describe one route. Turn left and swim down a slope to a T-intersection. Here you can go left (north) up a slope or right (south) down a slope. Turn left. At the next intersection you can go left (west) or up. Go left. At the next intersection you can go up or forward (west). Go up. At the top of the shaft, continue to follow the tunnel as it turns north. At the next intersection you can continue forward (north), turn right (east), or go up. Swim up to surface in the cave where you started. (screenshots)
Take some deep breaths and dive back down (still facing north). At the three-way intersection at the bottom you have a choice to go forward (north), right (east), or turn around and head south. Go forward. The tunnel slopes upward then continues straight up a vertical shaft. At the top there's a dead-end alcove on the left (west) containing a small medipack (7). Grab it, roll, and continue east toward a tile with reed symbols on it. Then head upward to surface in ROOM #4. Pull the switch to open the trapdoor to the last room (#5 in the diagram). (screenshots)
ROOM #4 TO ROOM #5 (solid orange line): Face west (with the switch behind Lara). Swim down and forward (past the reed symbols). If you didn't get the small medipack (7) in the alcove earlier, pick it up now. Then continue downward. At the bottom of the vertical shaft, follow the passageway as it turns to the south. At the next intersection you can go up (to the room where you began the maze), forward (south), or left (east). Go left. The tunnel slopes upward. At the next intersection you can go up or right (south). Go up. Follow the tunnel upward through a few turns and past a snake symbol. Climb out of the water in ROOM #5. Use the switch to open the gate back in the cave, and pick up the STONE OF ATUM (8) on the opposite ledge. (screenshots)
ROOM #5 BACK TO START (broken green line): Returning to the start is fairly easy. Face west (so the switch is behind Lara) and jump into the water. Swim down past the snake tile. Keep going forward (west) and downward through all turns. When you reach the intersection (where you can go left, right, or up), swim up to surface in the cave where you first entered the water maze. (screenshots)
Slide down to the ledge on the left side of the deep pit. Take a running jump to the ledge ahead on the left, or jump to the slope, slide back and grab the edge, then traverse to the right and pull up. Be extra careful when jumping out of the pit; it's very easy to slide in. You need to line up a running jump along the diagonal edge of the flat ledge, aiming for the middle of the slope. Take the running jump and hold Forward but not Action to stick the landing. Return through the gate and turn left to get back to the HIEROGLYPH PUZZLE. (screenshots)
WHEN YOU HAVE ALL FOUR STONES—Maat, Re, Khepri, and Atum—return through the west gate to the ROOM WITH BASALT STATUES AND COLORED LIGHTS. Place each stone in the niche below the chute with its corresponding color and hieroglyph clue. When you've placed all four, the gate opens. (screenshots)
TRAPPED ROOMS LEADING TO THE EXIT: Follow the short hallway to a deep pit. Use the bars on the ceiling to traverse across the pit. Drop to the ledge on the other side and kill a couple of bats (24-25). (screenshots)
When you enter the next room, the gate closes and drill-like blades begin to descend from the ceiling. You'll need to run around to the alcoves to collect each of the 4 HOLY SCRIPTURES (9-12) before the north gate will open. You don't have to retrieve them in any particular order, but I recommend making your last pick-up one of the artifacts nearer to the exit. Then you can get out more quickly. For one possible strategy, check this page with screenshots.
Continue up the short ramp to the next room. Here you'll find more of those X-shaped blades hidden in the floor. There are only four sets of blades, none in the corners or the center of the room. So you can either jump from the doorway to the center then from there to the exit (screenshot), or crouch on either side of the doorway and slowly crawl forward, triggering the blades, waiting for them to recede, then crawling on. (screenshot)
Ahead is another deep pit with monkey bars overhead. Traverse across the pit, drop down and kill 2 more bats (26-27). Continue through the cave to the next level.
*NOTE ON SECRETS: There are 70 secrets in the entire game. These are marked "(x/70)" in this walkthrough. To check your progress in-game, press Pause (P on keyboard, Start on PlayStation or Dreamcast controller) then choose Statistics. At the end of this level, you should have 64/70.
†UPDATE HISTORY: 6/10/00 - Previous edit, details not available.
5/5/19 - First major update since this walkthrough was created in 1999. This revision includes many new screenshots as well as various other corrections and clarifications.
1/23/25 - Added running item and kill counts, which hopefully will be useful in the upcoming Remaster.
2/21/25 - Added VGCartography's level maps, with permission. Visit VGCartography on DeviantArt and follow on Twitter/X and YouTube for more fantastic game maps.
ACKNOWLEDGEMENTS: Special thanks to the participants in the alt.games.tombraider newsgroup and the old tombraiders.com forum, without whom parts of this walkthrough could not have been written. Thanks also to James 007 and Sturm for their help on this level.
FYI: According to my informants, the symbol of two reeds really represents the phonetic equivalent of E or Y, but let's go with the clues on the SCRAP OF PAPER and assume it's an I. The sandy hill hieroglyph represents the phoneme Q, a slightly softer version of the 'K' sound. There are several different real hieroglyphs that represent birds. A is a vulture, M is an owl, W is a quail chick, and there are other bird symbols as well. But in the clue, the closest match seems to be A. (If you'd like to learn more, check out "10 Fantastic Free Resources for Learning Egyptian Hieroglyphs" from Tomb Raider Horizons.) If anyone has a tighter explanation for the logic involved in this particular puzzle, please enlighten me.
The various stones are named after Egyptian deities. Maat is the goddess of law, order, and truth. Re (a.k.a. Ra) is the sun god and patriarch of the Egyptian pantheon. Khepri is identified with the scarab beetle; he is said to push the sun across the sky as the dung beetle rolls its ball of dung along the ground. (I'm not sure why they didn't make this one the Stone of Sobek, the crocodile god. It seems like a missed opportunity, but I'm glad there wasn't a room infested with scarabs!) Atum is another god associated with the sun and was later identified with Re. A shortlist of Egyptian deities appears on Wikipedia's Egyptian Pantheon page. Tomb Raider Horizons offers more info in the article "Oh My Gods! 5 Online Guides to Egyptian Gods and Religion."
‡NOTE ON VIDEO GUIDES: Eldin's videos don't always follow the same strategies I use in my walkthroughs, but if you prefer that format, I think you'll find them very useful.
WAS THIS WALKTHROUGH HELPFUL? If not, I apologize and invite you to contact me with any questions. If you need help right away, I recommend the r/TombRaider subreddit. Other fan-run forums are listed at tombraiders.net/stella/community.html. If this site was useful, please consider supporting it financially or in other ways. For details, visit tombraiders.net/stella/support.html. As always, I welcome your corrections/suggestions. Thank you!
Copyright © 1999- Stellalune (). Feel free to copy or print this walkthrough for personal use. By all means, share it with friends, but please include this credit line so people can send me their feedback. No part of this walkthrough may be reproduced on another site without permission. Follow this link for details about this site's advertising and privacy policy.
Stella's Tomb Raider Site: tombraiders.net.