STELLA'S TR2: GOLDEN MASK REMASTERED WALKTHROUGH
The Golden Mask Remastered guide is now complete. It includes all achievements/trophies. For the other guides that have not yet been updated, I will continue to link to the ORIGINAL WALKTHROUGHS, which cover all the basics. Please check the TR2 introductory notes for info on my process, modern vs. classic tank controls, etc. Follow this link for the archived classic walkthrough.
LEVEL 4: KINGDOM (Remaster)
Updated: 10/17/26(†)
Pickups: 52, including 3 secrets
Kills: 25 (29)
NOTES: 29 is the maximum number of kills if you include enemies and potential allies. If you avoid antagonizing the 4 Inuit warriors for the "Na Zdorovye!" achievement/trophy, begun in the first level, there are 25 hostiles. Depending on which other achievements/trophies you unlock, your kill count will probably be even lower. Also, one of the regular pickups in this level will be the GRENADE LAUNCHER, if you don't already have it. Supplies do not carry over to the next level, so go ahead and use what you have.
LEVEL MAP by VGCartography (used with permission)
Kingdom Video Walkthrough by Eldincy‡
CAGE AND ROCKY HILLSIDE: The level begins with a view of the cage from outside. Several ape-men are running around on the hillside. I'm not sure what the designers' intention was here, but I'll refer to them as sasquatches—the Pacific Northwest's famous cryptids, also known as "Bigfoot." If you've played TR2, you'll recognize them as redecorated Tibetan Yeti.
IMPORTANT: The "Legitimate Repression" achievement/trophy requires you to "leave three sasquatches locked in the start cage." In order to do that, and get all pickups with minimal injury, we'll leave a few items in the starting area and return for them later. If you don't care about achievements, the archived classic walkthrough covers all kills and pickups in the starting area, as well as alternative strategies for avoiding the sasquatches.
Ignore the switch on the side of the orange block for now, and watch out for the lit burner. Slide the movable cage onto the gold floor tile to open the nearby trapdoor and get the the flares (1) underneath the cage. Hop over the open trapdoor, approach the switch, and save the game. (screenshots)
Pull the switch to open the cage door. The 3 sasquatches (1-3) running around outside can now get in. Immediately hop back, then take a standing jump up onto the switch block. The sasquatches may all approach at once, in which case, just stay where you are as they make their way inside. Usually, you'll have to run out and get their attention. If there's already a sasquatch in the doorway, wait for him to come inside and make his way around the hole. Then run off the edge of the cage and straight out the door. Jump up onto the low block near the outer wall. Then roll and run/jump back into the cage. Jump directly onto the switch block, or jump over the hole and then climb onto the block. (screenshots)
Wait for all 3 sasquatches to enter the cage. (They will attempt to give Lara a free chiropractic adjustment, so heal as needed.) Then hop back off the block and pull the switch again to close the cage door. Finally, try not to get pummeled too badly as you drop back into the hole and grab onto the ladder on the inside wall. Climb down into the next area. (screenshots)
NOTES: You could run/jump all the way around the outside of the cage then back inside to lure the sasquatches in, but you'll spawn a fourth sasquatch (23, below) if you do. Better to just run out then back inside. Also, a fifth sasquatch (24, below) appears if you collect the large medi pack in the cave at the bottom of the hill. We'll ignore all pickups for now and return to this area later to get them. "Legitimate Repression" will unlock when you finish the level.
CAVERN WITH POOLS OF WATER AND MOLTEN GOLD: Hop down from the barred alcove and go around to the right (left when facing the alcove). Continue uphill into a small cave with solid gold walls and floors. Hop up into the opening straight ahead. Slide down the slope into a pool of water. Surface and turn right. Climb out on the ledge near the gold panel with the carved face. Then pull up onto the ledge on the right. Continue into a short passageway, where you'll find Uzi clips, M16 clips, and a small medi pack (2-4). (You're now behind the barred alcove you just came from.) Grab the items, turn around, and head back up the slope. Climb onto the ledge on the right. Jump forward and slide down into the area near the barred alcove and pools of bubbling gold. (screenshots)
Walk down the slope to the edge of the slightly raised stone block overlooking the golden pool. Take a running jump from there down to the ledge on the left side of the pool. Turn right and take a running jump into the alcove with the shotgun shells (5). After picking up the shells, roll, then take another running jump back to the previous ledge. (screenshots)
Move carefully into the next room, where there's another pool of molten gold and several angled blocks. Position Lara at the edge of the pool on the right side of the ledge. Take a standing jump forward onto the sloping block ahead. Immediately jump again to spring off the slope and land on the flat spot in the far right corner. (screenshots)
Turn right, go up the ramp, and climb onto the high ledge on the left. Go around the left side of the orange structure and kill a sasquatch (4) that climbs out of the pit ahead. (The grenade launcher works very well.) Then pick up some shotgun shells (6). From here, you can see the gold coins through the bars but can't reach them yet. Climb over the orange rocks on the right, turn left, and slide down the slope. Drop through the opening in the floor into another cage. (screenshots)
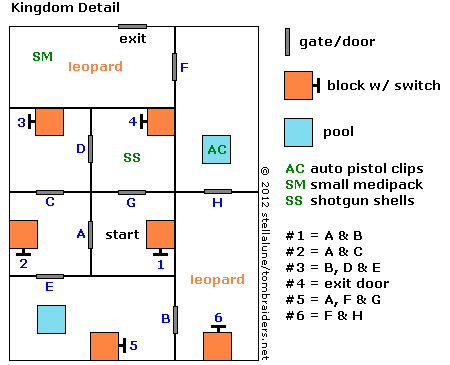
NETWORK OF CAGES WITH SWITCHES: This section is illustrated in a series of screenshots and in this diagram. Each switch is numbered (1 through 6); each gate is labeled with a letter (A through G). When you begin, all gates are closed; all switches in the up position. As you explore, watch out for the burners, which light and extinguish as you use various switches. The lit ones can burn Lara, and there are only a few small pools of water not very conveniently placed to put out the flames. The 2 snow leopards (5-6) in nearby cages can't reach you yet.
Begin by pulling switch #1 (in the cage where you start) to open gates A and B. Turn left and go through gate A into the next cage. Pull switch #2 to open gate C (ahead) and close gate A. Go through gate C into the next cage and pull switch #3 to open gates D and E, and close gate B. If the leopard (7) in the cage at the far right (bottom of the diagram) went into the adjacent cage (bottom left of diagram, with pool) when gate B was opened, it will now be able to reach you. Turn right, ready a weapon, and shoot it as it approaches. (Or jump up onto the switch block and shoot it with pistols.) (screenshots)
Go through gate D and pick up the shotgun shells (7). Pull switch #4 to open the exit from this area: a wooden door on the other side of the bars to Lara's left. Turn around and return through gate D into the cage with switch #3. Turn left and go through gate C into the cage with switch #2. Then continue straight ahead through gate E into the cage with the small pool. Inside that cage, use switch #5, on the back of the block, to open gates A, F, and G. The cutaway shows gate F with the second leopard (6) behind it. Gate B, behind you, remains closed for now, so the leopard can't reach you. Now, return through gate E (near the small pool) into the cage with switch #2. Turn right, and go through gate A into the cage where you started. (screenshots)
Pull switch #1 again to return it to the 'up' position and open gate B. (It also closes A, but you can exit through G.) If you didn't shoot the first leopard (5) earlier because it remained trapped in its original cage, it will now be able to reach you. Kill it as it approaches. (screenshots)
Exit the starting cage through gate G. Go left through gate D, left again through gate C, and straight on through gate E into the cage with the pool. Pull switch #5 again. This puts it in the 'up' position and closes gate F, near the exit. Turn around and go through gate B into the cage with switch #6 . This switch controls both gates F (near the exit) and H (directly behind you if you're facing the switch). Pull the switch, roll and draw weapons, and then shoot the second leopard (6) as it charges toward you. (Or hop up onto the switch block and shoot it from there.) (screenshots)
When the coast is clear, go around the burner, which ignited when you pulled that last switch, and through gate H. Hop into the small pool to retrieve some automatic pistol clips (8). Then continue forward and left through gate F. Pick up the small medi pack (9) on the floor ahead and then go through the wooden door, which you opened earlier using switch #4. (screenshots)
AREA BEYOND THE CAGES: In the hallway beyond the cages, head to the left first. Slide down the ramp and jump to grab the ladder. Climb all the way down into the spike pit at the bottom. Let go and walk through the spikes to get the Uzi ammo (10). Climb back up the ladder past the spot where you grabbed on before. Position Lara so her feet are level with the spiked ledge on the left. Then backflip onto the ledge behind her. (screenshots)
Follow the short passageway opposite the ladder and enter the dark, low-ceilinged room on the right. Inside, turn left, go forward a few steps, and then turn right again to find some flares (11) and automatic pistol clips (12) sitting on grates in the floor. (Perhaps you noticed them earlier while exploring below.) On the far side of the room is a barred doorway, behind which you can again glimpse the gold coins. (screenshots)
To get them, climb the stairs near the grates where you found the flares and ammo. Then follow the hallway to a T-intersection. Turn right. Don't jump over the orange slope ahead or Lara will land in the spikes beyond. Instead take a standing jump up to the flat spot on the right, where you'll find more automatic pistol clips (13). Hop/slide back down into the hallway and head down the stairs and around the corner to find SECRET #1, the gold coins (14), sitting in the barred alcove. (screenshots)
Taking the coins opens the nearby trapdoor. Now there's a sasquatch (7) running around in the cages below. You can hang from the opening to draw it out and then pull up and shoot it from above, but this is time consuming. You're probably better off just dropping down and finishing it quickly with a grenade or the Uzis. Afterward, return through the cages to the exit. (Check the diagram if you get disoriented.) This time, follow the huge footprints up the long ramp on the right. (screenshots)
TREES AND WOODEN BRIDGES ABOVE GOLDEN POOL: Climb the rocks to the orange opening. When you take the large medi pack (15) near the skeleton, 2 sasquatches (8-9) charge out of the woods. Shoot them as they approach. Then jump down to the flat area ahead on the right. Watch out for the pool of molten gold. Take a standing jump up to the flat spot in the middle of the blocky clump of trees just ahead on the right. Between the trees, go forward then left. Draw weapons and shoot a third sasquatch (10) as it runs toward you. For some reason, it's able to withstand the heat of the bubbling pool. (screenshots)
Turn around, move back inside the clump of trees, and head to the left onto the wooden bridge. Turn left and do a tricky running jump across the pool to grab the left side of the leafy green ledge. (The setup for this jump is shown in the linked screenshots.) Pull up and claim 2 sets of automatic pistol clips (16-17).
Once you have the ammo, move forward to the edge of the green ledge. Hop back once, then take a running jump to land on the sloping stone wall ahead. Slide back and grab the edge. Traverse to the left and pull up onto a flat section of the wall. Turn left and walk carefully forward to the edge. It's dark here, so take care not to step off into the molten gold. Stand at the edge and sidestep to the right until Lara is touching the wall. Pivot slightly to the left and take a standing jump onto the wooden bridge. Start toward the other end of the bridge but stop a little before the last section. Take a standing jump onto the ledge with SECRET #2, the gold bars (18). Make sure you give Lara enough room to jump; it's easy to overshoot this ledge and land on the slope behind it. If that happens, you'll have to reload or come all the way back around to get the secret. (screenshots)
Once you have the gold bars, step forward off the ledge and slide down to a flat spot at the edge of the molten pool. Move to the middle of this block, angle Lara slightly to the left, and take a standing jump onto the tree root with the M16 ammo (19). Turn left and walk up to the highest point on the tree root. Position Lara with her back to the tree trunk and take a running jump across the pool. Do not press Action during this jump or Lara won't make it. Go forward, then left, then jump back up to the flat spot in the middle of the clump of trees. This time, go all the way through and cross the wooden bridge. (screenshots)
IMPORTANT: If you're going for all achievements/trophies, you'll have to make a choice now. There's an Inuit warrior (1) just ahead. You can spare him for the "Na Zdorovye!" achievement/trophy (don't anger the warriors or their spirits) or kill him to get the grenades he drops, for all pickups and the "Harvest Plan Implemented" achievement/trophy. If you want both, save the game before killing him and do not overwrite this save. Play through the rest of the level with all pickups, as described below. Save at the beginning of the bonus level, NIGHTMARE IN VEGAS. Then reload your earlier save and complete KINGDOM again without harming any allies or bothering to get every item. Once you've unlocked "Na Zdorovye!," load the NIGHTMARE IN VEGAS SAVE and continue with 100%. There are tips for a speedier second playthrough in a footnote.
CONTINUING WITH ALL PICKUPS: Beyond the wooden bridge, look to the left across the stream of gold and you'll see the Inuit warrior (1) pacing on a small ledge. If you choose to kill him, do it before crossing the gap. Then take a running jump to grab the vine-covered ledge where he was standing, pull up, and retrieve the 2 pairs of grenades (20-21) he dropped. (screenshots)
NOTES: If you don't already have it, one of these items will be the GRENADE LAUNCHER.
Follow the ledge to the right to find a small medi pack (22) sitting in a barred alcove. Then take a running jump back across the golden stream. Turn left and continue into the building. (screenshots)
BUILDING WITH SQUARE HALLWAY AND GOLD 'X' PATHWAY: Inside is a hallway with a wooden door and numerous barred windows surrounding a large room with an X-shaped golden path. First, head to the right. Enter the perpendicular hallway and turn left. Continue to the end, where you'll find some grenades (23). Now, go back the way you came. Just before the entrance and the wooden door, there's a switch on the right. Pull it to open a trapdoor in the ceiling of the room with the X path, dropping a mercenary (11) into that room and also spawning a sasquatch (12) behind the bars on the far side of the that room. Neither of them can reach you yet. (screenshots)
Just beyond the wooden door, on the left, is a golden alcove with 2 more switches. Use the switch on the right to open the wooden door. Ready weapons, hop down into the X-path room and deal with the mercenary (11). (screenshots)
IMPORTANT: If you killed the Inuit warrior you met a few minutes ago, ignore the left switch, which opens 3 doors in the X-path room, letting letting in 3 more Inuit warriors (2-4). They'll fight the mercenary, but then you'll have to fight them. If you don't use the left switch, they remain locked away.
Sitting in the middle of the golden path is a large medi pack (24). Taking it opens a door in the far left corner of the outer hallway, releasing the sasquatch (12). It also opens the bars of the cage directly above, so the sniper (13) inside can see Lara if she moves toward the edges of the room. So, grab the medi pack, roll, and kill the sasquatch as it approaches. Then run back to the entrance. Climb into the doorway, turn around, and shoot the sniper from below. If you like, you can pull the left switch to release the 3 Inuit warriors (2-4), then fight them. Or, just let them be and move on. (screenshots)
Follow the outer hallway past the 2 switches and around the next corner. Pick up some automatic pistol clips (25) in the third alcove on the right. Continue to the end of the hall and through the gold door. Keep going, past the doorway on the left lined with greenery. At the end of the hall, on the right you'll find some Uzi ammo (26). Grab it, turn around, and backtrack to the doorway with the greenery. (screenshots)
TREETOPS: Slide down the short green slope, but don't run forward; there's a gap in the floor, and it's a long drop into a pool of molten gold below. Grunting sounds alert you to the presence of a couple of sasquatches (14-15) in the treetops. Don't worry; they can't reach you yet. There's no "correct" way to explore this area. Here's one possible sequence with all pickups:
Take a standing jump across the gap onto the sloping green "branch" ahead. Then take a running jump to the next ledge to get some flares (27). Move to the higher end of this ledge and turn to face out over the open area. From here, you may be able to target the sasquatches (14-15) up in the trees using the M16 or even pistols. They're sneaky, though, so this could take time. If you have grenades or Uzi ammo to spare, they'll be easier to kill when you reach the top. (screenshots)
When you're ready, take a running jump back to the previous branch/ledge, pressing Action to shorten the jump or angling slightly to either side so you don't overshoot the ledge. Walk down to the right, turn around so Lara's back is toward the entrance, hang from the ledge, and climb to the left, onto the ladder. (screenshots)
First, climb down. Near the bottom, backflip off the ladder onto the ledge behind. Take a standing jump from the BACK of the ledge onto the molten gold square with 2 pairs of grenades (28-29). This tile is safe, but the rest of the pool is searing hot. Turn around and jump back to the leafy ledge. Then jump and grab onto the ladder. (screenshots)
This time, climb almost to the top. Pause there before pulling up. (If you like, you can save while hanging on the ladder. Just be sure to hold Action when you reload, so Lara doesn't fall.) Watch the 2 sasquatches (14-15). When they move away from the top of the ladder, pull up, turn right, and jump over to the flat area beyond the skeleton. As you jump, whip out the grenade launcher (or your guns of choice), roll, and hop back while firing. Just take care not to back up too far, since there's a large hole beyond the second skeleton. (screenshots)
When both sasquatches are dead, collect the small medi pack (30) at the top of the ladder, plus automatic pistol clips (31) among the bones of the second skeleton and M16 clips (32) on the other side of the hole. Mind the edges; it's a long way down. (screenshots)
Climb down the ladder near the second skeleton to get another small medi pack (33). Then face the ladder, sidestep to the right edge, and side flip left, onto the gold ramp. Slide onto the short, perpendicular slope below and immediately jump onto the long, gold ramp ahead. (If you don't jump quickly, Lara will slide down a series of green slopes into the molten gold pool.) Once Lara lands on the gold ramp, just let go, and she'll slide down a series of slopes to the bottom of the cavern, landing at last on a gold tile with a face motif and some shotgun shells (34). (screenshots)
Take a carefully angled standing jump over the molten gold onto the raised, gold block in the doorway ahead. Do not press Action since this shortens the jump, though you might want to veer to the right a bit to stick the landing. Don't run forward since there's more molten gold below. (screenshots)
GOLD WALKWAY WITH TRAPDOORS: When Lara lands on the first tile in this serpentine, golden walkway, there's a sound of trapdoors opening. One of these is ahead on the right. If you don't care about getting all secrets/items, you can skip the next side area and continue with the section titled "GOLD WALKWAY WITH TRAPDOORS (again)," below.
To obtain the final secret, turn right and move along the golden walkway. Stepping on the second tile closes the first trapdoor ahead, but stepping on the third tile re-opens it. Take a running jump from the third tile into the open trapdoor. (The molten gold on the floor here is safe.) Follow the passage to a ladder. Climb until Lara's hands are level with the orange ledge on the right, backflip onto the ledge behind, and then pull up onto the orange ledge. (screenshots)
ROOM WITH GOLDEN SLOPES AND FOUR GOLD 'WATERFALLS': To reach the secret, you'll need to work your way around the golden slopes counter-clockwise from the entrance to the square, orange-gold panel on the opposite side of the room (not the ornate gold door in the upper right corner, which is the exit from the secret area). (screenshots)
Start by stepping off the orange ledge and sliding down to the flat spot below on the right. Take a running jump across the flowing stream of gold to the next flat ledge. Position Lara at the center of this ledge and turn about 45 degrees to the left. Take a standing jump down to the more or less flat tile in the middle of the golden slope. Turn so the pool of molten gold is ahead and to Lara's left. Step back as far as you can. Then take a standing jump down to the flattish spot two tiles ahead. Next, set up and take a running jump onto the angled block on the other side of the golden stream, one square higher and to the right (5). (screenshots)
Turn right to face uphill. Walk to the top left corner of this block and take a standing jump up to the flat ledge to the left of the golden waterfall. Turn left, so the gold door at the top of the slope is straight ahead. (This is the exit from the secret area.) Walk forward to the left corner of this ledge, then take a standing jump up to the flattish spot just to the left of the slope. Take a running jump from there down to the flat ledge just to the right of the orange-gold wall panel. (Or, instead walk to the top of the flattish spot, jump forward to land on the slope near the wall, and slide down onto the flat ledge.) Move to the edge near the wall and take a standing jump toward the panel, which shatters as Lara passes through it. (screenshots)
SECRET ROOM: Inside is a small room with some items lying on the floor. Be careful to walk only on the safe tiles directly below the smooth, gold squares on the ceiling. All other floor tiles are deadly molten gold. Walk forward and take the flares (35). Turn right and kill a leopard (16) that charges in from the next room. Then carefully move around to the right, sticking to the safe tiles as you retrieve the small medi pack (36). Return to the tile where you got the flares. Position Lara so the staircase is behind her and the wide opening where you entered is on her left. Take a running jump to the safe tile near the far wall. Turn left and take another running jump into the alcove with SECRET #3, the gold skull (37). (If you're having trouble setting up this jump, try this: Face the skull, sidestep to the right so Lara is nearly touching the wall, walk forward to the edge, which is slightly higher near the wall. Then hop back once before running and jumping.) (screenshots)
Once you have the skull, turn around and take a running jump back to the previous safe tile. Turn right, back up to the wall, and take another running jump back to the spot where the flares were. Then walk around to the right, over the spot where the medi pack was, and into the next room. Climb the stairs to the gold door, which is now open. (screenshots)
LEAVING THE SECRET AREA: Slide down the ramp straight ahead (not the one on the right) to land on the flat ledge below. Take a running jump across the gold stream. Climb onto the block straight ahead. Then pull up onto the ledge on the left. The rightmost alcove on this ledge contains the exit ramp. To avoid injury in the long drop coming up, angle Lara a little to the left and jump forward onto the ramp. Slide down facing uphill and grab the end of the first slope. Drop onto the gold slope below and slide down a series of ramps onto the gold tile with the face at the bottom of the TREETOPS area. (Remember, you found some shotgun ammo here earlier.) Once more, take a diagonal standing jump from the carved gold square onto the raised gold block. Once again, take a standing jump from the edge of the face tile onto the GOLD WALKWAY WITH THE TRAPDOORS. (screenshots)
GOLD WALKWAY WITH TRAPDOORS (again): As noted earlier, walking or jumping over certain tiles on this walkway triggers the opening or closing of various trapdoors. Move onto the second tile in the walkway to close the first trapdoor. Then avoid the third and fourth tiles by jumping diagonally onto the fifth tile, just before the first trapdoor. This way the trapdoor will remain closed. Walk onto the first trapdoor, turn left, draw weapons, and move two tiles forward. When you do, a sasquatch (17) emerges from the dark opening in the greenery ahead. Shoot it as it approaches. Then step onto the to the tile nearest the second trapdoor to draw out a second sasquatch (18). Back up carefully as you shoot it. (screenshots)
Continue along the walkway. (The second trapdoor opens then closes again as you go. There's nothing interesting below.) Climb into the opening the sasquatches came from. Approach the small medi pack (38) on the ground ahead, but don't pick it up yet. A third sasquatch (19) comes through the dark opening on the right. There isn't much room to maneuver here, so either roll on the spot and use a grenade, or run to the left, roll, draw Uzis, and shoot the creature as it charges. Then collect the health pack. (screenshots)
You'll find some shotgun shells (39) and Uzi ammo (40) in the dark areas off to the left and right of the depression with the medi pack. Just watch out for spike pits as you explore. When you have everything, climb back over to the gold walkway and follow it to the end. From the spot where you find the Uzi clips, all you need to do is vault over the low green ledge and hop down onto the gold walkway. Turn left and follow the walkway to the end. Climb the tall, golden blocks then the short ladder. (screenshots)
NOTE: There are two more trapdoors on the walkway, but there's nothing but lava beneath, so you can safely ignore them.
MOLTEN GOLD STREAM AND LEOPARD CAVE: At the top of the ladder, avoid the stream of molten gold on the right. (A ladder on the other side of the stream leads up to a barred door. We'll return here shortly.) Follow the path forward and left into a dimly lit cavern with uneven stone floors. Two leopards (20-21) attack, one from ahead on the right, one from the left. Deal with them. Then continue forward between the rocky hills toward the low, wide opening beyond which you can see a wall of ladders. Kill a third leopard (22) here. (screenshots)
When you've dealt with all 3 big cats, head back the way you came. Pick up the items inside the building with red walls: a large medi pack and 2 sets of M16 clips (41-43) in opposite corners. Taking the medi pack opens the gate at the top of the ladder you passed earlier, allowing you to return to the STARTING AREA. It also lets in a sasquatch (23), assuming you didn't kill it at the beginning. You can wait in the red room and shoot it as it approaches. (screenshots)
IMPORTANT - CHOICE OF PATHS: If you followed this guide and locked the first 3 sasquatches in the cage for the "Legitimate Repression" achievement/trophy, you'll probably want to return there now for the pickups you missed. Read on. If you don't care about 100% completion, proceed to the end of the level (below).
BACK TO THE START: Exit the red room where you found the last several items and make a U-turn to the right, into the area with the MOLTEN GOLD STREAM. Move down to the end of the path, turn left, take a running jump over the stream, and grab the wooden ladder. Climb to the top and pick up the shotgun shells (44) in the doorway. (screenshots)
CAGE AND ROCKY HILLSIDE (again): With the first 3 sasquatches (1-3) trapped in the cage at the top of the hill, you can explore this area in peace. Go forward into the cave at the bottom of the hill to find another box of shotgun ammo (45). Grab it. Then jump over (or go around) the spike pit and pick up a large medi pack (46) lying next to the barred window. Another sasquatch (24) appears when you take the large medi pack, but it will be trapped inside the cage. So it can't reach you, and you can't kill it. Make your way to the top of the hill and collect Uzi ammo (47) on the ground near the cage door, plus flares and a small medi pack (48-49) on the painted floor tiles near the top of the hill. When you have everything, return to the bottom of the hill and go through the barred door where you came in. (screenshots)
Turn around and drop back to grab the ladder, but don't climb down. Instead, backflip from the top of the ladder to land on the other side of the molten gold stream. Head up the path and back into the area where you killed the sasquatch and 3 leopards earlier. (screenshots)
WALL OF LADDERS AND FINAL AREA: When you're ready to finish the level, continue over the rocky hill, past where you shot the last leopard, into the room with the wall of ladders. Climb to the top. (screenshots)
In the middle of this wide ledge is a receptacle for the MASK OF TORNARSUK. If you want all pickups, wait to use the mask. First, approach the double doors on the right. They open so you can enter the room beyond. There's a switch on the far side of the gap, but you can't reach it yet. Climb down the ladder into the pit, walk through the spikes, and take the large medi pack (50) in the alcove on the right. Then climb back out. (screenshots)
FINAL BOSS: Save the game. Then set the MASK in its receptacle. When you do, the doors on the right close, the stone-and-gold structure behind you transforms into a long ramp, and the GUARDIAN (25) emerges at the top. It appears to be a gilded version of the Guardian of the Talion from TR2. The level ends when the boss falls, so your strategy will vary depending on whether or not you want all pickups and/or achievements/trophies.
If you want every item and the "Victory Over the Bourgeoisie" achievement/trophy, you must awaken the GUARDIAN, get the last 2 pickups, then "fight the Guardian of the Kingdom by staying with him on the other side of the bridge with no way back." Here's the sequence (also shown in this series of screenshots):
- As soon as you've placed the mask in its receptacle, press Look to get camera control back. Then roll and move to either side of the base of the long, golden ramp. As the GUARDIAN comes stomping down, get ready to run.
- When it reaches the bottom, jump past it onto the ramp and head for the top. Use running jumps to cover the distance faster.
- When you reach the room at the top, run around behind the golden face panel to find the last 2 items: grenades and a large medi pack (51-52), as well as a switch. It's possible to pick up both items then use the switch in one pass, but you'll probably take some damage from the GUARDIAN's pummeling. Heal as needed.
- Or, instead, pick up the grenades, run out and around the gold panel, then back inside for the health pack. The GUARDIAN follows closely, but at least he's not right on top of you. Once you have the health pack, run around the partition again and back to the switch.
- Use the switch to re-open the double doors to the right of the mask receptacle and extend a bridge across the spike pit in the next room.
- Run/jump back down the ramp, into the room on the right, and across the bridge.
- Now, if you want the "Victory Over the Bourgeoisie" achievement/trophy, you'll need to trap the GUARDIAN on this side of the gap before killing it. Stand near the switch and wait for it to approach. (Maybe save in a new slot if things are going well.)
- As soon as the GUARDIAN clears the gap, pull the switch to retract the bridge.
- Jump out of the way. Then, quick as you can, climb/jump onto the switch block and move back against the wall, where it's harder for the GUARDIAN to reach you.
- Fire away until the GUARDIAN falls, the achievement/trophy pops, and the level ends.
NOTE: If all this avoidance stresses you out, you can save the game before waking the GUARDIAN. Then play through twice: Once to get the achievement/trophy while ignoring the pickups. Then again for all pickups, using one of the alternatives below.
If you want all pickups but don't care about the achievement/trophy, use the same basic tactics described above, except that when you reach the switch that retracts the bridge, don't wait for the GUARDIAN to cross. Just pull the switch. Depending on how fast you are, the guardian will either be trapped on the other side of the gap, or it will fall into the pit. Shoot it with pistols until it falls and the level ends. (screenshots)
If you're not interested in all pickups and just want to finish the level, move to the edge of the ledge above the wall of ladders and take a few shots at the GUARDIAN as it approaches. Before it gets too close, holster your guns and quickly climb down to the floor. You can then shoot the GUARDIAN safely from below. (screenshots) You may need to adjust your position a few times so you can get a clear shot. If it wanders off, just climb up the ladders to draw it closer to the edge. Then quickly drop back down. When the guardian falls, the level ends.
BONUS LEVEL AND ACHIEVEMENT/TROPHY CLEANUP: When you finish the level, "Comrade Croft" unlocks automatically for completing the Melnikov Island chapter. If you trapped the 3 sasquatches in the cage at the beginning, "Legitimate Repression" also pops on the statistics screen. Then, if you've found all 12 secrets, you'll be transported to the surreal and hilarious NIGHTMARE IN VEGAS bonus level.
Finally, for the "Na Zdorovye!" achievement/trophy (don't anger the Inuit warriors or their spirits), you'll need to save the game in Las Vegas. Then reload your earlier save from before killing the Inuit warrior (above). This time, play through without killing any allies. The footnote includes a few time-saving tips.
If you missed any secrets or pickups, you're welcome to download PC save files for the end of the Kingdom and/or the start of Vegas.
†UPDATE HISTORY: Updates made prior to the Tomb Raider I-II-III Remastered release, including credit for tips sent in by other players, are tracked in the archived classic walkthrough.
10/17/26 - Remastered guide posted.
"NA ZDOROVYE!" ACHIEVEMENT/TROPHY: The first Inuit warrior you encounter (above) drops grenades when killed. So, if you want both the "Na Zdorovye!" (don't anger the Inuit warriors or their spirits) and "Harvest Plan Implemented" (all collectibles), you'll have to play at least part of the level twice. To streamline this process, when you meet the first Inuit warrior, save the game before killing him, and do not overwrite this save. Then play through with all pickups. Save at the beginning of the bonus level, NIGHTMARE IN VEGAS. Then reload your earlier save and complete KINGDOM again without harming any allies or bothering with all pickups. Once you've unlocked "Na Zdorovye!," load the NIGHTMARE IN VEGAS SAVE and continue with 100%.
Here are some notes on completing the KINGDOM level more quickly. It shouldn't be too difficult, since you're already familiar with the level.
- In the BUILDING WITH THE SQUARE HALLWAY AND GOLD 'X' PATHWAY, use the same tactics described above: Pull the first switch to free the mercenary. Use the right switch in the pair of switches to open the wooden door. (Ignore the left switch, which releases the Inuit warriors.) Go in and kill the mercenary. Take the large medi pack to open the exit and free the sasquatch, then kill it as it approaches. Ignore the sniper above and proceed to the green ramp leading to the TREETOPS.
- You can ignore most of the TREETOPS area. To get through quickly, slide down the short, green ramp at the entrance and jump over to the branch/ledge directly ahead. Turn around to face the entrance. Then take a carefully angled jump onto the long, gold ramp below and to the left of the entrance. Slide all the way down to the gold tile with the embossed face and shotgun shells. (screenshots)
- Jump up onto the GOLD WALKWAY WITH TRAPDOORS, just like you did the first time. Follow the walkway all the way to the end, ignoring the side areas and killing 3 sasquatches on the way. (The first 2 sasquatches spawn just as described in the main walkthrough, when Lara stands between the first and second trapdoors. The third sasquatch attacks when you approach fourth trapdoor.) At the end of the GOLD WALKWAY, climb the ledges and ladder to the MOLTEN GOLD STREAM AND LEOPARD CAVE.
- Advance forward and left into the LEOPARD CAVE. Kill the 3 leopards as you make your way across this area to the WALL OF LADDERS.
- Climb to the top, place the MASK OF TORNARSUK in its receptacle, and fight the GUARDIAN using whatever tactics you prefer. No need to run around or pull any switches. I like to climb back down the ladders and shoot it from below. When the GUARDIAN falls, the level ends, and "Na Zdorovye!" unlocks on the statistics screen.
NOTE ON LEVEL MAPS: Special thanks to VGCartography for the excellent level maps, which are used here with permission. Visit VGCartography on DeviantArt and follow on Twitter/X and YouTube for more fantastic game maps.
‡NOTE ON VIDEO GUIDES: Eldin's videos don't always follow the same strategies I use in my walkthroughs, but if you prefer that format, I think you'll find them very helpful.
DARK MODE: I plan to add optional dark mode for these pages, but my current priority is updating the walkthroughs. Meanwhile, may I suggest a reputable dark mode browser extension, such as Dark Reader? (Download only from trusted sites, like darkreader.org or your browser's official add-on/extension site.)
WAS THIS WALKTHROUGH HELPFUL? If not, I apologize and invite you to contact me with any questions. If you need help right away, I recommend the r/TombRaider subreddit. If this guide was useful, please consider supporting my work financially or in other ways. For details, visit tombraiders.net/stella/support.html. As always, I welcome your corrections/suggestions. Thank you!
Copyright © 1998- - Stellalune (). Feel free to copy or print this walkthrough for personal use. By all means, share it with friends, but please include this credit line so people can send me their feedback. No part of this walkthrough may be reproduced on another site without permission. Follow this link for details about this site's advertising and privacy policy.