STELLA'S TR2: GOLDEN MASK REMASTERED WALKTHROUGH
The Golden Mask Remastered guide is now complete. It includes all achievements/trophies. For the other guides that have not yet been updated, I will continue to link to the ORIGINAL WALKTHROUGHS, which cover all the basics. Please check the TR2 introductory notes for info on my process, modern vs. classic tank controls, etc. Follow this link for the archived classic walkthrough.
UNLOCKING THIS BONUS LEVEL: If you collect all 12 secrets in the four Melnikov Island levels, you'll automatically be loaded into Nightmare in Vegas. If you missed any secrets, you can download a PC save file.
LEVEL 5: NIGHTMARE IN VEGAS (Remaster)
Updated: 10/17/26(†)
Starting Inventory: Pistols (unlimited ammo)
Pickups: 75, including shotgun, Uzis, automatic pistols, door circuit, elevator junction, 2 keys, and 3 secrets
Kills: 23
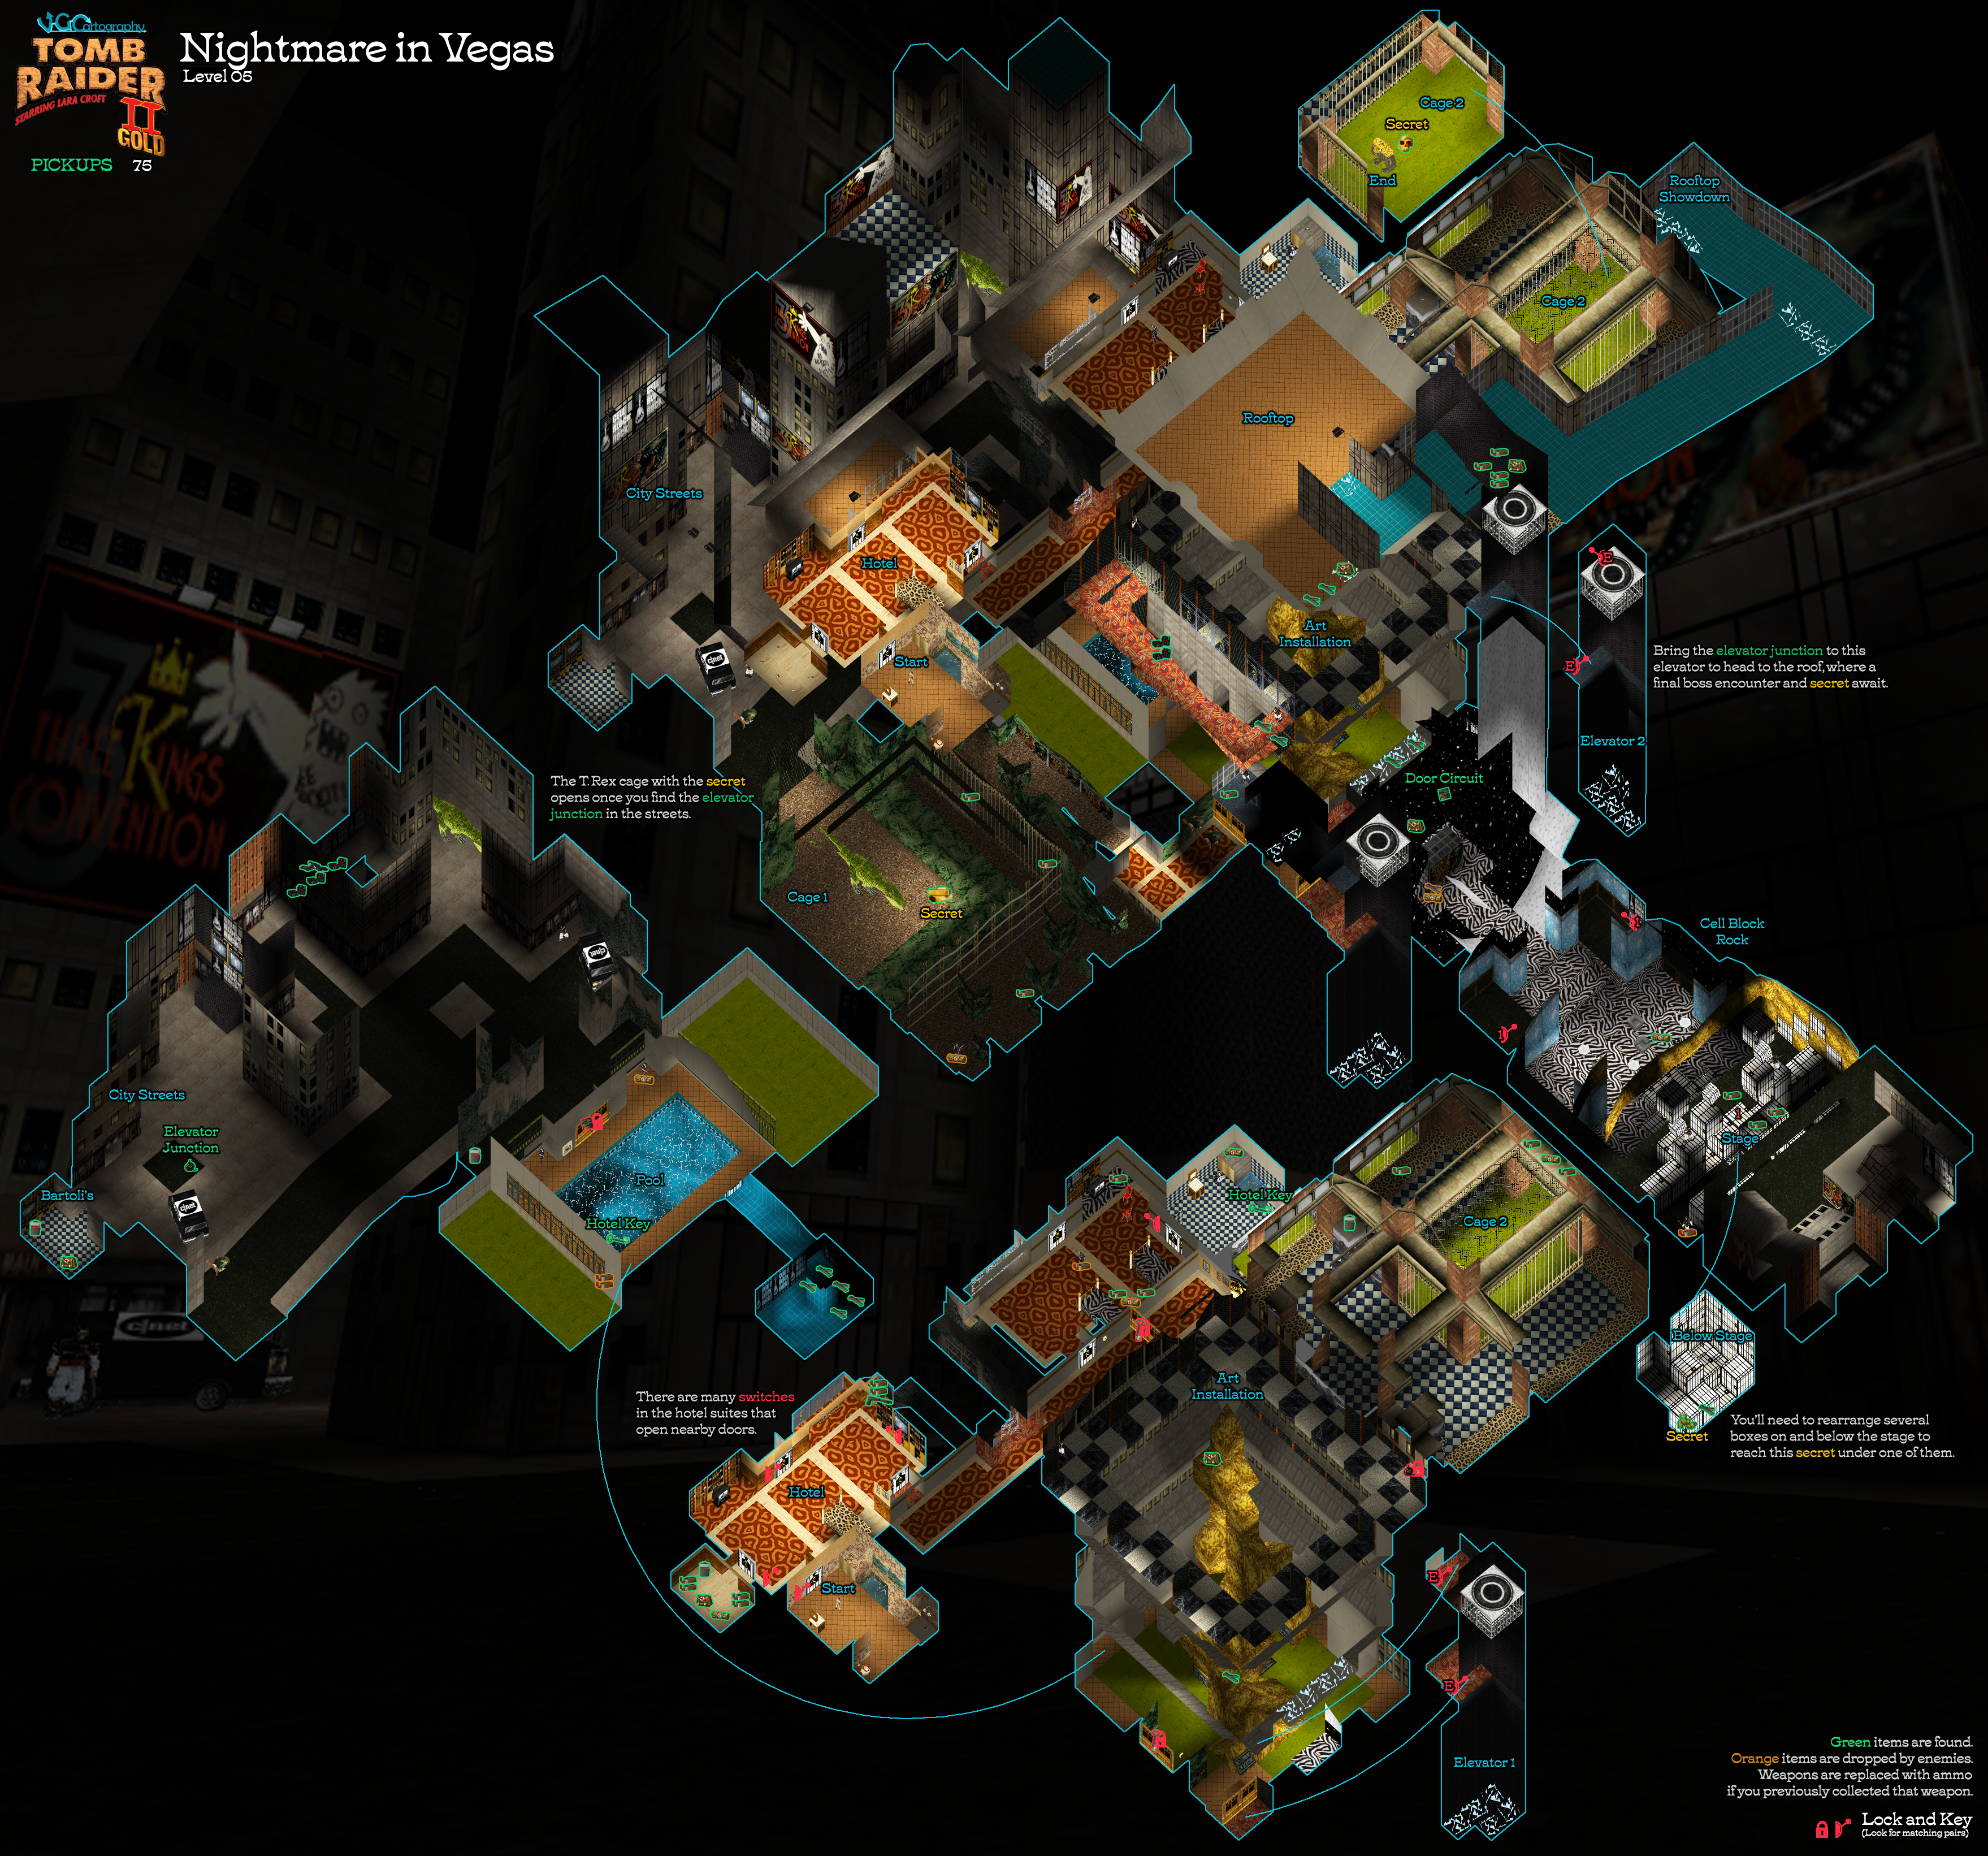
LEVEL MAP by VGCartography (used with permission)
Nightmare in Vegas Video Walkthrough by Eldincy‡
HOTEL ROOMS: Press the button to open the door and exit the bathroom. In the next room, there's another button on the left, which opens the closet. Inside are 4 boxes of shotgun shells, small and large medi packs, and flares (1-7). The door opposite the bed also opens with button and leads to a balcony, which affords a view of the Vegas skyline. In the suite next door, you can see a couple of armed baddies pacing back and forth. Lara smells danger! (screenshots)
Back inside, grab the LOADED SHOTGUN and 2 boxes of shells (8-10) from the windowsill to the right of the chaise longue. Then, if you like, press the button below the TV showing the Elvis concert, and you'll receive a mysterious vision of Winston blundering around in a bathroom somewhere. Lara to the rescue! (screenshots)
The remaining door in Lara's room opens automatically as you approach. Exit into a hallway and turn left. The doors at the far end are locked. Shoot out the window in the garish alcove and step out onto a tiny ledge. Walk to the right edge and take a standing jump to grab the top of the vine-covered wall. Traverse to the left onto the trellis, then climb down, left, and up again onto a ledge outside the nasty neighbors' window. (screenshots)
This window is not breakable. So move to the end of the ledge and jump over to the balcony. Shoot out the glass and take on those 2 masked gangsters (1-2). Relieve the bodies of a small medi pack and shotgun shells (11-12), and pick up 3 more boxes of shells (13-15) scattered around the room. Press the button to free the butler from the bathroom. Go in and grab the small medi pack (16) on the dresser and the HOTEL KEY (17) lying on the floor of the shower stall. (screenshots)
Exit the bad guys' room through the door near the aquarium (or is it another TV showing a marine life documentary?). This door opens automatically. Turn left and use the key in the keyhole to open the double doors. (screenshots)
NOTE: If you don't want Winston following you as you explore, lure him back into the bathroom, run out and press the button to shut him in, like you do in Croft Manor. ;)
ATRIUM WITH HUGE GOLDEN SCULPTURE - UPPER LEVEL: Here on the top level of this very tall room you'll find, clockwise from the entrance, a ZOO, a BROKEN ELEVATOR (it's missing a part, which you'll find shortly), a couple of empty alcoves, and a GLASSED-IN HALLWAY WITH A GARISH CARPET (barred by a metal gate at the moment). There is no single correct order to cover this area. Here's one possible route that includes all kills and pickups:
BUG WARNING: It is possible to descend by safety dropping from the walkway on the right side of the ATRIUM onto one of the small, concrete ledges below (screenshot), or by climbing/sliding down the huge sculpture. However, doing this may cause a bug that prevents the final boss from spawning, so you are unable to finish the level. To avoid this problem, just make sure you enter the ZOO before descending to the lower levels. Once you've done that, you can explore however you like.
Starting in the doorway where you enter the ATRIUM from the hallway near the HOTEL ROOMS, turn right and follow the black-and-white tiled walkway about halfway across this side of the room. Turn left to face the huge, golden SCUL. Then take a running jump to grab the side of the sculpture just below the large medi pack (18). (Many, though not all, of the sculpture's textured surfaces are climbable.) (screenshots)
To unlock the achievement/trophy "The Motherland Calls," you must "do a handstand on the top of the sculpture." So, climb up just until Lara's hands are hanging onto the top edge. Briefly release and re-press Action, so her feet dangle free, then quickly press Walk + Forward/Up to pull up into a handstand walkover. (Or, if the timing is too tricky, instead pull up so Lara is standing near the medi pack. Then hop back, grab the edge, and before her feet can come up onto the climbable surface, press Walk + Forward/Up to do the handstand.) Good job! Now, don't forget to take the medi pack. ;) (screenshots)
Turn around and take a running jump back to the black-and-white walkway. Follow it around to the right and enter the ZOO. (screenshots)
ZOO WITH BIRD MONSTER CAGE: As you approach, the GUARDIAN spawns inside its cage. It can't reach you yet. So just ignore the caterwauling. Inside on one of the raised, gray blocks to the left of the big cage are some flares (19). Climb up, grab them and shoot the thug (3) who appears near the entrance. Then head for the back left corner of the room, where you'll find some shotgun shells (20) near the second snow leopard diorama. Return to the front of the room and climb the blocks on either side of the entrance to reach the rafters. Jump over to the top of the monster's cage. In an alcove at the back you'll find 2 boxes of shotgun shells and a small medi pack (21-23). You can also see the gold skull inside the cage, but you can't reach it yet. For now, safety drop to the floor, losing a little bit of health in the process, or climb back down the ledges at the front of the room, taking no damage. Then go back out into the ATRIUM WITH THE HUGE SCULPTURE. (screenshots)
STUNT DIVING FOR UZIS: Move to the edge of the walkway overlooking the huge, golden sculpture. Now look waaaaayyy down. There's a small, square trapdoor at the base of the sculpture. That's where you're headed. Save the game because you'll need to do more gymnastics for the "1980 Summer Olympics" achievement/trophy. Walk to the edge. Walk one step back. Hold Walk, then press Forward + Jump to do a swan dive. As soon as Lara is airborne, hold Roll to do two somersaults on the way down. The trapdoor opens as you fall, and the room below is flooded, so Lara should splash down safely. (Or, if you don't care about achievements, just take a standing jump from the edge of the walkway into the trapdoor.) (screenshots)
IMPORTANT: Do not try hanging from the edge before you jump or dive. The trapdoor is triggered by Lara moving through the square directly in front of the spot from which you dive, and it only cycles once. So if Lara hangs from the edge and then pulls up, the trap door will open and close. Then, when you attempt to dive, the door will remain closed, and Lara will crash and die. If you do this by mistake, and don't have a convenient save, you'll have to restart the level if you want the achievement/trophy.
FLOODED AREA BENEATH THE SCULPTURE: The trapdoor closes, sealing you inside the flooded room, but there's a small air pocket just below the trapdoor. Scattered around the floor are the UZIS and 4 sets of clips (24-28). When you have everything, swim along the narrow tiled passageway and through the door with the 'K' on it, which opens as you approach. You'll emerge in a SWIMMING POOL. Get air if necessary. Then retrieve a second HOTEL KEY (29) from the bottom of the pool. When you return to the surface, a gangster (4) is taking potshots at Lara from the shallow end. Quickly climb out of the water and kill him. (screenshots)
ATRIUM WITH HUGE GOLDEN SCULPTURE - LOWER LEVEL: The double doors near the swimming pool won't open until you replace the missing CIRCUIT. For now, move out into the ATRIUM. Head for the area to the right of the sculpture. Roll and take out the 2 armed bad guys (5-6) who appear near the SWIMMING POOL. Relieve them of a small medi pack and 2 boxes of shotgun shells (30-32). (screenshots)
Then return to the alcove decorated with tropical foliage near the sculpture. Use the HOTEL KEY in the lock to open the doors. (screenshots)
JUNGLE ROOM: Inside, two narrow hallways lead away from the entrance. Follow the one on the right first. Move forward and shoot the armed thug (7) lurking in the bushes. Grab 2 boxes of shotgun shells (33-34) on the ground near the T. REX CAGE, which you can't access yet, even though the gaps in the bars are MASSIVE. Return toward the entrance, turn right and follow the other hallway. Inside, turn right, then left. Move forward, keeping the cage bars on Lara's right. Kill another gangster (8) and take his small medi pack, plus more shotgun shells (35-36) lying on the ground. (screenshots)
BLACK-AND-WHITE "CELL BLOCK ROCK" LOUNGE: Return to the ATRIUM, go around the right side of the huge sculpture, and enter the black-and-white room. Inside, press the 2 buttons in the alcoves decorated with blue bubbles. This raises the curtain on the stage. As you approach the stage, 4 club-wielding goons (9-12) climb over the black-and-white blocks and attack. You can back away while firing but not too far. If you go all the way up the stairs, another bad guy (13) enters and starts shooting. Better to wait and deal with him on the way out—or at least after fighting the guys with batons. Afterwards, pick up shotgun shells (37) from one of the club goons, plus a small medi pack and flares (38-39) lying on the floor in the seating area with the zebra-pattern carpet. (screenshots)
Climb onto the stage and take the shotgun shells (40). This triggers the appearance of 2 more goons (14-15), who emerge from behind the blocks. You can move out into the open to fight them, or just hit one with 2 shotgun blasts, roll and do the same to the other. Then move to the right side of the stage and climb onto one of the blocks between the wall and the stacked blocks with the swinging block above. (You could also climb up on the left side, where the blocks are arranged similarly.) Turn left and climb onto the next block. Pull up onto the next block at the right edge, so Lara doesn't get clobbered by the swinging block above. Pivot slightly to the right and take a standing jump to the ledge along the back wall with the 2 boxes of shotgun shells (41-42). Grab them and safety drop to the floor. (screenshots)
Along the base of the backstage wall are 2 movable blocks. Pull each one twice toward the front of the stage, so they line up with the row of stationary blocks. Doing this opens the trapdoor behind the row of blocks. (screenshots)
Drop through the opening into a room with more movable blocks. On the lowest level, there's an L-shaped open space in one corner, as well as another open square. Hop down into the L-shaped space. Pull the first movable block (in the corner) once. Climb over it, turn right, and pull the second block once. Climb over the second block and pick up the 2 sets of Uzi clips (43-44) that were underneath. Then turn around and push the second block into the corner where the first block started. Turn around again, move forward, and grab the third block. Pull it out of the corner and climb over it to find SECRET #1, the gold coins (45). (screenshots)
Climb back up through the trapdoor. Climb over the row of blocks and return through the lounge and up the steps. If you didn't encounter the bad guy with the gun (13) earlier, he'll appear near the exit. Kill him, take his small medi pack and Uzi clips (46-47), and exit back into the ATRIUM. (screenshots)
ELEVATOR BETWEEN LOWER AND MIDDLE LEVELS: Outside the BLACK-AND-WHITE LOUNGE, turn left. The doors in the corner of the ATRIUM leading to the ELEVATOR are now open. Do not rush in, since there's no elevator there yet, and the bottom of the shaft is lined with broken glass. (screenshots)
Pull the switch once to call the elevator. Pull it again and then step into the elevator and ride up. When the doors open, step out. (You can see the upper level of the CELL BLOCK ROCK LOUNGE from the doorway, but if you want all pickups, ignore it for now.) Pull the switch to send the elevator down again. Take a carefully angled standing jump to grab the ledge above the ladder inside the elevator shaft. This jump is a little tricky, but if you stand at the edge, on the seam between the two floor tiles, and aim for the right side of the ladder, Lara should make the grab. Or, run over the top of the elevator as it descends, grab the ladder, and climb to the top. (screenshots)
Pull up into the passageway at the top of the ladder, and go to the right. Hop down onto the ledge below, but take care not to run on into the pit lined with broken glass. Ready weapons. Then take a running jump over the glass into the hallway on the other side of the pit. Kill the goon with the club (16) who rushes around the corner. Pick up the shotgun shells (48) and continue to an opening overlooking the sculpture. Take a running jump over to the flattish "arm" of the sculpture, where it meets the wide ledge lined with shards of broken glass. (screenshots)
NOTE: If you miss this jump and slide down the sculpture, it's OK. Just return to the elevator and ride up again. There's a flat ledge just outside the elevator. You can jump over to the SCULPTURE from there as well. (screenshot)
CELL BLOCK ROCK - ABOVE THE ENTRANCE: Walk through the broken glass and pick up 2 sets of Uzi clips (49-50). Then take a standing jump from the edge of the ledge with the glass shards onto the ledge with the stars. Pick up the DOOR CIRCUIT and large medi pack (51-52). To get down, take a running jump from the left end of the star ledge (when facing the sculpture), over the glass, to land on the sculpture and slide down to the floor. (screenshots)
ATRIUM - LOWER LEVEL (again): Cross the ATRIUM to the SWIMMING POOL. Use the DOOR CIRCUIT in the electrical panel on the far wall to open the double doors. (screenshots)
EXPERT CHALLENGES: There are a few interesting things you can do in this area by exploiting useful glitches in the game. These are covered in a footnote in the archived classic guide.
DARK STREET: Enter and stay sharp. Someone left a cage open, and there's a Tyrannosaurus rex (17) running loose in the street. Because why not? (#TombRaiderLogic) If you want to kill it from a relatively safe spot, climb into the opening in the concrete wall just inside on the left. There's a box of flares (53) on the ground a little to the left of the raised opening. (screenshots)
Either before or after killing the dinosaur, go behind the building with the "Main St" signs to find the AUTOMATIC PISTOLS and 3 sets of clips (54-57). Watch out for the nasty guy with the club (18) who comes around when you pick up the guns. He approaches from the right end of the street, when facing the entrance. So, if you run out into the open with pistols drawn, you should be able to kill him before he gets too close. (screenshots)
After you've killed both man and dinosaur, check out a little Easter egg hidden behind the c|ore van parked near the entrance. Lara has finally received her much-deserved walk-of-fame star. (screenshots)
NOTE: If you toggle between modern and classic graphics, you can see the old c|net logo, when it used to include the vertical bar, as well as the modern-day tribute to Core Design.
Follow the street away from the van toward the far end. This street leads into an open area with another van. In the square depression to the right of the second van, you'll find the ELEVATOR JUNCTION (58). Picking it up triggers the appearance of a second T. rex (19). If you want to, you can take shelter in the small room with the checkerboard tile floor and the Bartoli poster hanging above it. Pick up the flares and large medi pack (59-60) lying on the floor. When you take the health, another enemy with a club (20) approaches from across the street. Deal with him and the second dinosaur. (You'll probably need to step in and out of the safe room so Rexy doesn't lose interest and wander off.) Killing both T. rexes unlocks the achievement/trophy "The Nightmare Just Got Worse." (screenshots)
When the coast is clear, go down the ramp into the T. REX CAGE and pick up SECRET #2, the gold bars (61). Then return up the ramp, toward the first van, then through the doorway on the right to the ATRIUM. (screenshots)
CLIMBING THE SCULPTURE BACK TO THE UPPER LEVEL: Grab onto the side of the sculpture that faces the SWIMMING POOL. Climb upward, a little to the right, and then up again to a flat spot with some Uzi ammo (62). After picking up the ammo, walk to the upper right corner of this flat tile. Turn a little so Lara is facing the right side of the steeply angled slope on her left. Then take a standing jump onto the slope, slide back, and grab the edge. (screenshots)
NOTE: When making this jump, be sure to aim for the right side of the slope. If Lara lands too far to the left, her feet will touch the slope below before she can grab, and she'll slide down to the floor. Then you'll have to climb back up again.
Climb to the right and continue scaling the main vertical part of the sculpture. When Lara's feet are roughly level with the top of the horizontal crossbeam connecting the two vertical parts of the sculpture, onto the jutting concrete ledge behind her. (screenshots)
NOTE: You could instead climb all the way to the top of the sculpture, where you found the large medi pack earlier. Then turn around and take a running jump onto the black-and-white walkway. You'd then enter the HALLWAY WITH THE GARISH CARPET at the top of the ramp. (screenshots)
Enter the HALLWAY WITH GARISH CARPET and vault up onto the carpeted step ahead. Turn left and shoot 2 bad guys with clubs (21-22) as they come down the stairs. They don't drop any goodies, but there are 2 sets of automatic pistol clips (63-64) in the alcove at the bottom of the stairs and 2 sets of Uzi clips (65-66) in the alcove near the first landing. Continue to the top of the ramp and exit this room into the UPPER LEVEL of the ATRIUM. (screenshots)
ELEVATOR BETWEEN UPPER LEVEL AND ROOF: Follow the black-and-white tiled walkway around to the BROKEN ELEVATOR in the opposite corner of the room. Ignore the ladder on the back wall of the shaft for now. The elevator car above prevents you from climbing all the way to the top, and there's more broken glass below. Place the ELEVATOR JUNCTION in the electrical panel. Then pull the switch to call the elevator. Pull the switch again, get in, and ride up to the ROOF. (screenshots)
ELEVATOR SHAFT, ROOFTOP, AND FINAL BOSS: The cage containing the GUARDIAN (23) (and the third secret) is at the end of the long hallway on the right. As soon as Lara steps out of the elevator, the monster begins making its way toward you. If you don't care about getting all the pickups and achievements/trophies, just wait for the creature to approach, run back into the elevator, and shoot him from safety. When he moves away, step out just long enough to get his attention, then hop back firing. Once he falls, the level ends. (screenshots)
If you do want 100%, you'll need to avoid the monster as you make all the pickups. Then, to unlock the "Lucid Dream" achievement/trophy, "fight the Guardian of the Kingdom in his own cage." Right. Let's go....
Don't wait for the monster to approach. Save the game, exit the elevator, and run to the left. Run forward along the blue-tiled floor. Turn right and take a running jump over the glass shards in the doorway. Make a U-turn to the left. Run forward and then slow to a walk as you carefully retrieve the large medi pack (67) sitting in the broken glass. Step out of the glass and pick up the 2 sets of Uzi clips (68-69). (screenshots)
Run back around to the right, toward the hallway with the elevator. The monster should be arriving about now, so avoid him as well as you can. Jump over the broken glass, turn left, then run forward and right, into the elevator. (screenshots)
When you're safely inside, save the game again if you like. Then run out and pull the switch to send the ELEVATOR down. There are a few tense seconds as the ELEVATOR doors close and it starts to descend. Avoid the monster by flipping to the left. Then run in a wide circle back around toward the ELEVATOR shaft. (This little detour gives the ELEVATOR time to descend so you don't end up inside the car.) Take a running jump to grab the ladder on the back wall of the ELEVATOR shaft. Or, run across the top of the elevator car and grab onto the ladder. (There's no hurry now. If you like, you can ride all the way down on the top of the car. Then climb the ladder.) (screenshots)
Climb almost to the top of the ladder. Then backflip onto the ledge behind. Here you'll find a large medi pack and 4 boxes of shotgun shells (71-75). Walk away from the elevator shaft to the hole in the floor other side of this little room. Save again if you like. Then turn around, hang from the edge, climb down the ladder, and drop into the blue-tiled hallway where the GUARDIAN waits. (screenshots)
Immediately flip/run to the left to avoid the GUARDIAN. Follow the blue-tiled hallway down a long ramp. The monster will be hot on Lara's heels, so take running jumps where it's safe to do so. At the bottom of this first ramp, jump over another field of broken glass and continue around the corner to the left. Run/jump down the next ramp, veering to the left near the bottom as you jump over more broken glass. The monster's cage is just ahead. SECRET #3, the gold skull (70) is lying on the floor of the enclosure. Grab it as quickly as you can. (If the monster hasn't quite caught up with Lara yet, you may want to save again here. Use a new slot if you want to be extra cautious.) (screenshots)
NOTE: If you found all 15 secrets, the "Codex of Melnikov" achievement/trophy unlocks now. If you found all 331 Golden Mask pickups, you'll also unlock "Harvest Plan Implemented."
DEFEATING THE GUARDIAN: As soon as Lara has the skull, roll, draw weapons, and back up firing. But don't let the monster pin Lara against the bars. When he gets close, jump past him, roll, and continue shooting. There's no foolproof strategy here. Just use your most powerful weapons, keep moving, and heal if necessary. Most importantly, for the "Lucid Dream" achievement/trophy, you must defeat the guardian inside his cage. So do not allow him to move outside of the enclosure once you begin shooting. (That is, stay in the green astroturf area. If he moves out onto the blue tiles, the achievement won't register.) Continue firing and evading, and when the monster falls, "Lucid Dream" unlocks, and the level ends. "That's Just a Nightmare," for finishing the bonus level, unlocks on the statistics screen. (screenshots)
MISSING GUARDIAN BUG: If you reach the end of the level and the GUARDIAN is nowhere to be found, then you've accidentally triggered the bug mentioned above. You'll need to restart the level or download a PC save file.
GUARDIAN ALTERNATIVES: If you're struggling to get all three pickups in the outdoor area, you can make two or three trips, luring the GUARDIAN down the hall away from the goodies before returning. You can pause inside the elevator to catch your breath. If the monster catches up with Lara while you're picking up the items, try and get out of its way and heal to repair the damage. He needs to pound Lara a few times to take all her health.
It's also fine to do separate runs for all pickups/secrets and "Lucid Dream" (fight the Guardian inside its cage). Save the game inside the elevator before engaging the Guardian. Go after the pickups in the outdoor area. Return to the elevator and save in a new slot. Send the elevator down and go for the pickups in the dark room at the top of the ladder. Then drop down into the hallway, run down to the cage, and grab the gold skull. That should unlock "Codex of Melnikov" and "Harvest Plan Implemented." Now, reload your earlier save. Run/jump down to the cage, ignoring all pickups, and fight the Guardian there for the "Lucid Dream" and "That's Just A Nightmare" achievements/trophies. GG!
†UPDATE HISTORY: Updates made prior to the Tomb Raider I-II-III Remastered release, including credit for tips sent in by other players, are tracked in the archived classic walkthrough.
10/17/26 - Remastered guide posted.
TO RESTART A LEVEL: Kill Lara, press Action/Enter to open the Passport menu, page to the right, and choose "Restart Level."
NOTE ON LEVEL MAPS: Special thanks to VGCartography for the excellent level maps, which are used here with permission. Visit VGCartography on DeviantArt and follow on Twitter/X and YouTube for more fantastic game maps.
‡NOTE ON VIDEO GUIDES: Eldin's videos don't always follow the same strategies I use in my walkthroughs, but if you prefer that format, I think you'll find them very helpful.
DARK MODE: I plan to add optional dark mode for these pages, but my current priority is updating the walkthroughs. Meanwhile, may I suggest a reputable dark mode browser extension, such as Dark Reader? (Download only from trusted sites, like darkreader.org or your browser's official add-on/extension site.)
WAS THIS WALKTHROUGH HELPFUL? If not, I apologize and invite you to contact me with any questions. If you need help right away, I recommend the r/TombRaider subreddit. If this guide was useful, please consider supporting my work financially or in other ways. For details, visit tombraiders.net/stella/support.html. As always, I welcome your corrections/suggestions. Thank you!
Copyright © 1998- - Stellalune (). Feel free to copy or print this walkthrough for personal use. By all means, share it with friends, but please include this credit line so people can send me their feedback. No part of this walkthrough may be reproduced on another site without permission. Follow this link for details about this site's advertising and privacy policy.