TOMB RAIDER 2013 Quick Guide to All Relics
Updated: 8/26/13(†)
Collectibles Intro | Documents | GPS Caches | Treasure Maps | Challenges
WARNING: This page contains spoilers. No major plot points are revealed, but you will learn more about the various levels and Yamatai's backstory if you read ahead.
There are 42 relics in the game. These are divided into 15 different sets, each of which can be found within a particular area. The list below follows the same order as the Relics screen in the game, not the order in which they are found while playing. This guide is designed to help you find any relics you may have missed. Additional details can be found in the complete walkthroughs for each area.
IMPORTANT: The relics may appear in a different order than noted here. That is, the boxes containing the relics are always in the same fixed locations, but which relic you find inside each box can vary depending on the order in which you pick them up. It helps to check your in-game map for the relic icons to see which one(s) you're missing. Undiscovered relics will appear grayed out on the in-game map. Once you know which relic location you're trying to reach, you can use the walkthroughs and the annotated maps that accompany them to help find it.
Kanpo Herbs (3) - Mountain Village
Kanpō (or Kampō) is the Japanese branch of traditional Chinese herbal medicine. (More on Wikipedia.) The three Kanpo Herb relics can be found in the Mountain Village.
YAGEN
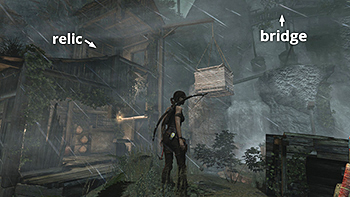
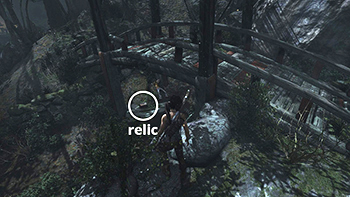
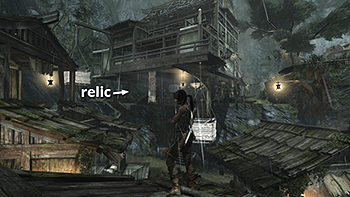
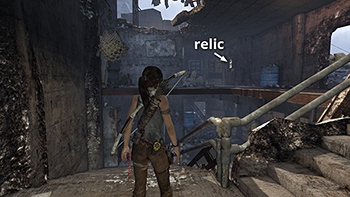
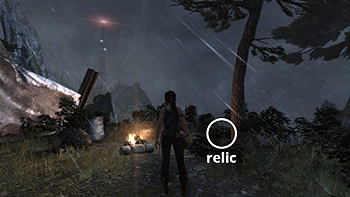
This relic is #2 on the first visit map. It is located in the area at the top of the waterfall north of the village. It is accessible on the first visit to Mountain Village but only after obtaining the climbing axe. See here for how to reach that area. Once there, climb to the upper floor of the larger hut to find the box with the relic. (Click screenshot to enlarge.)
MEDICINAL HERB VIAL
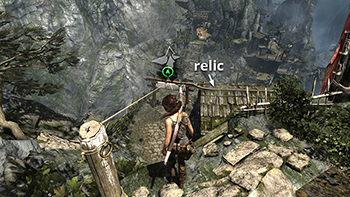
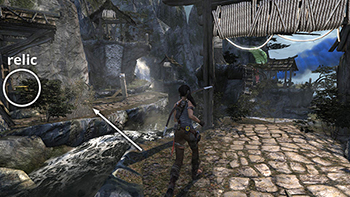
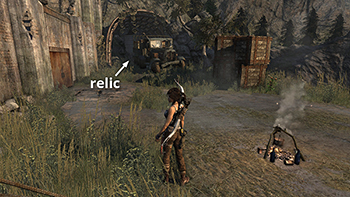
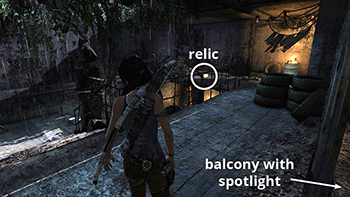
This relic is #3 on the second visit map. It is located in the wooden house below the Village Overlook Base Camp and is not accessible until the second visit to Mountain Village. See here for how to reach that area the first time or here for how to reach it after completing the Mountain Village level. (Click screenshot to enlarge.)
DRIED GOBO ROOT
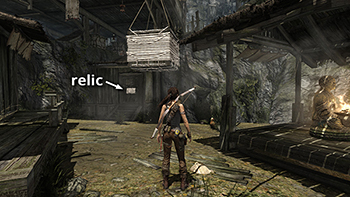
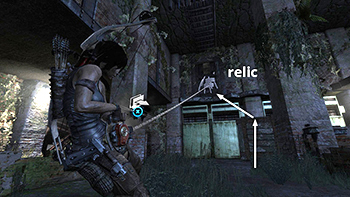
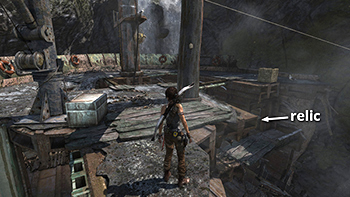
This relic is #6 on the third visit map. It's behind the rope-wrapped door in the basement level of the largest building in the village proper. It is accessible during the second or third visit to Mountain Village, northwest of the Village Plateau Base Camp. See here for details. (Click screenshot to enlarge.)
Noh Masks (3) - Coastal Forest
Noh is a form of classical Japanese musical drama that has been performed since the 14th century. Many characters are masked, with men traditionally playing both male and female roles. (More on Wikipedia.) The three Noh Mask relics can be found in the Coastal Forest.
HANNYA MASK
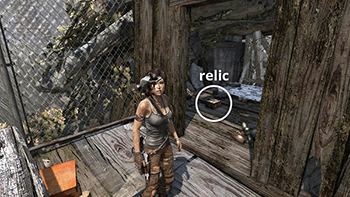
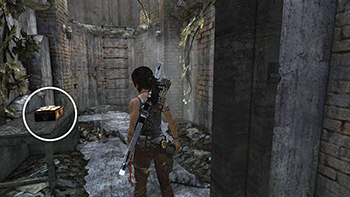
This relic is #1 on the level map. It is found in the underground bunker connecting the first and second parts of the level. See the walkthrough for details. (Click screenshot to enlarge.)
ONI NOH MASK
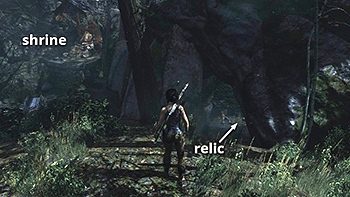
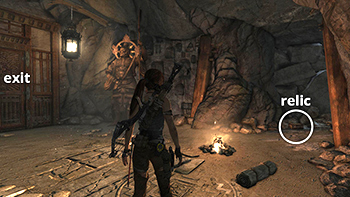
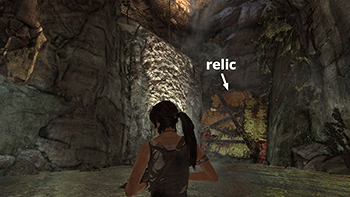
This relic can be found in a small cave in the northwest corner of the second area. It's #3 on the level map. If you start at the shrine with the cherry trees and follow the area boundary wall northward, you'll find the cave on your left. See here for details. (Click screenshot to enlarge.)
Edo Period Fans (2) - Mountain Temple
There are two sets of fan relics: The Edo Period Fans are found in the Mountain Temple. The Ceremonial Fans are hidden in the Geothermal Caverns (below). For more info, check out Tomb Raider Horizons' article on gunbai fans.
GREEN FOLDED FAN
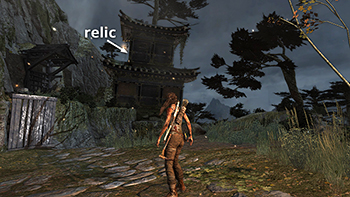
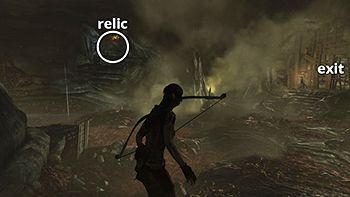
Both Edo Period fans are found in the last part of the Mountain Temple level, after you escape from the ambush in the burning building. The Green Folded Fan is inside on the upper level of the taller of the buildings that isn't on fire. It's relic #1 on the level map. See here for details. (Click screenshot to enlarge.)
GUNBAI WAR FAN
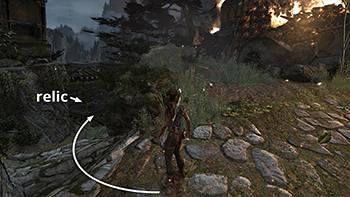
Gunbai were metal or wood-and-metal fans used by samurai officers to communicate commands to their troops. Today they are used by Sumo umpires. (Wikipedia) This relic is located in the small building below and between the one with the first fan and the burning temple. It's relic #2 on the level map. See here for details. (Click screenshot to enlarge.)
Semper Fi (3) - Mountain Village
There are two relic sets in the Mountain Village: the Kanpo Herbs (above) and these World War II mementos. Semper Fidelis, Latin for "always faithful," is the motto of the United States Marine Corps.
SILVER FLASK
This is relic #1 on the first visit map. It's located on the ground floor of the three-story building in the village. See here for details. Once there, climb to the upper floor of the larger hut to find the box with the relic. (Click screenshot to enlarge.)
OLD PHOTOGRAPH
This is relic #4 on the second visit map. It is not accessible until the second or third visit to Mountain Village. It can be found on a ledge below the entrance to the Hall of Ascension Challenge Tomb. Check the walkthrough for details. (Click screenshot to enlarge.)
USMC DOGTAGS
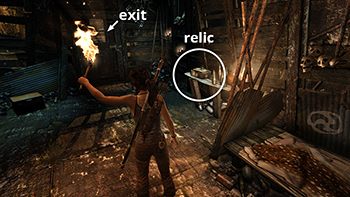
This is relic #5 on the third visit map. It is accessible during the second or third visit to Mountain Village, but I cover it during the third. It can be found in one of the huts on the ledge to the southwest of the Village Plateau Base Camp. See here for details. (Click screenshot to enlarge.)
Senshi Elite (2) - Base Exterior
Senshi means "soldier" or "warrior" in Japanese. The relics in this set were apparently left behind by soldiers fighting in WWII. They can be found in the Base Exterior level.
Ancient Coins (3) - Cliffside Bunker
There are two sets of coin relics: Ancient Coins and Bronze Coins. The Ancient Coins are found in the Cliffside Bunker. The Bronze Coins (below) are located in the Base Approach level. Note that Cliffiside Bunker has no fast travel camps. So if you missed something in that level the first time through, you'll need to fast travel back to Shipwreck Beach and then head for the bunker on foot. See the walkthrough for details.
100 MON COIN
This coin is relic #2 on the level map. It is hidden in the room with the rope-wrapped door inside the large building where you fought the men raising the generator. You can't open that door until you have obtained the rope ascender. Refer to the walkthrough for details. (Click screenshot to enlarge.)
PORTUGUESE TIN COIN
This is relic #3 on the level map. It's in the walled-off area on the west side of the bunker. It is not accessible until you obtain the rope ascender. Once you have it, pull open the rope-wrapped door in the gun turret room and go through. See here for details. (Click screenshot to enlarge.)
Bronze Coins (2) - Base Approach
In addition to the Ancient Coin relics found in the Cliffside Bunker (above), the Base Approach level also has a pair of coin relics.
A Family Outing (3) - Shipwreck Beach
All three Family Outing relics can be found on the first visit to Shipwreck Beach. If you miss any, they are still accessible on subsequent visits.
STUFFED BUNNY
This children's toy can be found in the multi-level shipwreck between the beach and the Cliffside Bunker. It's in a little room on the middle level. It is relic #2 on the first visit map. The walkthrough includes additional details. (Click screenshot to enlarge.)
TOY TRAIN
This is relic #4 on the first visit map. It is located at the top of the tower you must climb to reach the Flooded Vault Challenge Tomb entrance. Before sliding down the zip line from the tower, drop down on the right to find the relic. See here for details. (Click screenshot to enlarge.)
WORN WALLET
This relic #6 on the first visit map. It is in one of the rooms leading to the Flooded Vault Challenge Tomb. It's the room overlooking the sea that looks like it once contained a gun turret. See here for details. (Click screenshot to enlarge.)
Yuan Dynasty Jade (3) - Shipwreck Beach
The Yuan Dynasty (c. 1271–1368) was the empire established by Kublai Khan after he conquered the Southern Song dynasties in China. (Wikipedia) These ancient jade objects are also hidden around Shipwreck Beach. Like the Family Outing relics (above), they can all be obtained on the first visit or later on.
BROWN JADE INK BOX
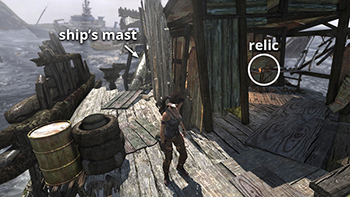
After picking up the block and tackle on the wrecked galleon, walk down the fallen mast and look in the little room on the left to find this relic. It's relic #1 on the first visit map. See here for details. (Click screenshot to enlarge.)
STAINED JADE HEAD REST
This is relic #3 on the first visit map. It can be found in the multi-level shipwreck between the beach and the Cliffside Bunker. It's sitting on a table on the lower level. See here for details. (Click screenshot to enlarge.)
SHAPED JADE HEAD REST
This is relic #5 on the first visit map. It is found in one of the rooms leading to the Flooded Vault Challenge Tomb. It's sitting on a table in the second room just before the metal ladder. See here for details. (Click screenshot to enlarge.)
Ceremonial Fans (3) - Geothermal Caverns
There are two sets of fan relics: The Ceremonial Fans are hidden in the Geothermal Caverns; the Edo Period Fans are found in the Mountain Temple (above).
FUNERAL FAN
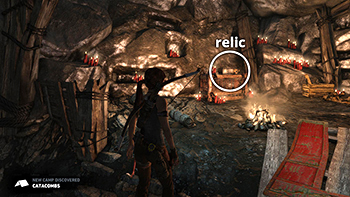
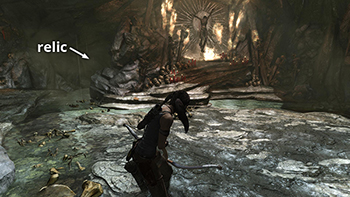
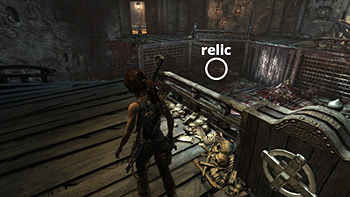
This fan is found in the area called "The Pit," where the prisoners are kept. It's sitting on a rock ledge with some skulls and candles on the north side of the cave. It is relic #1 on the level map. See the walkthrough for more info. (Click screenshot to enlarge.)
Vases (3) - Chasm Shrine
This relic set includes exquisite vases from various cultures and eras. Visit Tomb Raider Horizons for more info on Ban Chiang and Kansu pottery, as well as other TR relics.
Daggers (3) - Summit Forest
This collection of ancient and fairly modern decorative blades can be found in the Summit Forest.
JADE CEREMONIAL DAGGER
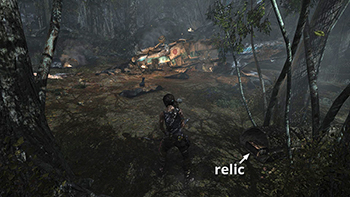
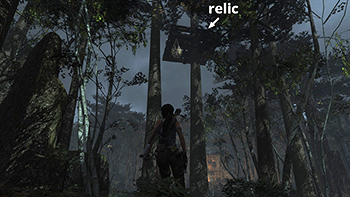
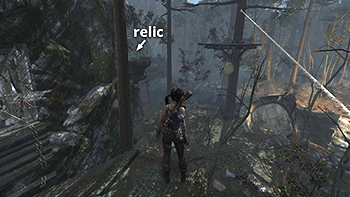
This is relic #2 on the level map. It can be found on the west side of the main area with the forest and marsh, on one of the wooden platforms in the treetops. It's the platform with the salvage net hanging from the underside, near the fallen tree. The walkthrough describes how to climb up. (Click screenshot to enlarge.)
JAPANESE CEREMONIAL DAGGER
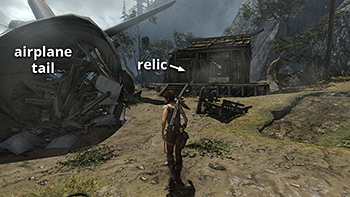
This carved dagger is relic #3 on the level map. It's located on a high ledge on the southeast edge of the forest. It can be reached by climbing the rope line from the plane wreck to the wooden platform. Then jumping onto the ledge. See here for details. (Click screenshot to enlarge.)
Animal Statuary (3) - Shantytown
The three carved animal relics are found in Shantytown. Two are in the area before the Ancient Gate, the third in the area beyond it.
JADE HORSE
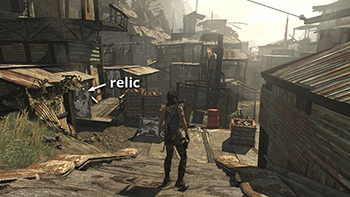
This is relic #2 on the part 1 map. It is found in one of the little shacks on the west side of Shantytown. As you leave the building containing the entrance to the Well of Tears Challenge Tomb, go down the steps and look for the shack on the left with a boarded-up doorway. Shoot out the planks and enter to find the relic. See here for details. (Click screenshot to enlarge.)
JADE WATER BUFFALO
On the street with the painted arches leading up to the Ancient Gate, the first building on the left contains one of the carved animal relics. It is behind the plank-and-barbed wire barrier on the middle level. It's relic #4 on the part 1 map. See here for details. (Click screenshot to enlarge.)
JADE DRINKING VESSEL
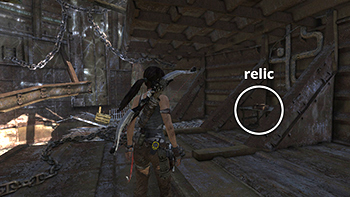
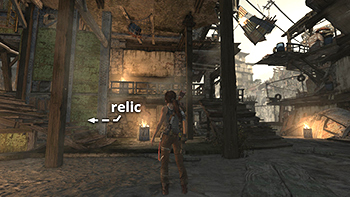
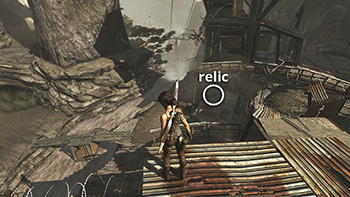
This is relic #7 on the part 2 map. It is in the big building with the windmill and cargo-hauling machinery, on the basement level, under the stairs. See here for details. (Click screenshot to enlarge.)
Inro (4) - Shantytown
An inrō is a traditional Japanese case worn suspended from the obi, or sash, and used for holding small objects. (Both Wikipedia and Tomb Raider Horizons have fascinating articles about inro.) These relics are found in Shantytown, two before the Ancient Gate, two after.
DECORATIVE INRO
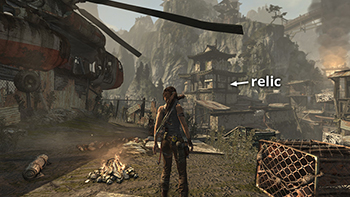
The first inro relic is found in the shack directly below Helicopter Hill. Go into the first small room on the right to find it. Look for relic #1 on the part 1 map and see the walkthrough for more info if necessary. (Click screenshot to enlarge.)
METAL INRO
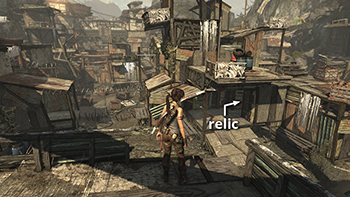
This is relic #3 on the part 1 map. It is located in the tall, traditional Japanese-style building east of Helicopter Hill. It's on the middle level, so you'll need to go around back and climb up. Check the walkthrough for details. (Click screenshot to enlarge.)
COMMANDER'S INRO
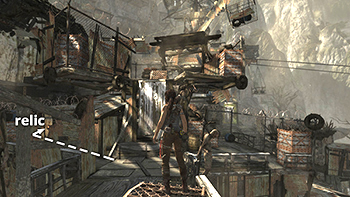
This is relic #5 on the part 2 map. It can be found in the southwest corner of Shantytown, in the area downstream from where you first encounter Grim. It's inside on the lowest level of the building with the huge pulley that runs the gondola. See here for details. (Click screenshot to enlarge.)
SCRIBE'S INRO
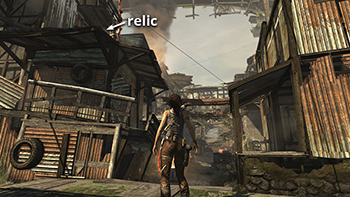
This is relic #6 on the part 2 map. Before scrambling up to the building with the windmill, go around to the left to find a boarded-up doorway. Shoot out the planks and go inside to find the relic. See here for details. (Click screenshot to enlarge.)
Helmets (2) - Research Base
There are two ancient helmets are hidden in the Research Base. Lara assesses these relics as dating from China's Chou (or Zhou) Dynasty, c. 1046–256 BCE. (Wikipedia)
CHOU DYNASTY HELMET
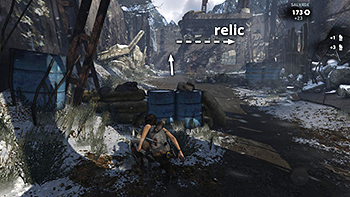
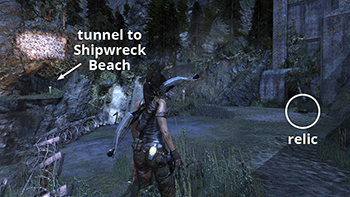
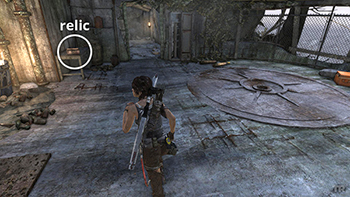
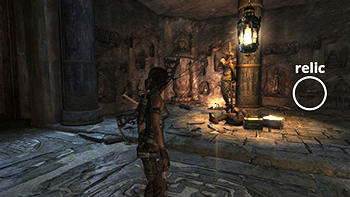
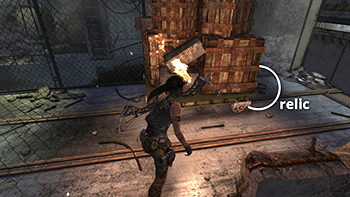
This is relic #1 on the level map. It's in the tunnel leading into the base from Shipwreck Beach. After climbing down to the stream bed, use explosive arrows or grenades to blow open the metal barriers and access the relic. See here for details. If you're out of grenades, see this tip in the Guide to 100% Completion. (Click screenshot to enlarge.)
Top of Page | Collectibles Intro | TOMB RAIDER Walkthrough | Main Page
†UPDATE HISTORY: 8/13/13 - Page first posted online.
8/26/13 - Added links to Tomb Raider Horizons' Arte-Factual features.
WAS THIS WALKTHROUGH HELPFUL? If not, I apologize and invite you to contact me with any questions. If you need help right away, I recommend the r/TombRaider subreddit. Other fan-run forums are listed at tombraiders.net/stella/community.html. If this site was useful, please consider supporting it financially or in other ways. For details, visit tombraiders.net/stella/support.html. As always, I welcome your corrections/suggestions. Thank you!
Copyright © 2013- Stellalune (). All rights reserved. The screenshots and videos included here were made using Fraps. Feel free to copy or print this walkthrough for personal use. By all means, share it with friends, but please include this credit line so people can send me their feedback. No part of this walkthrough may be reproduced on another site without permission. Follow this link for details about this site's advertising and privacy policy.
Stella's Tomb Raider Site: tombraiders.net.
