TOMB RAIDER 2013 Quick Guide to All Challenges
Updated: 8/13/13(†)
Collectibles Intro | Documents | Relics | GPS Caches | Treasure Maps
WARNING: This page contains spoilers. No major plot points are revealed, but you will learn more about the various levels and Yamatai's backstory if you read ahead.
Challenges are the little sub-quests in which you must locate a series of objects and do something like shoot them, set them on fire, etc. These are separate from the Challenge Tombs. Some of them can be hard to spot, but they glow when you use Survival Instinct. The number of items you must find is indicated on the level map for each area, but the items themselves are not shown, even after you find them. My downloadable level maps do include them.
There are 13 challenges with a total of 84 individual items in the game. This guide is designed to help you find any challenge items you missed. Since you may have found them in a different order than I describe in the walkthrough, it will probably help to refer to the annotated maps and screenshots below.
Coastal Forest
The challenge in this level is called "Ghost Hunter." The object: find and shoot 10 hanging skull totems. These look like sun-catchers only a bit more gruesome. ;) They can be hard to spot in the dimly lit forest, so don't hesitate to use Survival Instinct. [Level Map]
Ghost Hunter Totem 1
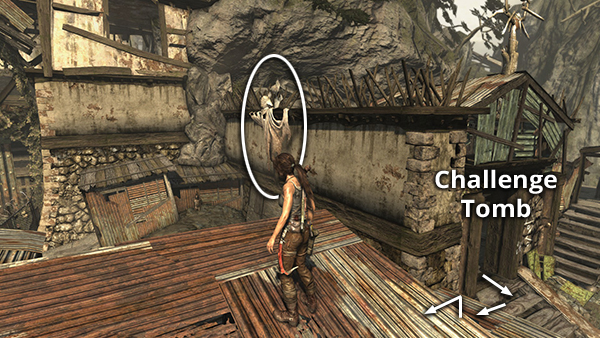
The first totem is hanging from a tree near where you you obtained the Makeshift Longbow. Shoot the totem with an arrow during the bow tutorial and kill two birds...er, skulls...with one stone. ;) See here and check the level map for details. (Click screenshot to enlarge.)
Ghost Hunter Totem 2
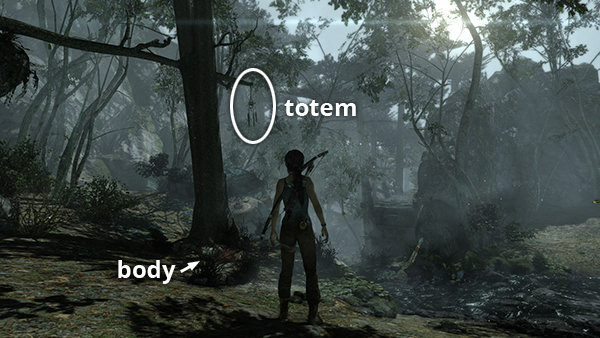
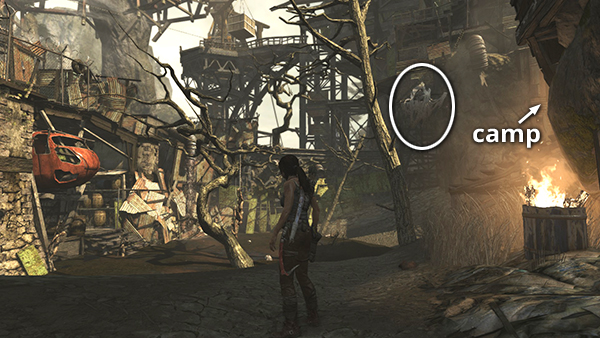
Totem #2 is hanging in the forest southwest of the Sheltered Ridge Base Camp. From the campsite, head uphill and follow the path under the rock overhang. When Lara stands up, look to the left to spot the totem. Refer to the walkthrough and level map for details. (Click screenshot to enlarge.)
Ghost Hunter Totem 3
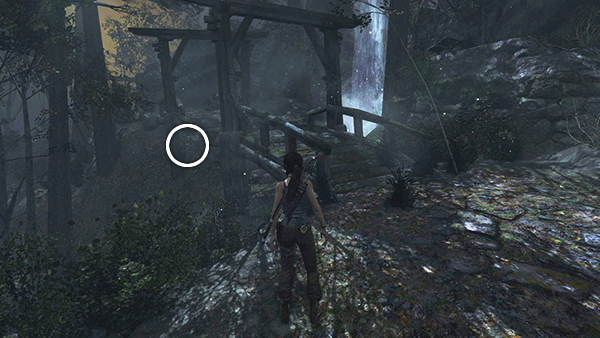
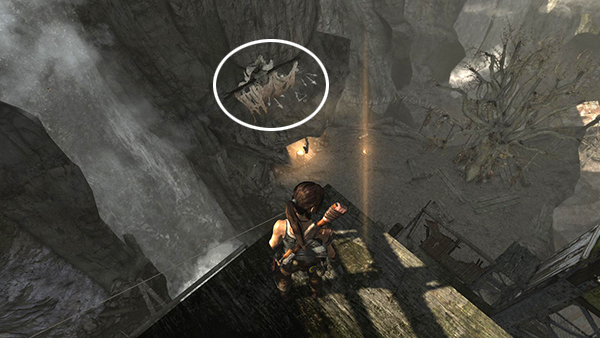
Again, all totems are noted on my level map. This one is in the northeast corner of the first area, hanging from a fallen tree between two large rock outcrops. If you start at the bunker and head downstream to the little waterfall, then look to the left, you'll see the totem. See here for details. (Click screenshot to enlarge.)

Ghost Hunter Totem 4
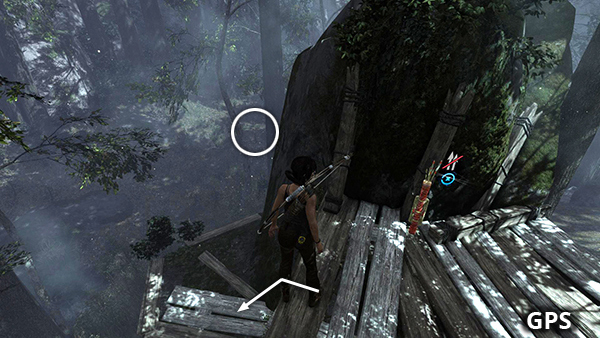
This totem is hanging from a tree near the wooden ledge with the 3rd GPS cache. If you drop down off the south side of the ledge onto the smaller ledge below, the totem is off to the right. See here for details. (Click screenshot to enlarge.)
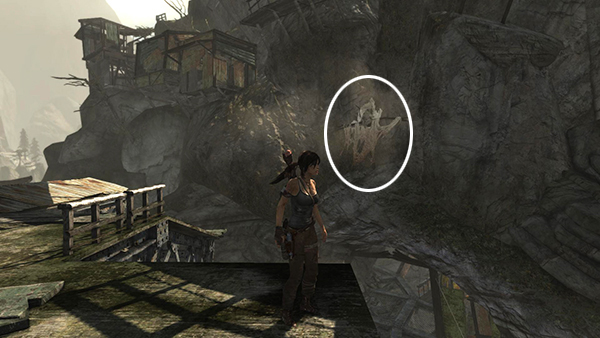
Ghost Hunter Totem 5
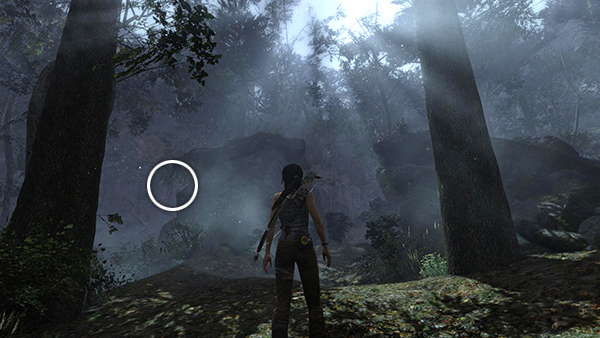
After shooting the 4th totem, drop down and head up the hill (west on the map). Soon you'll come to two tall rocks with a small gap between them. Hanging to the left of this double rock formation is the fifth totem. See here and the level map for details. (Click screenshot to enlarge.)
Ghost Hunter Totem 6
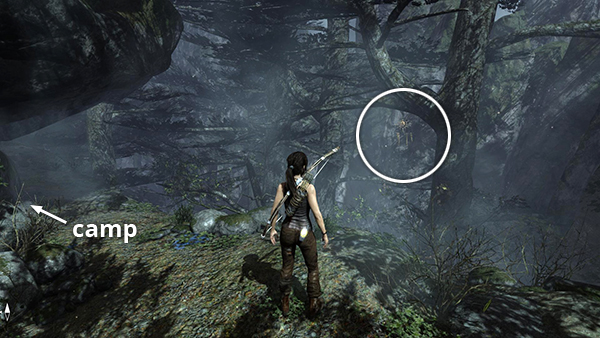
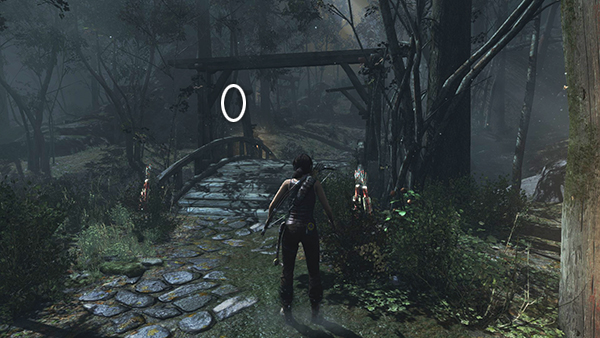
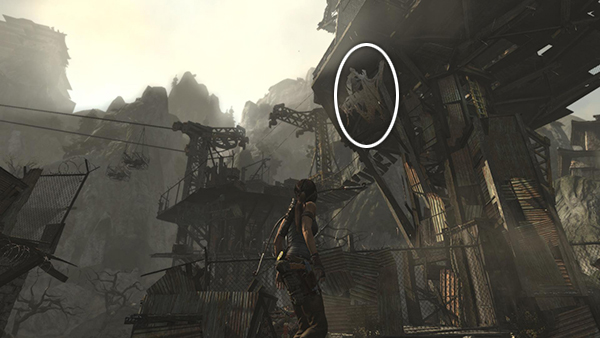
The remaining totems are in the second area, beyond the bunker where you get the pry axe. This totem can be found hanging below and to the left of the wooden bridge near the waterfall, at the top of the hill on the east side of the forest. See here and the level map for details. (Click screenshot to enlarge.)
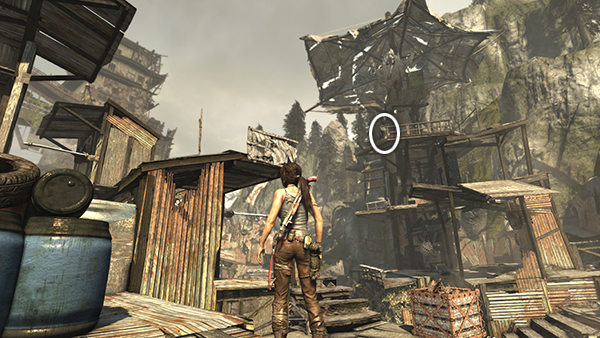
Ghost Hunter Totem 7
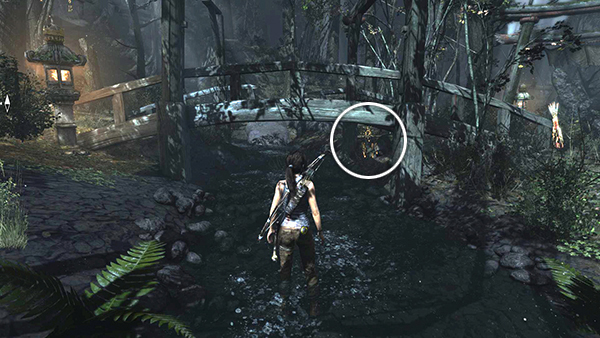
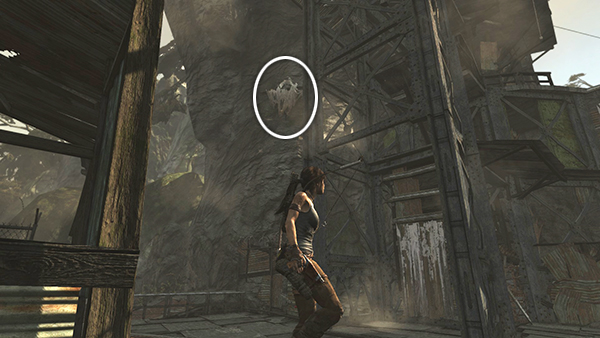
Totems 7 and 8 are located near the smaller bridge just beyond the foot of the steps leading down from the Forest Ruins Base Camp. They are also marked on the level map. This one is hanging on the upper left (northwest) side of the bridge. See here for details. (Click screenshot to enlarge.)
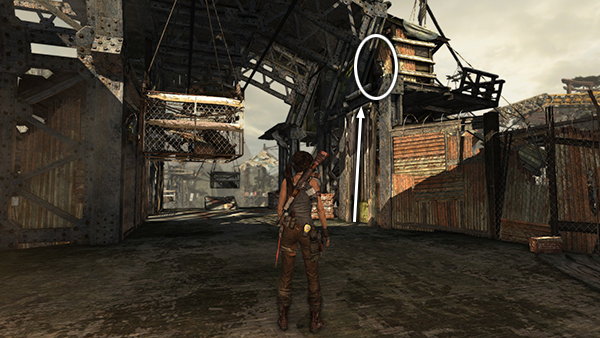
Ghost Hunter Totem 8
This totem is hanging from the underside of the same bridge as totem #7, also on the left (northwest) side. See the walkthrough and the level map for details. (Click screenshot to enlarge.)
Ghost Hunter Totem 9
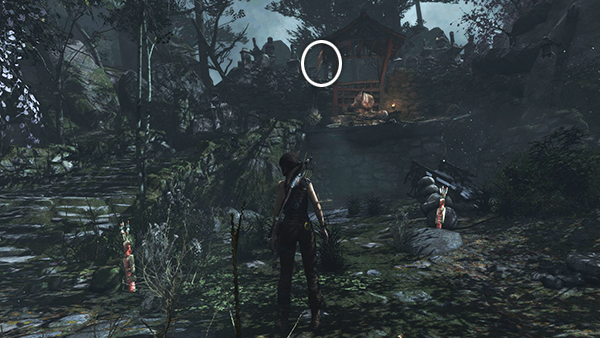
This totem hanging from the wooden roof above the statue in the little shrine in the northwest corner of the second area. See here for details and check the level map if necessary. (Click screenshot to enlarge.)
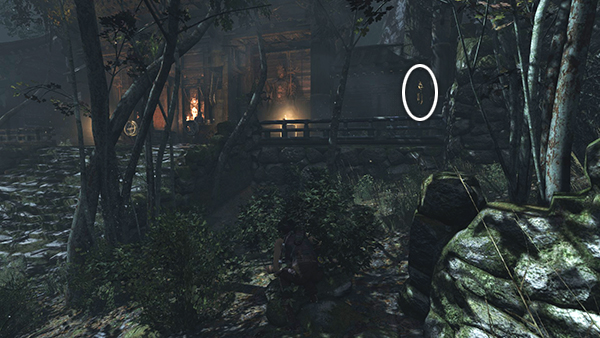
Ghost Hunter Totem 10
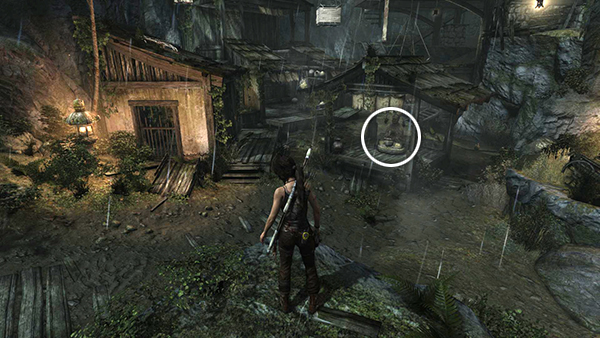
This totem is hanging just to the right of the large gate at the northeast end of the level, where you meet up with Dr. Whitman. The totem is hanging on the far right of the gate, beyond the fire barrel. See here and refer to the level map for details. (Click screenshot to enlarge.)
Mountain Temple
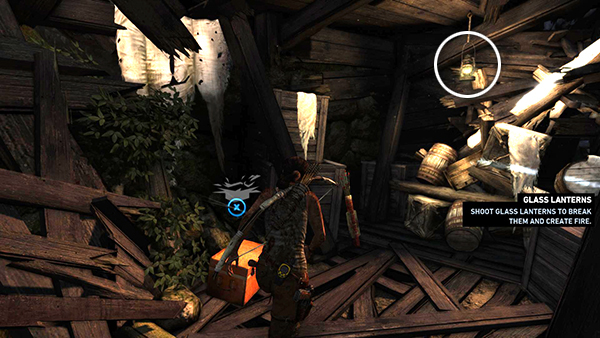
The challenge for this level is called "Pyromaniac." There are 7 old-fashioned, glass lanterns in the level. To beat the challenge, you only need to destroy 5 of them. Note that all of the major collectibles, including the lanterns, can be found in the area above the long rope ladder. [Level Map]
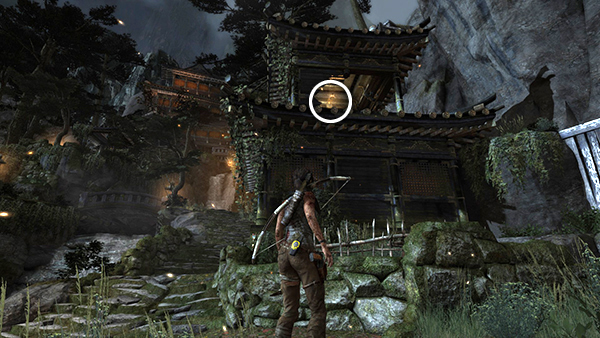
Pyromaniac Lantern 1
The first lantern is hanging inside the building directly in front of you as you climb up the long rope ladder from the lower part of the level. Shoot it with an arrow to unlock the challenge. See here for details. (Click screenshot to enlarge.)
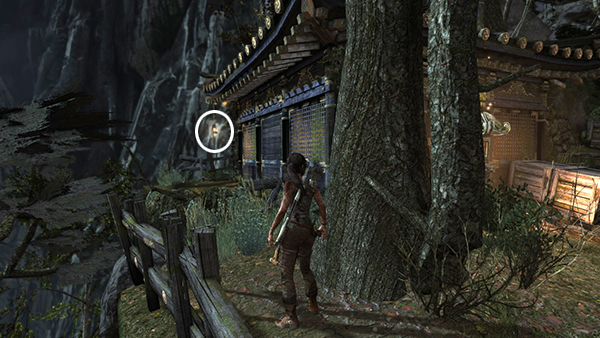
Pyromaniac Lantern 2
The second lantern is hanging from the corner of the building just above the Mountain Temple Base Camp. See here for details. (Click screenshot to enlarge.)
Pyromaniac Lantern 3
The next lantern is hanging from the back corner of the building where you learn to shoot arrows into walls to distract enemies. Go around to the left, behind the wooden wagon and clay jars to spot it. See here for details. (Click screenshot to enlarge.)
Pyromaniac Lantern 4
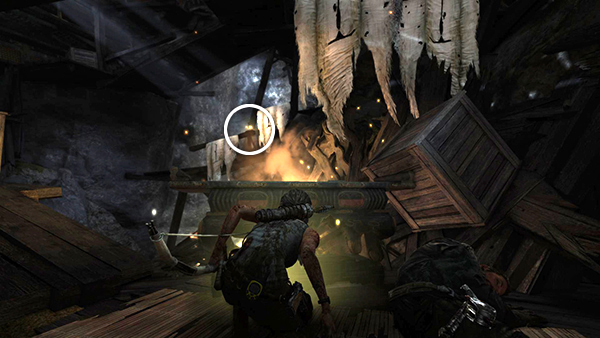
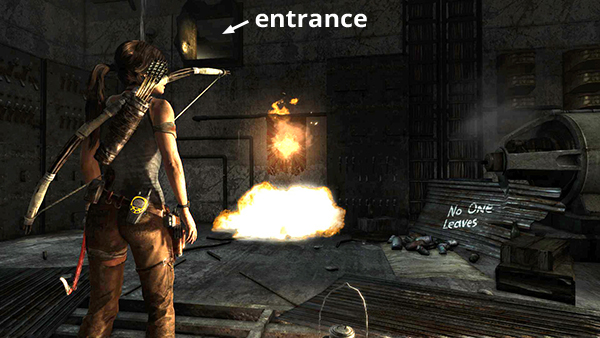
It's impossible to miss this lantern as you play through the level. After you scramble up into the temple, you'll drop down into a passageway blocked by junk. You must then shoot the lantern in order to burn away the debris so you can proceed. See here for details. (Click screenshot to enlarge.)
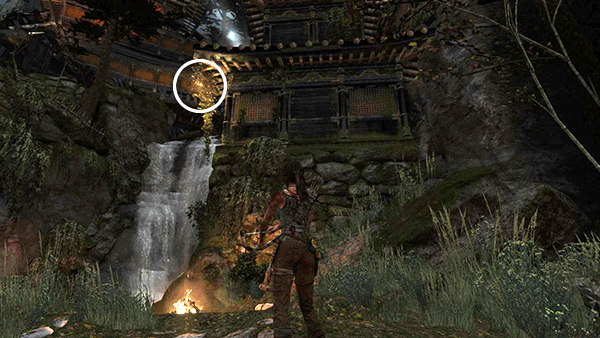
Pyromaniac Lantern 5
This lantern is hanging inside the temple that catches fire while you're fighting the Solarii. You'll spot it shortly after the stealth kill tutorial. Shooting it attracts enemy attention, though, so you may want to skip it. Once you've completed the level, you can no longer get into this building, but there are several other lanterns you can shoot instead. See here for details. (Click screenshot to enlarge.)
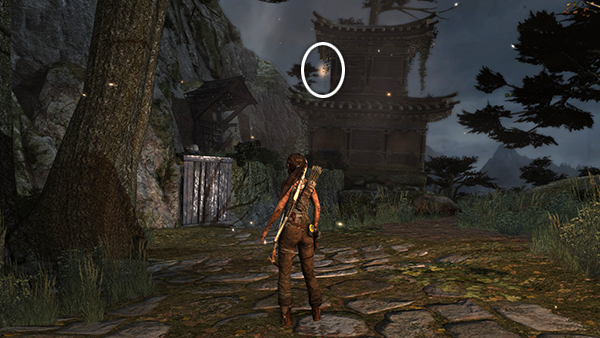
Pyromaniac Lantern 6
This lantern is in the upper area, where you end up after riding the zip line down from the burning temple. It's hanging from the southeast corner of the large building in the area above the scrambling wall. See here for details. (Click screenshot to enlarge.)
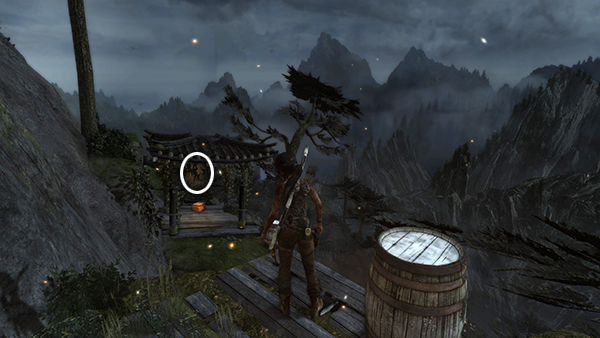
Pyromaniac Lantern 7
If you go around behind the building where lantern #6 was hanging, you'll see a small enclosure built into the cliffside below. The 7th lantern is here. See here for details. You can also shoot it from the path far below, just beyond the base camp. (As shown here.) This is convenient if you missed it the first time and need to return via fast travel. (Click screenshot to enlarge.)
Mountain Village
There are two separate challenges in this level: "Illumination" involves locating 10 statues and using your torch to light the braziers in their laps. "Egg Poacher" involves raiding 5 birds' nests. I have attempted to cover both challenges with minimal backtracking in my walkthrough, but if you missed anything and need to return via fast travel, this guide should help.
Note that the in-game map does not show challenge items, but they are noted on my maps. Illumination statues are marked with a star and the numbers "I1, I2, I3," etc. Egg Poacher nests have a star and "EP1, EP2," etc. [Level Maps: first visit | second visit | third visit]
Illumination Statue 1
The first statue is sitting inside a small pavilion in the middle of the village. It's also noted on the first visit map. Light your torch on one of the nearby lanterns and then use it to ignite the burner in the statue's lap to unlock the challenge. See here for details. (Click screenshot to enlarge.)

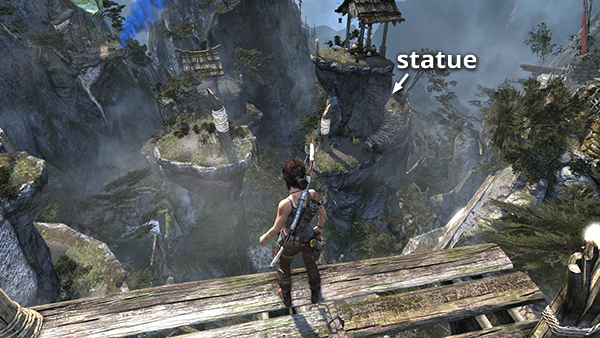
Illumination Statue 2
This statue is in the area at the top of the waterfall north of the village, which is accessible on the first visit to the level but only after obtaining the climbing axe. See the walkthrough and first visit map for details. Once you reach that area, climb the cliffs on the right, light your torch on the lantern, and cross over the rushing stream to the ledge with the statue. (Click screenshot to enlarge.)
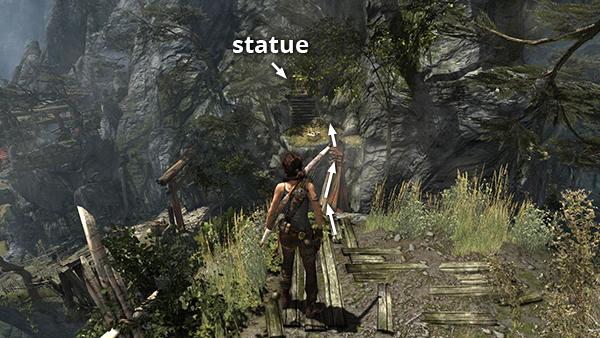
Illumination Statue 3
This statue is only accessible on the second and subsequent visits to the village. It's sitting in a little enclosure on one of the high northern ledges. It's marked on the second visit map, and that walkthrough tells how to reach it by sliding down the zip line from the Village Overlook Base Camp. The third visit walkthrough describes how to climb up from below. (Click screenshot to enlarge.)
Illumination Statue 4
This statue is on the next ledge below and to the east of statue #3. Just ride the zip line down and then climb up through the hut to reach it. See here and the second visit map for details. If you missed it and are backtracking from below, see here. (Click screenshot to enlarge.)
Illumination Statue 5
This statue is inside the tunnel connecting the cliffs on the north side of the village to the waterfall area. It's about halfway along on the climb up to the Hall of Ascension Challenge Tomb. See here and the second visit map map for details. If you missed it and are backtracking from below, see here. (Click screenshot to enlarge.)

Illumination Statue 6
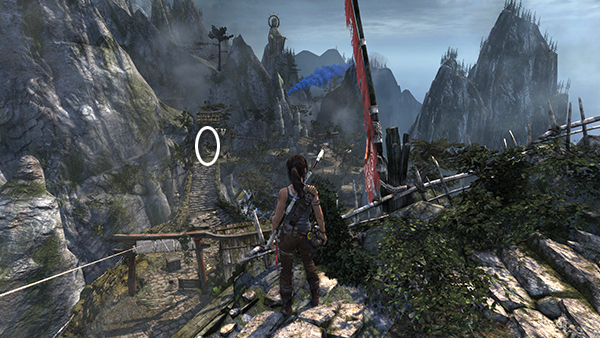
This statue is marked on the second visit map. It is only accessible on the second and subsequent visits to the Mountain Village and can be found on one of the ledges in the canyon to the east of the village, below the entrance to the Hall of Ascension Challenge Tomb. See here for details. (Click screenshot to enlarge.)
Illumination Statue 7
This statue can be found in the same area as #6. It's on the far side of the southwestern most column in the canyon. See the walkthrough and the second visit map for details. (Click screenshot to enlarge.)

Illumination Statue 8
This statue is marked on the third visit map. It is only accessible after returning to the Mountain Village from the Chasm Monastery. The statue is sitting on a small ledge just downstream (southeast) of the Mountain Descent Day Camp. See here for details. To get back here after completing the level, see here. (Click screenshot to enlarge.)
Illumination Statue 9
This statue can only be reached after returning from the Chasm Monastery. It's on a ledge beyond the Mountain Descent Day Camp and above the little Solarii encampment. See here for details. It's also noted on the third visit map. If you missed it when you first passed through this area and need to return via fast travel, see here. (Click screenshot to enlarge.)

Illumination Statue 10
The final statue is accessible during the second or third visit to Mountain Village. I cover it during the third, and it is marked on the third visit map. It's on the ledge behind the little group of huts on the hill southwest of the Village Plateau Base Camp. See here for details. (Click screenshot to enlarge.)
Egg Poacher Nest 1
The first Egg Poacher nest is on the roof of the three-story building in the village proper. Check the walkthrough if you need help climbing up to it and refer to the first visit map if necessary. (Click screenshot to enlarge.)
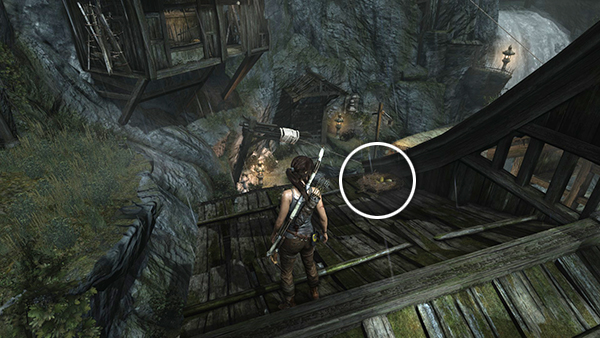

Egg Poacher Nest 2
This nest is is located in the area at the top of the waterfall north of the village, which is accessible once you've obtained the climbing axe. After lighting the second illumination statue (above), jump across to the tall building and climb onto the roof to reach the nest. See the walkthrough and the first visit map for details. (Click screenshot to enlarge.)
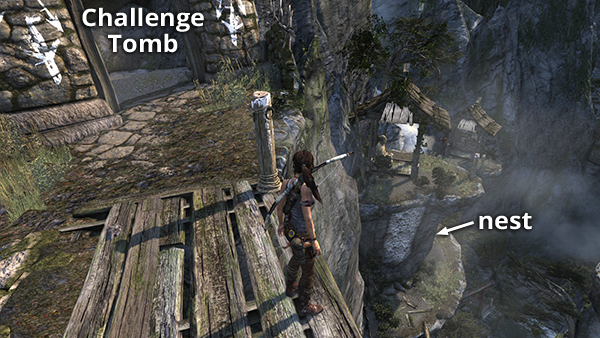
Egg Poacher Nest 3
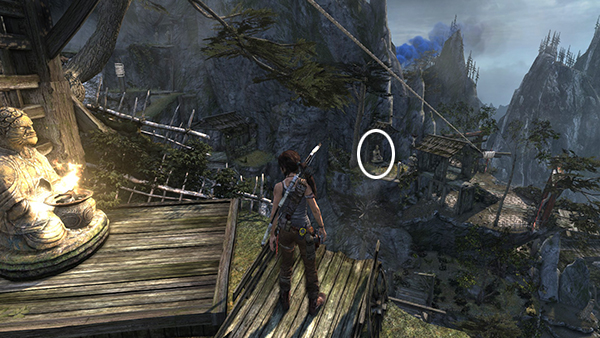
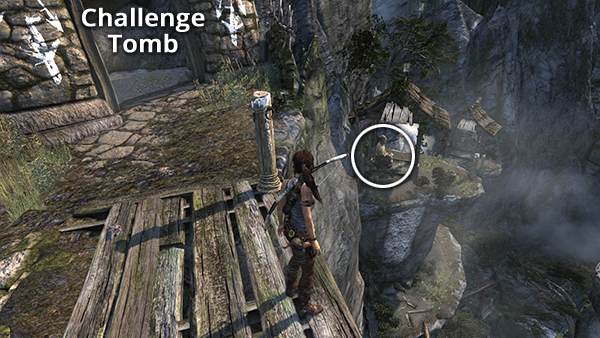
This nest is marked on the second visit map. It is only accessible on the second and subsequent visits to the Mountain Village and can be found on one of the ledges in the canyon to the east of the village, below the entrance to the Hall of Ascension Challenge Tomb. See here for details. (Click screenshot to enlarge.)

Egg Poacher Nest 4
This nest is also found in the canyon east of the village. The walkthrough describes a route to it that also covers the various other collectibles. If you're only missing the nest, it's easier to just start from the Challenge Tomb entrance, ride a zip line down to the column directly ahead, then jump down onto the ledge below and to the left of the ledge with the nest. (Click screenshot to enlarge.)
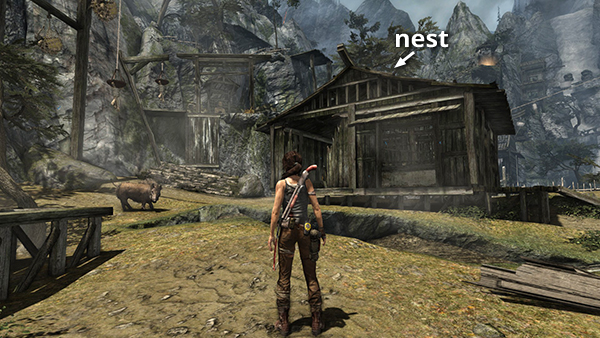
Egg Poacher Nest 5
The final nest is marked on the third visit map. It is accessible during the second or third visit to Mountain Village, but I cover it during the third. It's on the roof of one of the huts southwest of the Village Plateau Base Camp. See here for details. (Click screenshot to enlarge.)
Mountain Base
There are 5 tattered Sun Queen banners hanging on the walls of this level. Some are hard to spot in the darkness so use Survival Instinct if necessary. Use your torch to burn them all in order to beat the "Non-Believer" challenge. [Level Map]
Non-Believer Banner 1
The first banner is in the area where you kill the two Solarii moving the fuel barrel. Light your torch in the bathroom on the right side of the hall and then go to the room at the end on the left to burn the banner. See here for details. (Click screenshot to enlarge.)
Non-Believer Banner 2
This banner is in the room where you pick up and throw the lanterns. It's hanging on the west wall, just below the opening where you first climbed in. You can use one of the lanterns to set it on fire or come back later with a lit torch. See here for details. (Click screenshot to enlarge.)
Non-Believer Banner 3
The third banner is hanging in the southeast corner of the room where you obtain the WWII Submachine Gun. Unless you're returning to this level after obtaining the fire striker, you'll need to go back downstairs to the bathroom in order to light your torch so you can burn the banner. Check the walkthrough for more info. (Click screenshot to enlarge.)


Non-Believer Banner 4
This banner is in the little room at the west end of the large room where the Solarii ambush Lara with the spotlight. The banner is inside on the left, and there's a fire barrel on the landing leading up to the control room if you need it to light your torch. See here for details. (Click screenshot to enlarge.)
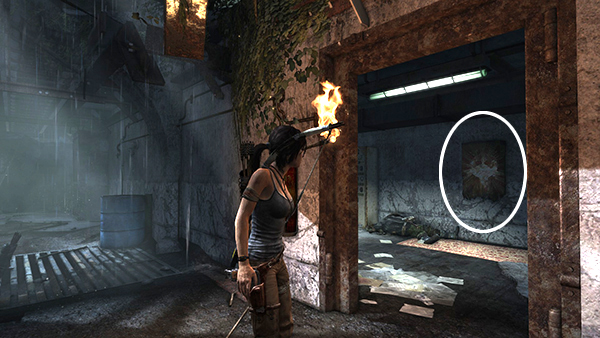
Non-Believer Banner 5
The last banner is hanging on the left wall as you enter the control room near the end of the level. See here for details. (Click screenshot to enlarge.)
Shantytown
There are two challenges in this level. One, called "Laid to Rest," involves dismantling various effigies made of wood and tattered cloth. There are 10 of these effigies in the level, but you only need to destroy five them to beat the challenge. To do this, shoot a fire arrow at the effigy. Then, once the cloth parts have burned away, use a rope arrow to pull down the framework. For the "Silencer" challenge, you must use your axe to destroy four of a possible five crank-powered sirens.
Note that the in-game map does not show challenge items, but they are noted on my maps. Laid to Rest effigies are marked with a star and the numbers "LtR1, LtR2," etc. Silencer alarms have a star and "S1, S2," etc. [Level Maps: Part 1 |Part 2]
Laid to Rest Effigy 1
The first effigy is noted on the part 1 map. It's on the path behind the helicopter. You won't be able to destroy it the first time you pass it, since you won't yet have fire arrows. Be sure to return once you get them in order to burn the effigy. Then pull it down with a rope arrow. See the walkthrough for details. (Click screenshot to enlarge.)


Laid to Rest Effigy 2
This effigy is also marked on the part 1 map. It's hanging on the wall just below the Helicopter Hill Base Camp. When you climb down to the ground and face the helicopter, you'll see it. Check the walkthrough for details. (Click screenshot to enlarge.)
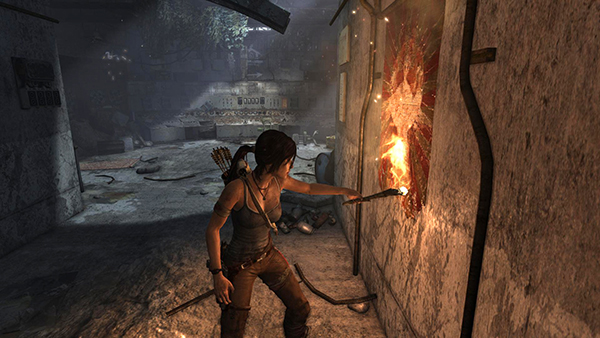
Laid to Rest Effigy 3
This effigy is hanging on the outer wall of the building that houses the Well of Tears Challenge Tomb. You'll need to climb up on the shacks outside the building to get a shot at it. See here and check the part 1 map for details. Or, wait until you've beaten the enemies at the Ancient Gate and then take down the effigy, as shown here. (Click screenshot to enlarge.)

Laid to Rest Effigy 4
This effigy is hanging near the top of the tall tower with the tattered canopy on the west side of the first area. It's marked on the on the part 1 map. See here for details on how to reach it. (Click screenshot to enlarge.)
Laid to Rest Effigy 5
This effigy can be found in the narrow alley behind the shacks in the southeast corner of this first area. If you ride the zip line down from the tall, Japanese-style building, the effigy is just ahead on the left. See the walkthrough and part 1 map for details. (Click screenshot to enlarge.)

Laid to Rest Effigy 6
This effigy is just beyond the Ancient Gate Day Camp, above and to the right of the nasty, oily pool. It's marked on the part 2 map and detailed in the walkthrough. (Click screenshot to enlarge.)
Laid to Rest Effigy 7
This effigy is also shown on the part 2 map. It's hanging from the tower where Lara meets Grim and battles another large group of Solarii. See here for details. (Click screenshot to enlarge.)
Laid to Rest Effigy 8
This effigy is hanging from the cliff wall in the southwest corner of Shantytown. Look for it behind the tower made of steel girders that you climb just before engaging the Solarii near the windmill. See here and check the part 2 map for details. (Click screenshot to enlarge.)
Laid to Rest Effigy 9
The 9th and 10th effigies are mounted on the cliffs near the building with the windmill and cargo-hauling apparatus. If you climb onto the roof and look out over the Windmill Base Camp, you'll see this one. You can also destroy it from the campsite below. See here and check the part 2 map for details. (Click screenshot to enlarge.)
Laid to Rest Effigy 10
This effigy is hanging just to the left (north) of #9. Again, if you climb to the top of the windmill building, it's easy to spot. See here for details and/or reference the part 2 map. (Click screenshot to enlarge.)
Silencer Alarm 1
There's only one Silencer alarm in the first part of Shantytown. It's on the upper level of the tall tower with the tattered canopy on the west side. It's marked on the part 1 map. See here for details on how to reach it. When you do, stand close to it and tap Interact to break it with your axe. (Click screenshot to enlarge.)

Silencer Alarm 2
After you first meet Grim and then fight a squad of Solarii, use a rope line to climb up onto the building where the bad guys were standing. You'll find the second alarm there. See here and the part 2 map for details. (Click screenshot to enlarge.)
Silencer Alarm 3
This alarm is sitting on top of one of the buildings on the southwest side of Shantytown. After you climb up from the area with the stream and fight a few Solarii, but before going over to the windmill building, climb to the upper level to find the alarm. See here and the part 2 map for details. (Click screenshot to enlarge.)

Silencer Alarm 4
This alarm is inside the large building with the windmill and cargo-hauling machinery. In the area where the moving cargo cages change direction, scramble up the painted wall onto the ledge with alarm. Then, if you like, you can continue climbing the plank ladder onto the roof. See here for details and check the part 2 map if necessary. (Click screenshot to enlarge.)
Silencer Alarm 5
This last alarm, which you won't need if you've found and dismantled the first four, is in the lower level of the windmill building. Go to the southwest corner and you'll find the alarm sitting on the ledge just behind the chain-link fence. See here and the part 2 map for details. (Click screenshot to enlarge.)

Challenges Part 2 | Collectibles Intro | TOMB RAIDER Walkthrough | Main Page
†UPDATE HISTORY: 8/13/13 - Page first posted online.
WAS THIS WALKTHROUGH HELPFUL? If not, I apologize and invite you to contact me with any questions. If you need help right away, I recommend the r/TombRaider subreddit. Other fan-run forums are listed at tombraiders.net/stella/community.html. If this site was useful, please consider supporting it financially or in other ways. For details, visit tombraiders.net/stella/support.html. As always, I welcome your corrections/suggestions. Thank you!
Copyright © 2013- Stellalune (). All rights reserved. The screenshots and videos included here were made using Fraps. Feel free to copy or print this walkthrough for personal use. By all means, share it with friends, but please include this credit line so people can send me their feedback. No part of this walkthrough may be reproduced on another site without permission. Follow this link for details about this site's advertising and privacy policy.
Stella's Tomb Raider Site: tombraiders.net.