Stella's Classic Tomb Raider: Last Revelation Guide
NOTES ON THE REMASTER: This guide has not yet been updated for the remastered game. Revisions are in progress but will take time. I hope this version, based on the classic game, will still be helpful. Thanks for your patience.
IMPORTANT: Levels 13 through 20, set in Alexandria, are interconnected. Some backtracking among them is needed to find all the necessary items. This walkthrough covers what I hope is the most direct route including all kills, pick-ups, and secrets. I have also included an ALEXANDRIA FLOWCHART outlining the basic path through the levels. This chart contains minor spoilers, such as keys and puzzle items, so you may want to avoid it unless you get lost/confused. The walkthrough also contains notes on what to do if you missed any crucial items.
LEVEL MAP by VGCartography (used with permission)
Last Revelation Remastered Video Walkthroughby Eldincy‡
Kills: 10 (11) Items: 29, including Horseman's Gem, 3 Golden Stars, 2 Scrolls, Pharos Pillar, and Torch Secrets: 3*
NOTE: There's an extra enemy in the classic PlayStation game. It is covered in the FIRE CIRCLE PUZZLE section, below.
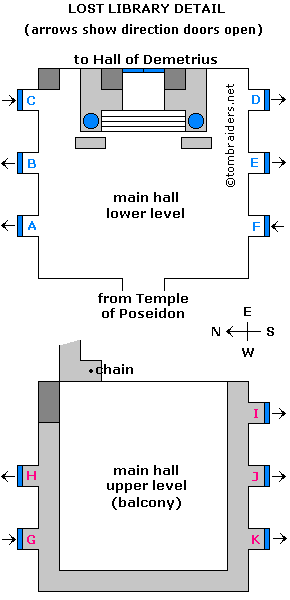
KEY TO DIAGRAM
lower level doors:
A = Fire Circle Scroll Room
B = Stacked Rooms with Pole and Blades
C = Exit from Fire Circle Puzzle Poom
(to upper level after puzzle solved)
D = Planetarium
E = Reading Room and Small Pool
(to upper level after trapdoor open)
F = Room below wooden plank floor
upper level doors:
G = Exit from Archives
H = Lyre Room
I = Pharos Pillar (trapdoor to lower level)
J = Wooden Floor Room (to lower level)
K = Room with Lions' Heads
You enter this level through a crawlspace from the TEMPLE OF POSEIDON. Go through the next crawlspace and drop down into a hallway with a lantern. Continue in either direction to reach the MAIN HALL WITH TWO LEVELS AND MANY BLUE DOORS. This room is the hub for all of your explorations in this level. It is illustrated in the diagram at right and in these screenshots of the north wall and south wall.
Some of the blue doors can be opened from this room; some open only from the other side. There's no set order for exploring the different side rooms, but I've tried to include the least amount of backtracking while still obtaining the necessary clues and puzzle pieces before you get to the puzzles.
DOOR B – STACKED ROOMS WITH POLE AND BLADES: Go to the middle door on the lower level, north side (marked B in the diagram) and press Action to push it open. Follow the passageway to a climbing pole. Unlike the other poles you've seen so far, this one has a gear-like blade moving around the square opening. To get through without taking damage, stand at the edge of the opening, to either side of the pole. Hop back once and watch the blade. If Lara is standing on the left side of the hole, wait for the blade to move to the right (or vice versa). Then hold Action and either take a standing jump forward or just run off the edge to land safely in the room below. (screenshots)
NOTE: This "hole maneuver" is detailed with a video in the Useful Bugs section.
Shoot the large vase to get a small medipack (1). Repeat the hole maneuver to descend past the next blade to the level below. Shoot the vases here to get shotgun shells and a large medipack (2-3). Then repeat the maneuver a third time or just safety drop carefully past the next blade into the passageway below. (screenshots)
Follow the hallway to a second pole. There's no need to climb it. Just stand below one corner of the opening, wait for the blade to pass to the other side, then pull up through the opening. (screenshots)
ROOM WITH TWO HUGE GEARS – FIRST GOLDEN STAR: As you enter the room at the top of the steps, a mechanical man (1) swinging an axe emerges ahead on the right. (screenshot) This new enemy type can be challenging to defeat since explosives can't harm him, and his metal hide repels bullets. The aquamarine gem in his chest is his vulnerable spot. (screenshot) Sometimes but not always, you'll hear him grunt when you score a direct hit, and he'll let out a longer groan when he's about to fall, so you can stop shooting. If you run to meet him as he comes around the center pillar toward you, then hop back firing, you can take him out with 4-5 wideshot shotgun blasts at close range, a few more regular shotgun blasts, or about 25 direct hits with the pistols. If you're using pistols, keep firing as you hop back. Then, when the mechanical man gets close, jump past him, roll, and start backing up while shooting again. Don't let him back Lara into a corner. Once you've taken care of him, use the crowbar to pry the GOLDEN STAR (4) out of the column. (screenshot)
Turn around to face the two huge gears. Move behind the gear on the right into the southeast corner. Stand at the edge of the opening with Lara's back toward the edge of the moving gear. Drop back and grab the edge. Then climb down the ladder into the pit. Drop down twice to find SECRET #1 (50/70), a small medipack, revolver ammo, and Uzi clips (5-7). Climb back up the ledges and ladder the way you came. (screenshots)
The square pillar where you pried out the GOLDEN STAR is one of three supporting a T-shaped ledge. Go around to the left (south) side of the left pillar and climb the ladder to the top. Go through the doorway on the left and down a short flight of stairs to an opening with a climbing pole. Drop through the opening into the room below. (screenshots)
ROOM WITH BRASS ARCHES AND PIPES: Two mechanical men (2-3) emerge as you explore. Run forward to meet the first one, which comes from behind the archway in the far right (northwest) corner. Back away while shooting at the blue gem in his chest, just as you did the first mechanical man. When he falls, enter the side passageway to the south. The second mechanical man approaches from the right. Again, hop back while firing at the blue gem in his chest to destroy him. Notice the locked gate on the east wall with the receptacle next to it. The GOLDEN STAR won't fit, so you'll need to find something else to put there. Enter the room to the south. Climb down the ladder, go through the crawlspace, and save the game before stepping out into the big room ahead. Don't overwrite this save until you have defeated the next enemy. (screenshots)
BUG NOTE: Once you have started the fight with the mechanical horseman, do not try to go back through the crawlspace. The horseman may attempt to follow Lara and get stuck inside the wall, preventing you from defeating him, which you must do in order to continue.
LARGE ROOM WITH FOUNTAINS AND MECHANCAL HORSEMAN: The next enemy can be challenging, but here's a trick to make things much easier. Step forward carefully until Lara is standing just inside the doorway to the big room. Equip the grenade launcher (with regular or super ammo) and aim for the northwest corner, just to the right of the bronze horse. Fire a grenade and immediately step forward to trigger the cutscene. (screenshots)
Cutscene: In the usual version of this scene, a mechanical man runs into the room, mounts the bronze horse and begins riding around. If you use the grenade trick described above, the grenade should land on the floor in front of the mechanical man just as he emerges from the alcove, and you'll see it explode during the cutscene. This is the only time he is vulnerable to explosives. Now, instead of mounting the bronze horse and charging at Lara, as he would normally do, he just paces around the horse.
Without his horse, the mechanical horseman (4) is just like the other mechanical men you've encountered. Before he turns his attention to Lara, switch to the shotgun (or pistols/Uzis), run out into the open so you have room to maneuver and start shooting at the blue gem in his chest, backing away as you fire, until he falls. When you defeat him, both horse and man disappear, leaving behind the HORSEMAN'S GEM (8). Pick it up. (screenshots)
NOTE: As far as I know, this method works on all systems, though it does require fairly precise timing to fire the grenade just before triggering the cutscene. If you can't make it work, if you didn't happen to save before entering the room, or if you're out of grenades, see the footnote for alternatives.
After defeating the horseman, follow the wide hallway to the south of the main room, where you'll find a raised gate and a pulley mechanism. Stand on the step below the gate, facing the angled block and use the laser sight-equipped crossbow with normal arrows to target the metal ball to the left of the chain. You can also use pistols with the laser sight bug to conserve ammo. (If you don't have the LASER SIGHT yet, try shooting an explosive arrow in the general direction of the chains, or use the grenade gun, jumping straight up and firing at the highest point.) When you hit the ball, the gate opens. Climb in to get SECRET #2 (51/70), a large medipack, shotgun shells, and Uzi ammo (9-11). (screenshots)
Return to the big room and exit to the right (east), where you entered. (screenshot) Go through the crawlspace and climb the ladder back to the ROOM WITH BRASS ARCHES AND PIPES. Head under the brass archway and turn right. Use the HORSEMAN'S GEM in the receptacle near the small gate to open it. (screenshot) Enter and pull the chain. (screenshot)
Cutscene: A gate opens in an underwater room below. (You can see this area through the grate in the floor.)
Exit the alcove with the chain and make a U-turn to the right to return to the climbing pole. (screenshot) Climb up, backflip off the pole, and go up the steps to the upper level of the ROOM WITH HUGE GEARS. Go to the right end of the T-shaped ledge and climb back down the ladder to the floor. (screenshot)
MAZELIKE ROOMS WITH SWINGING CHAINS: At the bottom of the ladder, head to the left (west) side of the room. There are two doorways here. Go through the one on the left. (The one on the right eventually leads you to the same place, but the left path is a little less complicated.) The room beyond the doorway has swinging chains that will hurt Lara if they hit her. You can avoid them by approaching on either side and running carefully past them, or by staying to either side and crawling underneath them. Move past the first chain, then the second, then turn left into a small room with a spinning gear. Stand at the edge of the metal trapdoor with the gear on Lara's left and press Action to open the trapdoor. (screenshots)
FLOODED AREA – SECOND AND THIRD GOLDEN STARS: Jump into the water, roll, and swim through the flooded passageway to the north (the only other way out of this room). Follow the passageway forward then left. Swim straight across the large room with the square, metal pillars, through the gate on the west side. (This gate will be open if you pulled the chain in the ROOM WITH BRASS ARCHES AND PIPES after defeating the mechanical horseman, above.) Behind the gate is a small room where you can climb out of the water and use your crowbar to pry 2 GOLDEN STARS (12-13) from their receptacles. When you have them, swim straight across the large flooded room to the opening where you came from. Turn right, swim into the small room ahead, and surface at the trapdoor. (screenshots)
Climb out of the water and return past the swinging chains to the exit in the northeast corner of the mazelike area.
ROOM WITH TWO HUGE GEARS (again): Before leaving this area make sure you have 3 GOLDEN STARS in your inventory. If you missed the FIRST STAR, it should still be in its receptacle on one of the square columns in this room. (screenshot)
STACKED ROOMS WITH POLE AND BLADES (again): Go through the east door to get back to the climbing pole. Stand at the edge of the opening, to either side of the pole, and when the blade moves to the other side, run off the edge to fall safely into the passageway below. Follow the hall to the other pole. Grab onto the pole and climb up until Lara is hanging just below the blade (i.e., 3 pulls up the pole). When the blade moves into the front right corner, about to pass in front of Lara, quickly pull up once more and immediately backflip off the pole to land on the ledge above. If you didn't do it on the way down, shoot the 2 vases to get a large medipack and shotgun shells (2-3). (screenshots)
To get past the next blade, walk to the edge, hop back once, and then take a standing jump to grab the pole, climb up three times, wait for the blade to move to the front right corner (so it's about to pass in front of Lara), and then quickly climb up twice and backflip. Or, stand at the edge of the opening, wait for the blade to move to the far right corner, then take a standing jump to grab the pole and immediately backflip onto the ledge above and behind. Shoot the ceramic vase for a small medipack (1) if you didn't get it earlier. Next, position Lara so she's facing west or south, so there's no wall behind her on the upper level. Then repeat the sequence described above to get past the third blade. Follow the corridor back to the MAIN HALL. (screenshots)
MAIN HALL (again): Lara will probably have lost some health climbing up the pole past the blades. If you like, you can return through the corridor to the west (screenshot), climb into the raised crawlspace where you first entered this level, and follow the passageway back to the TEMPLE OF POSEIDON. Whenever you change levels, Lara's health is restored. Return through the crawlspace to the LOST LIBRARY and proceed.
DOOR E – READING ROOM AND ROOM WITH SMALL POOL: Push open the middle set of doors on the lower level, south side of the MAIN HALL (E on the diagram above). Follow the twisting stairs down to a room with scattered scrolls, stone benches, and a hanging lantern. As you enter, 2 fire wraiths (5-6) appear. Run through either exit. Both hallways lead to a room with benches and a small pool. Jump into the pool and wait there for the fire wraiths to extinguish themselves. (screenshots)
Climb out of the water and move around to the southeast corner of the pool. When you step on the tile with the gold orbital patterns, Lara looks intently at the chute high on the wall. Open your inventory, select the BINOCULARS, and look into the opening. Now hold Action to activate the light, and you'll see a colored diagram with four planets of different colors orbiting the blue earth at the center. This is a clue to the upcoming PLANETARIUM puzzle. Use the Draw/Holster Weapons button to stow the binoculars when you're done. (screenshots)
Follow the hallway to the west, shooting the ceramic vase and picking up a small medipack (14) on the way. Back in the READING ROOM with the scattered scrolls, you'll notice a ladder on the wall next to the entrance. If you followed this walkthrough so far, the trapdoor at the top of the ladder is still closed, so you can't go that way. Instead, return up the stairs the way you came to the MAIN HALL. (screenshots)
DOOR D – PLANETARIUM: Make a U-turn to the right and barge open the left door on the lower level, south side. Shoot the ceramic vase in the hall to get a small medipack (15). Follow the hall to a big room with an illuminated map of the heavens on the ceiling. Just inside on the right is a globe with a blue band at its equator. Grab it and push/pull it onto the gold circle in the middle of the concentric rings on the floor. A glowing white orb appears above the globe, showing that it's in the correct position. (screenshots)
Place the 3 GOLDEN STARS (which you should have collected in the area behind door D) into the star-shaped receptacles to open the four gates. Now move the other 4 globes onto the correct circles within the diagram, using the clue you found in the ROOM WITH THE SMALL POOL and fire wraiths: gray = inner circle, green = second circle, pink = third circle, yellow = outer circle. When all of the globes are positioned correctly, electricity shoots out of the golden disk on the north wall, connecting globes, and a door opens below the disk. (screenshots)
NOTE: The solution to the puzzle is based on ancient astronomy, which places Earth at the center of the solar system, with the sun and planets revolving around it, as shown in this historical model. So, assuming Earth is at the center of the puzzle, we place the globes as follows: Moon (gray globe, inner circle), Venus (green globe, second circle), Mercury (pink globe, third circle), Sun (yellow globe, outer circle).
After solving the PLANETARIUM puzzle, go through the door beneath the lightning disk and follow the corridor to the next room, shooting 2 vases along the way to get a large medipack (16) and a box of wideshot shells (17). (screenshots)
FIRE CIRCLE PUZZLE ROOM: This large room has a seven-pointed star inscribed on the floor and 7 serpent statues fitted with levers, one at each point of the star. If you've followed this walkthrough, you will not yet have found the clue to help solve this puzzle, but it is important that you enter the room briefly to trigger a musical cue and cause the puzzle clue to appear elsewhere. Now backtrack along the hallway just as far as the blue door. Barge it open to emerge back in the MAIN HALL. (This is door C on the diagram.) (screenshots)
DOOR A – FIRE CIRCLE SCROLL ROOM: Push open the left door on the lower level, north side of the MAIN HALL. Follow the hallway and break the ceramic jar to get the small medipack and Uzi ammo inside (18-19). Continue to a room with a stone pedestal, banners hanging from the ceiling, and an elaborate golden circle inscribed on the floor. (screenshots)
When you step down onto the floor, 2 mechanical men (7-8) emerge from the side alcoves. Avoid them while shooting the blue gems in their chests to defeat them, just like you did the others. Or, run back down the hallway to the corner just before the blue door leading back into the MAIN HALL. The mechanical men won't pursue Lara any farther, so you can take your time shooting them with pistols. (screenshots)
When the coast is clear, approach the pedestal in the room with the hanging banners and press Action to take the FIRE CIRCLE SCROLL (20). Open your inventory to examine it for a clue: "For the serpents to live, all must first be stilled. Provoke each in turn, and the circle will burn complete." Return to the MAIN HALL the way you came. (screenshot)
NOTE: If you visit the FIRE CIRCLE SCROLL ROOM without first setting foot in the FIRE CIRCLE ROOM, you'll still meet the mechanical men, but the scroll on the pedestal will be translucent so you can't pick it up and examine it. (screenshot) Of course, it's possible to solve the FIRE CIRCLE puzzle without reading the scroll, but a good raider does her research. ;-)
DOOR C – FIRE CIRCLE PUZZLE: Back in the MAIN HALL, go through door C (lower level, northeast corner) to get back to the puzzle with the serpent levers. Or, if you haven't opened door C yet, go through door D (lower level, southeast corner) to reach the PLANETARIUM. Then exit through the doorway to the north to get back to the FIRE CIRCLE PUZZLE ROOM. (screenshots)
This puzzle consists of 7 serpent statues with levers that activate flames when pulled. Each lever can be moved up or down any number of times. Using any lever affects the flame on that statue, as well as the two other statues at the opposite points of the star. If a flame is off, the lever will turn it on and vice-versa. The goal is to light all seven flames at once.
Refer to the clue from the FIRE SCROLL, which begins, "For the serpents to live, all must first be stilled." So, if you played around with the levers earlier and any of the flames are now lit, step on the raised tile with the star symbol on the east side of the room to extinguish all of the flames. Now start by using any of the serpent levers and, following the instructions in the scroll to "provoke each in turn," move in either direction around the circle, using each lever as you go. Avoid the raised tile with the star symbol on the east side of the room, since it resets the puzzle. Only step there if you make a mistake and want to start over. When you pull the seventh lever, "the circle will burn complete," meaning all burners should be lit, and blocks will rise from the floor in the middle of the room. (screenshots)
Regardless of which version of the game you're playing, you will need to follow the same path to the next area, but in the PlayStation version (classic PS1 only, not sure yet if they'll include it in the Remaster), solving the fire circle puzzle also releases a fire wraith, so you'll need to go quickly. Climb/jump up the blocks. Walk to the left edge and jump straight up to grab the edge of the opening in the ceiling. Pull up and run up the stairs to a fountain. Jump into the water and the wraith should follow and be snuffed out. Climb out of the water and head down the short ramp into the next room. (screenshots)
ARCHIVES – FIRST ROOM WITH LADDER: This small room contains several stone benches. There are scrolls scattered about and more scrolls stored in shelves lining the walls. Climb the ladder to the upper level. (screenshot) Go around to the opposite side of the balcony and shoot the vases. The second one contains a small medipack (21). (screenshot) Climb back down the ladder.
Follow the hall opposite the ladder, smashing another ceramic vase in the hallway to get some Uzi ammo (22). (screenshot) Go through a SECOND ROOM WITH BENCHES AND SCROLLS (screenshot), continue down the stairs, and follow the hallway to the end. Push open the blue door (marked G in the diagram) to emerge on the UPPER LEVEL OF THE MAIN HALL. Turn right and follow the balcony around to the other side of the room. (screenshot)
The blue doors on the south side of the balcony (I, J, and K in the diagram) only open from the MAIN HALL side. If you like, you can open them all now. Just be careful not to go too far into the left door. If you do, a fire wraith (10, below) will appear, and you'll have no convenient way of dealing with it.
DOOR K – ROOM WITH LIONS' HEADS: Go through the right door on the upper level, south side. Light a flare and save the game before sliding down the ramp. As you slide, jump to grab the ladder above and in front of you just before the end of the ramp. Climb up to emerge on top of a huge statue of a lion's head. You'll hear a rumbling as a metal globe rolls down the ramp on the opposite side of the room. You're safe up here. Take a running jump from the top of the lion's head to the long ledge on the right (west) wall. This is SECRET #3 (52/70), a large medipack and normal arrows (23-24). Safety drop to the ground. (screenshots)
NOTE: If you miss the concealed ladder and drop out of the lion's mouth onto the ground, either reload and try again, or take a standing jump up the slope then flip to either side to get out of the way of the rolling globe. Fight the mechanical man (9), as described below. Then use the crawling corner bug to reach the ledge with the secret. (screenshots)
If you came down via the ledge with the secret and want all the kills, slide down into the trench where the globe landed. This triggers a brief cutscene that's meant to play when the globe rolls down the slope. A mechanical man (9) then appears in the southeast corner of the room. Fight him using the same tactics as the others. If you like, you can hop up onto the low stone block in the middle of the room or down into the trench with the globe. The robot can't reach you, but it's also harder to target the blue diamond in his chest from either of these safe spots. (screenshots)
After you defeat the mechanical man, run up the ramp where the globe rolled down and stand at the top as a second globe sails over Lara's head and rolls into the trench. Take a standing jump from the top of the ramp to grab the switch on the wall to the left. This raises a large stone block in the middle of the room. (screenshots)
NOTE: You can avoid triggering the mechanical man by staying out of the trench where the first globe landed, and you can avoid the second rolling globe by pulling the switch before stepping on the low block in the middle of the room. As long as you don't go up the ramp again after stepping on this block, the second globe won't roll.
Climb onto the block and take a running jump to grab the ledge ahead (on the south wall). Pull up and light a flare so you can see the raised opening just to the left. Climb inside and follow the passageway around to an opening overlooking the second lion's head. Take a running jump from the left side of the opening, without pressing Action, to land on the front edge of the lion's sloping forehead. Make sure you aim carefully and don't grab while Lara is in the air or she'll fall short. Climb up on the right and pull the chain. This widens the opening in the lion's mouth so you'll be able to crawl through. (screenshots)
Hold Action and hop back three times to slide down the front of the lion's snout and grab the edge of its nose. Let go and immediately grab again to catch onto the lion's lower jaw. To prevent Lara from slipping, hold Duck/Crouch continuously as you pull up into the lion's mouth and crawl forward a bit. If Lara stands up before crawling all the way into the mouth, she'll slip and fall, and you'll need to climb up the blocks and jump to grab the lion's nose again. (screenshots)
Crawl forward until Lara can stand. Then climb the pole to the small room above and backflip to the floor. The two gates open automatically as you approach. Go through the one on the right. (screenshots)
ROOM WITH PHAROS PILLAR: Enter the room and take the PHAROS PILLAR (25) from the pedestal. Stand facing the trapdoor in the floor next to the pedestal, with the pedestal ahead on Lara's right, and press Action to open the trapdoor. Notice the ladder on the left side of the trapdoor leading down to the room below. If you want all the kills, enter the hallway opposite the pedestal to draw out a fire wraith (10). If you avoid this doorway, the wraith won't appear, but you should open the trapdoor regardless. (screenshots)
NOTE: This hall leads to one of the doors on the upper level of the main hall, marked I in the diagram. However, it can only be opened from the outside. Maybe you opened it earlier.
If you don't trigger the wraith, after taking the PHAROS PILLAR and opening the trapdoor, skip the next paragraph.
If you do trigger the wraith, you'll need to find some water to destroy it. Run to the right side of the trapdoor, drop back to grab the ladder. Press and release Action repeatedly to climb down quickly. At the bottom of the ladder, you'll find you're back in the READING ROOM (behind door E). Roll and run/jump through the door diagonally opposite the ladder. Follow the hallway around to the ROOM WITH THE SMALL POOL. Jump into the pool and wait there for the fire wraith to extinguish itself. Climb out of the water and return to the READING ROOM. Climb back up the ladder and through the trapdoor to the room where you got the PHAROS PILLAR. (screenshots)
Return through the open gate into the small room with the climbing pole. This time go through the other gate, now on on the right. If it is not already open, it should open as you approach and then close behind you. (screenshots)
TORCH ROOM AND ROOM WITH WOODEN PLANK FLOOR: A little way down the hall is an alcove. Pick up the wooden TORCH (26) from the floor. Step on either round grate to light one of the braziers. Carefully approach the brazier with torch in hand and press Action to light the torch. Continue along the hallway and down the stairs to a room with a wooden floor. Press the Draw Weapons button to toss the torch onto the wooden floor and stand back to watch as it goes up in flames. If the torch slides off the wooden slats, pick it up and try tossing it again. After a few moments, the wooden floor burns away leaving jagged opening. Lara won't grab the angled edges of the opening, so to avoid taking damage when you drop into the room below, move to the far (north) edge and safety drop from there. (screenshots)
NOTE: The raised passageway on the east side of the room with the wooden floor leads to door J on the upper level of the MAIN HALL. It can only be opened from the other side, but you shouldn't need to go that way.
BUG NOTE: A few PlayStation users have found a bug here. After burning away the floor, they left the area, saved the game, then returned later only to find an invisible barrier preventing them from dropping through the floor. I recommend dropping through immediately after burning the floor.
ROOM BELOW WOODEN FLOOR: Pick up the MUSIC SCROLL (27). (It's the one in the circle on the floor that Lara stares at intently when you walk past it.) Shoot the vase to get some shotgun shells (28). Climb up into the doorway, turn left and push open the blue door (marked F in the diagram) to emerge back in the MAIN HALL. (screenshots)
RETURNING TO THE UPPER LEVEL: If you've already opened the doors on the upper level and the trapdoor in the PHAROS PILLAR ROOM, go through the middle door on the south side, lower level (E on the diagram and shown in this screenshot), and follow the stairs down. As you enter the READING ROOM, make a U-turn to the right and climb the ladder. (screenshot) Pull up through the open trapdoor into the PHAROS PILLAR ROOM. If you dealt with the fire wraith (10) earlier, you can now just follow the hallway opposite the trapdoor and pedestal. (screenshot) This brings you back to the MAIN HALL, UPPER LEVEL, through door I.
If you are still avoiding the wraith, instead, at the top of the ladder in the PHAROS PILLAR ROOM, continue straight ahead into the room with the climbing pole. Go through the gate on the right (screenshot) and follow the passageway back to the ROOM WITH THE WOODEN PLANK FLOOR. Climb into the opening to the right of the big hole in the floor (screenshot) and follow the passageway to emerge in the the MAIN HALL, UPPER LEVEL, through door J.
If you haven't opened the upper level doors, you'll need to get back to the upper level a different way. Go through the right door on the north side, lower level of the MAIN HALL (C in the diagram). (screenshot) This leads to the FIRE CIRCLE PUZZLE. Climb the blocks and pull up through the opening in the ceiling. (screenshot) Follow the hallway to the ARCHIVES, exit on the left, opposite the ladder. (screenshot) Then continue through the next room to emerge in the MAIN HALL, UPPER LEVEL, through door G.
DOOR H – LYRE ROOM: Finally, barge open the right door on the upper level, north side. Shoot the vase in the hallway to get the Uzi ammo (29) inside. Then continue to the room at the end of the hall. Face the music stand near the lyre and press Action twice to place the MUSIC SCROLL on the stand. (screenshots)
Cutscene: Lara plays a tune on the lyre and a nearby door opens.
Go through this door and follow the passageway to the small balcony in the northeast corner of the MAIN HALL. Pull the chain to open the big blue doors. Take a standing jump over the railing to land on the steps below. Then go through the doors you just opened to the next level. (screenshots)
IMPORTANT: Make sure you have the PHAROS PILLAR before entering the next level. It's possible to return for it later, but it's much easier to get it now. If you missed the PILLAR, check the section on RETURNING TO THE UPPER LEVEL, above.
*NOTE ON SECRETS: There are 70 secrets in the entire game. These are marked "(x/70)" in this walkthrough. To check your progress in-game, press Pause (P on keyboard, Start on PlayStation or Dreamcast controller) then choose Statistics. At the end of this level, you should have 52/70.
†UPDATE HISTORY: 5/22/00 - Previous edit, details not available.
5/5/19 - First major update since this walkthrough was created in 1999. This revision includes many new screenshots as well as various other corrections and clarifications.
11/22/20 - Updated the planetarium puzzle solution with a corrected view of ancient astronomy, thanks to 1956Firebird.
1/23/25 - Added running item and kill counts, which hopefully will be useful in the upcoming Remaster.
2/21/25 - Added VGCartography's level maps, with permission. Visit VGCartography on DeviantArt and follow on Twitter/X and YouTube for more fantastic game maps.
3/22/26 - Corrected the description of the musical instrument Lara plays. It's a lyre, not a harp, obviously. Thanks to Paul H. for the heads-up.
ACKNOWLEDGEMENTS: Special thanks to the participants in the alt.games.tombraider newsgroup and the old tombraiders.com forum, without whom parts of this walkthrough could not have been written. Thanks also to nineball, Annie, Ashya, Atli, CroatiaRaider, James, Jeff Reid, Josh B., L.Y.ris, Marc, Mary V., Niels & Pernille, two different Sams, Sturm, Twisby, and Will for their help on this level, and to the various other players who pointed out the solution to the planetarium puzzle near the pool and the extra fire wraith in PlayStation version.
MECHANICAL HORSEMAN ALTERNATIVE STRATEGIES: The horseman is challenging but not impossible to defeat without tricks. He won't do much damage as long as you keep moving to stay clear of his axe and the horse's hooves. The most important thing is not to let him back Lara into a corner or up against a wall. I'd recommend using pistols for the first part of the fight, while he's still on horseback, so you don't waste ammo. After you've shot the blue gem in his chest for a while, he'll dismount and come after Lara on foot. At this point, switch to the shotgun or Uzis if you like. Continue to fire at the gem, hopping away from him until he gets too close. Then jump past him, roll, and start backing up while shooting again. Keep firing and he'll soon fall. I have not included screenshots for this since it's pretty self-explanatory, but there are many examples on YouTube if you need them.
Alternatively, run through the large room into the wide hallway on the left (south), which leads to secret #2. Target the chains to the left of the raised metal gate with an explosive arrow to open the gate. (Details are included in the section on obtaining the secret.) Grab the edge of the opening with the secret and traverse into the left corner, near the angled block below the chains. You may need to pull up and then dangle like this a few times, but eventually the horseman should get stuck in the corner where the angled block meets the wall. You can then pull up into the opening, target the blue gem with the crossbow and laser sight, and shoot it with normal arrows (or the pistol with the laser sight bug). After a bit of this, the horseman will fall off his horse. You can then hop down and fight him as you did the others. (screenshots)
‡NOTE ON VIDEO GUIDES: Eldin's videos don't always follow the same strategies I use in my walkthroughs, but if you prefer that format, I think you'll find them very useful.
WAS THIS WALKTHROUGH HELPFUL? If not, I apologize and invite you to contact me with any questions. If you need help right away, I recommend the r/TombRaider subreddit. Other fan-run forums are listed at tombraiders.net/stella/community.html. If this site was useful, please consider supporting it financially or in other ways. For details, visit tombraiders.net/stella/support.html. As always, I welcome your corrections/suggestions. Thank you!
Copyright © 1999- Stellalune (). Feel free to copy or print this walkthrough for personal use. By all means, share it with friends, but please include this credit line so people can send me their feedback. No part of this walkthrough may be reproduced on another site without permission. Follow this link for details about this site's advertising and privacy policy.
Stella's Tomb Raider Site: tombraiders.net.