Stella's Classic Tomb Raider 3 Walkthrough
NOTES ON THE REMASTER: This guide has not yet been updated for the remastered game. Revisions are in progress but will take time. I hope this version, based on the classic game, will still be helpful. Thanks for your patience.
NEVADA LEVEL 2: HIGH SECURITY COMPOUND
Updated: 4/29/24(†)
Secrets: 2 Pickups: 34, including PISTOLS, DESERT EAGLE PISTOL and GRENADE LAUNCHER, 3 keycards, and 4 security passes Kills: 15* Save/power-up crystals: 3
*NOTES: The number of kills varies depending on the actions of your enemies (the guards) and allies (the prisoners). This guide assumes you don't kill any prisoners and do destroy the mechanical gun turrets, which also count as kills, for some reason. See the footnote below for details. Be sure to find all the secrets so you can access the bonus level at the end of the game.
LEVEL MAP by VGCartography (used with permission)
High Security Compound Video Walkthroughby Eldincy‡
Objectives: You begin the level locked in a cell with only a single small medi pack (and your save crystals in the PlayStation game) left in your inventory. The guards have confiscated everything else you collected up to this point. You must escape and, in the process, get your hands on some weapons. Until then, your fellow prisoners will make valuable allies. You'll also need to find a series of 7 keycards/passes in order to access different areas of the level.
NOTES: Because you must take a non-linear path through this complicated level, you'll enter each of the three major areas or "bays" several times from different access points. There are signs on the walls indicating "BAY C," "BAY D," and "BAY E." These letter designations don't realistically represent different quadrants of the complex, but I've mentioned them since they serve as handy landmarks.
The PlayStation Demo is a bit different from the final level. Dr Kirk has kindly provided a walkthrough, which you can download here.
BAY C - CELL BLOCK: From the starting position facing the cell door, backflip into the window to trip the motion sensor. The door opens, and a military policeman rushes in and tries to pummel Lara with his baton. Just before he reaches the window sill, jump over him. Run out the door, roll, hop back, and grab the edge of the walkway. When you do this, the guard stupidly believes Lara has gone downstairs. He runs out of the cell, along the walkway, and down to the lower level. Continue hanging here until he's come all the way around and is standing just below. (screenshots)
NOTE: The kill count doesn't include guards that the prisoners subdue, so they are marked in orange but not numbered.
Now pull up. The guard realizes his mistake and starts running back toward you. Quickly press the button on the wall to the right of your cell. This opens the adjacent cell, releasing a burly convict, who heads straight for the guard. Run after him and press the button between the next two cells to release another prisoner. The two convicts will then subdue the guard. (Is it just me, or do these guys look like clones of George Michael on steroids?) (screenshots)
Follow the catwalk to the other side of the upper level and press the third button, on the right, to open the next two cells. This will release 2 more prisoners. You don't need them right now, but they'll make good reinforcements when you return here later. You can ignore the fourth button if you like, since the cell it opens is empty. Enter the cell on the far left (i.e., the one farthest from the cell where you started). (screenshot)
If you don't care about getting the next secret, you can take a shortcut on the movable box puzzle here. Start by jumping over the sink into the passageway above it. Then just push the first movable box once. Crawl through the low tunnel on the left and continue around to a second movable box. Pull it once then crawl back through the low tunnel to the first box. Push it once more to reveal a hole in the ceiling where you can climb out. Pick up the walkthrough at the COMPOUND ROOF section, below.
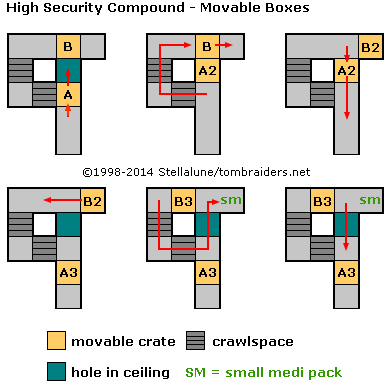
If you do want the secret, this diagram and these screenshots show how to get it. Start by jumping over the sink into the passageway above it. Push the movable box once (from A to A2 in the diagram). Crawl through the low tunnel on the left and continue to a second movable box. Push it once (from B to B2). Doing so reveals the back of the first box. Push the first box twice (to A3). The first push moves the box back to its original position and reveals a hole in the ceiling. The second push exposes the crawlspace again (now on the right). Ignore those openings for now.
Turn around and go back to the second box. Pull it twice (from B2 to B3). Now return through the crawlspace to the passageway behind the first box. Turn left and proceed to the dead end where the second box was to find SECRET #1, a small medi pack (1). Then climb up through the hole in the ceiling onto the walkway above.
NOTE: The markings on these boxes are actually a little Easter egg. Majestic 12 or "MJ-12" was supposedly the code name for a secret committee created in 1947 by U.S. President Harry S. Truman to investigate UFO sightings. Thanks to Alex for the inside scoop.
COMPOUND ROOF: Move forward to the edge of a pit lined with barbed wire. Take a running jump across the pit—on the right side to avoid taking damage—and grab the opposite edge. Pull up and continue forward. Walk through the next coil of barbed wire, across a closed trapdoor, then through another barbed of wire. Pull the switch to open the trapdoor. Move into the corner to the left of the switch and pull up onto the ledge above. (screenshot) Take a few steps to the left to the top of the ladder, drop and hang from the edge, then climb down the ladder into the hallway about halfway down on the left. (screenshot) Don't go all the way to the bottom, since there's more barbed wire below.
BAY C - DARK PASSAGEWAY AND CELL BLOCK (lower level): Follow the passageway to a dark, metal trapdoor in the floor. Do not drop down here or you'll be seen and shot by a guard with a pistol on patrol. Instead take a standing jump over the trapdoor. It will fall open, making a noise and attracting this guard. Run forward along the passageway to a small room with another trapdoor in the far left corner. Step onto the trapdoor and fall through into the hallway below. If you go quickly, the guard will still be investigating the sound you made earlier. Immediately roll, run forward, and pull the switch on the right wall of the glassed-in office. This opens the barred door of the CELL BLOCK where you started the level. The 4 prisoners you released earlier will then come out and take care of the guard for you. Steal a small medi pack, shotgun shells, and a KEYCARD TYPE A (2-4) from the guard once he's down. Use the card in the card reader to open the other barred door, opposite the entrance to the CELL BLOCK. (screenshots)
BAY D - CORRIDOR, LAVATORY, AND STORAGE ROOM: Inside BAY D, follow the yellow-and-white corridor straight forward. Turn left and enter a short hallway with a metal door at the end. Press the button to open the door. Go through the LAVATORY, past rows of sinks and toilets, to the opposite corner, and press another button to open another metal door.
Enter a small STORAGE ROOM. Find the movable MJ-12 box on the right side of the room and pull/push it under the hole in the ceiling on the left. (screenshot) Climb onto the box and pull up through the hole in the ceiling into a small room with dim, purple lighting. Take a standing jump over the pipe on the left, turn right, and throw the switch in the corner. (screenshot) This closes the door between the BAY D CORRIDOR and the LAVATORY, flooding the LAVATORY and STORAGE ROOM. Drop into the water and swim past the MJ-12 boxes to the opposite corner of the room, where there's another opening in the ceiling. (screenshot) Climb out of the water there.
Proceed carefully along the narrow passageway. There's a hole in the floor at the first corner above a KITCHEN with a lit stove. Do not drop down there or Lara will catch fire. Instead take a standing jump over the hole onto the yellow-and-white metal floor ahead. Then continue around to the right to another rooftop walkway.
COMPOUND ROOF (again): Walk to the edge of the first barbed wire pit. Hop back once and then take a running jump without grabbing to cross the pit. Repeat this for the second pit. At the end of the walkway, turn right and drop down into the room below. Go down the short ramp on the left and use the switch to turn off the flames back in the KITCHEN. (screenshot)
Come back up the short ramp into the room with the glass walls and metal door. You can press the button here to open the door if you like, but it's not necessary. Do not return to BAY D that way. Instead climb back up through the hole in the ceiling near the button. Return the way you came, across the barbed wire pits, into the passageway with the metal walls, and around the corner to the left. Drop down through the hole in the floor into the KITCHEN. Now that you've turned off the fire, the stove is safe to stand on.
BAY D - KITCHEN, MESS HALL, AND OFFICE: Ignore the save/power-up crystal above the stove for now. The spinning fan prevents you from reaching it. Take the small medi pack (5) on the counter. Then go to the far end of the room, press the button to open the kitchen door, and go through.
There are 2 more buttons in this hallway. Press the one around the corner to the right first to open the door to the MESS HALL. Then press the button on the left. This opens the OFFICE door, releasing another guard with a baton. Let him chase you through the MESS HALL and the yellow-and-white CORRIDOR back to the CELL BLOCK so the George Michael squad can take care of him for you. Then relieve him of his small medi pack (6). (The page with screenshots includes turn-by-turn directions from the KITCHEN to the CELL BLOCK.)
Return through the MESS HALL to the OFFICE where the guard came from. Press the button on the wall opposite the entrance to raise the grates covering the exhaust fans in the KITCHEN. (screenshots) The other button just opens and closes the office door.
VENTILATION DUCTS: Exit the office and turn right into the KITCHEN. Climb onto the stove and then the ledge above. Move very carefully past the exhaust fans to retrieve the save/power-up crystal (1). Walk to the edge, turn around, slide backwards down the slope, and grab the edge. Do not let go or Lara will drop into barbed wire. Instead traverse to the left and drop onto the flat spot below. (screenshots)
Climb into the crawlspace and follow it to a ladder. Climb up and dismount on the left. Walk along the beneath the grating until your friend George uses the handprint scanner in the room above to open the trapdoor for you. Turn around and walk back to the edge of the opening near the ladder. Take a standing jump to grab the opposite edge and pull up. (screenshots)
Continue to the end of the hallway. Vault up onto the ledge on the right. Turn left and climb the grating on the wall like a ladder.
BAY E - GREEN RAMP: At the top of the ladder, pick up a small medi pack (7). There's a guard with a baton patrolling the hallway at the top of the green ramp. If he spots Lara, he'll come after her. He's unable to climb down the grate, though, so you'll have to lead him elsewhere. As he moves off to the left, run up the ramp and turn right. Pause if necessary to make sure the guard sees you. He'll yell "hey!" when he does. Then, with the guard chasing you, run through the next room and past the MJ-12 box. (screenshots)
Don't turn right here or Lara will set off a motion sensor, activating an automated gun turret, which will prevent you from getting very far. Instead, just beyond the MJ-12 box, turn left. Run forward between the wall on the left and the angled block on the right. Then turn right and run off the edge into a rectangular opening in the floor. Continue forward, down a series of metal blocks and into the corridor directly ahead. Press the button on the left to let another prisoner out of his cell. Move out of the way and let him subdue the guard. Then you can loot the body for a KEYCARD TYPE B (8). (screenshots)
The grated opening at the end of the hallway overlooks an area you'll visit later. The other metal door doesn't open yet. Leave it for now and climb back up the metal blocks. Go back into the room near the MJ-12 box and use the KEYCARD in the card reader to open the control room. Enter and pick up the large medi pack and Uzi clips (9-10) by the window. Push the button to deactivate the motion sensors and gun turret. (screenshots)
NOTES: It is possible to avoid the guard at the top of the green ramp by running past him, climbing on top of the MJ-12 box, and then taking a running jump around to the right and over the motion sensors. (screenshot) As long as Lara doesn't touch the sensors, she won't trigger the gun. You can then skip the business with the guard, the prisoner, and the keycard, but you will miss the pickups in the room with the button.
Also, gun turrets are noted in orange, like enemies, rather than pink, like typical hazards, since each turret counts as a kill when destroyed. Obviously you won't be able to kill this one without any weapons, but later you can choose whether or not to destroy them.
BAY E - SANDY OUTDOOR AREA - FIRST YELLOW KEY AND LOCK: Go through the wide corridor with the deactivated sensors and gun turret. Turn left and move to the edge of the opening in the floor. Turn around, drop back, and grab the edge. Then climb down the ladder. (screenshots)
There's another guard with a baton patrolling the sandy area outside. You'll need a little help to get past him, so run through the doorway and down into the yellow-and-white passageway on the left. The guard may or may not see you at this point. Don't worry; just keep going. Jump up onto the ledge and press the button on the left to open the cell door. (The other button opens a door leading back to the previous area. It's OK to press it but not necessary.) Two more prisoners emerge and beat the FIRST YELLOW SECURITY PASS and some flares (11-12) out of the guard. Grab those items, cross the sandy area in front of the HANGAR, and use the security pass in the yellow lock to open the hatch. (screenshots)
BAY E - STEALTH FIGHTER HANGER: Enter the HANGAR and follow the corridor past a glassed-in room containing a stealth jet. At the end of the corridor, turn left and vault up into a raised passageway. Turn left again and follow this passageway down a ramp until you come to a crawlspace. The camera shifts here to show a guard with a pistol on patrol down below. Press Look to regain Lara's perspective. Then duck and crawl through the low tunnel on the right. When you emerge from the tunnel and can stand again, move past the windows. (The guard doesn't seem to notice Lara although she can see him.) Approach the edge and turn around so the windows are on Lara's right. Then safety drop into the room below. It's not a long fall, but if you hang and drop, Lara will land quietly without alerting the guard. (screenshots)
Duck and crawl along behind the counter so the guard doesn't see you. When you reach the switch, stand up and watch the guard. When he moves into the far right corner, pull the switch open the door on the left and activate a laser beam, trapping the guard in the corner. Just be careful because the beam runs all the way across the room to the corner near the switch. Don't accidentally run into it. (screenshots)
Alternatively, you can watch the guard as he paces. Then, just before he reaches the spot where the laser beam originates, flip the switch, and he'll be fried by the laser. Or, let him see you, and when he comes around the corner toward you, flip the switch to kill him. (screenshots)
Once you've trapped or disposed of the guard, jump over the laser beam into the doorway. Follow the hallway through several twists and turns to a new area with "BAY C" signs on the walls. (screenshots)
BAY C - SATELLITE DISH TOWER: Continue along the BAY C corridor, past a closed metal door, up a ramp, and around another corner to an opening overlooking a huge, open room containing a central structure with a satellite dish on top.
NOTES: The route described below takes you through this area with little no injury for Lara, but if you like, you can take a substantial shortcut here without missing any kills or pickups. Lara will lose half her health in the process though. Instead of going around to the glassed-in control room and then dropping into the pool, as described in the main walkthrough, just hop down from the doorway to the ledge below and then safety drop to the floor. This page with screenshots includes additional details. You can then skip all the way down to the section on retrieving the yellow security pass, below. I recommend taking this shortcut if you are not a strong swimmer, since it will allow you to avoid a difficult swimming sequence.
The glassed-in control room on the right is where you're headed, but you'll need to take a slightly roundabout route to get there. From the doorway facing the tower, step off the edge to land on the walkway below. Turn left and follow the yellow-and-white stairs up and around the central structure to the other side. When you reach the second highest step, drop onto the ledge below. Carefully position Lara near the right edge of the ledge with her back to the wall of the central structure. Angle her toward the left side of the doorway. Then take a standing jump forward to grab the doorsill and pull up. (screenshots)
Follow the passageway around to a hole in the floor and drop into the control room below. Press the button on the wall near the window to move the satellite dish on top of the tower, revealing an opening beneath it. Now press the second button in the hallway to open the nearby door. Exit, turn right, and follow the corridor back to the ledge overlooking the tower. This time, instead of dropping down, take a standing jump from the doorway to grab the top edge of the central structure and pull up near the satellite dish. (screenshots)
BAY C - POOL BELOW THE SATELLITE DISH TOWER: Approach the opening in the floor and save the game if you can. Step off the edge into the hole, rather than safety dropping. Lara falls a long way through the center of the tower and splashes down in the pool below. If you safety drop, she tends to get sucked in by the circulating fan in the square duct at the bottom center of the pool. If you step off the edge instead, you can then press the swim (Jump) button as soon as she lands in the water to swim forward into the octagonal alcove directly ahead. (screenshots)
You'll still need to fight the current created by the circulating fans behind the metal grilles on the sides of the pool in order to reach the surface. So as soon as you enter the alcove, roll to face the center of the pool, and then swim forward along the bottom, following the left side of the metal structure containing the circulating fan. When the fan is on Lara's immediate right, swim straight upward and climb out on the small, square burner. Don't worry; the pattern of holes is just for show. It does not ignite. (screenshots)
NOTES: There is a save/power-up crystal in the duct with the circulating fan, but you can't get it until you deactivate the fan.
If you're struggling with this swimming sequence, as long as you saved before dropping through the hole in the tower, you can change your mind and try the shortcut described above. In order to do that, you must first drop through the square opening to the right of the satellite dish (not the one above the pool) and follow the stairs down and around to the ledge below the doorway. Then follow the sequence shown in these screenshots.
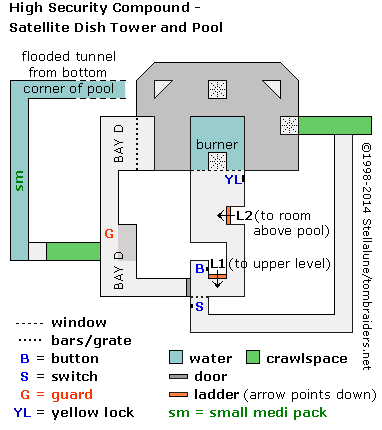
DARK ROOM WITH ANGLED WALLS ABOVE THE POOL: This map shows the rooms and passageways on this level. The pool is colored in blue. The small, square burner where you climb out of the pool is labeled "burner."
From here, you must jump clockwise around the edge of the pool, to the green crawlspace. Start by facing the barred opening with the "BAY D" signs beyond and jump across the water to the slope directly ahead. Walk up the slope, turn right, and walk along next to the bars. Now either take a standing jump down to the small, triangular corner ledge, or jump onto the slope directly ahead and slide down onto the triangular ledge. Walk to the far corner and take a standing jump up onto the next square burner. Take a running jump to the next small, triangular corner ledge. Turn right, walk to the far corner and take a standing jump to the square burner in front of the green crawlspace. (screenshots)
BAY C - GREEN CRAWLSPACE AND UNDERWATER TUNNEL: Go through the green crawlspace to emerge in a dark passageway with metal walls. Follow it to the end. Flip the switch (S on the map) to open the door on the other side of the grate. You can't get through from this side, so return through the passageway and green crawlspace to the ledge overlooking the pool. (screenshots)
Slide down the slope into the pool and swim down through the underwater tunnel in the far right corner. (This tunnel is shown at the top right corner of the map above.) Follow the tunnel forward then up and to the right. On the bottom, about halfway along the upward slope, there's a small medi pack (13). Grab it and then surface and wade forward. (screenshots)
BAY D - GUARDED CORRIDOR: Step up into the passageway on the right and proceed with caution. There's an armed guard on patrol in the hallway ahead (G on the map). It doesn't matter if you light a flare here or not. The trick to evading the guard is to crawl into the green tunnel and just keep moving. Crawl forward as the guard moves off to the left. Then, as soon as Lara emerges from the tunnel and can stand, run to the right and around the corner into the next room before he turns around and sees you. (screenshots)
NOTES: If the guard spots Lara and starts shooting, you can either reload and try the sequence again, or run down the hallway to the right and quickly press the button in the alcove opposite the grate, marked B on the map, to shut the door so the guard can't get in. Wait for him to wander off and then press the button again to re-open the door. I'll include a reminder about this later on in case you forget.
If you reach this point and the metal door is closed, preventing you from entering the next room, then you missed a switch. Return through the crawlspace and the flooded tunnel to the pool at the base of the tower. Fight the current to reach the surface. Climb out onto the burner and pick up the walkthrough at the section where you jump around the edge of the pool to reach the green crawlspace, above.
Once you get past the guard, climb the ladder on the left, just beyond the metal door and grate. (L1 on the map). (screenshot) There's another ladder (L2) in the next room, but we're not ready to go there yet. The switch on the other side of the grate is the one you used earlier to open this door.
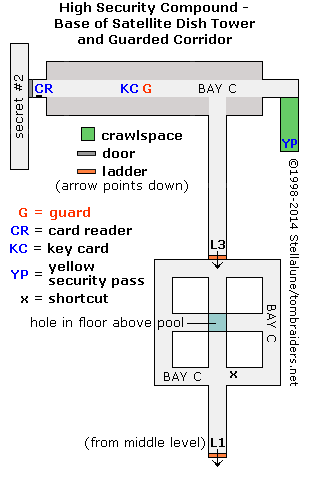
BASE OF SATELLITE DISH TOWER AND GUARDED CORRIDOR: These areas area is shown in this second map. At the top of the ladder (L1), run forward up the gray ramp to emerge in a square room at the base of the SATELLITE DISH TOWER.
NOTE: If you took the shortcut when you first entered the SATELLITE DISH TOWER area, you will have dropped down from the central structure into the area at the base of the tower, landing at the spot marked X on the map.
Go through the central structure, jump across the hole in the floor above the pool, and continue forward to the opposite wall. Or go around the perimeter to the other side of the room. Climb the ladder (L3) to the next level. (screenshots)
BAY C - SECOND YELLOW KEY AND LOCK: You can run about halfway up the yellow-and-white ramp, but you should slow to a walk as you near the top. There's a guard posted off to the left with his back to you (G on the map). Turn right and walk or crawl to the end of the hall. As long as you don't run, the guard won't notice you. Climb into the raised crawlspace on the right, grab the SECOND YELLOW SECURITY PASS (14) (YP on the map), crawl backwards to the opening, and drop to the floor. Then walk or crawl back to the yellow-and-white ramp, which is now on your left. (screenshots)
NOTE: Make a mental note of this guarded hallway. There's a locked door at the far end. You will return here later to pick up a secret.
At the bottom of the ramp, climb down the ladder (L3) and cross the tower room, again jumping over the hole in the floor above the pool. Or go around the perimeter to the other side of the room. Continue down the gray ramp and climb down the ladder (L1) at the end. (screenshot)
NOTE: Now you're back on the lower level, so refer to the first map, above.
At the bottom of the ladder (L1), look to the left. The metal door there should be open so you can see into the BAY D hallway, where you avoided the guard earlier. If you took the shortcut mentioned earlier or shut this door to trap the guard, you should now press the button (B on the map) in the alcove to the left of the ladder to open the door. You do not need to go that way now, but you will return here later to get a secret. (screenshots)
Once you've checked the door, turn around and head away from BAY D into the next room. Use the YELLOW SECURITY PASS in the yellow lock near the window (YL on the map). This closes a hatch over the circulating fan at the bottom of the pool. Climb the ladder to the right of the yellow lock into a dimly lit blue room with a large opening overlooking the pool. Safety drop from the opening onto the small, square ledge that juts out into the pool. From there, you can step off into the water almost exactly above the opening with the save/power-up crystal (2). Now that you've deactivated the circulating fan, it's safe to swim down into the duct. (screenshots)
LONG UNDERWATER TUNNEL: After snagging the crystal, swim through the long tunnel beyond it. There are no side passages, so you can't get lost, but you'll need to go quickly to avoid running out of air. The sequence is as follows: Swim forward along a level passageway, up a slope, turn right, swim up another slope, turn left through a low opening, where you'll pass a box of flares (15)—leave them for now if your air supply is getting low—and continue to a dead end with a hatch straight ahead and a lever on the left wall. Pull the lever to open the hatch. Then swim through, up another slope, along a flat section with a small medi pack (16). Again, leave it if you're about to run out of air. Surface in a small room. Be sure to surface in one of the corners, since there's a laser trap running along the middle of the room. (screenshot)
Take a breath and then swim back down for the flares and health pack if you didn't get them at first. Then swim back to the laser room and climb out of the water on the small, square ledge on the left. Jump over the laser beams onto the slightly higher ledge. (screenshot) Step forward and drop into another flooded tunnel. Turn left and swim up this white-walled tunnel to another opening. Climb out of the water on the left and crawl through into the next room.
ROOM WITH CONVEYOR BELT AND HOOK: If you're not sure where to go next, just watch your prisoner friend. He'll show you the way. Climb the MJ-12 boxes near the crawlspace where you came in. Drop down into the small room below and press the button to open the hatch. Go through into another small room, where you'll find a large medi pack, your trusty PISTOLS, and a loaded DESERT EAGLE PISTOL with 2 extra sets of clips (17-21)—at last! (screenshots)
NOTE: In the remastered game, these pickups will vary, but regardless of what you get, the item count will tick up by 5.
Be careful exiting the room, as the motion sensors for the gun turret (1) above have been activated. Either stay close to the right wall as you turn the corner to avoid tripping the sensors, carefully climb the boxes, and then drop down on the other side. Or, alternatively, shoot the turret so it can no longer harm you. I don't generally recommend wasting ammo unnecessarily, but if you feel you must do this, the Desert Eagle works much faster than the pistols. For what it's worth, the turret counts as an official "kill" on the stats screen. (screenshots)
NOTE: If you don't care about getting all secrets, you can skip down to the section ROOM WITH CONVEYOR BELT AND HOOK (again), below.
BACKTRACKING FOR SECRET #2: Now that you've got some weapons, you'll be able to get past those armed guards and go after the second secret. Return through the crawlspace near the MJ-12 box. Swim through the white tunnel to the small room with the laser trap. Jump over the lasers, drop into the water, and follow the long, flooded tunnel back to the pool below the SATELLITE DISH TOWER. Surface for air if you need it. Then swim down to the far left corner of the pool and follow the other underwater passage to the dark crawlspace. If you took the shortcut earlier, or missed this pickup the first time, there's a small medi pack (13) on the bottom of the tunnel just before you surface. Go through the green crawlspace on the left into the hallway near the YELLOW LOCK ROOM. Shoot the guard (2) on patrol here and continue around the corner to the ladder opposite a metal grate. (screenshots)
NOTE: This is the same area you visited before, shown on the first map, above. If you neglected to open the door here earlier and your way is blocked, return to the pool. Climb out of the water on the small, square ledge and jump clockwise around the edge of the pool to the green crawlspace. (This is covered in an earlier series of screenshots.) Follow the crawlspace, then the passageway beyond it, to the switch that opens the door on the other side of the grate. Return to the pool, swim down through the tunnel in the corner, and go through the dark crawlspace back to the hallway where you killed the guard. Now head to the right again and the door should be open.
Climb the ladder opposite the grate (L1 on both maps) and follow the gray ramp up to the square room at the base of the SATELLITE DISH TOWER. Go around or through the central structure to the other ladder. Climb up and follow the yellow-and-white ramp up to the hallway where you got the SECOND YELLOW SECURITY PASS earlier. Kill another guard (3) and take the 2 pairs of grenades and KEYCARD TYPE B (22-24) that he drops. Use the card in the card reader at the end of the hall to open the hatch (CR on the second map). This is SECRET #2—the loaded GRENADE LAUNCHER (25). (screenshots)
To get back to the room where you found the other weapons, return down the yellow-and-white ramp and climb down the ladder to the base of the SATELLITE DISH TOWER. Drop through the hole in the center of the room into the pool. Swim down through the square opening in the middle of the pool, where you found a save crystal earlier, and follow the long, underwater tunnel to the small room with the laser trap. Climb out of the water, jump over the lasers, and swim through the white tunnel back to the big room where George is waiting for you.
ROOM WITH CONVEYOR BELT AND HOOK (again): Turn right and follow the conveyor belt up the ramp, killing a guard with a gun (4) t the first landing. As you start up the second ramp, 2 more MPs (5-6)—one with a gun and one with a club—come down toward you. Let the one with the gun get away for now. He'll run off to the left and open a door, releasing 2 more MPs with pistols (7-8). Shoot them all as they come down the ramp. You can flip from side to side and/or back down the ramp while shooting to avoid taking too much damage. Then continue up the ramp. When you reach the top, a German shepherd (9) comes up behind you, so watch out for it. When the coast is clear, pick up the BLUE SECURITY PASS and grenades (26-27) one of the men dropped. (screenshot)
OUTDOOR AREA AND CONTROL ROOM: Go out into the open area at the top of the ramp. In a small room to the left of the gate, where the last two MPs came from, you'll find a large medi pack (28). (screenshot)
NOTE: If you kill the third man before he can open this door, you won't have to deal with the last two men, but you also won't be able to get the health pack, since Lara can't use the handprint scanner that opens the door.
Return to the top of the ramp, climb the ladder on the right (shown in the previous screenshot), and follow the narrow corridor to the blue lock. Use the BLUE SECURITY PASS here to open the next door. Kill the guard (10) inside the little control room. (The Desert Eagle is handy in close quarters.) Here you'll find 2 buttons. Press the one on the right to activate the conveyor belt. The left button opens the gate, letting in another guard and his dog (11-12). So unless you want all the kills, don't bother pressing it.
Return to the hole in the floor, drop down, and kill the man and his dog if you let them in. Then head back down the ramps to the bottom of the conveyor belt.
ROOM WITH CONVEYOR BELT AND HOOK (yet again): When you pressed the button in the office with the blue lock, the conveyor belt dumped an MJ-12 box on the floor here. Climb on top of it and jump to grab the ladder on the wall. Climb onto the ledge above. (screenshots)
Stand beneath the duct made of black metal grating and jump straight up to grab it. Continue holding Action and use the direction buttons to monkey swing across the room to the ledge with the small medi pack (29). Release Action to drop onto the ledge. Grab the health, turn around, and jump up to grab the grating again. Now monkey swing forward to the middle of the room, turn left and follow the duct past the moving hook. It's safe as long as you don't get too close. At the end of the duct, drop down onto the stairs near the wall. (screenshots)
Step up onto first stair, turn around, and jump straight up to grab the edge of the opening above. Pull up and kill the guard (13) lurking here. He's carrying the THIRD YELLOW SECURITY PASS (30). Somehow I don't think he'll mind if you borrow it.
Move into the middle of the room, where the ceiling is a little higher, and take a standing jump over the laser beam to reach the save/power-up crystal (3) . Jump back over the laser, drop down through the hole onto the stairs, move down to the lowest step, and then safety drop to the floor, losing a smidgen of health in the fall. Alternatively, if you're really trying to conserve health, you can monkey swing back to the ledge above the MJ-12 box and then drop down. (screenshots)
BAY X - LOADING DOCK: Use the YELLOW SECURITY PASS in the yellow lock to open the gate to BAY X. (screenshot) Head up the ramp to the loading dock and kill the armed guard (14) on duty outside. Then go around the right side of the truck, enter the warehouse, and shoot another MP with a gun (15) inside on the left. (screenshot)
Climb the stack of boxes on the left to find some Desert Eagle clips and a small medi pack (31-32) in a depression in the middle of the pile. (screenshot) Climb down and head for the far right corner of the storeroom (i.e., the right when Lara's back is to the entrance). The fourth box from the corner is movable. (screenshot) Pull it out to reveal an alcove containing Uzi clips and grenades (33-34). When you have everything, step into the back of the truck to end the level. (screenshot)
A short cutscene follows: Lara hides behind some boxes as the truck doors are closed. She pops open a soda and takes a much-needed rest as she rides on to Area 51. The dialogue is included on the cutscene transcripts page. You can also re-watch the movie on my YouTube channel.
NOTE ON MAXIMUM KILLS: If you play this level as was presumably intended, you won't have to kill any of the prisoners and probably won't want to. It is possible to get 16 kills without cheating or backtracking if you kill the last prisoner (in the room with the conveyor belt) and shoot the gun turret in the room where you find the weapons.
If you want to experiment, you can use a savegame editor or possibly the all-weapons cheat to get guns early on. You can then kill most of the prisoners as you go. However, there are two convicts who can't be killed with weapons: the first one you release at the beginning of the level and the one in BAY E, where you get the second keycard. I assume the programmers made them invincible so the guards couldn't defeat them.
GreenApple968 has discovered it is possible to kill the first prisoner by luring him into the restroom and drowning him by flooding that area. He shows how to do it in this YouTube video. Bravo!
Or, if you like, you can use the crawling corner bug at the spot marked with an 'X' in this screenshot to reach the ledge near the control room at the top of the tower. Jump from there to grab the doorway and follow the corridor back through the room with the laser trap to the outdoor area and BAY E. You can then pick up another few kills: the guard in the laser room if you didn't get him before, 3 more gun turrets, and the prisoner near the MJ-12 box. The other prisoner is invincible. You can't return all the way to the beginning of the level, though, since the crawlspace leading through the ducts into the kitchen is blocked by an invisible wall, and even if you could get through, the slope behind the fans is too steep to climb.
†UPDATE HISTORY: 3/28/14 - First major update since this walkthrough was created in 1998. This revision includes revised maps and many new screenshots, as well as various other corrections and clarifications.
10/6/14 - Added link to PSX demo walkthrough, which I had mistakenly left out of the revised version.
7/16/17 - Added missed set of Desert Eagle clips (one of two found with the weapon) and adjusted incorrect item total in the header. Thanks to Tomas for setting me straight.
2/5/24 - Added VGCartography's level maps, with permission. Visit VGCartography on DeviantArt for high-res versions, and follow on Twitter/X and YouTube for more fantastic game maps.
4/29/24 - Added sequential kill and item counts, which will hopefully be helpful for both the classic and remastered versions. More remaster updates coming eventually. Thanks for your patience.
ACKNOWLEDGEMENTS: My eternal gratitude goes out to the participants in the alt.games.tombraider newsgroup, without whom some parts of this walkthrough could not have been written. Thanks also to Alex, Bo, Cujo, Eldor, Eric R., GreenApple968, Hazel, Horst, Jason P., Jeff, Mitchi, Peter, Scot, and Stephen D. for their help on this level, and to the many players who reminded me about the small medi pack in the dark tunnel leading from the pool to the hallway with the guard holding the second yellow key.
‡NOTE ON VIDEO GUIDES: Eldin's videos don't always follow the same strategies I use in my walkthroughs, but if you prefer that format, I think you'll find them very useful.
WAS THIS WALKTHROUGH HELPFUL? If not, I apologize and invite you to contact me with any questions. If you need help right away, I recommend the r/TombRaider subreddit. Other fan-run forums are listed at tombraiders.net/stella/community.html. If this site was useful, please consider supporting it financially or in other ways. For details, visit tombraiders.net/stella/support.html. As always, I welcome your corrections/suggestions. Thank you!
Copyright © 1998- - Stellalune (). Feel free to copy or print this walkthrough for personal use. By all means, share it with friends, but please include this credit line so people can send me their feedback. No part of this walkthrough may be reproduced on another site without permission. Follow this link for details about this site's advertising and privacy policy.
Stella's Tomb Raider Site: tombraiders.net.