Stella's Classic Tomb Raider 3 Walkthrough
NOTES ON THE REMASTER: This guide has not yet been updated for the remastered game. Revisions are in progress but will take time. I hope this version, based on the classic game, will still be helpful. Thanks for your patience.
IMPORTANT: There are several potentially game-breaking bugs in this level. If you don't mind a few spoilers, scan down the walkthrough for the pink sections explaining these problems and how to avoid them. If you just want a few general tips for avoiding bugs, remember to always pick up the various artifacts before leaving the rooms where you find them. There are a few crucial artifacts that can be left behind, and the level designers did not account for this. There is also a certain switch in an area with quicksand that should only be pulled once. Using this switch more than once can prevent you from obtaining one of the secrets.
ANTARCTICA LEVEL 3: LOST CITY OF TINNOS
Updated: 5/4/24(†)
Secrets: 3 Pickups: 33, including 2 keys and 4 Oceanic Masks Kills: 90 Save/power-up Crystals: 5
NOTE: The number of kills may vary depending on which version you're playing and how long you take to complete certain areas. Also, if you use grenades or rockets, you may get an inaccurate kill count—more than double the actual number of kills. Note that one of the regular pickups will be the ROCKET LAUNCHER if you didn't get it in a previous level. There is also one item that can only be obtained by exploiting a glitch in the game.
LEVEL MAP by VGCartography (used with permission)
Lost City of Tinnos Video Walkthroughby Eldincy‡
Objectives: Explore the courtyard of the ruined city to find the key and switches that will let you access the rest of the level. Cross over two bridges into the next area. From there you'll need to do two separate side "missions," one to find a key, the other to find four masks. You'll need all of these items to open the level exit.
IMPORTANT: This is the penultimate level in the game. Again, I recommend that you save at least 50 Desert Eagle rounds for the final boss, but now is the time to use any grenades and rockets you've hoarded.
COURTYARD: The metal door straight ahead opens as you approach. Exit the Quonset hut into the ruins. Go to the far left corner of the courtyard. Note the location of the closed door at the top of the ramps. Climb the ladder to the left of it and follow the passageway around to an opening overlooking the COURTYARD. Pull the switch on the left side of this opening to open the door below, but don't drop down yet. Turn around so the switch is on Lara's right and follow the passageway forward toward the blue gate. Before this gate, on the right, is another opening overlooking the COURTYARD. Take a running jump from the opening to land on top of the tall, angled pillar. Then take another running jump to grab the ledge with the save/power-up crystal (1) and rocket (1). Pull up, get the goodies, and then safety drop to the floor. (screenshots)
NOTE: If you don't have the ROCKET LAUNCHER, you'll get it here instead of the rocket.
Now turn around and head for the far left corner again. Hop up onto either of the angled ledges flanking the door you just opened. Then jump into the doorway. Inside, in a little alcove on the right, you'll find the FIRST ULI KEY (2). (screenshots)
Return outside to the COURTYARD. Head to the left. In the corner near the tall, painted doors there's a keyhole. Use the ULI KEY there open the blue metal gates. Enter and climb the ladder to the small, dark room above. Follow the passageway away from the ladder. You can use the switch in the doorway directly ahead to open the gate leading back into the hallway where you were earlier, but this isn't necessary. Turn left and step outside onto a ledge overlooking the COURTYARD. Throw the switch here. You receive a "vision" of a room with several buttons, but nothing actually happens until you pull the next switch. (screenshots)
Climb back inside and go forward to the end of the hall. Slide down the ramp and use the switch on the side of the angled block at the far end of the room. This opens the double doors leading back into the COURTYARD. If you pulled the other switch above, this switch will also extend a tall block with a ladder in the room where you'll go next. If you missed the previous switch, go back outside, turn right, and climb the ladder again to reach it. (screenshots)
ROOM WITH 5 BUTTONS: Cross the courtyard to the far left corner. Go through the doorway behind the snowbank into a room with 5 buttons on a high ledge. Climb the ladder you just extended and press the first, second, and last button from left to right. This opens the gate below. Drop down and go through. (screenshots)
NOTE: Several people have suggested solutions to the 5-button puzzle other than trial and error. The best one I've heard comes from Jeff Reid, who notes that the symbols on the blocks behind each button could represent living things in a food chain: humans, elk, plants, birds, fish. If you read each set of symbols from top to bottom, all but the 3rd and 4th sets make sense (3rd—trees don't eat elk; 4th—fish don't eat birds). That works for me.
BROKEN BRIDGE: As you step out onto the bridge, you'll notice a buzzing noise. High up on the right cave wall is a small hole from which giant wasps begin to swarm. (screenshot) Try to shoot the wasps with pistols before they get too close. Their stings are not venomous but they do cause damage. In the PC/Mac version of the game there are 21 wasps (1-21) in all. So if you stand on the bridge and kill them all as they emerge, you can then proceed without interference. In the PlayStation version, the wasps seem to respawn continuously until you leave this area. So you'll need to watch out for them during the next climbing sequence and shoot them as they approach.
NOTE: If you're playing the PlayStation version, you may want to try using the rocket launcher to destroy the first few wasps that emerge from the hive. Several players have reported that doing so prevents more wasps from spawning. It doesn't seem to work on the PC version, but it's certainly worth a try if you have rockets to spare.
As the wasps emerge, you'll notice their glowing abdomens illuminate an invisible platform near the hive opening. That's where you're headed if you want the next secret. If you don't want the secret, just follow along for now. Move forward to the gap in the middle of the bridge, turn left, and take a running jump to grab the edge of the snowy opening in the cave wall. Pull up and get the save/power-up crystal (2). Now turn around, move out into the opening, turn left, and take a standing jump to the top of the pile of snow. Walk forward to the edge and jump straight up to grab the stone ledge above. Pull up and turn right. Take a running jump to grab the edge of the bridge arch and pull up once more. If you don't care about getting the secret move to the left side of this ledge land safety drop onto the bridge. Then skip down to the SECOND BRIDGE section, below. (screenshots)
If you do want the secret, turn right to face the archway on the other side of the wide gap. The wasps' nest is just beyond this archway on the left side of the cavern. If there are still wasps coming out of it, it will be easy to spot. Light a flare, throw it in that direction, and you'll see an invisible platform about halfway across the gap. Take a running jump to land on it. (screenshots)
NOTE: If you're out of flares, pistol fire will illuminate the invisible platform once you're standing it, but for now you can aim for the triangular flat spot on the left corner of the opposite arch. It's clearly too far to reach from here, but if you take a running jump toward it, Lara should land on the invisible platform. (screenshots)
If the wasps are still spawning, try and shoot them before they get close enough to knock Lara off the ledges. Walk carefully to the far corner, take a step back from the edge, then take a standing jump to the corner of the arch. To avoid having to take an awkward jump over the pointed part of the arch, instead walk to the far corner of the triangular flat spot. Take a standing jump without pressing Action to land on the next invisible platform. Then turn left and take a final running jump into the cave. Be careful not to run forward into the deep hole from which the wasps emerge. This is SECRET #1, 2 small medi packs sitting in the doorway, plus 2 sets of Desert Eagle clips and some grenades inside on the right (3-7). (screenshots)
NOTE: According to several PlayStation gamers, if you save the game on the last invisible platform and then allow Lara to fall to her death, when you reload the wasps stop respawning. This doesn't seem to work in the PC version.
To get back to the archway on the other side of the cavern, start by taking a standing jump from the cave onto the nearest invisible platform. Walk to the far right corner and take a standing jump onto the triangular flat spot on the right side of the arch. Move to the opposite corner and take a standing jump onto the next invisible platform. Now take a running jump back to the ledge on the left side of the other arch. Walk to the far side of this ledge and safety drop onto the bridge below. Turn around and head away from the gap in the bridge toward the gray, stone wall. Pick up the small medi pack (8) in the narrow cave on the left. Then head through the tunnel on the right to the next area. (screenshots)
SECOND BRIDGE: When you walk out onto the bridge, 2 giant mutants (22-23) come charging out of the building ahead. They have clawlike appendages like the super mutants in the mines, but they're bigger and shoot balls of energy so keep moving! If you followed my earlier advice and saved your rockets, this fight can be quick and easy. Run out onto the bridge and move onto the sloping edge on either side. As soon as Lara targets one of the mutants, fire a rocket. Then immediately flip to the other side of the bridge. When Lara lands on her feet, quickly fire another rocket. Then flip back to the other side. Repeat this twice more and you're done, since it only takes 2 rockets to kill each of the mutants. Just be sure to release the Action button as you jump so Lara doesn't waste rockets and take care not to fall off the bridge as you fight. (screenshots)
If you're out of rockets, my second-choice weapon would be the MP5. It can target the mutants at a fairly long distance, so you can use the same basic strategy of flipping from side to side while shooting. You should be able to take out one of them that way. If the second mutant rushes you, you may want to switch to the Uzis for close combat. If the mutant backs Lara into a corner, either roll to get on the other side of it or use a health pack and just keep firing until it falls. (screenshots)
NOTES: Grenades also work fairly well against the giant mutants, but you'll need 4 or 5 of them to bring down each one. The Desert Eagle is also excellent, but don't forget to save around 55-60 Desert Eagle rounds for the final boss. If you fall off the bridge and survive, it's possible to climb back up using the snowy ledges (screenshot), but it's probably just easier to reload and try again.
Before entering the building ahead, look over the left side of the bridge. Below you'll see a square, gray door. (screenshot) This is the location of secret #3. The door is closed now, but you'll return later.
ENTRANCEWAY WITH SWINGING BURNERS: As you approach the doorway, the burners ignite and begin to swing back and forth. Carefully run past both swinging burners. (screenshot) The entrance to secret #2 is at the top of the next room, but you can't reach it yet. There's also another wasps' nest high on the left wall. (screenshot) In the PC/Mac game, 6 wasps (24-29) will emerge from this crack. If you kill them now, they won't respawn. As far as I know, in the PlayStation game the wasps continue to spawn as long as you remain in this room. So it's best to just keep moving. Continue to the right and up the stairs. (screenshot)
NOTE: If you prefer, you can go down the stairs on the left and do the ROOM WITH FOUR GATES and the ROOM WITH HINGED LEDGES now, but I have included it later.
ROOM WITH PILLAR OF LIGHT: Here you'll find a cross-shaped walkway with a PILLAR OF LIGHT at the intersection. You can jump through the light on the upper level, but do not step into it on the ground level or Lara will burn to death. There are four gates—one at the end of each walkway—flanked by carved blocks depicting each of the four ancient elements: earth, air, fire, and water. Two staircases lead down to the base of the PILLAR OF LIGHT. There are 4 receptacles here, one for each of the OCEANIC MASKS you'll find in the four elemental areas. There's also a small, square gate, where you'll re-enter this room later, and a tall, silver gate which you'll open near the end of the level. (screenshot)
You can explore the elemental areas in any order, but when you enter each area the gate closes behind you. You must complete it in order to exit. Several players recommended exploring the air and earth areas first in order to minimize the wasp respawn in the in the PlayStation game. I haven't tested this since I have the PC version.
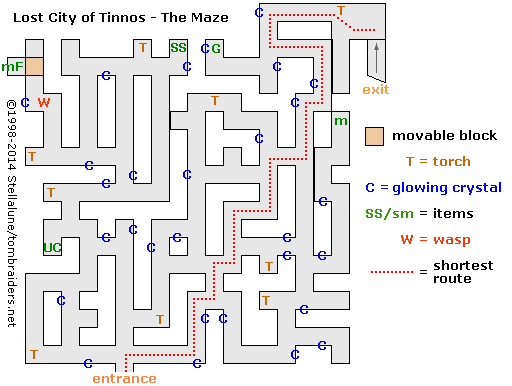
AIR ELEMENT AREA: The AIR gate is to the left of the PILLAR OF LIGHT when facing it from the entrance. Inside is a big maze. I have included the map below to help navigate. The shortest route is marked in red, but if you explore a bit, you can pick up several items, all noted on the map. Hidden around the left side of the maze are Uzi clips, shotgun shells, a small medi pack, and flares (9-12). The last two items are together in a small alcove in the far left corner. Shoot the single wasp (30) guarding this area. Then push the movable block with the carved faces to get the goodies. (screenshot) There's another small medi pack (13) in a dead-end passageway on the right side of the maze and grenades (14) off to the left just before the exit.
If you get lost, just keep on in a consistent direction—e.g., always keep the wall on your right and turn only when you reach a dead end—or try this excellent strategy sent in by Adam M. "The idea is to follow the breeze blowing through the tunnels and it will lead you through the maze. When you first enter the area, you can hear the wind blowing. You will also notice that Lara's braid blows back behind her. You can use this to navigate. Run down the tunnels with her hair blowing back behind her. When you get to an intersection, stop and see which direction her hair blows. (screenshot) Turn and run 'upwind' to follow the breeze to its source and the maze exit. If you take a wrong turn, you will soon find out as the wind stops and her braid drops and hangs."
When you reach the exit at the far right corner of the maze, follow the ramp up to a room with three other ramps rigged with spiked wooden cylinders. Avoid the steep center ramp, which leads down to a lava pit. Vault up onto the gray ledge on the left and face the ramp above it. Run or jump forward onto the ramp. The cylinder ahead will start to roll down toward you. So quickly side flip to the right to avoid it. Then immediately flip to the left as the cylinder on the right rolls down. Now run or jump a little farther up the left ramp, flip to the right to avoid the next cylinder, and then flip back to the left and continue up the ramp. The FIRST OCEANIC MASK (15) is sitting on the pedestal at the top of the room. (screenshots)
BUG NOTE: Make sure you pick up the mask, since it is possible to leave without it, and you won't be able to get back into the air maze again. If you've already done this, see the footnote for possible solutions.
Once you have the mask, run through the door on the right (behind the statue). It is timed to close quickly once you step off the pedestal but standing on the pedestal will open it again. Stand in the corner and let the door close behind you. Follow the passageway and drop down the long shaft into a small pool. Swim through the tunnel, surface, and climb out of the water. Follow the hallway to the intersection with the gray floor tile. Turn right and go through the blue gate, which opens as you approach. (screenshot)
Go through the dark anteroom to emerge on the lower level of the room with the PILLAR OF LIGHT. Avoid the light beam itself or Lara will catch fire. There are 4 receptacles here. You could place the OCEANIC MASK in one of them, but I recommend waiting until you have them all. For now, head up the stairs to the upper level. (screenshot)
NOTE: There may be a few stray wasps waiting for you here if you left the room below without killing them all.
EARTH ELEMENT AREA: This gate is straight ahead as you come up the stairs. Enter and walk into the quicksand. Follow the right wall forward. Lara's head will occasionally disappear below the surface, but if you keep moving she'll be fine. As you go along, 5 wasps (31-35) fly in from above. There's a small ledge ahead where you can climb out of the quicksand and shoot at the wasps. When the coast is clear, continue through the quicksand, past the two round symbols carved on the cave wall, until you come to an alcove on the right with steps leading up. (screenshots)
Climb out of the quicksand on the lowest step, turn around, and take a standing jump onto the sloped block to the right of the step. Now take a standing jump over the quicksand onto the rock pile. Turn left and look back toward the round, carved symbol. Take a running jump across the quicksand to the triangular ledge at the corner of the rock pile near that carving. Climb into the opening above. Take the small medi pack (16) and throw the switch. This drops a block from the ceiling of the first room after the swinging burners. This will enable you to get secret #2 later. (screenshots)
BUG NOTE: Be sure to pull the switch only once. Using the switch more than once can trigger a bug that can prevent you from obtaining secret #2. If you've already done this, see the footnote for possible solutions.
After using the switch, crawl back out onto the ledge and return through the quicksand to the steps ahead on the right. Climb the blocks on the left and follow the path around to the left. Go left at the fork, vaulting up several low steps. At the top, kill another wasp (36) that flies in from the side passageway on the right, where there's a torch mounted on the wall. Follow the main tunnel around to the left. Cross the stone bridge above the quicksand where you explored earlier and take the SECOND OCEANIC MASK (17) from the pedestal. (screenshots)
Taking the mask triggers an earthquake that continues until you leave the area. At this point you have a choice of paths by which to exit this area. If you don't mind losing a little health, take this shortcut: Follow the path away from the mask pedestal and step out onto the small, square ledge on the right. If you look over the edge, you'll see another square ledge below. That's where you're headed. Walk to the edge, hop back once, and then take a standing jump with Action to land on the lower ledge. Some loose rocks will land on the ledge behind Lara, and she'll lose about half her health in the fall, but she should survive. Now skip the next paragraph and pick up the walkthrough below. (screenshots)
If you'd rather play it safe, after picking up the mask, walk back along the path. If you go slowly and carefully, the falling rocks should land in front of Lara, instead of on her. When you reach the fork where you killed the wasp earlier, go left toward the torch, but stop before you reach it. To avoid the next cluster of falling rocks, run across the square to the right of the torch but be sure to stop just beyond it to avoid falling into the lava pit ahead. Then take a running jump across the lava. Continue around to the right and down the steps to where the quicksand used to be. Now it's a deep chasm. Take a running jump from the bottom step over the chasm. When you land, immediately hop back and grab the edge to avoid more falling rocks. Then pull up. (screenshots)
This small, corner ledge is where you end up whether you take the shortcut or the longer way round. Position Lara with the outer corner of the ledge behind her on the right. Take a standing jump to the slightly higher ledge just around the corner. Then take a carefully angled running past the overhanging rocks to the square ledge ahead on the right. Then immediately run into the hallway so Lara doesn't get squashed by still more falling rocks. (screenshots)
Once inside the hallway, you can see the PILLAR OF LIGHT ahead, but the gate in front of it doesn't open. Jump to grab the ladder on the right. Climb down and follow the passage to some swinging burners. There are Desert Eagle clips (18) in the first alcove on the right. Even if she is crawling, Lara can be struck by the burner at its lowest point. So stay close to the right wall as you approach the clips. Then crawl back out along the same path. Run carefully past the burners to the switch. Pull it to open the trapdoor above the ladder at the end of the passageway. The trapdoor is on a slow timer, but you shouldn't have any trouble getting through before it closes. At the top, turn around, jump over the open trapdoor (or wait for it to close and walk over it). Exit through through the small, blue gate, which opens as you approach. Continue back to the room with the PILLAR OF LIGHT and climb the stairs to the upper level. (screenshots)
NOTE: You can get secret #2 now if you like. I have included it later, to save a trip downstairs.
WATER ELEMENT AREA: This gate is on the right when facing the PILLAR OF LIGHT with the EARTH ELEMENT gate behind you. Enter and approach the first pool. Below are two rotating wheels fitted with scythe-shaped blades. Swan dive over the blades into the far right or left corner of the pool. Surface in the corner out of the blades' reach. Pull up onto the ledge near the wall. Then crawl into the low passageway. At the bottom of the water-filled shaft beyond is a large medi pack (19). (screenshots)
Crawl back out to the ledge, turn right, and jump into the water. Try to land in the corner, where the rotating blades can't reach Lara. Then swim down past the lower blade wheel through the opening at the bottom center of the room. Follow the tunnel to a room with FOUR SQUARE OPENINGS and another rotating blade wheel. (screenshots)
Swim past the moving blades into the LEFT OPENING to get air. Pull the lever on the wall below the air pocket. This opens a door inside the rightmost opening of the four. This door is timed, so after pulling the lever, roll, swim past the blade, make a U-turn to the left, swim past the blade again and through the RIGHT OPENING. Then swim straight up the long vertical shaft to the air pocket at the top of the next room. (screenshots)
This flooded room has four blade wheels, two on each side of the room, with a horizontal shelf between each set of blades. Carefully retrieve the Desert Eagle clips (20) sitting on one of these shelves. Then return to the air pocket. Get the Uzi clips (21) on the other shelf. Then swim along the shelf between the blades to the opposite wall. Turn left and continue past the second blade wheel into an alcove with another lever. (It's at the top right if you're facing that wall.) Pull the lever to open the gate at the bottom center of the same wall. Swim down through it, climb out of the water, and claim the THIRD OCEANIC MASK (22). (screenshots)
BUG NOTE: Make sure you pick up the mask, since it is possible to leave without it, and you won't be able to get back into the water area again. If you've already done this, see the footnote for possible solutions.
Once you have the mask, get the save/power-up crystal (3) and use the switch in the alcove on the right to open a gate down in the room with the FOUR SQUARE OPENINGS. Swim back to the previous room. Keep going forward, hugging the bottom to take the least damage from the blades. If necessary, you can head for the air pocket in the ceiling before moving on, but if you have enough air, just continue straight across the room through the opening at the bottom center. Follow the underwater tunnel to the right, then down. Pull the lever on the left to open another gate nearby, roll, and continue on through the narrow crevice on the left. Pick up the MP5 clips (23) on the bottom. Swim forward through the gate you just opened and turn right into the room with the FOUR SQUARE OPENINGS. Go through the one on the BOTTOM. (You can stop and get air in the top or left opening, but if you're fast you won't need to.) (screenshots)
Continue straight along the underwater passage. Turn right and pass through the gate you opened using the switch in the OCEANIC MASK room. Follow the underwater passage until you can surface in knee-deep water. Wade forward into the deeper water on the other side. Swim down again, through the low tunnel on the left, and up a long shaft to a small room where you can climb out of the water. Pull the switch and fall through the trapdoor into a hallway. Turn left and go up the ramp, then left again through the blue gate, which opens automatically as you approach. Now you're back in the room with the PILLAR OF LIGHT. (screenshots)
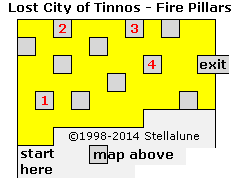
FIRE ELEMENT AREA: If Lara is standing with her back to the EARTH ELEMENT gate, the entrance to the FIRE area is on the far side of the PILLAR OF LIGHT. Go through the gate, which then closes behind you. The passage widens into a large cave with a pool of weird, yellow lava. There are a number of square pillars standing in the pool. Some of these have burners on top, which ignite when Lara stands on or jumps over them. There's also a map carved into the ceiling of the cave. If you climb on the block and light a flare, the "safe" pillars on the map will glow. The diagram at right also shows a safe path across the pool. (screenshots)
Start on the left side and take a running jump to the nearest pillar (#1). From there, take another running jump over the next pillar to land on the pillar against the far wall (#2). Turn right and take a running jump to grab the next pillar (#3), which is also against the wall. Pull up and turn right. Take a running jump to land on the pillar with the large medi pack and shotgun shells (24-25) on top (#4). This pillar will ignite after a moment, so grab the items and quickly backflip onto the previous pillar (#3). Now carefully line up the next running jump. You want to land on the same pillar where you got the goodies (#4) but on the side farthest from the exit. Then you can immediately turn left, run, and jump, without wasting time setting up the jump. When you land on the ledge near the exit, stop so you don't fall through the trapdoor ahead. (screenshots)
There's a large medi pack (26) just beyond the trapdoor, but it's impossible to get it without being flattened by the rolling spiked cylinder unless you cheat by exploiting a bug in the game. First, jump over the trapdoor. Trigger the cylinder by stepping down near the medi pack and immediately hopping back to safety. Then face the cylinder, move as far to the left and as close to it as possible. Now jump forward repeatedly and Lara will gradually creep into the cylinder. When you have reached the center line of the cylinder, turn 90 degrees to the right and continue to jump forward. Once Lara is standing over the medi pack, you can pick it up. Use the same technique to get out from behind the cylinder again: Stand on the left side of the cylinder, facing the trapdoor, and jump forward until you gradually work Lara through the cylinder and out the other side. (screenshots)
Fall through the trapdoor and slide down the chute into the next room, where there are 4 fire-breathing mechanical statues above a pool of yellow lava. Between the two statues on the right is a ledge with a switch that deactivates the statue near the exit. You don't have to use the switch to proceed, but it makes things easier. To get to to the switch, then the exit, you'll need to jump across a series of 3 invisible platforms without getting barbecued. Here's one way: Take a standing jump from the edge of the walkway to grab the first invisible platform. Don't pull up immediately. Watch the flame above cycle on and off. Just before the flame goes out, begin to pull up. By the time Lara is standing, the flame will be out. Immediately take a standing jump over the first platform and grab the edge of the second one. Repeat this sequence to get to the third platform. While hanging, traverse to the left corner. Watch the flames and pull up just before they go out. Turn right and take a running jump over to the ledge with the switch. (screenshots)
NOTE: You could instead skip the switch and immediately take a running jump forward to the exit, but the timing can be tricky.
Pull the switch to deactivate the statue nearest the exit. Turn around, walk to the edge, and when the flames go out, take a standing jump to grab the third invisible platform again. Traverse to the left, wait, pull up, turn right, and take a final running jump to the ledge by the exit. The blue gate opens as you approach, but do not rush in. There's a swinging burner just inside. (screenshots)
Stand in the doorway on either side of it, and as the burner swings away, take a standing jump onto the pedestal, or crawl around the edge of the room to avoid the burner. Then climb onto the pedestal. Pick up the FOURTH OCEANIC MASK (27). Exit through the door on the right (behind the statue). It's timed to close quickly once you step off the pedestal, but getting back on the pedestal will open it again. (screenshots)
BUG NOTE: Make sure you pick up the mask, since it is possible to leave without it, and you won't be able to get back into the fire area again. If you've already done this, see the footnote for possible solutions.
Follow the passage to the gate on the left. It opens automatically, bringing you back to the room with the PILLAR OF LIGHT. If you don't yet have all four OCEANIC MASKS yet, return upstairs and choose another gate. You'll need to explore all four element areas (above) to get all four masks.
WHEN YOU HAVE ALL FOUR OCEANIC MASKS: You can place them in the receptacles around the base of the PILLAR OF LIGHT. Or, wait until you get the SECOND ULI KEY as well. You'll need all of these items to finish. Climb the stairs to the upper level and exit through the doorway to the right of the EARTH gate. Return down the stairs to the room where you killed the wasps earlier.
ENTRANCEWAY WITH SWINGING BURNERS (again): If you pulled the switch in the EARTH AREA, there is now a movable block in the middle of the floor. Push the block once. Climb on top of it and jump to grab the ladder. Climb up to the opening and enter the room. Carefully run past the swinging burner and crawl into the alcove to get SECRET #2, a large medi pack (28) and save/power-up crystal (4). Climb out the way you came and drop to the floor. (screenshots)
BUG NOTE: If you missed the switch in the EARTH area, or if you pulled the switch only to find the movable block is insubstantial (screenshot), there are several possible solutions included in a footnote.
Now follow the hallway to the left (when facing the movable block with the swinging burners behind you). Pull the switch to open the gate and enter the next room cautiously.
ROOM WITH FOUR GATES: As you step forward, the gate closes behind you. Three giant mutants (37-39) are waiting for you inside. One comes through the gate directly ahead. Two more emerge from the side gates when you reach the middle of the room. You can devise your own strategy, or try one of these: Kill the first mutant with your weapon of choice, while jumping up and down to avoid its fireballs. While you do this, do not advance into the room beyond the two low ledges on right and left. When the first mutant explodes, run into the middle of the room onto the tile with the jutting bit of stone. This triggers the appearance of the other mutants in their alcoves. The gates holding them back open after a few moments—right first, then left—giving you time to roll, retreat to the entrance, and climb the ladder on the left (when facing the gate). Once up on the ledge, you can crouch near the wall and shoot the mutants with pistols or Uzis from relative safety. When the coast is clear, climb down. (screenshots)
Alternatively, if you've been hoarding rockets, go ahead and use them now. As long as each rocket hits its target, you'll only need 3 of them to destroy each mutant. So step into the room just far enough to open the gate ahead and release the first mutant. As soon as Lara gets a lock on it, fire 3 rockets while jumping straight up and down to avoid its fireballs. When the first mutant explodes, step out just a little farther, angle Lara to the right and wait for the gate on that side of the room to open, releasing the second mutant. Again, shoot 3 rockets at it while jumping straight up and down. Then advance a little farther out and wait for the left gate to open, releasing the third mutant. Destroy it the same way. This strategy also works pretty well with the Uzis, but instead of jumping straight up and down, flip side to side and/or back away while firing. (screenshots)
NOTE: There are only 2 more giant mutants in this level, and these are optional kills. Still, you may want to hang onto a few rockets for them. Again, I recommend saving around 55-60 Desert Eagle rounds for the final boss.
Pull the switch in the left alcove. This raises a platform above the gray stone block in the mutant room. Climb onto the block, jump to grab the ledge, and pull up. Follow the upper ledges around to the right to a small opening. Crawl through to the next room. (screenshots)
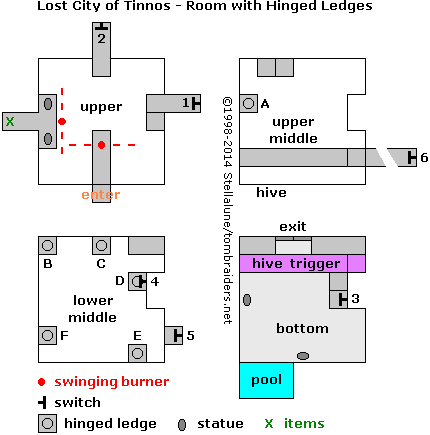
ROOM WITH SWITCHES AND HINGED LEDGES: The diagram on the right may help clarify my descriptions of this room. The switches are numbered in the order you use them. The square, hinged ledges are indicated by letters A-F.
Approach the first swinging burner. Stand to either side and jump or crawl past it. (If you crawl, don't hesitate under the burner or Lara will catch fire.) Turn left and take a running jump to the ledge with the two statues behind the second swinging burner. If you start to run when the burner ahead is farthest to the left, it will swing away by the time Lara gets there. Crawl into the alcove and pick up Uzi clips and flares (29-30) (X in the diagram). Crawl out. Then take a running jump past the swinging burner back to the end of the first walkway. Be sure to set up this jump so Lara lands to the left of the first burner. From there, take another running jump to the ledge ahead. Crawl in and pull switch #1. This doesn't appear to do anything at first, but you'll notice a change after using the next switch. (screenshots)
Crawl back out and take a running jump to the stone ledge ahead on the right (opposite the entrance). Crawl into the alcove and pull switch #2. This lowers ledge A (under the ledge with the two statues). And, if you already pulled switch #1, it raises ledge B and ledge C (directly below). Exit the alcove, turn right, and hop down the stone steps onto ledge B (in the corner). Turn around and take a running jump to ledge C, then a standing jump down to the rectangular, stone ledge in the corner. Turn right, back up to the wall and take a standing jump to land on the raised block next to switch #3. (screenshots)
If you don't want to trigger a swarm of giant wasps, be careful not to drop down onto the square, pink ledge on the left or the walkway running across the room in front of the carved double doors (the areas shaded PURPLE in the diagram and accompanying screenshots). If you do, the wasps will begin to emerge from the crack in the wall high above the pool. In the PC/Mac game, there are 14 wasps (40-53) in all. So you may just want to trigger them and kill them all. Then you can explore freely without worrying about where to step. However, in the PlayStation version, I believe the swarm is infinite, so it's probably better to avoid setting it off.
Use switch #3 to raise ledge D, above. Climb back onto the block to the left of switch #3. Walk to the edge and take a standing jump to grab the rectangular stone ledge ahead. Pull up, turn around, and take another standing jump to grab ledge D, near switch #4, and pull up. When you throw switch #4, the ledge collapses under you. So either side flip quickly to the left to land on the rectangular ledge, or fall onto the block below, losing a small amount of health in the process, and then jump back to the rectangular ledge. Switch #4 also raises ledge F, below the end of the walkway spanning the room. (screenshots)
To get there, you'll first have to raise ledge A again. Walk to the edge of the rectangular stone ledge and take a standing jump to grab ledge C (above the big double doors) and pull up. Then take a running jump to ledge B (in the corner). Turn around, walk to the edge, and jump straight up to grab the stone step above. Pull up, climb onto the upper step, then pull up onto the ledge above. Crawl into the alcove and use switch #2 again (move it into the up position) to raise ledge A (under the ledge with the two statues). This also collapses ledges B and C (below), but you don't need them anymore. (screenshots)
Crawl out, go down the two steps on the right, and take a standing jump to ledge A. Take one step back from the edge and then a standing jump to land on ledge F (under the walkway). Jump up to grab the handholds on the underside of the walkway. Monkey swing across to the alcove ahead and throw switch #5 to open the big double doors and raise ledge E, just outside the alcove where you're now standing. (screenshots)
NOTE: At this point you could proceed to switch #6 (in the alcove above switch #5) and go for the final secret, but I recommend completing the next room first.
Ignore ledge E for now. Instead jump straight up to grab the handholds beneath the walkway, and monkey swing back across the room to ledge F. Turn left to face the cracked wall containing the wasp hive. Then take a standing jump with Action to land safely in the small pool below. Climb out of the water and approach the open double doors. If you didn't trigger the wasp swarm earlier and don't want to, make sure you jump over the long, reddish ledge in front of the doors to avoid doing so. Follow the hallway to the next room. (screenshots)
ROOM WITH SHALLOW POOLS AND SECOND ULI KEY: As you move out into the middle of the room, more giant wasps begin to emerge. In the PC/Mac game, there are 35 wasps (54-88) in all: 25 from a hole in the ceiling in the middle of the room and 10 more from a crack in the wall in the back right corner. They stop spawning once you've killed them all. As far as I know, the swarm is infinite in the PlayStation game, though it should cease once you take the ULI KEY and leave the area. (screenshots)
There are also 2 more giant mutants (89-90) lurking in the side alcoves. You can draw them out one at a time or avoid them. One is in the alcove to the right of the entrance when facing it. If you approach this doorway with weapons drawn, you can get a lock on the mutant when it appears, then back- and side-flip away shooing until it explodes. The second mutant is in the alcove on the left side of the room when facing the entrance. I suggest facing that wall and approaching the middle left door on that wall, rather than the middle right, so you don't accidentally back into the deep pool while fighting the mutant. Again, approach the doorway with weapons drawn, target the mutant as soon as it appears, and flip away while firing to destroy it. (screenshots)
Once you've cleared the room, head for the corner beyond the deep pool to find the SECOND ULI KEY (31) sitting on a shelf in the alcove there. Then cross the room to the alcove in the opposite corner. Climb the ladder to a short passageway with a switch and a keyhole. Pull the switch to open the gate next to it, which leads back to the PILLAR OF LIGHT. (screenshots)
NOTE: You don't have to open this gate before going after secret #3, but it helps. If you don't care about obtaining the final secret, simply use the SECOND ULI KEY in the lock beside the gate. Then enter the room with the PILLAR OF LIGHT and place the FOUR OCEANIC MASKS in the receptacles around the light beam (assuming you haven't already done so). This deactivates the beam and opens a hole in the floor where it previously shone. Drop through and slide down the ramp to finish the level. Otherwise, continue following along to get the secret.
TIMED RUN FOR SECRET #3: The final secret in the game is quite challenging. It requires a fairly complicated timed run. Before starting the timed section, you'll need to return to the top of the ROOM WITH SWITCHES AND HINGED LEDGES. To get back there, jump to grab the ladder and climb back down. Go through the ROOM WITH SHALLOW POOLS and out the middle right doorway on the far side of the room. (screenshots)
Again, if you haven't triggered the wasp swarm in the ROOM WITH SWITCHES AND HINGED LEDGES, you may want to jump over the threshold to avoid doing so. Now you're headed for switch #6 at the left end of the walkway high above. Start by pulling switch #3, on the lower level, to raise ledge D, above. Climb onto the block to the left of switch #3. Walk to the edge and take a standing jump to grab the rectangular stone ledge ahead. Pull up, turn around and take another standing jump to grab ledge D, near switch #4, and pull up. Do not pull switch #4 this time. Instead take a running jump to grab ledge E, directly ahead. Pull up, turn around, and jump straight up to grab the walkway above. Pull up once more. (screenshots)
Climb into the passageway at the right end of the walkway (above switch #5). There you'll find switch #6, which opens the door below the SECOND BRIDGE, way back in the area where you killed the first two giant mutants. This door is timed to close after 2 minutes, so you have to hustle. Here's the sequence, also detailed in this series of screenshots and this short video walkthrough.
Make sure Lara's health bar is at least half full and save the game. Then pull switch #6 to open the secret door. Quickly press Look to get Lara's perspective back. Roll and run out of the alcove. As you land on the walkway below the raised block, side flip to the right to land on ledge D, below. Side flip to the right again to land on the rectangular stone ledge near the doorway. Then jump forward to land in the doorway, losing a little health in the process. Turn right and run through the big double doors. (screenshots)
NOTE: To get down to the floor without any health loss, try either of these two alternatives. After pulling switch #6, roll and run forward along the walkway, veering sharply to the left toward the wasp hive (the crack in the wall). Hold Action as you run off the ledge so Lara lands in the pool below. Or, after pulling switch #6, roll and sprint toward the end of the walkway. As you approach the wall, release sprint and stop running. Turn left, hold Walk, and step backward to the edge of the walkway. This takes a moment to set up, but you'll save time on the way down. Now hop back and press Action as though you were going to grab the edge of the walkway, but before you do, release Action and Lara will land on ledge F, under the walkway. Now take a standing jump with Action toward the wall to land safely in the pool below. Roll underwater and climb out of the pool. Run/jump across the room to the double doors. If you haven't triggered the wasp swarm yet, try to jump over the portion of the ledge that triggers it. If you don't manage to do this, don't worry; just keep going. You can kill the wasps later. (screenshots)
After exiting through the big double doors, run around the corner to the right. Then sprint forward into the ROOM WITH MANY SHALLOW POOLS and along the left side of the room to the far corner. When your sprint bar runs out, take running jumps to cover the ground faster as the meter refills. As you approach the alcove in the far left corner, ease off the sprint button and round the corner toward the ladder. Climb up, dismount on the left side, turn left, and run forward through the gate you opened earlier with the switch. (screenshots)
NOTE: If you didn't open the gate earlier, you can use the switch to do so now. This takes a few seconds, but if you do everything else without hesitation, you should still have enough time.
As you enter the PILLAR OF LIGHT room, turn right and take running jumps over the mask receptacle on the right side of the light beam. Continue taking running jumps up the stairs and through the doorway directly ahead (i.e., the doorway to the right of the EARTH GATE). Turn right at the bend in the stairs and sprint straight down into the room with the movable block and secret #2. Turn left and run carefully past the 2 swinging burners. (If you've done well and not run into anything yet, you'll have time to hesitate a little here to avoid catching fire. If you've done very well, you might want to save your game in a new slot. Then if Lara catches fire, you can reload and not have to redo the entire run.) Beyond the burners, sprint to the far end of the bridge and run off the right side to land on the snowy block below. Step off the edge onto the snowbank below, turn right, and run/jump/slide down the slope onto the gray rocks. Then dash through the door, which hopefully is still open. (screenshots)
Enter and claim SECRET #3—the last of the game—a save/power-up crystal (5), Desert Eagle clips and a large medi pack (32-33). If the door closes while you're inside the secret room, use the switch twice to reopen it. Climb back onto the bridge and return past the swinging burners and up the stairs on the right to the PILLAR OF LIGHT room. (screenshots)
PILLAR OF LIGHT AND LEVEL EXIT: Descend the stairs to the base of the PILLAR OF LIGHT. Head past the light beam to the back left side of the room and go through the silver gate you opened before getting the secret. (screenshot) Use the ULI KEY in the lock near the silver gate. Place the FOUR OCEANIC MASKS in the receptacles around the light beam (assuming you haven't already done so). This deactivates the beam and opens a hole in the floor where it previously shone. (screenshot) Drop through and slide down the ramp to finish the level.
NOTE: If you opened the hole under the pillar of light earlier only to return and find it sealed over, you can probably fix this glitch by returning to the ENTRANCEWAY WITH THE SWINGING BURNERS then coming back to where the pillar of light was. If that doesn't fix the problem, or if you have missed one of the OCEANIC MASKS and cannot open the passageway, just use the level-skip cheat. The only thing you'll miss is a short slide into the next level.
A cutscene follows: Willard uses the artifacts to raise the meteor from its crater. Then he falls into the pit and begins to change. There is some garbled dialogue made up of snippets from earlier cinematics. I haven't attempted to transcribe it, but there's a more detailed account of the action on the cinematics page, and you can re-watch the movie on my YouTube channel.
MISSING OCEANIC MASKS: It's possible to complete the AIR, WATER, and FIRE areas and leave without picking up the OCEANIC MASKS there. Once you return to the PILLAR OF LIGHT ROOM, there's no way to get back into the side areas, so you're stuck. If you have a convenient earlier save, just replay the element areas. Or download a PC/Macintosh save. For help installing savegame files see here. Otherwise, play the rest of the level and when come to the very end, where you would have to use all the masks in order to proceed, use the level-skip cheat to finish. Fortunately you won't miss much.
PHANTOM BLOCK BELOW SECRET #2: It's possible to come to the point where you'd normally obtain secret #2 and find that the block you need to climb on to reach the secret room is not solid. This bug seems to be triggered by pulling the switch in the EARTH ELEMENT AREA more than once. There are a couple of alternatives aside from reloading an earlier save or restarting the level. If you're playing on the computer, you can download a PC/Macintosh save with Lara entering the secret area. For help installing savegame files see here. Or use the crawling corner bug to obtain the secret, as shown in this short video walkthrough.)
UPDATES: 7/14/09 - Fixed two minor errors on the maze map, thanks to MMAN and xRikux89 from the Tombrunner.net forum and Sturm Brightblade.
11/26/14 - First major update since this walkthrough was created in 1998. This revision includes many new screenshots as well as various other alternate paths, bug notes, wasp notes, corrections, and clarifications.
11/7/16 - Added the note about using rockets to stop the wasps from spawning on the bridge in the PlayStation game. Several players sent in this tip over the years, including pauleddie, Julie, and Andrew R. Sorry it's taken me so long to add this, and I hope I haven't forgotten anybody.
10/13/17 - Added two missing items (the second small medi pack and the second set of Desert Eagle clips included in secret #1), thanks to a tip from Axel_Remaster. I must have been asleep at the controls that day. ;)
2/5/24 - Added VGCartography's level maps, with permission. Visit VGCartography on DeviantArt for high-res versions, and follow on Twitter/X and YouTube for more fantastic game maps.
5/4/24 - Added kill and item counts. (Actual remastered updates coming eventually, but this should help.)
ACKNOWLEDGEMENTS: Special thanks to participants in the alt.games.tombraider newsgroup, without whom some parts of this walkthrough could not have been written. Thanks also to Adam M., Adrian, Andre, Anya, Atli, Chris N., Chris O., Cody, Cujo, Del, Frank, Haydon, Jack M., Jeff Reid, John G., Korry, Laura J., Paul W., Mark R., and Ottar for their help on this level.
‡NOTE ON VIDEO GUIDES: Eldin's videos don't always follow the same strategies I use in my walkthroughs, but if you prefer that format, I think you'll find them very useful.
WAS THIS WALKTHROUGH HELPFUL? If not, I apologize and invite you to contact me with any questions. If you need help right away, I recommend the r/TombRaider subreddit. Other fan-run forums are listed at tombraiders.net/stella/community.html. If this site was useful, please consider supporting it financially or in other ways. For details, visit tombraiders.net/stella/support.html. As always, I welcome your corrections/suggestions. Thank you!
Copyright © 1998- - Stellalune (). Feel free to copy or print this walkthrough for personal use. By all means, share it with friends, but please include this credit line so people can send me their feedback. No part of this walkthrough may be reproduced on another site without permission. Follow this link for details about this site's advertising and privacy policy.
Stella's Tomb Raider Site: tombraiders.net.