Shadow of the Tomb Raider - Kuwaq Yaku Collectibles
Updated: 9/25/21(†)
This guide focuses on revisiting the level after completing it. If you are playing through for the first time, you may want to follow the main walkthrough instead to avoid possible spoilers. Collectibles are numbered in the order they appear in the main walkthrough and on the annotated level map.
Follow this link for a List of All Artifacts by Story/Dialect.
Treasure Chests · Relics · Documents · Murals · Monoliths · Survival Caches · Explorer Backpacks · Archivist Maps · Artifacts & Photos · Challenges · Side Mission
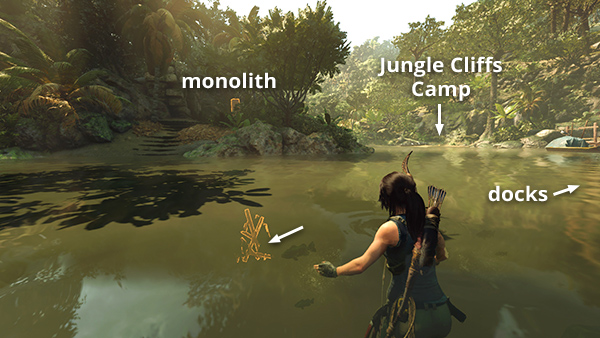
TREASURE CHEST 1
All treasure chests require the lock pick to open. Once you have acquired it, fast travel back to the Kuwaq Yaku or Jungle Cliffs Base Camp. Swim around to the left side of monolith #1, on the east side of the river. Then swim down below the surface, pry away the wooden barrier, and swim into the cave with the treasure chest. Inside the chest is an Artifact, Copal, from the Story A Community in Need. Apparently it smells wonderful, though I'm not sure how Lara can tell underwater. The walkthrough includes additional details and screenshots. (Click screenshots to enlarge.)
TREASURE CHEST 2
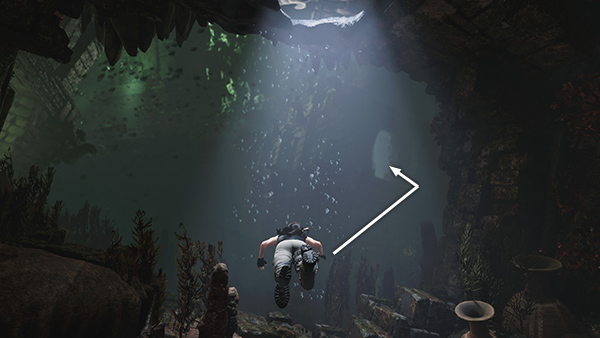
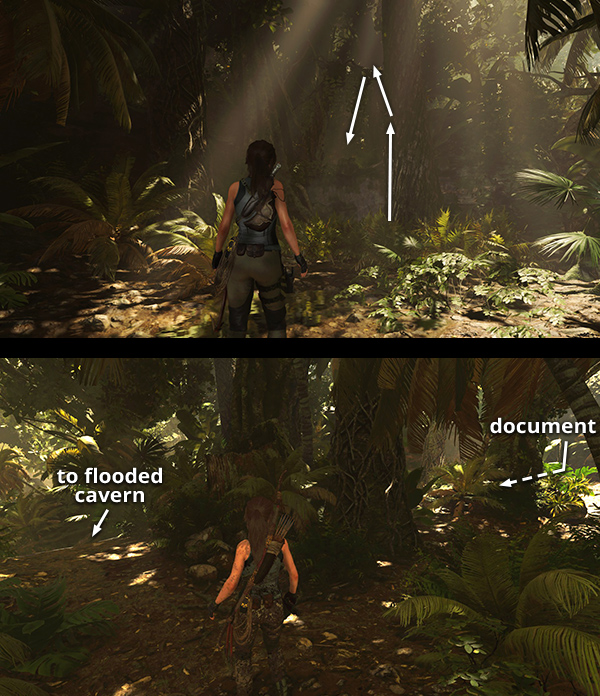
Once you have the lock pick, fast travel to the Temple of Life Base Camp, one of the two camps that appear in Kuwaq Yaku later in the game. Go through the opening to the north, past the stele, and through the doorway on the right. Dive into the pool and swim down through the opening on the southeast side, just like you did the first time. Watch out for piranhas! The treasure chest is in the ruined building on the southwest side of the flooded cavern, beyond the first air pocket, shown in this screenshot. The chest contains an Artifact, an Inti Statuette from The Resistance Story. Continue to the cavern exit and make your way to the Airfield Dirt Road Base Camp so you can move on. The walkthrough includes screenshots and other details. (Click screenshots to enlarge.)
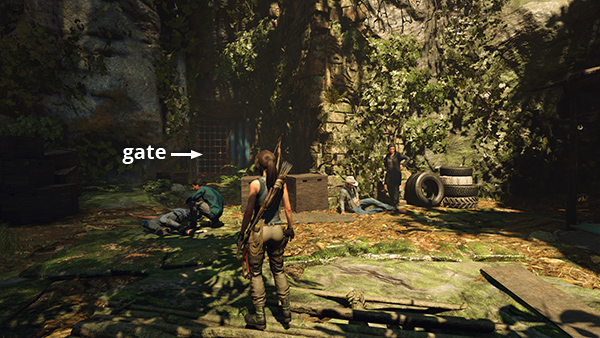
RELIC 1 - Tumi Knife (Fortune and Glory)
This relic is in the side area west of the village, which is only accessible after beginning the Invasive Species Side Mission. Check the walkthrough for details. When you defeat the mercenaries in the area where the villagers are being held, you'll find the relic in the cave behind the metal gate in the upper part of the campsite. (Click screenshot to enlarge.)
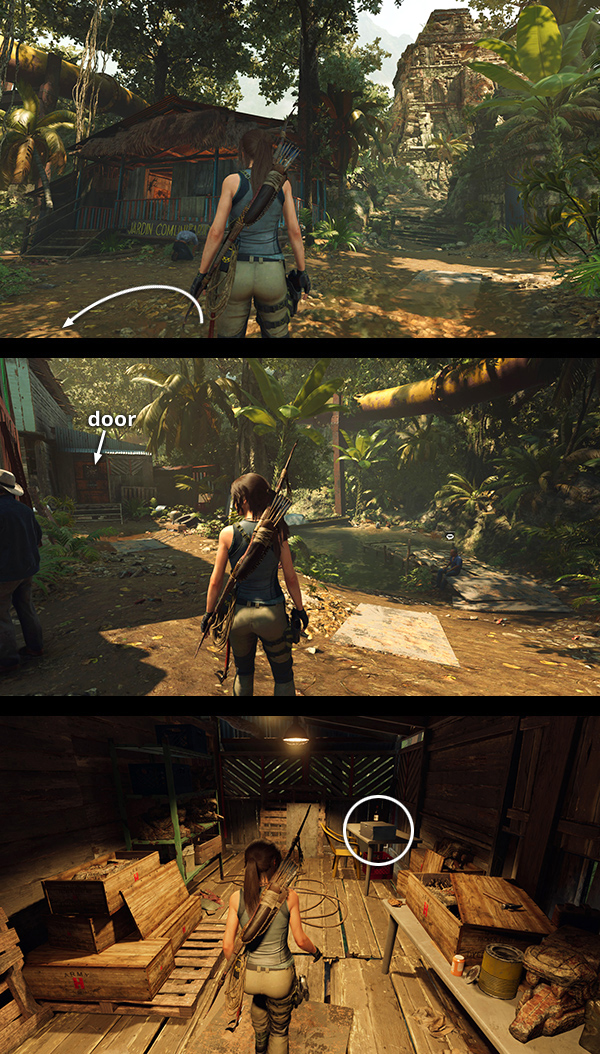
RELIC 2 - Burial Doll Replica (Fortune and Glory)
This relic is in one of the buildings on the west side of the village. From the Kuwaq Yaku Base Camp, head north across the metal footbridge into the village, then bear left (northwest). Just before the Community Gardens house, with the blue and red porch railings, make a U-turn to the left, toward the stream with the small dock and oil pipeline running above. The house nearest the stream has a room built onto the back. Pry open the metal door with the Porvenir logo and go inside to find the relic. (Click image for more and larger screenshots.)

RELIC 3 - Cone Mold (Fortune and Glory)
This relic is on the bottom of the river near the southeast corner of the dock with the fish market, just east of Abby's place and the Kuwaq Yaku Base Camp or north/northwest of the Jungle Cliffs Base Camp. (Click image for more and larger screenshots.)
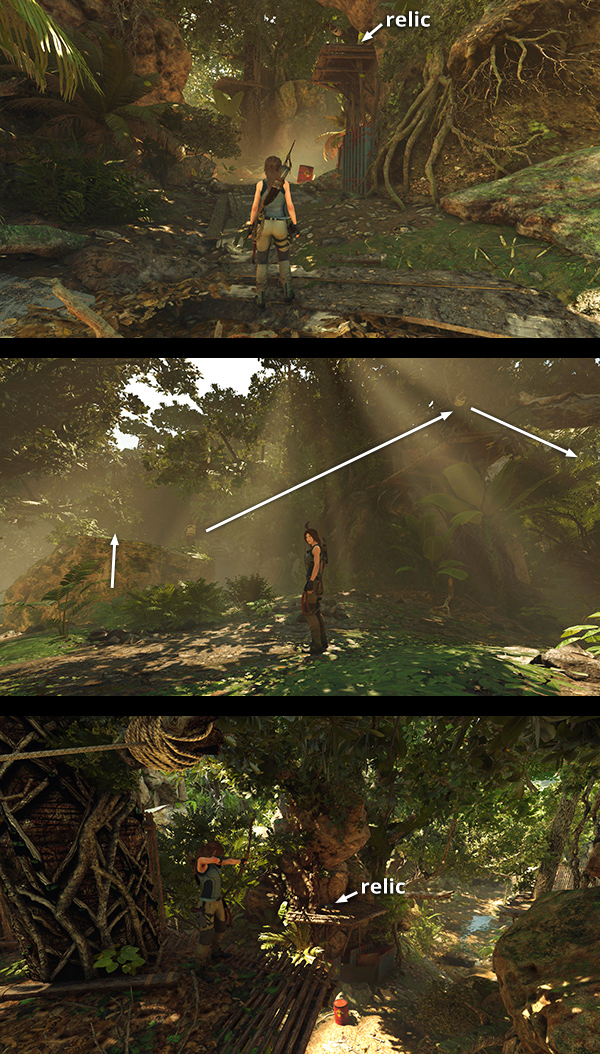
RELIC 4 - Promotional Toy (Fortune and Glory)
This relic is on the path to the Hunting Grounds north of the village. From the Hunting Grounds Base Camp, head up the slope to the northwest. Then turn right and follow the path to the north. The relic is on the first wooden platform on the right side of the path. To reach it, continue into the Hunting Grounds. Climb onto the big rock on the right, use a rope arrow to reach the nearest platform, then run another rope line down to the platform with the relic. (Click image for more and larger screenshots.)
DOCUMENT 1 - Company Town (Fortune and Glory)
The first document is sitting on an empty oil barrel between the Kuwaq Yaku base camp and the stairs leading up to Abby's bar. (Click screenshot to enlarge.)
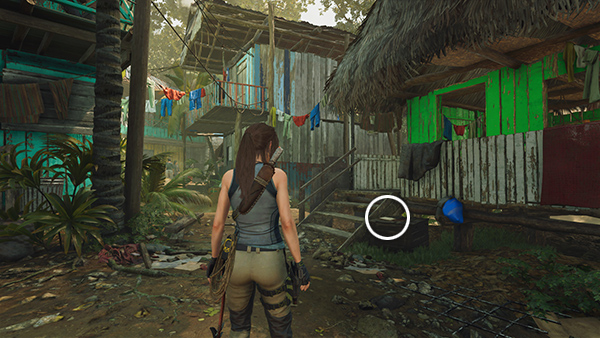
DOCUMENT 2 - Fuel for the Future (A Community in Need)
This document is in the village. From the Kuwaq Yaku Base Camp, head north across the metal footbridge. The document is sitting on a box near the fluorescent green house, presumably Abby's, second on the right. (Click screenshot to enlarge.)
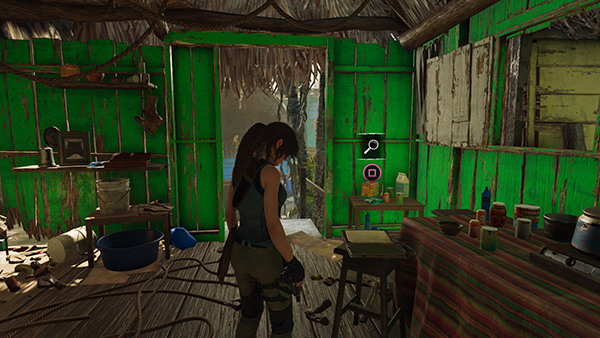
DOCUMENT 3 - Family Tree (A Community in Need)
Follow the directions for document #2, above. The third document can be found inside that same green house. (Click screenshot to enlarge.)
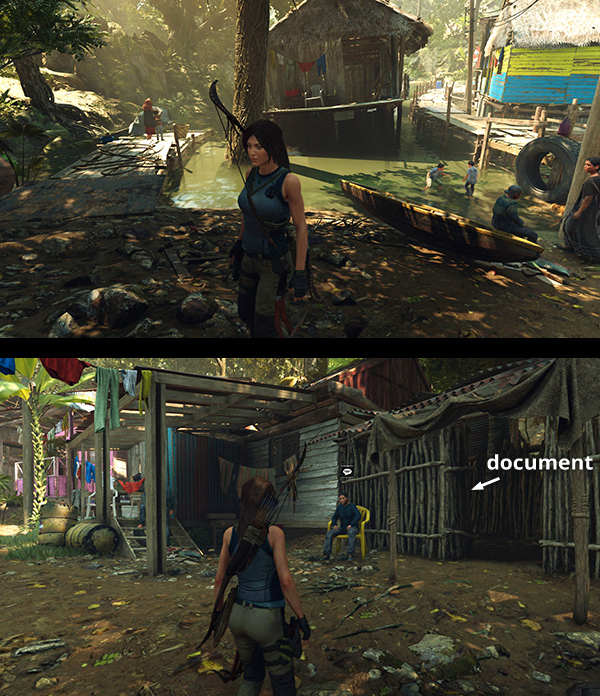
DOCUMENT 4 - Trinity's Offer (A Community in Need)
This document is in the northeast corner of the village. From the Kuwaq Yaku Base Camp head for the dock at the north end of the lake. (On the map it looks like it's closer to the Hunting Grounds camp, but it's actually within the village.) There's a shack built from sticks at the end of the row of houses facing the dock. The document is inside. (Click image for more and larger screenshots.)
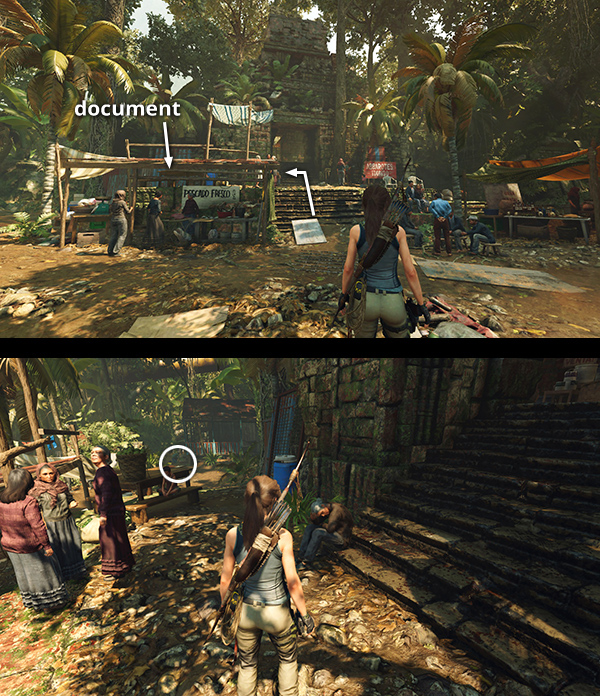
DOCUMENT 5 - A Haunting (Myth, Magic & Monsters )
This document is also in the village proper. Climb the steps leading up to the MARKETPLACE in the north-central part of town, but before entering the building, look to the left to spot the document sitting on a wooden table. (Click image for more and larger screenshots.)

DOCUMENT 6 - Water Quality Report (Fortune and Glory)
Just to the west of the MARKETPLACE is the the Community Gardens building with the blue and red porch railings. This document is inside. (Click screenshot to enlarge.)
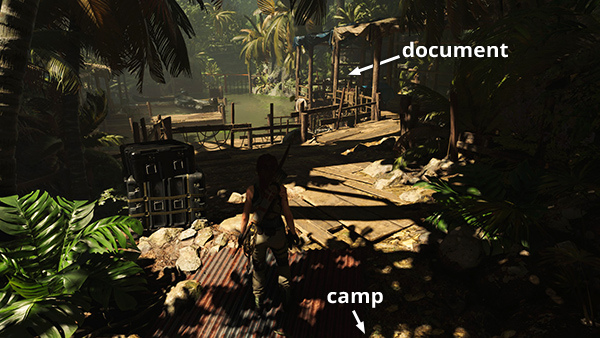
DOCUMENT 7 - End Times (Trinity)
This document is in the area with the boat dock where you fight the Trinity soldiers on the way to the Temple of Life. If you missed it the first time, fast travel to the Docks Base Camp and head south. The document is sitting off to the right on a table under an awning. (Click screenshot to enlarge.)
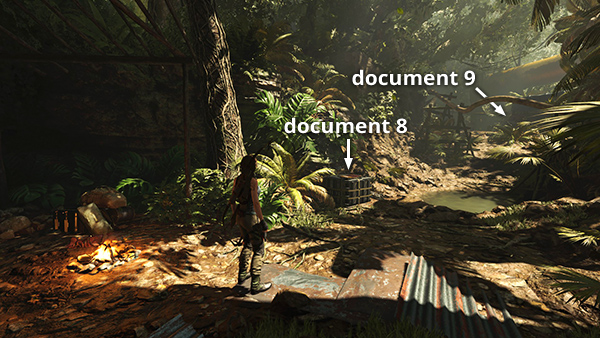
DOCUMENT 8 - Croft Report (Trinity)
This document is sitting on a storage box near the Docks Base Camp. (Click screenshot to enlarge.)
DOCUMENT 9 - Site Scrubbed (Trinity)
This document is just up the hill to the north of the Docks Base Camp and document #8. (See screenshot above.) #9 is sitting on a crate behind the parked truck on the right, just before the opening in the metal fence leading to the next area. It's easy to miss the first time through since you're about to head into a fight with some Trinity soldiers, but there shouldn't be any enemies around if you return later. (Click screenshot to enlarge.)
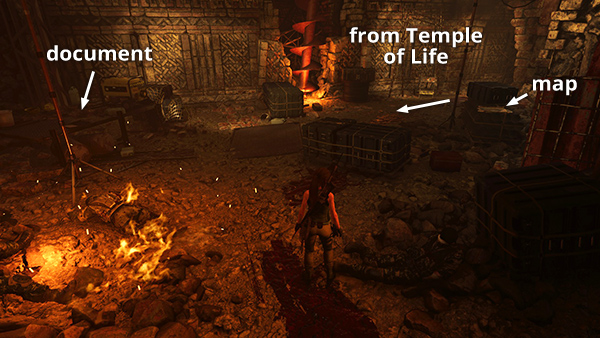
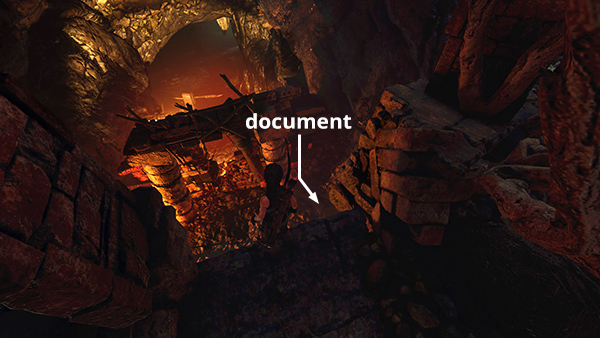
DOCUMENT 10 - Temple Survey (Trinity)
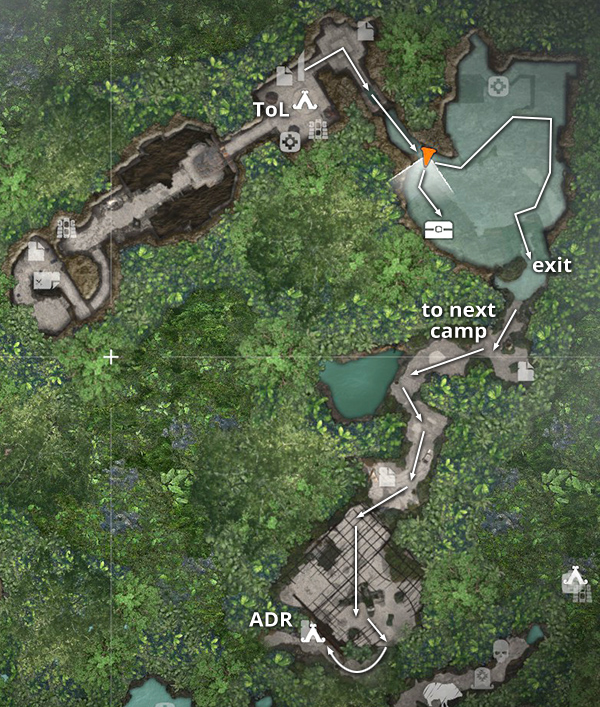
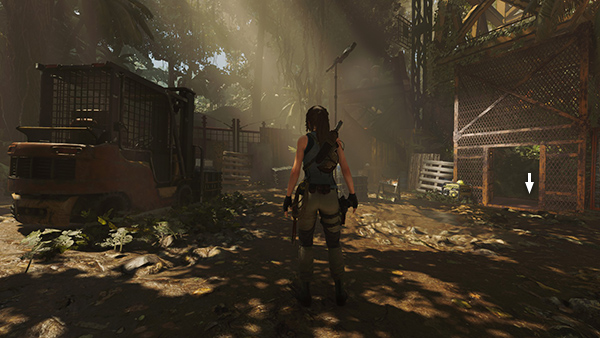
This document is in the caverns beneath the oil rig, on the way to the Temple of Life. Later in the game, you can reach it from the Docks or Temple of Life Base Camp. From the Docks, head north through the area where you fought the Trinity soldiers earlier, following the path described in the main walkthrough. When you reach the clearing with the forklift, go through the metal door on the right and rappel down into the cavern. Follow the tunnel to find the document sitting on a metal table in the area with the storage crates and dead soldiers. Once you have it, continue south, then northeast to the Temple of Life camp so you can fast travel away.
If you're starting from the Temple of Life camp, follow the passageway to the southwest. (screenshot) Continue through the lava-filled puzzle room, up the stairs, through the low tunnel on the left, and on to a room with modern lights and equipment. The document is here. (Click screenshots to enlarge.)
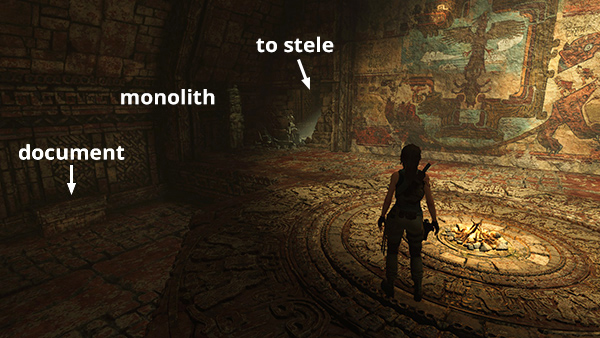
DOCUMENT 11 - Balams (Legends of the Maya)
This document is in the same large room as the Temple of Life Base Camp, which only appears after you've finished the level and moved on. If you fast travel to that camp, you'll find the document on a ledge on the northwest side of the room. From there, you can either continue past the stele and through the flooded cavern to the northeast (watch out for piranhas!) or use the base camp to fast travel away. (Click screenshot to enlarge.)
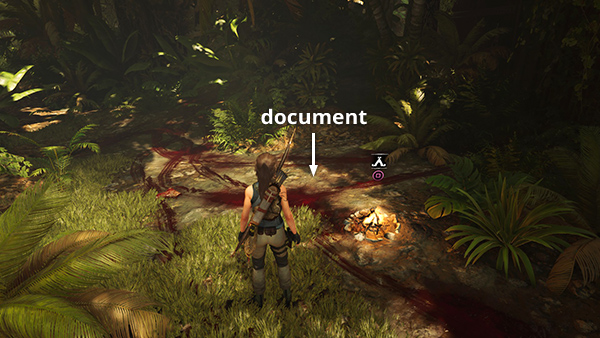
DOCUMENT 12 - Birthing the Serpent (Metamorphosis)
This document is in the same area as document #11, above. Go through the opening in the wall just north of the Temple of Life Base Camp into the room with the stele. The document is in an alcove to the northeast. Unless you need something else in the flooded cavern to the southeast, return to the campfire in the next room and fast travel out. (Click screenshot to enlarge.)
DOCUMENT 13 - Misdirection (Search for the Hidden City) and DOCUMENT 14 - Operation Update (Trinity)
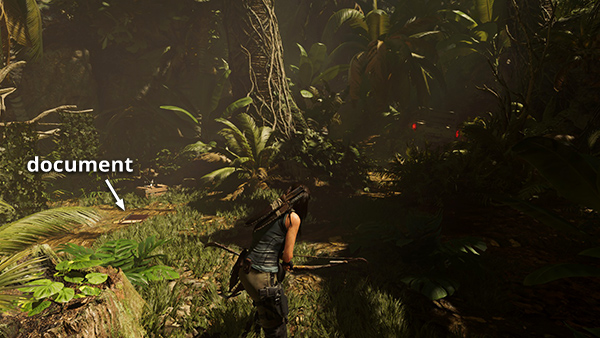
These documents are in the jungle between the Temple of Life and the overgrown airfield where you fought the Trinity soldiers earlier. If you don't fancy swimming through the piranha-infested cavern again, fast travel to the Airfield Dirt Road Base Camp. (This camp only appears after you complete the level and move on.) Follow the path to the southeast, which loops around to the north. Climb over the wooden wall to the clearing with the crashed plane. Exit that area in the northern corner and continue along the path. Document #14 is on the left just before the abandoned truck.
Document #13 is farther along the path to the north. When you come to an apparent dead end, scramble up the tree and jump down onto the ledge ahead. The document is on the side path to the right. Return to the Airfield Dirt Road camp and fast travel away. (Click images for more and larger screenshots.)
NOTE: If you're coming from the Temple of Light via the flooded cavern with the piranhas, you'll approach these documents from the north instead. Follow the main walkthrough if necessary.
DOCUMENT 15 - Scouring the Globe (Trinity)
This document is lying on the ground near the Airfield Dirt Road Base Camp. This screenshot shows where it would be in relation to the campfire. Here's another screenshot from the main walkthrough showing the area on your first pass, before the campsite appears. (Click screenshot to enlarge.)
DOCUMENT 16 - Secret Winds (Legends of the Maya) and DOCUMENT 17 - Votan (Metamorphosis)
These documents are in the Howling Caves Challenge Tomb at the northeast end of the Hunting Grounds. If you haven't explored there yet, follow the tomb walkthrough. If you've been through the tomb but missed either document, fast travel to the Petroleum Deposit Base Camp and face south. Document #17 is just ahead in a dead-end alcove, along with survival cache #12. To reach document #16, drop down into the area below the doorway just beyond the campfire. The document is on the ground to the right. When you have everything, climb back up to the base camp and fast travel away. (Click screenshots to enlarge.)
DOCUMENT 18 - Fever Dreams (Search for the Hidden City)
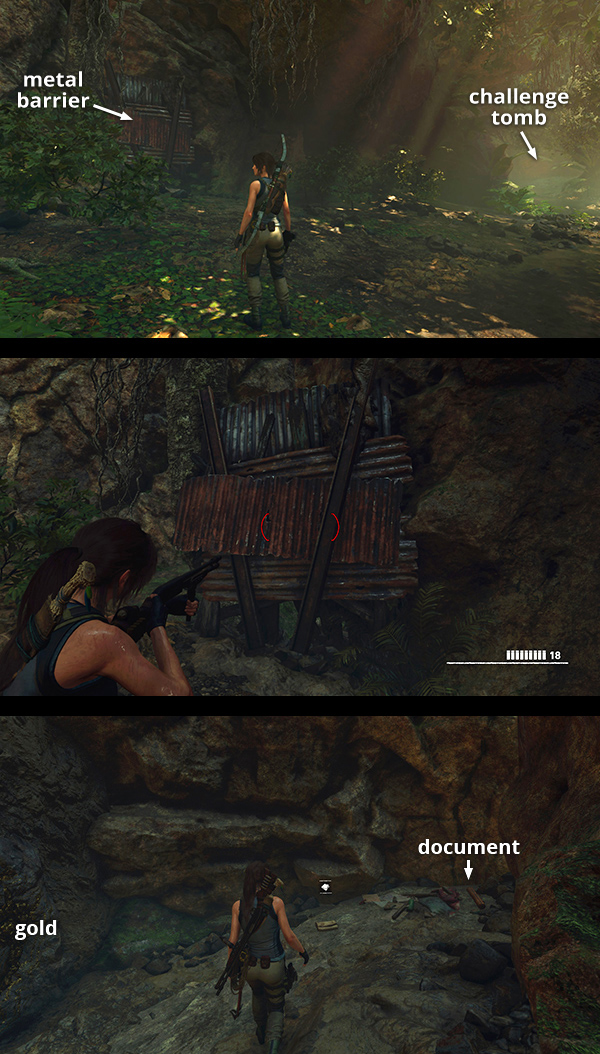
The last document is in the Hunting Grounds north of the village. You'll need the shotgun to reach it, so you won't be able to get it on your first pass through the level. Any time after completing the Cenote and obtaining the shotgun, fast travel to the Kuwaq Yaku Ruins or Hunting Grounds Base Camp and follow the path to the north. About halfway along the north wall of the valley is a metal barrier. Destroy it with the shotgun to find the document in a little cave behind it. (Click image for more and larger screenshots.)
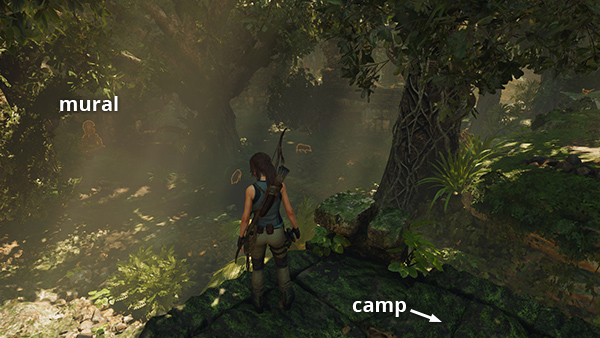
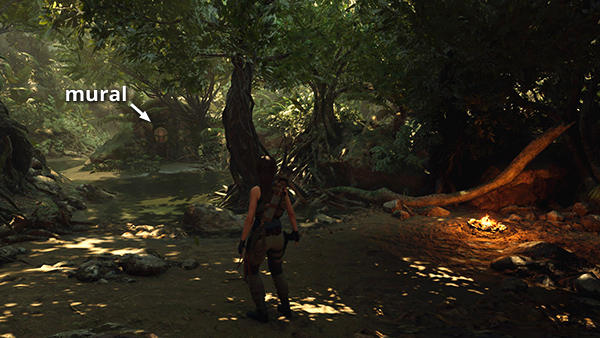
MURAL 1 - Suppay (Pantheon of Gods 2)
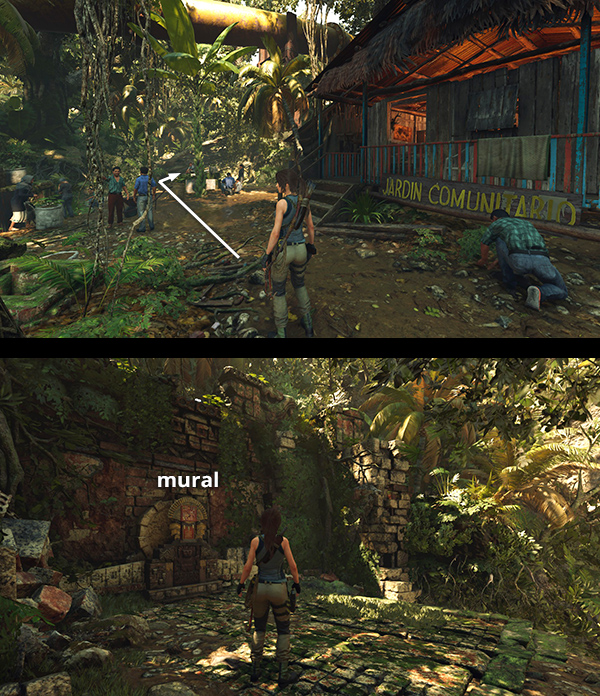
This mural is on the path leading to the side area west of the village. You'll pass it if you do the Invasive Species Side Mission. If you missed it, return to the Kuwaq Yaku Base Camp, head for the Community Gardens house, with the blue and red porch railings, northwest corner of the village. Follow the path to the west. Crawl under the fallen tree and continue along the path. The mural is just ahead on the left. (Click image for more and larger screenshots.)
MURAL 2 - Wayta, the Tyrant (Resting Places)
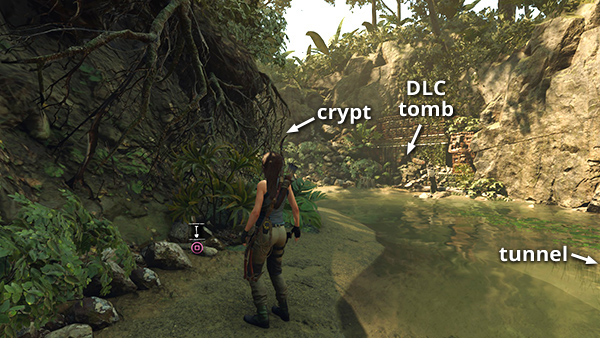
This mural is in its namesake, Wayta the Tyrant's Crypt. Fast travel to the Kuwaq Yaku base camp. Head north across the rusted metal footbridge toward the village. Then jump off the left side of the bridge and follow the river west to the crypt entrance. (screenshot) The mural is in the second room of the ancient building, before the muddy slope leading down to the sarcophagus. Follow the crypt walkthrough if necessary. (Click screenshot to enlarge.)

MURAL 3 - Inti (Pantheon of Gods 2)
This mural is submerged in the river between the village and the Jungle Cliffs Base Camp. If you haven't discovered that camp yet, you can fast travel to the Kuwaq Yaku Base Camp and swim southward from the docks to find the camp and the mural at the same time. (Click screenshot to enlarge.)
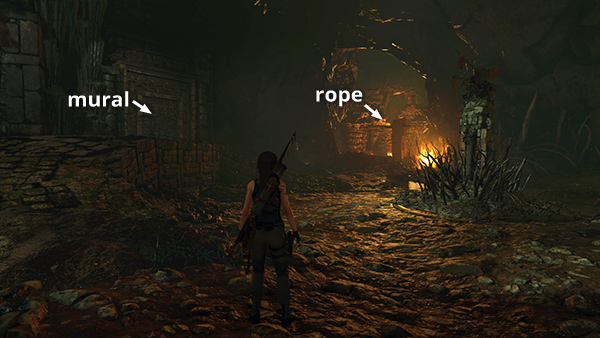
MURAL 4 - Coniraya (Pantheon of Gods 2)
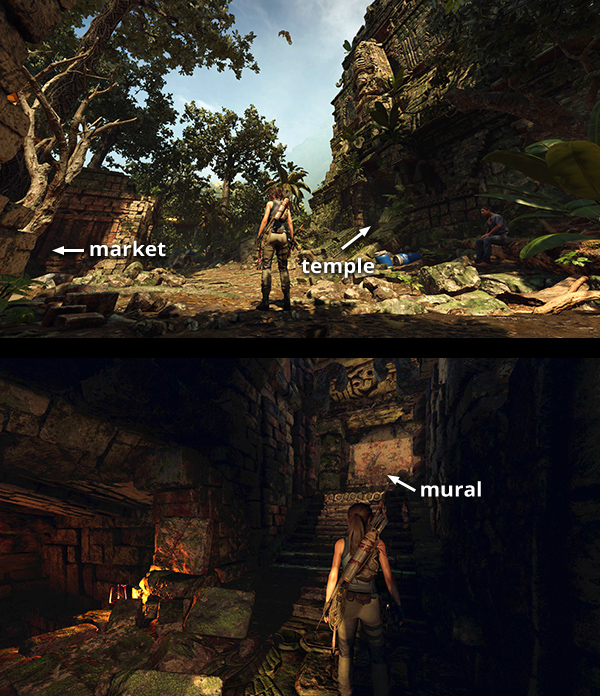
This mural is between the back (north) entrance to the MARKETPLACE and the temple on the north side of the village. As you exit the market, the mural is on the right under an orange awning. The nearest base camps are the Kuwaq Yaku camp, south of the village, and the Kuwaq Yaku Ruins camp, just down the muddy path to the east of the temple and the mural. (Click screenshot to enlarge.)
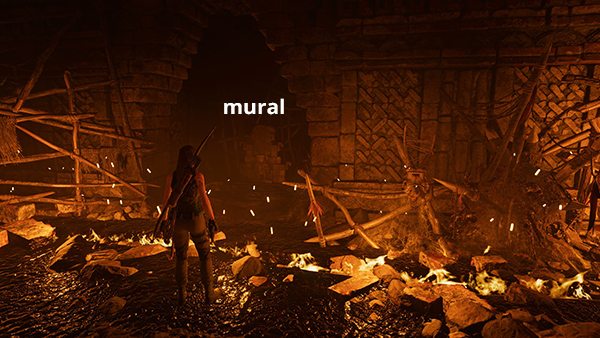
MURAL 5 - Temple of Life (Exodus)
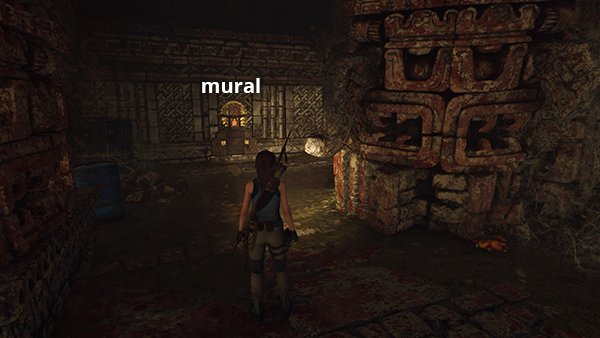
This mural is in the caverns beneath the oil rig, on the way to the Temple of Life. Follow the directions for document #10, above. If you've climbed down the shaft from the surface, the mural is just ahead on the left as Lara emerges from the low, curving tunnel into the area with the flames. If you're coming from the Temple of Life Base Camp, head southwest, across the long, straight walkway above the lava and up the stairs. The mural is in the alcove on the right side of the room, behind the shallow trench full of flaming oil. (Click screenshot to enlarge.)
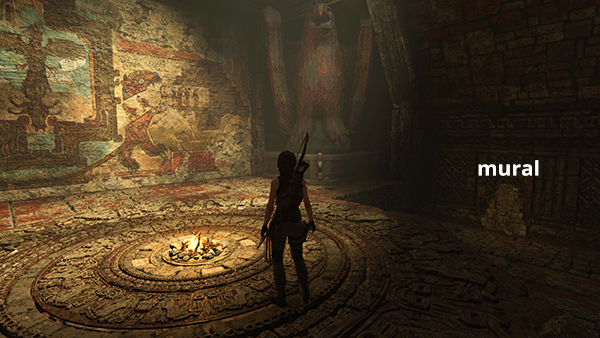
MURAL 6 - God of Suicides (Pantheon of Gods 3)
This mural is on the southeast wall of the large room with the Temple of Life Challenge Tomb. This camp only appears after you complete the level and move on. From here, you can either continue through the flooded cavern to the northeast or use the camp to fast travel away. (Click screenshot to enlarge.)
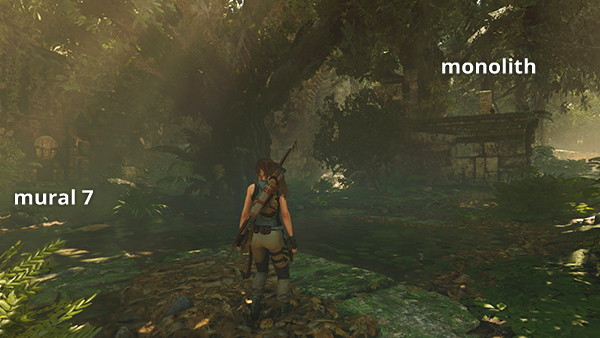
MURAL 7 - Pachamama (Pantheon of Gods 2)
This mural is in the Hunting Grounds north of the village. If you missed it the first time, fast travel to the Kuwaq Yaku Ruins Base Camp, climb the stone steps to the northeast, then drop down into the valley. The mural is just ahead on the north valley wall. (Click screenshot to enlarge.)
MURAL 8 - Howling Caves (Trials of the Gods)
This mural is in the Howling Caves Challenge Tomb. If you missed it the first time, fast travel to the Hunting Grounds or Kuwaq Yaku Ruins Base Camp and head north to the Hunting Grounds, then northeast to the tomb entrance. Dive into the pool and continue through the tunnels to the wolf den. (Follow the tomb walkthrough if necessary. As far as I know, the wolves don't respawn.) The mural is on the west wall of the den. To get out, use the rope line and claimable wall to reach the Petroleum Deposit Base Camp, then fast travel away. (Click screenshot to enlarge.)
NOTE: You can also start at the Petroleum Deposit camp and make your way through the tunnels to the mural, but this is not any faster due to the indirect route.
MURAL 9 - Urcuchillay (Pantheon of Gods 2)
This mural is just east of the Hunting Grounds Base Camp. (Click screenshot to enlarge.)
MURAL 10 - Temple of Death (Exodus)
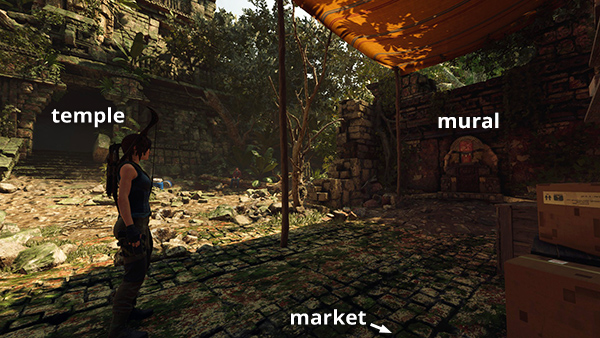
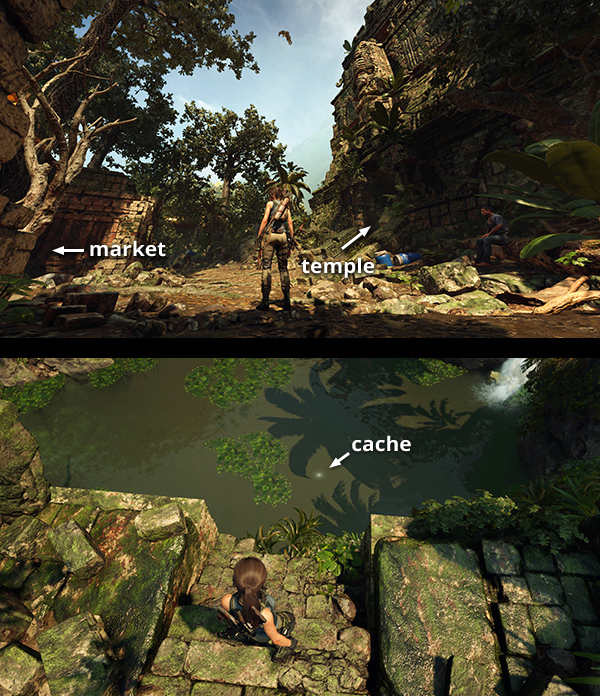
This mural is inside the temple north of the village MARKETPLACE. If you missed it the first time, fast travel to the Kuwaq Yaku Ruins Base Camp and follow the muddy path west to the clearing with the Eagle icon on the in-game map. The temple is here on the right. Go inside and you'll find the mural directly ahead, at the top of the stairs. (Click image for more and larger screenshots.)
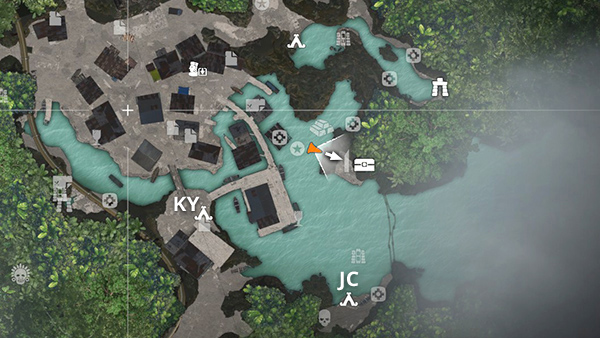
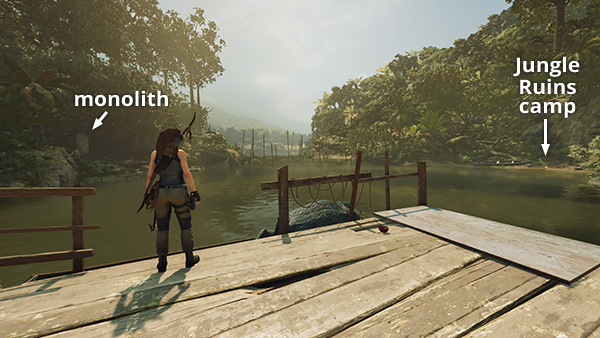
MONOLITH 1 (Proficient Quechua)
This monolith is on the east side of the river near the village, about the same distance from the Kuwaq Yaku Base Camp and Jungle Cliffs Base Camp. Deciphering it provides the clue to find survival cache #4, below. (Click screenshot to enlarge.)
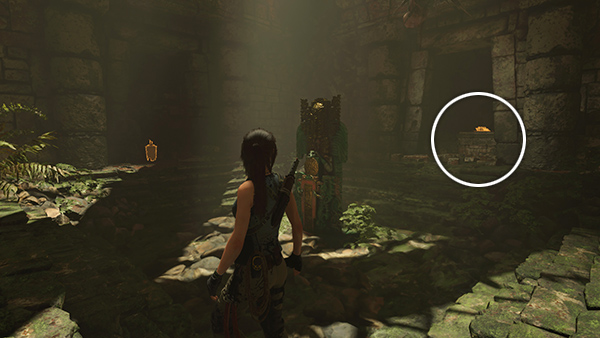
MONOLITH 2 - (Proficient Mam)
This monolith is in the same large room as the Temple of Life Base Camp, which only appears after you've finished the level and moved on. If you fast travel to that camp, you'll find the mural in the northern corner, near the opening in the wall that leads to the stele. Deciphering the monolith provides the clue to find survival cache #9, below. From here, you can either continue through the flooded cavern to the northeast or use the camp to fast travel away. (Click screenshot to enlarge.)
MONOLITH 3 (Fluent Quechua)
This monolith is in the Hunting Grounds north of the village. Lara probably won't understand enough Quechua to read it the first time you pass through this area. Later, fast travel to the Kuwaq Yaku Ruins Base Camp, go up the steps to the northeast, and drop down into the Hunting Grounds. You'll find the monolith on a man-made stone platform about halfway along the valley. Deciphering it provides the clue to find survival cache #14, below. (Click screenshot to enlarge.)

SURVIVAL CACHE 1
The first cache is just outside the entrance to the Crypt of Wayta, the Tyrant. From the Kuwaq Yaku base camp, head north across the rusted metal footbridge toward the village. Then jump off the left side of the bridge and follow the river west to the crypt entrance. (screenshot) The cache is buried on the riverbank a short distance southeast of the tunnel leading into the crypt. (Click screenshot to enlarge.)
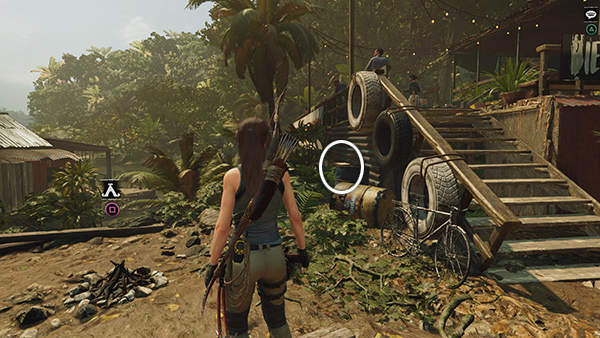
SURVIVAL CACHE 2
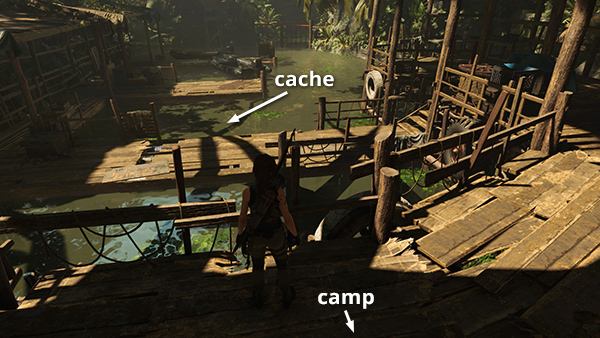
This cache is buried in the sand a few steps to the east of the Jungle Cliffs Base Camp. The first explorer backpack, hidden nearby, reveals the location of this and other caches on your in-game map. (Click screenshot to enlarge.)


SURVIVAL CACHE 3
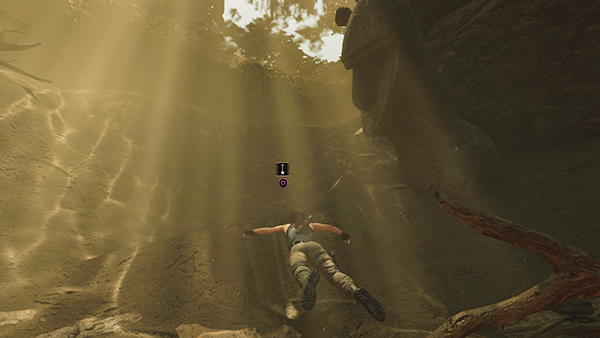
The next cache is just north of monolith #1. If Lara treads water while facing the west side of the monolith, you should be able to spot the cache on a rocky ledge at water level just to the left. (Click screenshot to enlarge.)
SURVIVAL CACHE 4 (Monolith Riches)
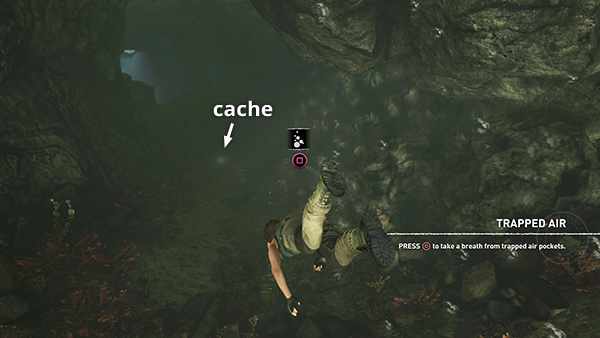
This cache only appears after you've deciphered monolith #1, which requires that Lara be Proficient in the Quechua dialect. Reading the monolith reveals a clue: "Take a deep breath and find me right under another's nose." Swim through the tunnel north of the monolith to find the cache buried on the bottom of the pool near this carved stone head. Check the main walkthrough for details. (Click screenshot to enlarge.)
SURVIVAL CACHE 5
This cache is near the entrance to the second crypt. Fast travel to the Hunting Grounds Base Camp and follow the stream to the southeast, past mural #9, above. Continue along the left bank of the stream until you reach the cache. If you come to the crypt entrance, you've gone too far. Or, if you come through the underwater tunnel from the river near the village, the cache will be directly ahead on the opposite bank of the stream. (screenshot) (Click screenshot to enlarge.)
NOTE: The entrance to the Forge of Destiny Challenge Tomb from the Forge DLC is also nearby.
SURVIVAL CACHE 6
The next cache is buried under the blue-and-tan shack built over the water just northwest of monolith #1. Swim down and around the left side of the wire cage to find it. (Click image for more and larger screenshots.)
SURVIVAL CACHE 7
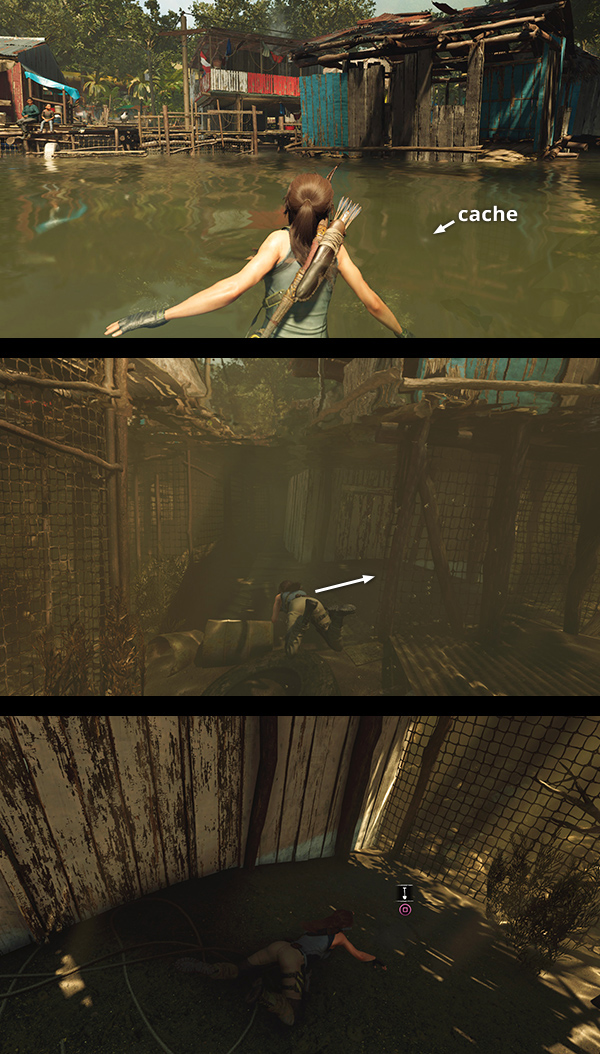
This cache is at the bottom of the pool beyond the temple on the north side of the village. Fast travel to the Kuwaq Yaku Ruins Base Camp and follow the muddy path west to the clearing with the Eagle icon on the in-game map. The temple is here on the right. Go inside and climb the stairs all the way to the top to emerge on the ledge overlooking the pool with the cache. You can't climb back up into the temple, so follow the river northwest to the Docks Base Camp. You can fast travel away from there. (Click image for more and larger screenshots.)
SURVIVAL CACHE 8
This cache is just south of the Docks Base Camp. It's buried on the river bottom beneath the middle dock in the area with the three boat docks where you fought the Trinity soldiers earlier. (Click screenshot to enlarge.)
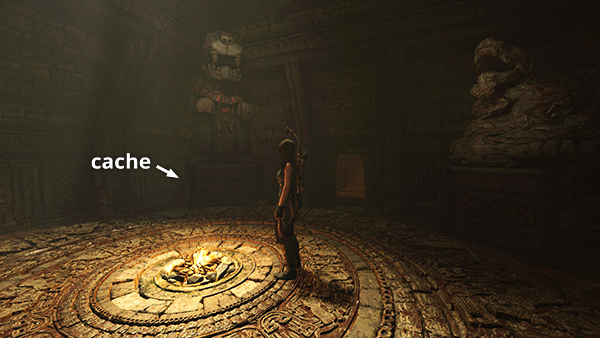
SURVIVAL CACHE 9 (Monolith Riches)
Fast travel to the Temple of Life Base Camp, which only appears after you've finished the level and moved on. You'll find monolith #2 in the northern corner. (screenshot) Reading it reveals a clue: "Two guardians have fangs. Two guardians have feet. One guardian has both to better protect me." The cache is buried in the south corner, behind the jaguar statue, the only one here with both fangs and feet. Now either continue through the flooded cavern to the northeast or use the camp to fast travel away. (Click screenshot to enlarge.)
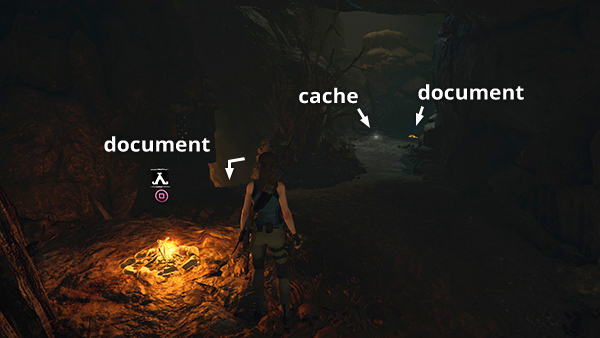
SURVIVAL CACHE 10
This cache is in the flooded cavern with the piranhas, beyond the Temple of Life. If you missed it the first time, you may want to wait until you get the lock pick and return for both the cache and treasure chest #2 at the same time. See the treasure chest notes, above, or follow the walkthrough, which includes screenshots and other details. (Click screenshot to enlarge.)
SURVIVAL CACHE 11
Fast travel to the Kuwaq Yaku Ruins Base Camp and head up the steps to the north. At the top, instead of turning right into the Hunting Grounds, turn left, continue down two shorter flights of steps, and you'll find the cache buried in the corner just ahead on the left. (Click image for more and larger screenshots.)
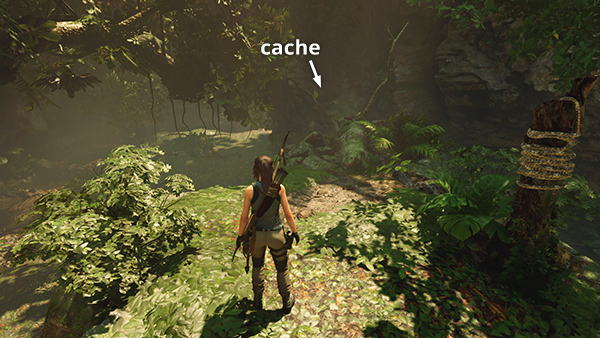
SURVIVAL CACHE 12
This cache is in the Howling Caves Challenge Tomb, at the northeast end of the Hunting Grounds. If you haven't explored there yet, follow the tomb walkthrough. If you've been through the tomb but missed the cache, fast travel to the Petroleum Deposit Base Camp and face south. The cache is just ahead in a dead-end alcove, along with document #17. (Click screenshot to enlarge.)
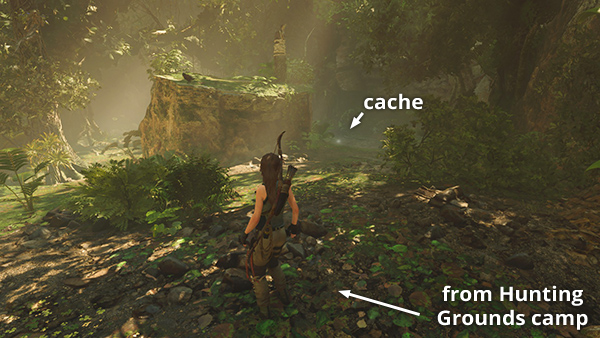
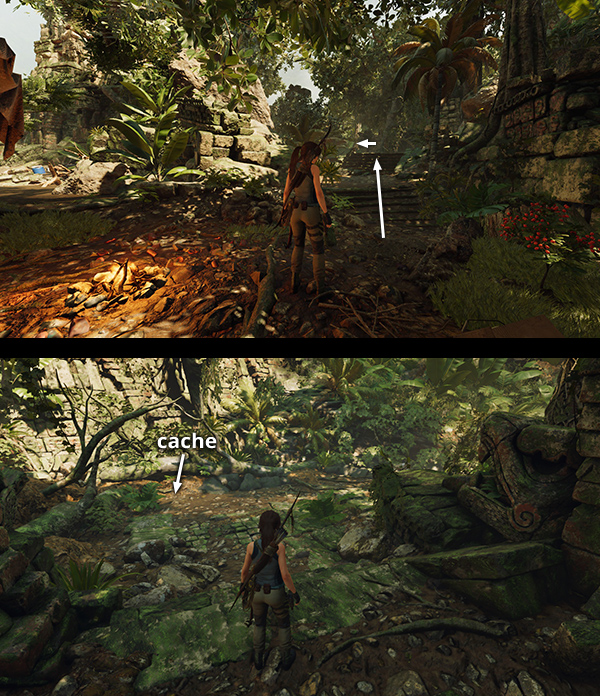
SURVIVAL CACHE 13
This cache is in the Hunting Grounds north of the village. If you missed it the first time, fast travel to the Hunting Grounds Base Camp then follow the path to the north. When you enter the valley, turn right and continue eastward, keeping the valley wall on Lara's right. The cache is buried just beyond the rock outcrop with the rope-wrapped stump but before the fallen tree spanning two rock outcrops. (Click screenshot to enlarge.)
SURVIVAL CACHE 14 (Monolith Riches)
This cache only appears after you've deciphered monolith #3, in the Hunting Grounds. It requires Fluent Quechua, so you'll need to return later in the game to read it and obtain the clue: "I lie silent where arrows once flew, guarding a door which will no longer open." From the monolith, head to the east and climb up near the rope-wrapped post. Cross over the fallen tree to the next ledge, where you'll find the cache near a door riddled with arrows. The walkthrough includes more details. (Click screenshot to enlarge.)
EXPLORER BACKPACK 1
Backpacks are not required for 100% completion, but finding them reveals the locations of other collectibles on your in-game map, so they can be useful. This one is sitting on the riverbank just west of the Jungle Cliffs Base Camp. If you haven't discovered that camp yet, start at the Kuwaq Yaku Base Camp and swim to the south end of the river to find the camp and backpack. Examining it reveals the following items on your in-game map: treasure chest #1; survival caches #2, #5, #6, #7, #8, #10, #11, #13; and both crypt entrances. (Click screenshot to enlarge.)


EXPLORER BACKPACK 2
The second backpack is on the way to the Howling Caves Challenge Tomb. If you missed it, fast travel to the Hunting Grounds or Kuwaq Yaku Ruins Base Camp and follow the path north to the Hunting Grounds. Head for the northeast end of the valley and you'll see the gilded totems indicating the tomb entrance. The backpack is on the left side of the path before the sinkhole leading down into the caverns. Examining it reveals treasure chest #2 and survival caches #1, #3, and #12 on your in-game map(Click screenshot to enlarge.)
ARCHIVIST MAP 1
Archivist Maps are also not required for 100% completion, but examining them can help you locate other collectibles. This one is inside one of the shacks built on the docks above the river in the village. Fast travel to the Kuwaq Yaku Base Camp. Then cross the wooden docks to the northernmost house—the one with blue-striped siding. Jump from the dock to grab the cloth-draped railing and climb up to find the map inside. Examining it reveals the following items on your in-game map: relic #4; documents #12, #16, and #18; monolith #1; murals #3, #5, #6, #7, #8, #9, and #10. (Click screenshot to enlarge.)

ARCHIVIST MAP 2
The second map is in the Crypt of Wayta, the Tyrant. From the Kuwaq Yaku base camp, head north across the rusted metal footbridge toward the village. Then jump off the left side of the bridge and follow the river west to the crypt entrance. (screenshot) The map is in the first man-made room, just beyond the flammable barrier, sitting on a stack of pipes in the northeast corner. Follow the crypt walkthrough if necessary. Examining this map reveals a number of collectibles on your in-game map: relics #1 and #3; documents #1, #2, #3, #6, #7, #9, #10, #13, #14, and #15; murals #4; monolith #2. (Click image for more and larger screenshots.)
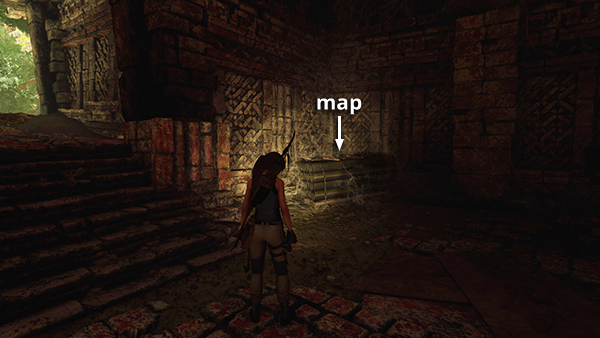
ARCHIVIST MAP 3
The last archivist map is in the caverns beneath the oil rig, on the way to the Temple of Life. Later in the game, you can reach it from the Docks or Temple of Life Base Camp. See document #10, above, for details. The map is on one of the crates in the area with the modern equipment and dead Trinity soldiers. Examining it reveals the following items on your in-game map: relic #2; documents #4, #5, #8, #11, and #17; murals #1 and #2; and monolith #3. (Click screenshot to enlarge.)
Other Artifacts
In addition to the collectible documents and relics listed above, certain artifacts and photos are added to Lara's collection automatically as you play through the game. These are mentioned at the relevant points in the main walkthrough and on the page with All Artifacts Listed by Story/Dialect.
Photo: Path to the Hidden City (Path of the Stars) - story progression
Artifact: Copal (A Community in Need) - inside treasure chest #1
Artifact: Inti Statuette (The Resistance) - inside treasure chest #2
Challenges | Walkthrough | Collectibles Guides | Main SOTTR Page
†UPDATE HISTORY: 6/2/19 - Page first posted online.
10/6/19 - Corrected references to the Jungle Cliffs Base Camp, which I had mistakenly labeled "Jungle Ruins". Thanks to Robert for the heads-up.
9/25/21 - Added the specific collectibles revealed by examining the Explorer Backpacks and Archivist Maps. I'm fairly confident but not 100%
sure about these. It can be difficult to reach the packs and maps without passing close enough to other collectibles to mark them on the in-game map.
WAS THIS WALKTHROUGH HELPFUL? If not, I apologize and invite you to contact me with any questions. If you need help right away, I recommend the r/TombRaider subreddit. Other fan-run forums are listed at tombraiders.net/stella/community.html. If this site was useful, please consider supporting it financially or in other ways. For details, visit tombraiders.net/stella/support.html. As always, I welcome your corrections/suggestions. Thank you!
Copyright © Stellalune (). All rights reserved. Feel free to copy or print this walkthrough for personal use. By all means, share it with friends, but please include this credit line so people can send me their feedback. No part of this walkthrough may be reproduced on another site without permission. Follow this link for details about this site's advertising and privacy policy.
Stella's Tomb Raider Site: tombraiders.net.