TOMB RAIDER 2013 Quick Guide to All GPS Caches (Part 2)
Updated: 8/13/13(†)
Collectibles Intro | Documents | Relics | Treasure Maps | Challenges
WARNING: This page contains spoilers. No major plot points are revealed, but you will learn more about the various levels and Yamatai's backstory if you read ahead.
This is the second page of a 2-page section on GPS Caches. Part 1 includes an introduction and covers the Coastal Forest through Base Exterior.
Shantytown (15)
Of the 15 GPS caches in Shantytown, 5 are hidden in the area before the Ancient Gate, the remaining 10 after. [Level Maps: Part 1 |Part 2 ]
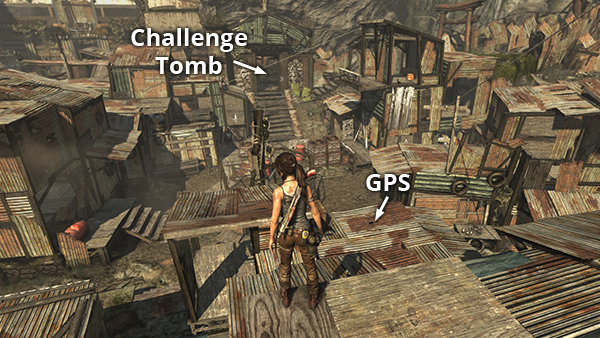
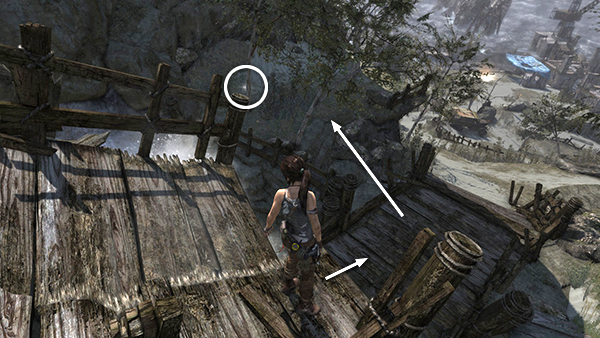
GPS Cache 1
This cache is shown on the part 1 map. It's inside one of the shacks near the middle of the first area, below Helicopter Hill. This screenshot shows a rooftop view of where the cache is located. Naturally you'll need to drop down to ground level to get inside. See here for details. (Click screenshot to enlarge.)

GPS Cache 2
This cache is also shown on the part 1 map. It's sitting just inside the tunnel leading to the Well of Tears Challenge Tomb. See here for details. (Click screenshot to enlarge.)
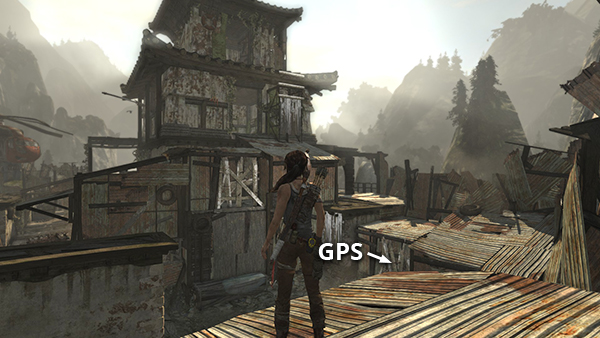
GPS Cache 3
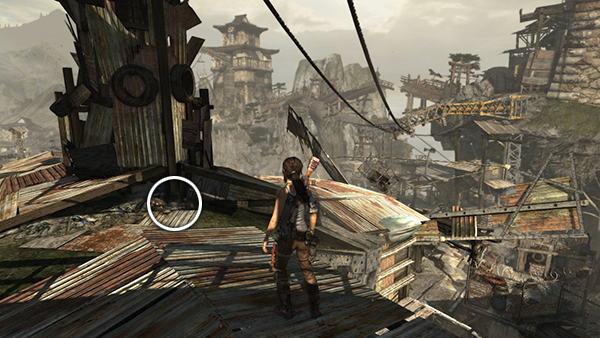
This cache is located on the lower level of the tall tower with the tattered canopy on the west side of the first area. It's marked on the on the part 1 map. See here for details. (Click screenshot to enlarge.)

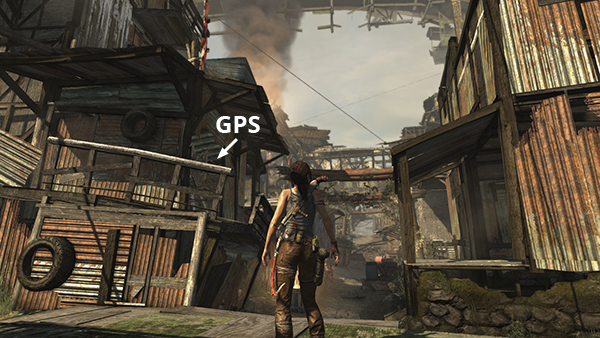
GPS Cache 4
This cache is also shown on the part 1 map. It can be found behind a boarded-up doorway below and to the south of the tall, traditional Japanese-style building. See here for details. (Click screenshot to enlarge.)
GPS Cache 5
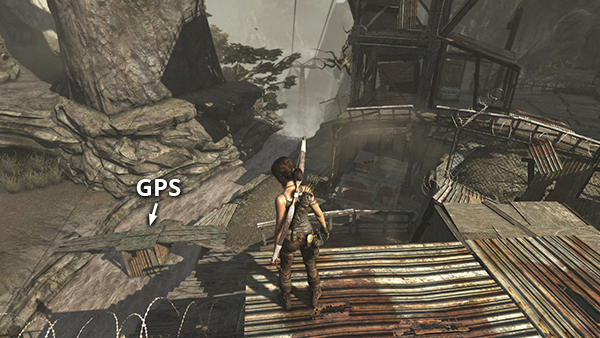
On the street with the painted arches leading up to the Ancient Gate, the first building on the left contains this cache. It is behind the plank-and-barbed wire barrier on the lower level. It is also labeled on the part 1 map and covered in the walkthrough. (Click screenshot to enlarge.)
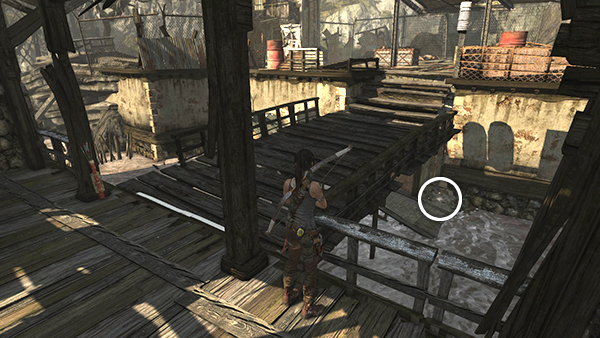
GPS Cache 6
This cache is marked on the part 2 map. It's concealed in a pile of discarded bottles below the wooden bridge leading to the area where Lara meets up with Grim. See here for details. (Click screenshot to enlarge.)
GPS Cache 7
This cache is also shown on the part 2 map. It can be found in the southwest corner of Shantytown, in the area downstream from where you first encounter Grim. It's below the little makeshift bridge spanning the stream. See here for details. (Click screenshot to enlarge.)
GPS Cache 8
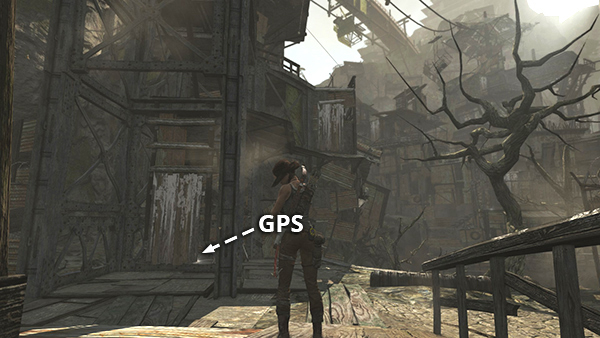
This cache is in the same area as #7, in the southwest corner of Shantytown. It's in the alcove with the plank barriers just around the corner from where you climb up to engage the Solarii near the windmill. Check the part 2 map and walkthrough for details. (Click screenshot to enlarge.)
GPS Cache 9
Before scrambling up to the building with the windmill, go around to the right to find this GPS cache lying on the ground. See here and check the part 2 map for details. (Click screenshot to enlarge.)
GPS Cache 10
This cache is located on the rooftop of the big building with the windmill and cargo-hauling machinery. See here for details and/or reference the part 2 map. (Click screenshot to enlarge.)
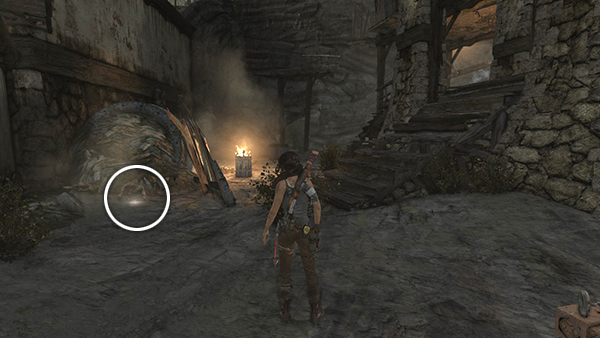
GPS Cache 11
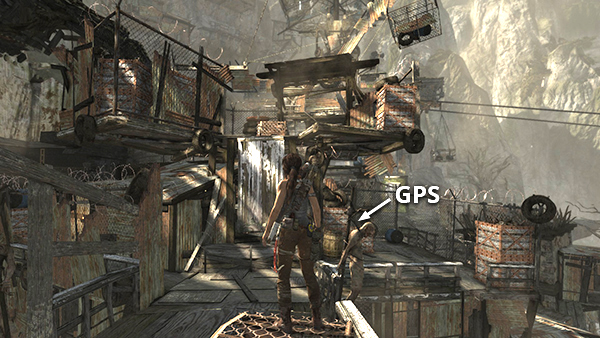
This cache can be found on the ground level of the building with the windmill and cargo-hauling machinery. It's sitting in a pile of junk and body parts in the southwest corner of that area. See here and the part 2 map for details. (Click screenshot to enlarge.)
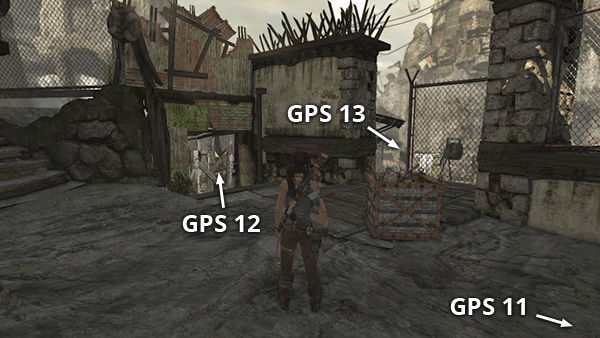
GPS Cache 12
This cache is not far from the previous one. Once you have #11, turn around, shoot out the plank barrier with your shotgun, and go through to the fenced area beyond to find several goodies, including the GPS cache. See here and the part 2 map for details. (Click screenshot to enlarge.)
GPS Cache 13
This cache is visible through the fence from the area below the Ancient Gate Day Camp, but you can't reach it until you get inside the building with the windmill and cargo-hauling apparatus. Go through the gap in the fence shown in the #12 screenshot (above) and drop down to find this cache lying in the corner. See here and the part 2 map for details. (Click screenshot to enlarge.)
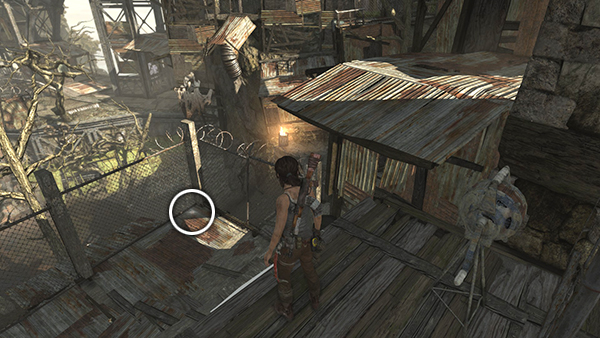

GPS Cache 14
This cache is in the basement of the building with the windmill and cargo-hauling machinery, near the cylindrical cage with the 5 salvage nets inside. The cache is on the ledge near the opening leading back to the area with the moving cargo cages. See here for details and check the part 2 map if necessary. (Click screenshot to enlarge.)
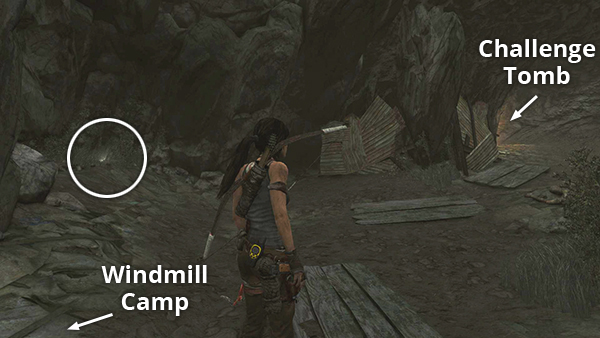
GPS Cache 15
This cache is also shown on the part 2 map. Starting at the Windmill Base Camp, enter the tunnel leading to the Chamber of Judgment Challenge Tomb. Proceed just until the tunnel widens and look to the left to spot the cache hidden near the wall in a tuft of grass. You may need to use Survival Instinct to spot it. See here for details. (Click screenshot to enlarge.)
Geothermal Caverns (5)
The 5 GPS caches in this level are scattered just about evenly throughout. If you missed any the first time through, just fast travel back to the Catacombs Base Camp and use these tips to find what you need. [Level Map]
GPS Cache 1
This cache is found in the area called "The Pit," where the prisoners are kept. There are two tunnel openings on the west side of this cave. Enter the one on the left with the billowing gas. Kill the prisoner who jumps out at you. Then climb onto the ledge to get the GPS cache. See here for details. (Click screenshot to enlarge.)
GPS Cache 2
This cache is also found in the area known as "The Pit." It's inside the horseshoe-shaped tunnel on the north side of the cave—the one with the prisoner cages lining one wall. The cache is about halfway along the tunnel, lying on the ground. See here for details. (Click screenshot to enlarge.)
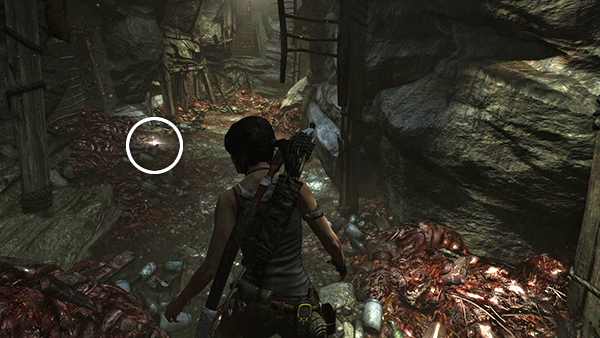
GPS Cache 3
This cache is sitting on the ground on the right (south) side of the tunnel where you kill the first group of Solarii. See here for details. (Click screenshot to enlarge.)
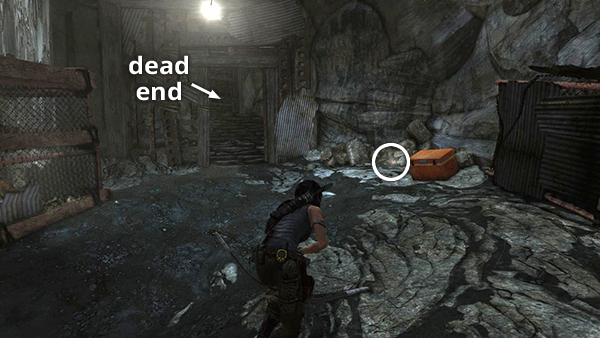
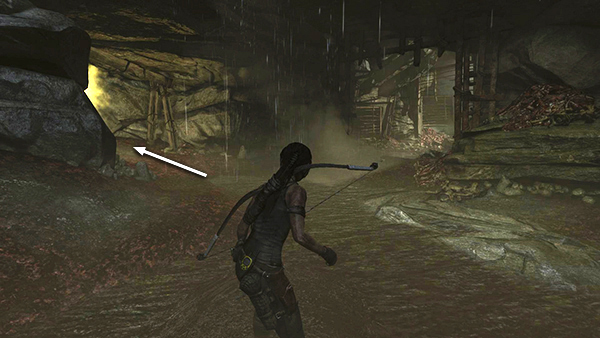
GPS Cache 4
This cache is located at the north end of the cave beyond the Catacombs Base Camp, in the area below the climbing wall. There's a metal door here with a dead end beyond. The cache is just to the right of this door. See here for details. (Click screenshot to enlarge.)
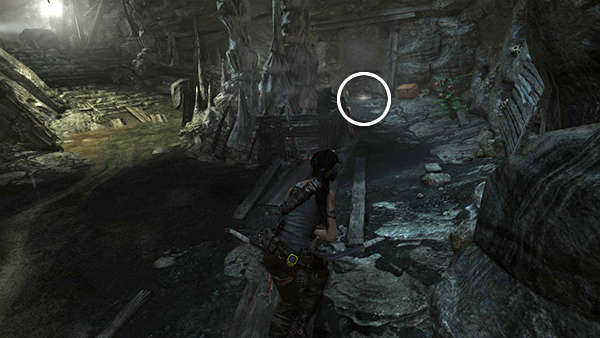
GPS Cache 5
This cache is found in the ritual chamber. It's at the top of the stone steps, just around the corner from the gas valve you need to turn in order to blast open the exit. See here for details. (Click screenshot to enlarge.)
Summit Forest (5)
There are 5 GPS caches in this area. Most are hidden at the south end of the forest, but there is also one near the start and one near the level exit. [Level Map]
GPS Cache 1
The first cache is found in the clearing with the crashed helicopter. It's tucked away in the marshy area to the left of the path leading down to the main forest. See here for details. (Click screenshot to enlarge.)

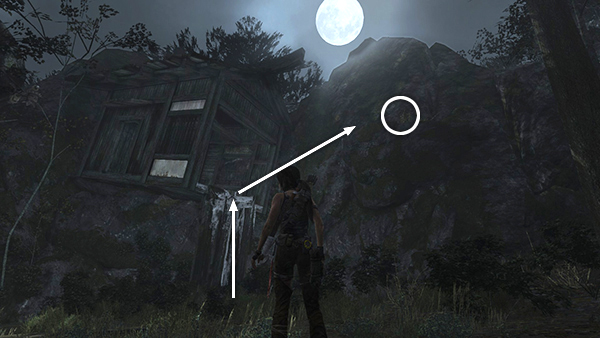
GPS Cache 2
This cache is in the southwest corner of the main forest area. See here for details. When you pull down the wooden beam supporting the hut built into the cliff wall, climb up into the hut, and immediately turn around to spot the cache sitting on the ledge ahead. (Click screenshot to enlarge.)
GPS Cache 3
This cache is sitting on another high ledge at the south end of the forest. It's a rather complicated climb to reach it, so refer to the walkthrough if necessary. (Click screenshot to enlarge.)
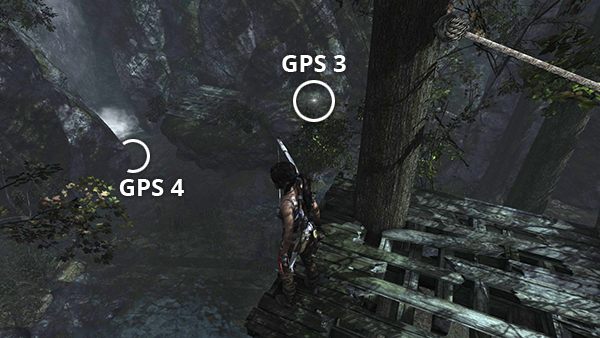
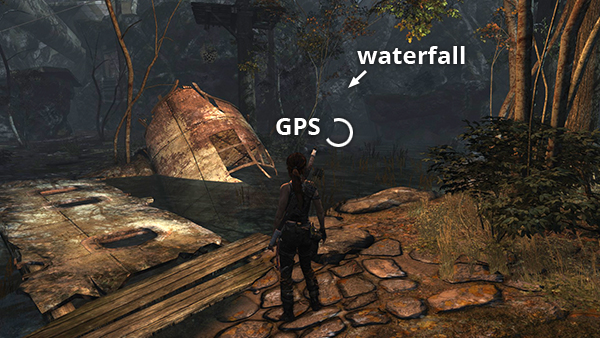
GPS Cache 4
The 4th cache is sitting in the pool near the waterfall at the southern edge of the forest. It's shown from ground level in this screenshot and from above in the screenshot for GPS cache #3, above. See here for details. (Click screenshot to enlarge.)
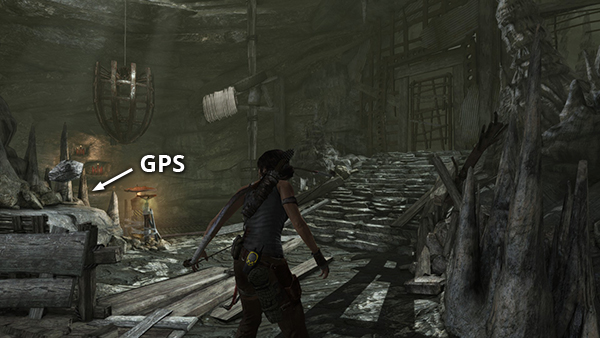
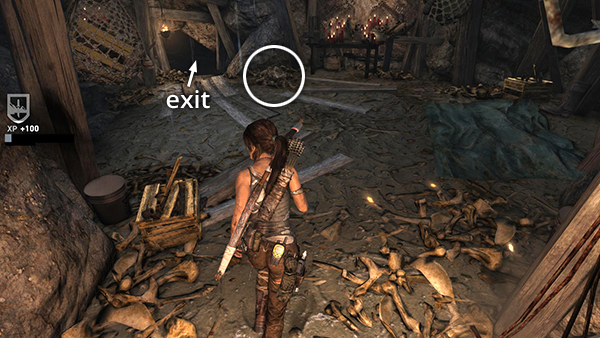
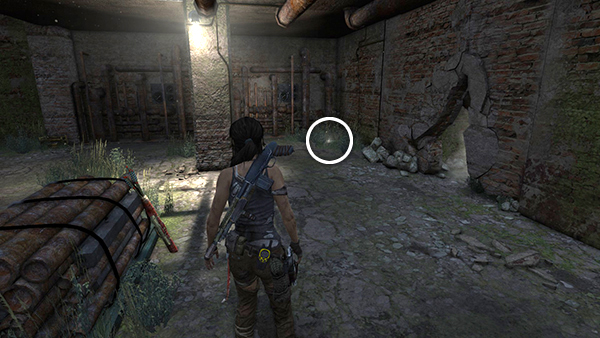
GPS Cache 5
The last cache is found near the end of the level, in the room above the cave with the wolf cages. It's sitting in a pile of rubbish just to the right of the tunnel that leads to the exit. See here for details. (Click screenshot to enlarge.)
Shipwreck Beach (15)
This is one of the larger levels in the game, with plenty of room to conceal 15 GPS caches. Twelve of these can be obtained on your first visit. Three are only accessible on the second visit, after you return from the Endurance wreck. If you miss anything, you can get it when you come back the third time, following the Research Base level, or later via fast travel. [Level Maps: First Visit | Second Visit]
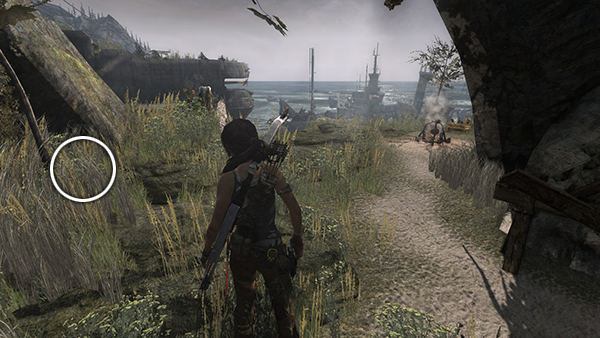
GPS Cache 1
This cache is shown on the part 1 map. It's close to where you enter the beach from the Gondola Transport level. After jumping down across the stream, look to the left to spot the cache. Or, if you're coming back up the path from the beach, this ledge will be on the right, as shown here. See the walkthrough for details. (Click screenshot to enlarge.)
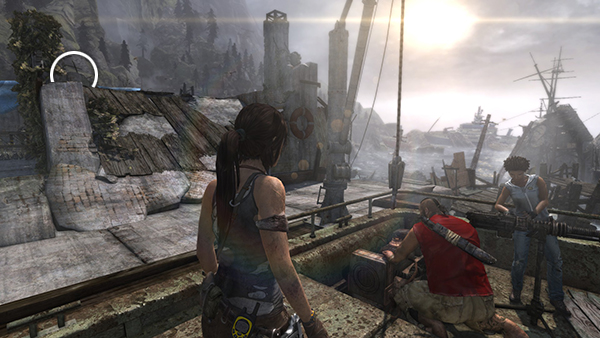
GPS Cache 2
This cache is also shown on the part 1 map. It's sitting on top of the building where you find Reyes's note about Lara. After talking to the crew on the PT boat, just move up the slope onto the roof and you'll spot the cache. See here for details. (Click screenshot to enlarge.)
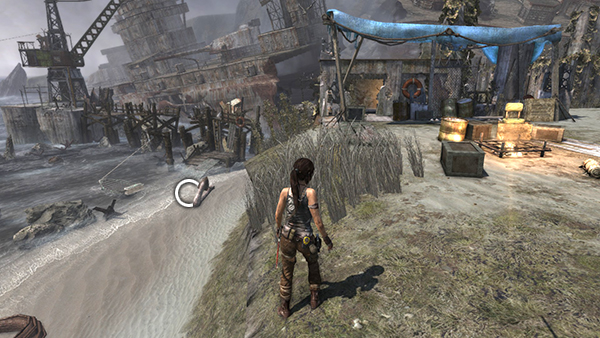
GPS Cache 3
This cache is sitting on the beach below the Survivors' Camp. Look for the large anchor partially buried in the sand and you'll find the cache nearby. See here and check the part 1 map for details. (Click screenshot to enlarge.)
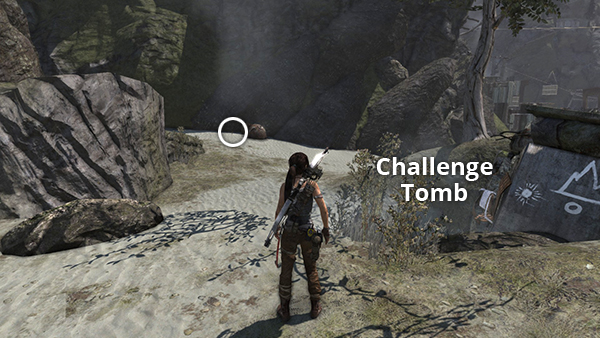
GPS Cache 4
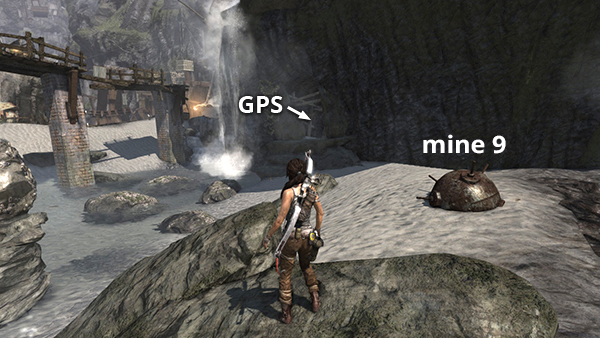
This cache is a short distance northeast of the Survivors' Camp. It's sitting on the sand next to the 5th mine for the Mine Sweeper Challenge, just beyond the entrance to the Temple of the Handmaidens Challenge Tomb. See here for details and/or check the part 1 map. (Click screenshot to enlarge.)
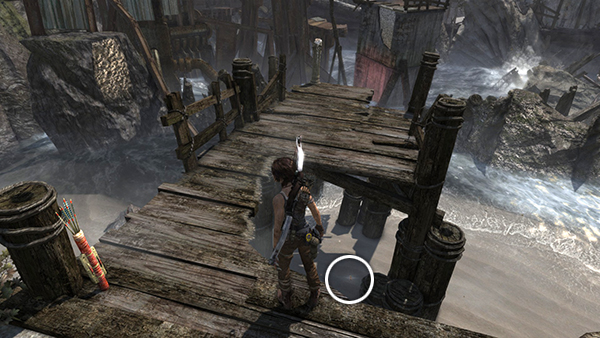
GPS Cache 5
After Lara obtains the Compound Bow, you'll set out toward the Endurance wreck. As you move to the end of the wooden pier northeast of the Survivors' Camp, look down through the hole in the pier to spot this cache sitting in the sand. See here for details or refer to the part 1 map. (Click screenshot to enlarge.)

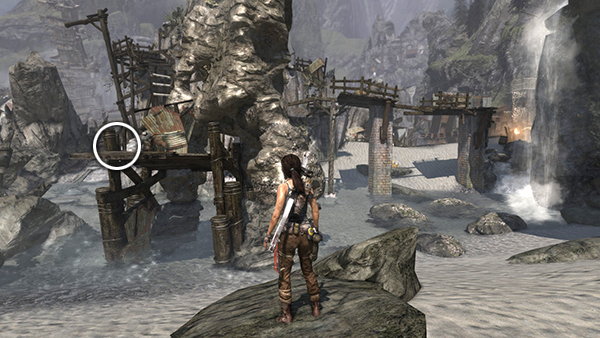
GPS Cache 6
This cache is marked on the part 1 map. It's sitting on a high ledge on the cliff between the pier and the multi-level shipwreck east of the Survivors' Camp. Check the walkthrough if you're having trouble finding it. (Click screenshot to enlarge.)
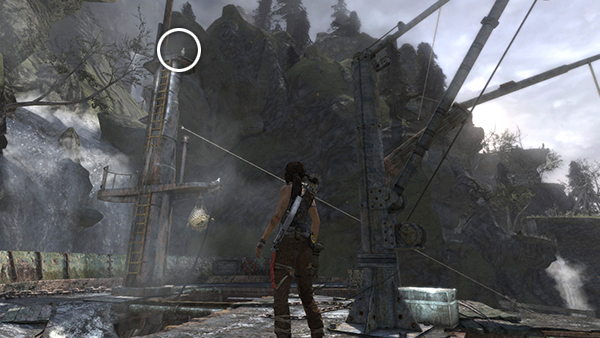
GPS Cache 7
This cache is at the top of the mast on the multi-level shipwreck east of the Survivors' Camp. It's shown on the part 1 map. Refer to the walkthrough if you need help reaching it. (Click screenshot to enlarge.)
GPS Cache 8
This cache is sitting on the wooden pier above the tide pool at the base of the tower you must climb to reach the Flooded Vault Challenge Tomb. It's possible to jump directly onto the pier (as shown here), but if you're having trouble doing that, there's an alternate method later in the walkthrough (here). (Click screenshot to enlarge.)
GPS Cache 9
This cache is in the same area as #8. There's a small cave next to the waterfall that feeds the tide pool. Go inside and you'll find the cache, along with some ammo. See here and check the part 1 map for details. (Click screenshot to enlarge.)
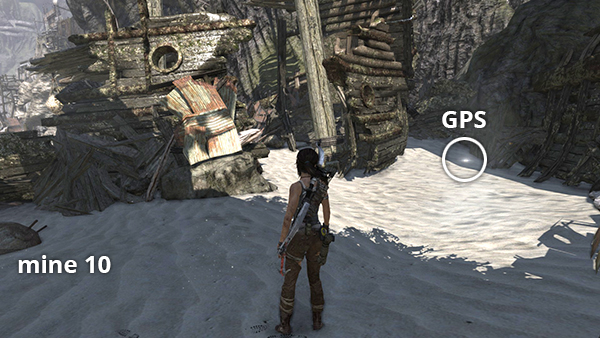
GPS Cache 10
This cache is at the far eastern end of the beach. From the tide pool where you found GPS caches #8 and #9, follow the path along the cliff to the southeast as far as you can go. When you reach a dead end, turn around and you'll spot the cache sitting at the base of the cliff. See here for details and/or reference the part 1 map. (Click screenshot to enlarge.)
GPS Cache 11
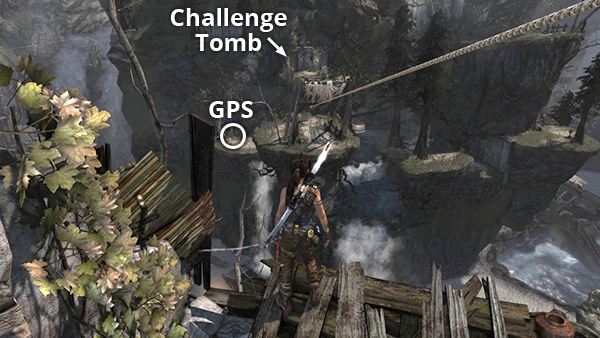
After climbing the tower and sliding down the zip line to the grassy ledge below the Flooded Vault Challenge Tomb entrance, instead of immediately climbing up, jump down to the ledge on the left to find this cache. Check the walkthrough and the part 1 map for details. (Click screenshot to enlarge.)
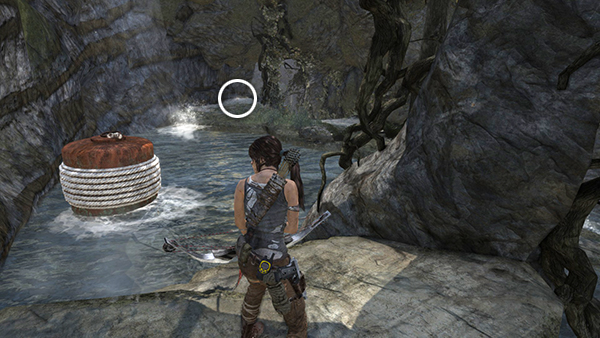
GPS Cache 12
This cache is not far from the previous one. Once you have #11, go through the sheltered area with the little pool and the rope-wrapped float to find this cache on the grassy bank on the left. See here and check the part 1 map if necessary. (Click screenshot to enlarge.)
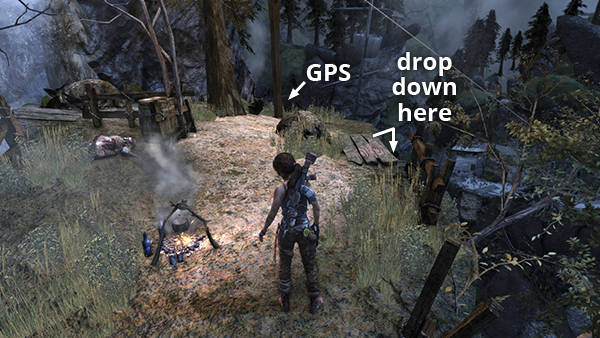
GPS Cache 13
This cache is not accessible until you return to Shipwreck Beach from the Cliffside Bunker. When you come to the Grotto Day Camp, high above the south end of the beach, drop down off the wooden ledge near the campfire to find this cache. See here and the part 2 map for details. To get back to this area from the Survivors' Camp, see here. (Click screenshot to enlarge.)
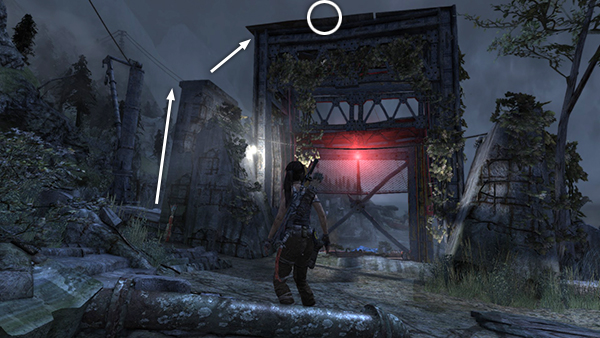
GPS Cache 14
The last two caches are not accessible until after you return from the Cliffside Bunker and begin your ascent to the Research Base. This one is sitting on the metal roof of the elevator shaft. Check the walkthrough and part 2 map for details. (Click screenshot to enlarge.)
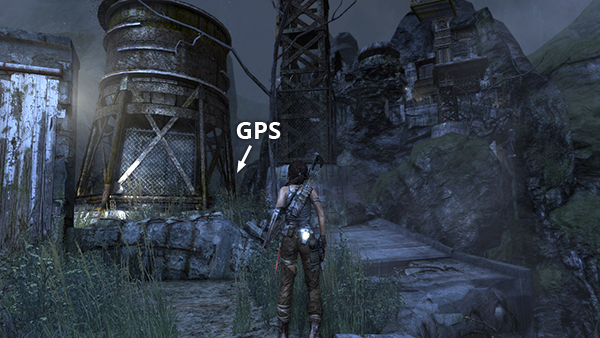
GPS Cache 15
This cache is also on the way up to the Research Base. It's hidden behind the water tower on the same ledge where you find the document written by Dr. Whitman. Again, see the walkthrough and part 2 map if you need more info. (Click screenshot to enlarge.)
Cliffside Bunker (5)
If you miss any of the GPS caches in this level the first time, it is possible to return later; however, since there is no fast travel camp here, you'll have to go to Shipwreck Beach and then head for the Bunker on foot, as described in the walkthrough. [Level Map]
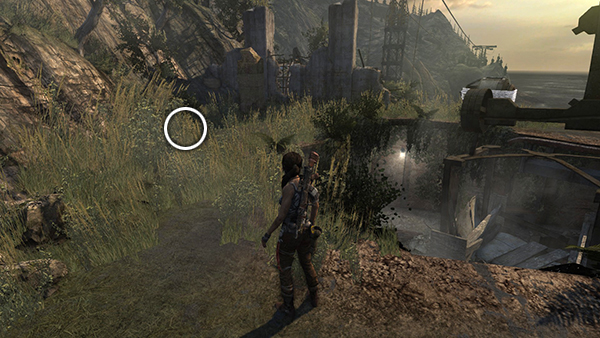
GPS Cache 1
The first cache is sitting on the ground in the tall grass where you emerge from the tunnel connecting to Shipwreck Beach. The Bunker Vista Day Camp is just ahead on the right. See here for details. (Click screenshot to enlarge.)
GPS Cache 2
This cache is lying on the floor on the lower level of the big room where you fight the squad of Solarii. It's in the southern corner; i.e., to the left of the tunnel where you entered if you're facing the opening. See here for details. (Click screenshot to enlarge.)
GPS Cache 3
This cache is on the roof of the bunker, hidden in the grass in the eastern corner. Check the walkthrough you need more help finding it. (Click screenshot to enlarge.)
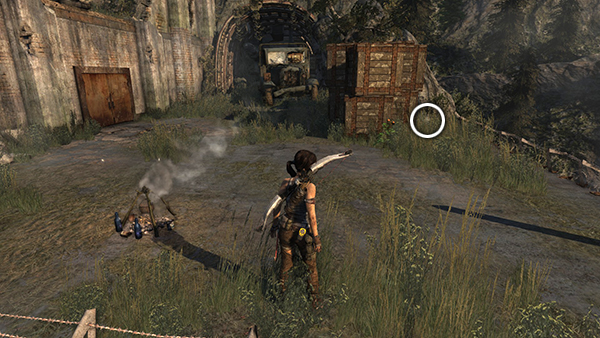
GPS Cache 4
This cache is on the wide ledge with the Endurance Overlook Base Camp. Its near the edge behind the stack of large, wooden crates. See here for details. (Click screenshot to enlarge.)
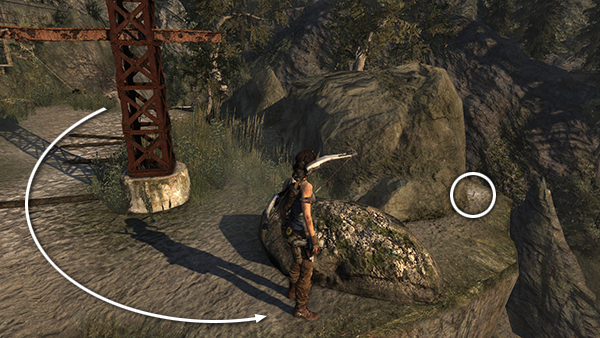
GPS Cache 5
The last cache is on the grassy plateau just before you slide down the zip line onto the Endurance. It's sitting close to the edge, behind a large boulder. See here for details. (Click screenshot to enlarge.)
Research Base (3)
If you've found all the others GPS caches in the game so far and then obtain the 3 caches in this level, you'll also receive a bonus document from the "GPS Secrets" set. See the walkthrough for details. [Level Map]
GPS Cache 1
This cache is in the tunnel leading from the level entrance into the base. It's on the left as you follow the stream from the spot where you first drop down. See here for details. (Click screenshot to enlarge.)

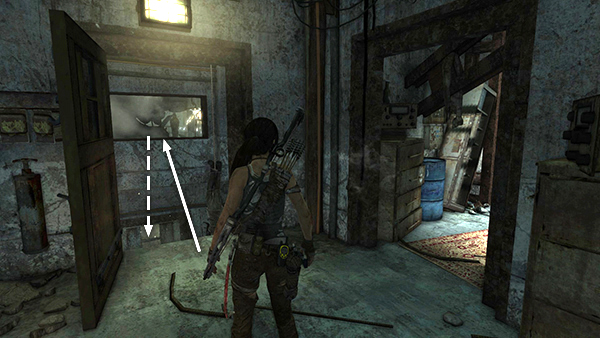
GPS Cache 2
In the room with the Research Lab Base Camp, pry open the metal door in the southwest corner. Then jump across the partially flooded hallway to grab the windowsill on the opposite wall. Lara will automatically pull up through the opening and drop down on the other side to find the GPS cache. See here for details. (Click screenshot to enlarge.)
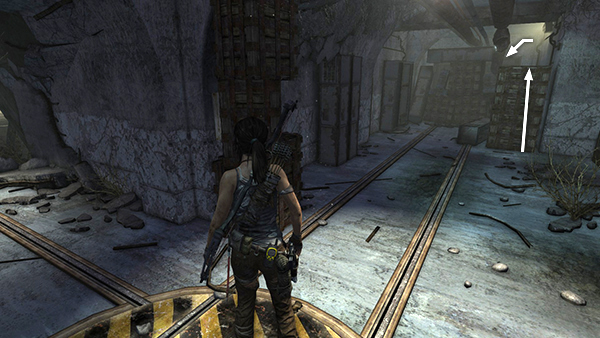
GPS Cache 3
This cache is in the hallway with the metal tracks beyond the elevator shaft, at the northwest corner of the level. You'll need to climb over the stacked boxes to reach that end of the hallway and discover the cache. See here for details. (Click screenshot to enlarge.)
GPS Caches Part 1 | Collectibles Intro | TOMB RAIDER Walkthrough | Main Page
†UPDATE HISTORY: 8/13/13 - Page first posted online.
WAS THIS WALKTHROUGH HELPFUL? If not, I apologize and invite you to contact me with any questions. If you need help right away, I recommend the r/TombRaider subreddit. Other fan-run forums are listed at tombraiders.net/stella/community.html. If this site was useful, please consider supporting it financially or in other ways. For details, visit tombraiders.net/stella/support.html. As always, I welcome your corrections/suggestions. Thank you!
Copyright © 2013- Stellalune (). All rights reserved. The screenshots and videos included here were made using Fraps. Feel free to copy or print this walkthrough for personal use. By all means, share it with friends, but please include this credit line so people can send me their feedback. No part of this walkthrough may be reproduced on another site without permission. Follow this link for details about this site's advertising and privacy policy.
Stella's Tomb Raider Site: tombraiders.net.