STELLA'S TOMB RAIDER 2 REMASTERED WALKTHROUGH
The TR2 Remastered guide is now complete. For the other guides that have not yet been updated, I will continue to link to the ORIGINAL WALKTHROUGHS, which cover all the basics. Please check the introductory notes at the start of the first level for info on my process, modern vs. classic tank controls, etc. This guide covers most but not all possible achievements/trophies. Follow this link for the archived classic guide.
LEVEL 9: LIVING QUARTERS (Remaster)
Updated: 8/1/26(†)
Pickups: 16, including 1 key and 3 secrets
Kills: 21
NOTE: The number of pickups includes the three dragon statuettes and the bonus items awarded for finding all three secrets. Also, the regular pickups in this level will include the HARPOON GUN, AUTOMATIC PISTOLS, SHOTGUN, and UZIS if you don't have them.
LEVEL MAP by VGCartography (used with permission)
Living Quarters Video Walkthrough by Eldincy‡
OBJECTIVES: Swim into a new section of the sunken ship, the engine room. Make your way through a series of side areas, including a room with lit burners, to the top of the engine room. Use a switch to flood the burner room so you can swim through to a previously unreachable area. Continue through another underwater cave to yet another passenger area. Locate the Theatre Key and use it to enter—you guessed it—the theatre! Press a button here to flood a pit in one of the previous passenger areas. Return there and swim across to the next level.
SEAFLOOR: You begin underwater where you left off a moment ago. Swim through the rusty metal opening and around to the left. Pull the lever on the rusty wall to open a trapdoor in the ship's hull. Roll and swim away from the lever and up through the trapdoor. (screenshots)
SHIP'S HULL/ENGINE ROOM: Climb into the ship, advance to the left, and shoot the guy with the club (1) who approaches from the far end of the room. Take his small medi pack (1) and go through the doorway he came from. You're now in the Maria Doria's engine room. The tall pillars seem to be giant pistons. Turn left, go to the far end of the room, vault onto the low ledge, and then climb onto the angled ledge separating the two sides of the room. The camera shifts to draw your attention to the switch in the alcove above, but you can't reach it yet. Hop down on the other side of the room. (screenshots)
Enter the rusty metal passageway below the switch and follow it through several twists and turns. When you come to a rectangular hole in the floor, hop down on the left side of the opening, pull out your weapons, and proceed cautiously to draw out 2 bad guys (2-3) one at a time. The first has a wrench, the second a gun. Do not run forward or you'll trip a rolling barrel trap at the T-intersection. Once you've dealt with the enemies, take their harpoons and automatic pistol clips (2-3). (screenshots)
NOTE: If you missed the HARPOON GUN and/or AUTOMATIC PISTOLS in earlier levels, you'll get them here instead of ammo.
Run forward to trigger the rolling barrels and then hop back out of the way. Draw weapons and stay alert. As the barrels land in the doorway another bad guy (4) rushes in and tries to club Lara. Put him down. Then move past the barrels into the room on the left. More barrels roll down the right side of the ramp, but you can easily avoid them. (screenshots)
BURNER ROOM: Note the lever high on the wall next to the entrance. It opens the door on the opposite side of the room, but it only works underwater, and you can't reach it yet. For now, go to the top of the ramp and face the leftmost burner. Take a running jump to grab the horizontal shelf that runs along above the burners. Traverse to the right, drop down beyond the burners, and use the switch to turn off the flames. (screenshots)
PISTON SWITCH: Climb into the small room above and to the left of the switch. Pull up into into the passageway above the short ladder and continue to a small room with a hole in the floor. Don't drop down yet. Use the switch to reposition the pistons back in the ENGINE ROOM. (At this point, you may hear an enemy moving around on the other side of the wall. You'll meet him in a bit.) Face the switch as you drop through the opening in the floor into the rusty passageway below. The ENGINE ROOM is just ahead. (screenshots)
ENGINE ROOM (again): Now that you've rearranged the pistons, you can make your way across them. Start by climbing onto the angled ledge separating the two sides of the room. Walk to the edge and take a standing jump to grab the first piston; pull up. (You can see that switch high up on the left again, but you still can't reach it.) Walk to the edge of the first piston and take a standing jump to grab the second piston; pull up. Take a running jump over the third piston to grab the edge of the fourth and pull up. A thug with a shotgun (5) is waiting in the corridor ahead. You can probably take him out from here. If you don't see him right away, try hanging from the front edge of the piston to get his attention, then pull up and start shooting. Or, if he refuses to show, take a running jump over to the doorway and confront him. (screenshots)
To reach SECRET #1, the Silver Dragon (4), in the alcove on the right, take a running jump from the fourth piston to the right side of the alcove. Or, take a running jump from the small ledge outside the doorway to grab the left side of the alcove, then pull up. Pick up the statuette and save the game before taking another running jump from the alcove to grab the doorsill. This jump can be a little tricky. If you miss, it's easier to reload than to climb all the way back across the pistons. Finish off that thug (5) if you didn't do so earlier. Steal his automatic pistol ammo (5) and continue along the rusty passageway. (screenshots)
BUG NOTE: In the classic game, there is a potential bug in the next area, in which the first movable block is missing. As far as I know, this has been fixed in the remaster. See the classic guide for details.
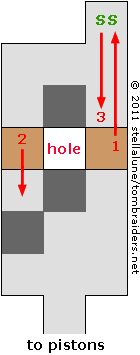 HALLWAY WITH MOVABLE BLOCKS: Follow the passageway to a dead end with a movable block. (The following sequence is illustrated in the diagram at right and in this series of screenshots.) Push the block three times (as indicated by red arrow #1). You'll reveal a hole in the floor on the left leading down into the room below. Do not drop down yet. Instead, go around to the left to find a second movable block. Push this block once (red arrow #2). Return to the first block, and pull it back twice (red arrow #3). Jump across the hole in the floor into the hallway near the second block and go to the right. In the area behind the first block you'll find 2 boxes of shotgun shells (6-7).
NOTE: If you don't yet have the SHOTGUN, you'll get it here, along with one box of ammo.
Now, drop through the hole in the floor and flip the piston switch again to the up position. This moves the pistons back to their original configuration. Do not drop down through the hole near the piston switch. Instead, climb back up into the hallway where you moved the blocks. Turn around, jump across the hole in the floor, and follow the corridor back to the doorway overlooking the ENGINE ROOM. (screenshots)
NOTE: If you fall through the hole near the movable blocks before pushing the second block, you will not be able to climb back out of the room below. Make sure the piston switch is in the down position. Then drop through the hole near the switch to get back to the ENGINE ROOM. Climb/jump back across the pistons to the high doorway on the far side of the engine room and return to the movable blocks. If you fall through the hole near the piston switch, you'll have to follow the rusty passageway back to the BURNER ROOM. Then climb up through the piston switch room to reach the movable blocks again.
Jump across the pistons again to the other side: Begin by take a standing jump from the edge of the doorsill to land on the nearest piston. Walk to the opposite edge and take another standing jump to grab the edge of the next piston; pull up. Then take a running jump over the third piston to grab the edge of the fourth and pull up. Turn right to face the alcove with the switch. Save the game and set up the next running jump carefully, since it's easy to miss: Walk to the outer left corner of the piston, aim for the right side of the alcove (press Look to check your angle), hop back once, then take the running jump and grab the edge of the alcove. Pull up and throw the switch to flood the BURNER ROOM and rearrange the pistons once more. (screenshots)
To get down without injury, take a running jump back to the fourth piston, which is now lower than it was before. Then safety drop to the angled surface below and slide down to the floor. Follow the rusty passageway below the switch alcove back toward the BURNER ROOM. (screenshots)
FLOODED BURNER ROOM: The part of the passageway where you killed the bad guys earlier is now flooded. Hop in the water swim back to the BURNER ROOM (i.e., left at the T-intersection with the barrels). As you enter the room, make a U-turn to the right. Now that it's underwater, you can reach the lever (on the wall above and to the left of the entrance when facing it). Use the lever to open the door on the opposite side of the room. Then, if you need air, head for the opening in the ceiling of the little room above the switch you used earlier to turn off the burners. Fill Lara's lungs then swim back into the BURNER ROOM and straight across, through the door door you just opened, then down through an opening in the floor. (screenshots)
UNDERWATER CAVE: There's a scuba diver (6) lurking here, so swim forward into the cave to put a little distance between him and Lara. Draw the harpoon gun as you roll to face him. Then let him have it. At this point, you probably need air, so head for the opening in the cavern ceiling next to the hole where you came in. (It's on the left as you enter and on the right if you swim into the cave and then turn around.) (screenshots)
When you're ready to move on, swim past the hunk of rusted metal on the floor of the cave and into the wide opening in the rocks ahead. Turn left and swim forward, hugging the left wall to avoid the giant eel lurking on the right. (Like the smaller eels, this one can't be killed, so we treat it as a hazard.) Pull the lever to open a trapdoor in the ceiling just outside this cave. Roll, swim out along the right wall to avoid the eel. Just outside the eel cave, head for the ceiling and re-enter the ship through the trapdoor you just opened. (screenshots)
ROOM WITH HUGE GEARS AND METAL DUCTS: There's an enemy with a gun (7) standing on one of the sloping blue ducts. (He'll be on your right if you climbed out of the water on the side opposite the open trapdoor.) Try to kill him before proceeding. He doesn't drop anything, so there's no need to climb up to his body. (screenshots)
To unlock the "Attentiveness Rewarded" achievement/trophy, use this simple shortcut to skip a complicated bit of business. Take a standing jump up onto the raised walkway running along the middle of the room. Move toward the switch but stop on the silver grate three tiles from it. Turn right and walk to the edge. Sidestep to the right corner of the grate to avoid the low, angled duct above. Then take a standing jump to grab the blue duct ahead. Pull up and go to the right. At the top, turn left. Then take a running jump into the doorway with the blue wood paneling. The achievement/trophy should pop as you enter the passageway ahead. Continue to the PASSENGER AREAS without missing a pickup. (screenshots)
Alternatively, if you don't care about achievements, or just enjoy climbing around and pulling switches, follow the longer route detailed in a footnote.
PASSENGER AREAS: Follow the wood-paneled hallway down to a small room with paintings on the wall. Another angry plumber (8) emerges from the first side passage on the right. Kill him and then enter the passage he came from. Here you'll find SECRET #2, the Gold Dragon (8), in a glass-lined pit. To unlock the "No Unnecessary Moves" achievement/trophy, stand at the edge of the opening facing the dragon and press Action + Roll to hop down and land just beyond the glass. The achievement registers as you pick up the dragon. Turn around, walk through the glass shards, and pull up out of the pit. (screenshots)
Or, if you don't care about achievements, stand at the edge of the pit and jump to grab the opening above. Pull up into a small, dark room. Run over the breakaway tile to collapse it and then safety drop through the hole to land near the dragon. Now retrieve your prize, walk through the broken glass and climb out of the pit. (screenshots)
Follow the passageway back to the room where you killed the plumber. Go around the corner to the right and follow the uneven, wooden passageway to the top of a slope. Near the bottom of the slope is a set of breakaway tiles with glass shards below. Either slide and jump just before Lara reaches the cracked tiles; or slide, land on the tiles, and immediately run forward before they collapse. Notice the haunting music. Notice the Jade Dragon on the seafloor outside the window. (screenshots)
Continue to an area with shallow water on the floor. There are 2 barracudas (9-10) here. One you should be able to kill right off with pistols. Then wade into the water, avoiding the breakaway tile for now. Try to shoot the second barracuda through the cracked tile. When the second fish floats to the surface, it's safe to take a swim. Step on the tile to break it. Then swim out through the tunnel to get SECRET #3, the Jade Dragon (9), plus a bonus of 4 sets of M16 clips (10-13) if you've found the other secrets as well. Swim back into the ship the way you came. (screenshots)
ROOM WITH ANGLED WOODEN FLOORS: Vault up into the next room, which has a steeply sloping floor. Move forward until you run into a blue wall with an angled top. Just to the left of it is a small hollow with a breakaway tile. Jump through the V-shaped gap to land on the cracked tile. This time, there's nothing nasty below. After the tile breaks, jump out on the other side. Step up onto the wooden shelf on the right. Turn around to face the blue half wall. (The steep slope and the pit with the cracked tile will now be on Lara's left.) Position Lara at the edge of the shelf, about 3 sidesteps from the steep slope. Flip left onto the slope, slide briefly, then jump and grab the edge of the blue half wall above the cracked tile. Traverse to the right until you can pull up. On the other side of the half wall, head for the exit in the upper right corner. Hop down and follow the passageway to the THEATRE LOBBY. (screenshots)
SHORTCUT: A tricky jump in the next area lets you skip to the end of the level. Details are in another footnote.
THEATRE LOBBY: Enter this garishly decorated room and kill a goon with a gun (11) at the top of the ramp on the right. Follow the ramp up to the next room. Then take out another armed baddie (12) in the black-and-white tiled area below on the left. Don't go over the railing yet. First head for the back of the orange-carpeted area with the ornate sofas and pull a wooden crate to open up a passageway on the other side. (screenshots)
Now jump over the railing into the black-and-white tiled area. Advance toward the skinny columns and kill 2 more enemies (13-14) that spawn off to the left. One has a gun, one a baton. Drop into the pit, locate another wooden crate on the left. Pull it out, then climb on top to shoot another thug with a gun (15), who appears on the ledge above. When he's dead, go behind the crate you just moved and pick up the THEATRE KEY (14). (screenshots)
Climb out of the pit and return around the corner toward the railing and freestanding wooden crate. Enter the corridor on the left and follow it up a short flight of stairs. The first wooden crate that you moved earlier is here, on the right. (If you didn't do that, see the note below.) Turn left, then right, and continue past a pair of glass doors and a keyhole to a small room with more ornate sofas. Kill the guy with the club (16) who comes down the stairs. Then backtrack to the glass doors and use the THEATRE KEY to open them. (screenshots)
NOTE: If you didn't move the crate blocking the hallway earlier, you'll need to do that now. Climb onto the freestanding wooden crate in the black-and-white tiled room and take a running jump over the railing into the orange-carpeted area where you came in. (screenshot) Go to the left, past the ornate sofas, to find the movable box. Pull it once to open up the hallway on the other side. Jump back over the railing to the lower level and find the now open hallway on the right.
THE THEATRE: Upon entering the theatre, you can go to the left or right. Both sets of stairs lead to an auditorium with tiered ledges representing the audience seats. There are several enemies waiting inside. The first man with a club (17) comes up either side aisle to meet you. There are 2 more enemies (18-19), one with a shotgun, in the box seating area on the right (when facing the stage). If you like, you can jump up there to get their attention, then backflip onto the tiered ledges while firing. You may have to repeat this a few times to kill both of them. Climb into the box and retrieve the Uzi ammo (15) the gunman drops. (screenshots)
NOTE: If you don't yet have the UZIS, you'll receive them here instead of ammo.
Use the switch in the box seating area to open the curtain on the stage. A guy with a wrench (20) is lurking backstage. Climb onto the stage to lure him out then back away firing. Go behind the curtain and pull the movable crate under the opening so you can climb up. Drop into the dark backstage area and go to the far end, jumping across a pit lined with glass shards. Press the button on the far wall to flood the pit where you found the THEATRE KEY earlier. (screenshots)
Head back there now: Return across the glass-lined pit, climb out of this area, and go back out onto the stage. Exit the theatre through the double doors at the back. On the way, you'll meet another guy with a shotgun (21). Kill him and take his shotgun shells (16). Then follow the passageway to the right, past the first movable crate and on to the room with the black-and-white tiles. Swim across the flooded pit and climb into the doorway to end the level. (screenshots)
†UPDATE HISTORY: Updates made prior to the Tomb Raider I-II-III Remastered release, including credit for tips sent in by other players, are tracked in the archived classic guide.
8/1/26 - Remastered guide posted. Better late than never. :D
LONGER ROUTE IN ROOM WITH HUGE GEARS AND METAL DUCTS: If you are not interested in the "Attentiveness Rewarded" achievement/trophy, or already have it, you can follow the path the developers probably intended. After killing the enemy with a gun (7) on top of the duct, take a standing jump up onto the raised walkway running along the middle of the room. Head for the right end of the walkway and pull the switch to open the door at the other end. Go through. Just inside this room are 2 switches that raise a pair of hinged ledges on the opposite side of the room. They are timed, but it's a fairly slow timer, about 30 seconds for each ledge, so there's no need to panic. To get across, pull the switch near the door, press Look, side flip to the left, pull the second switch, and press Look again. Then roll and take a running jump across the room to grab the first hinged ledge. Traverse to the right above a pit lined with broken glass. Don't hesitate until you've passed the hinged ledges and don't drop down on the other side. Continue traversing to the right and pull up into the corner alcove. (screenshots)
Here you'll find another switch. Use it to lower another hinged ledge back in the room with the ducts. This one is not timed. Drop to the floor, cross the room to the low ramp, climb onto the ledge with the switches, and re-enter the big room where you started. (screenshots)
Cross to the far left corner. Now that you've lowered the hinged ledge here, you can use the angled metal blocks to climb higher: Stand facing the lower angled block in the corner. Step back until Lara bumps into the other angled block behind her. Then jump forward onto the first slope. Continue holding Jump and Action, and Lara will backflip onto the higher block, spring forward, and grab the corner ledge above. Pull up, turn around, and take a running jump over the gap where the hinged ledge was. (screenshots)
Follow the duct to the top, where you'll find a movable block. Pull the block to the right so you can then move around behind it. Hang from the duct where the box was, traverse left, and pull up. Turn around, walk to the edge, and take a standing jump to grab the ledge ahead. Pull up and follow the dark passageway to the end. Slide down the ramp on the right and proceed along the top of the ducts until you can jump into the doorway with the blue wood paneling. (screenshots) Continue with the "PASSENGER AREAS," above.
SHORTCUT FROM THEATRE LOBBY TO LEVEL EXIT: Enter the LOBBY and kill the first 4 enemies there, as described above. Then, instead of going after the THEATRE KEY, use a carefully set up running jump to grab the elevated doorway on the other side of the pit. This skip has been used by speedrunners for decades and still works in the remaster. Details are on a separate page with screenshots.
‡NOTE ON VIDEO GUIDES: Eldin's videos don't always follow the same strategies I use in my walkthroughs, but if you prefer that format, I think you'll find them very helpful.
DARK MODE: I plan to add optional dark mode for these pages, but my current priority is updating the walkthroughs. Meanwhile, may I suggest a reputable dark mode browser extension, such as Dark Reader? (Download only from trusted sites, like darkreader.org or your browser's official add-on/extension site.)
WAS THIS WALKTHROUGH HELPFUL? If not, I apologize and invite you to contact me with any questions. If you need help right away, I recommend the r/TombRaider subreddit. Other fan-run forums are listed at tombraiders.net/stella/community.html. If this site was useful, please consider supporting it financially or in other ways. For details, visit tombraiders.net/stella/support.html. As always, I welcome your corrections/suggestions. Thank you!
Copyright © 1998- - Stellalune (). Feel free to copy or print this walkthrough for personal use. By all means, share it with friends, but please include this credit line so people can send me their feedback. No part of this walkthrough may be reproduced on another site without permission. Follow this link for details about this site's advertising and privacy policy.
Stella's Tomb Raider Site: tombraiders.net.