Shadow of the Tomb Raider - Peruvian Jungle Collectibles
Updated: 9/25/21(†)
This guide focuses on revisiting the level after completing it. If you are playing through for the first time, you may want to follow the main walkthrough instead to avoid possible spoilers. Collectibles are numbered in the order they appear in the main walkthrough and on the annotated level map.
Fast Travel is disabled until you reach the Jaguar Den Base Camp. After that, you can move freely among the various camps in Peru and Cozumel. (The main walkthrough explains how to use the base camps for Fast Travel.) The jungle canopy area at the very beginning, can't be revisited, but there are no major collectibles there.
Follow this link for a List of All Artifacts by Story/Dialect.
Treasure Chest · Relics · Documents · Murals · Monolith · Survival Caches · Explorer Backpacks · Archivist Maps · Artifacts & Photos · Challenges
TREASURE CHEST
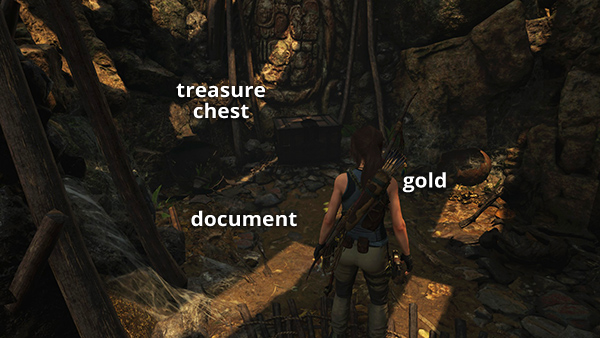
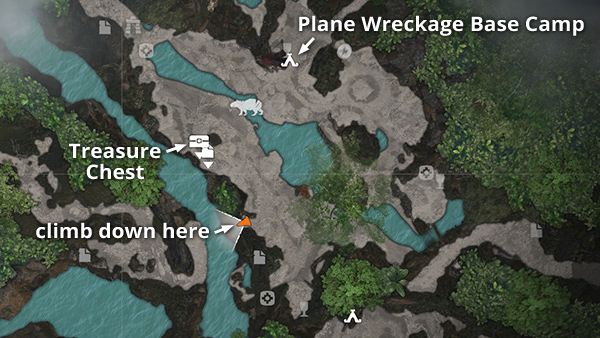
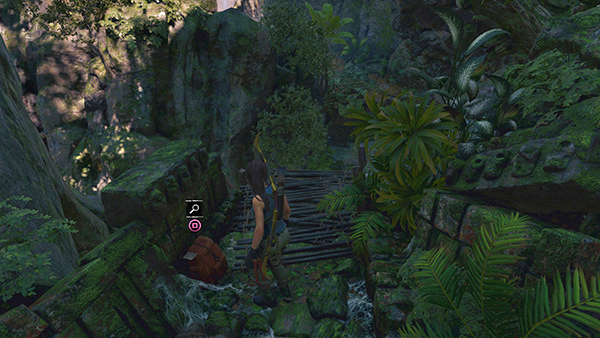
All treasure chests require the lock pick to open. Once you have acquired this tool, fast travel to the Plane Wreckage Base Camp. Then head south/southwest toward the edge of the ravine. At the spot indicated here on the map, climb down the cliffside then over to the left to reach a hidden cave with the treasure chest and document #13. The chest contains an Artifact (a Silver Mirror from the Day in the Life of a Paititian Story). The walkthrough includes details and screenshots. Climb back up the way you came, return to the base camp, and fast travel out to wherever you left off. (Click screenshots to enlarge.)
NOTE: You can also spot the chest through the wooden slats set into the ground near the cliff's edge, shown in this screenshot, but you can't break through the slats, so you'll have to climb down the cliff to get there.

RELIC 1 - Flight Log (Myth, Magic & Monsters)
This relic is sitting on the ground right next to the Plane Wreckage Base Camp. (Click screenshot to enlarge.)
RELIC 2 - Handkerchief (Expedition Unknown)
This is in the same area as the first relic. If you missed it, fast travel to the Plane Wreckage Base Camp. Then follow the path to the north toward a small pool, where you'll find the relic sitting on a shelf. (Click image for more and larger screenshots.)
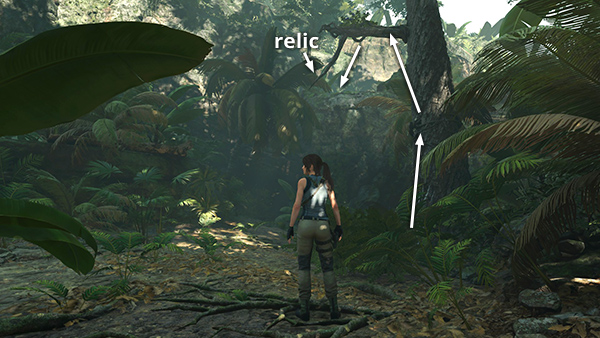
RELIC 3 - Sextant (Expedition Unknown)
This relic is on a high ledge at the south end of the area with the pool, where Lara cut down her gear early in the level. To reach it, start at the Plane Wreckage Base Camp and head due south. In the bottom corner of the area, there's a tree you can climb so you can then jump over to the ledge. The main walkthrough has details. (Click screenshot to enlarge.)
RELIC 4 - Grave Marker (Expedition Unknown)
This relic is in the Crypt of Rimak, The Storyteller. Fast travel to the Plane Fuselage Base Camp then head northwest to the crypt entrance. The relic is just inside the tunnel. When you're done, follow the path in this screenshot. Climb the rocks to the south, swing over to the plane fuselage, and slide down to the campsite. (Click screenshot to enlarge.)

RELIC 5 - Elongated Skull (Myth, Magic & Monsters)
This relic is also found in the Crypt of Rimak, The Storyteller. Fast travel to the Plane Fuselage Base Camp then head northwest to the crypt entrance. This relic is a little farther in from the previous one, at the end of a dead-end passageway leading off to the west. (Click screenshot to enlarge.)
RELIC 6 - Bowl of Powder (Day in the Life of the Inca)
This relic is in the area with the drawbridge puzzle. You can reach it from the Plane Fuselage Base Camp by following the path to the southeast or from the Jungle Ruins Base Camp by heading to the northwest, as indicated by the arrows in this map detail. You'll find the relic at the top of the steps near the monolith. When you're done in this area, return to either camp and fast travel away. (Click screenshots to enlarge.)

RELIC 7 - Llama Figurine (Day in the Life of the Inca)
This relic is also in the drawbridge area. Follow the directions for relic #6. Then climb the steps to the stone wheel and handle that you used when you solved the puzzle. The relic is on the ground near the stone wheel. (Click screenshot to enlarge.)
RELIC 8 - Pistol Parts (Expedition Unknown)
This relic is just northwest of the Jungle Ruins Base Camp, sitting on a shelf with a shovel leaning against it. (Click screenshot to enlarge.)
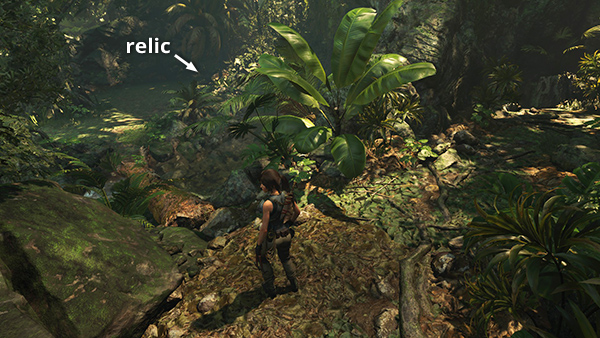
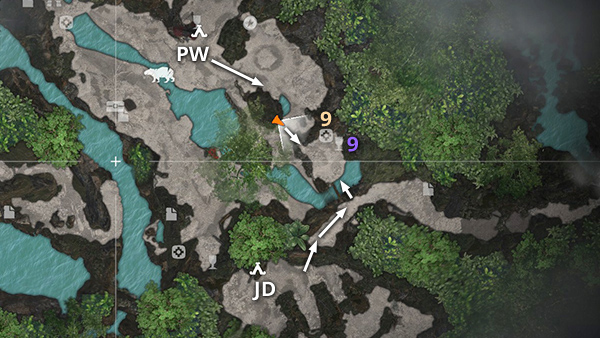
RELIC 9 - Video Camera (Search for the Hidden City)
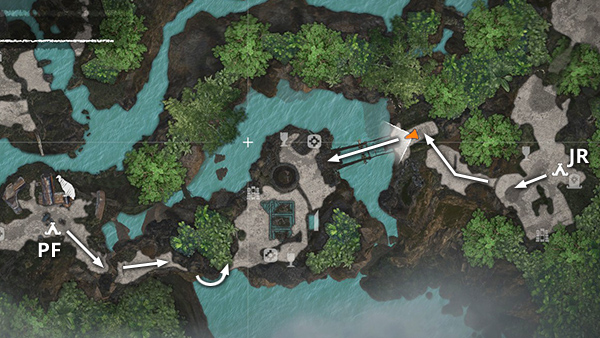
This relic is on the path between the Jaguar Den Base Camp and Kuwaq Yaku. If you missed it the first time, fast travel to the Jaguar Den camp. (Watch out for the jaguar, since it does respawn!) Crawl under the wooden barrier about halfway along the north wall and follow the path. Just ahead on the left, use the fallen tree as a bridge to cross the little stream. The relic is on the right side of the clearing ahead. (Click screenshots to enlarge.)
Or, If you don't want to deal with the jaguar, instead fast travel to the Plane Wreckage Base Camp and either swing over or climb up to the clearing from the south, as shown in this screenshot. (Here Lara is standing on the spot indicated by the orange triangle on the map detail.) The relic will then be just ahead on the left. When you're done, return to either camp for fast travel or continue on to Kuwaq Yaku via the path to the east.
DOCUMENT 1 - Struggle for Power (Conquerors)
This document is in the Crypt of Urqu, The Scout. The crypt entrance is northwest of the Plane Wreckage base camp. Once you've broken through the entrance with your axe, the relic can be found just inside the tunnel on the left. (Click screenshot to enlarge.)
DOCUMENT 2 - Jack's Journal 2 (Expedition Unknown 2)
This document is also in the Crypt of Urqu, The Scout. Once you've passed the mud wallow and the spear trap, you'll find the document in an alcove on the left side of the passageway. (Click screenshot to enlarge.)
DOCUMENT 3 - Jack's Journal 6 (Expedition Unknown)
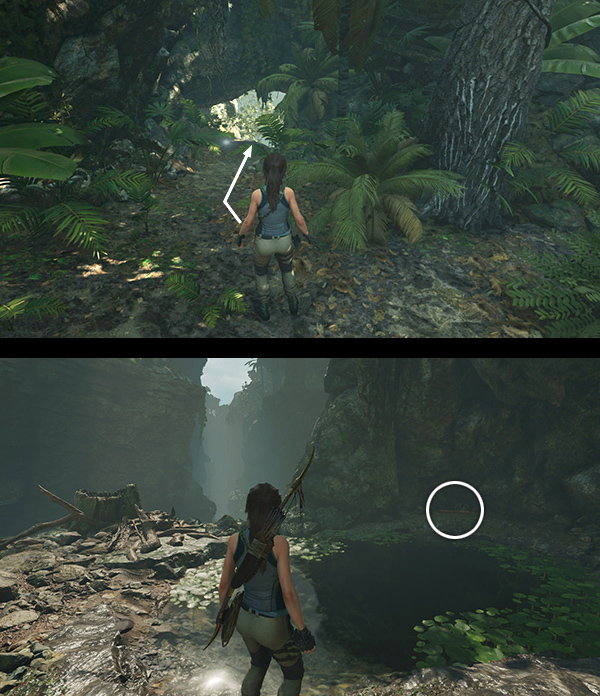
This document is at the south end of the area with the pool, where Lara cut down her gear early in the level. To reach it, start at the Plane Wreckage Base Camp and head due south. In the bottom corner of the area, near the base of the tree you climbed to reach relic #3, is an opening in the rocks. Go through and drop down on the ledge beyond to find the document. (Click image for more and larger screenshots.)
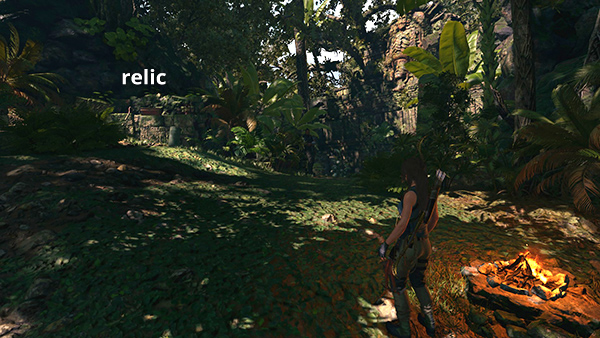
DOCUMENT 4 - Sisimite (Myth, Magic & Monsters)
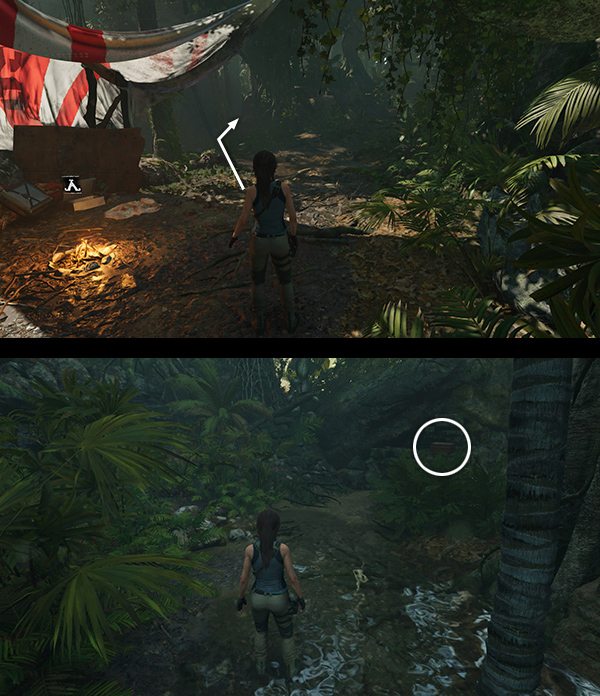
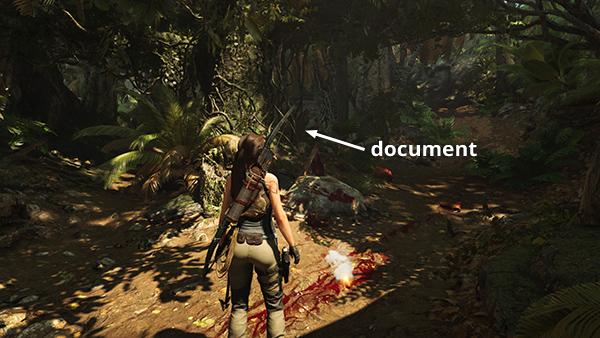
This document is on the west side of the ravine on the way to the first jaguar encounter. From the Plane Wreckage Base Camp, head to the southeast and follow the cliff edge until you come to the rope-wrapped post. Run a rope line across the ravine and cross over (like you did the first time). Follow the path up the slope. When you come to the gore-strewn area with the burning flare, head to the left to find the document lying at a dead end in the path. Depending on what else you're looking for, you can either return the way you came or continue along the path to the Plane Fuselage Base Camp. (Click screenshot to enlarge.)
DOCUMENT 5 - Jack's Journal 3 (Expedition Unknown 2)
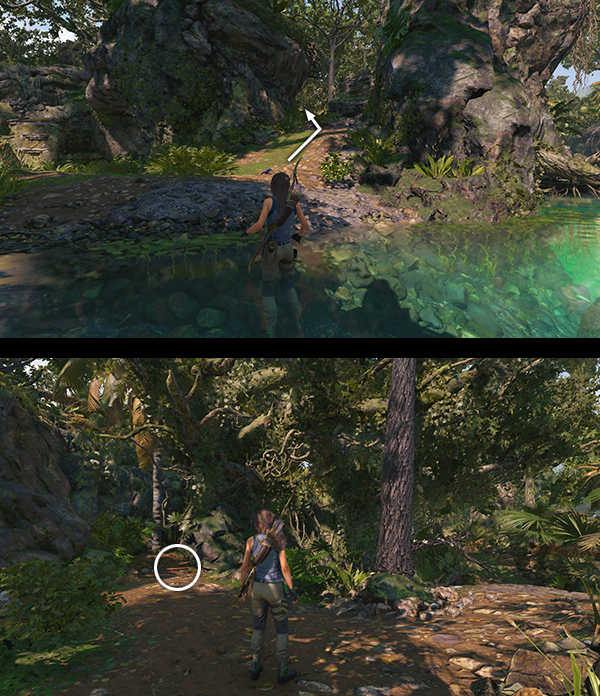
This document is on the approach to the Plane Fuselage Base Camp. If you missed it the first time, fast travel to the camp and head down the path to the northwest. Dive into the pool and climb out on the opposite bank. Take the first path on the right, up the slope and between the rocks, as shown in this screenshot. The document is just ahead on the left. When you're done, climb the rocks to the south, swing over to the plane fuselage, and slide down to the campsite. (Click image for more and larger screenshots.)
DOCUMENT 6 - Jack's Journal 5 (Expedition Unknown 2)
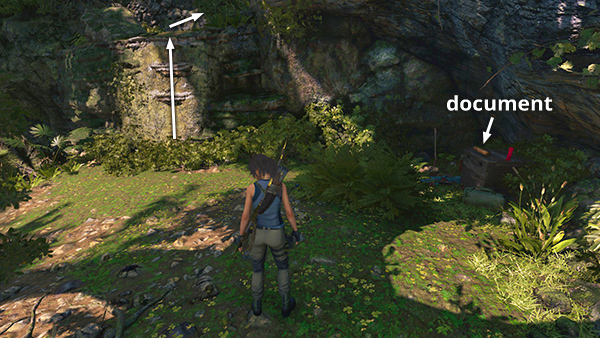
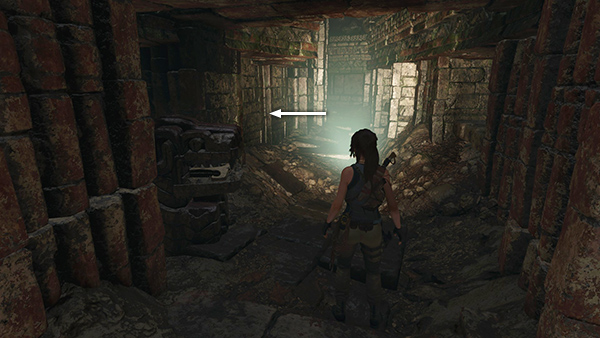
From the Plane Fuselage Base Camp, follow the path down to the northwest. Dive into the pool and climb out on the opposite bank. This document is just ahead on the right, sitting on a wooden crate in a small alcove. If that's all you need here, climb the handholds on the left (indicated by the arrows in the screenshot), follow the ledge around to the right, swing over to the rock pile, and climb back up to the wreckage and campsite. (Click screenshot to enlarge.)
DOCUMENT 7 - A King's Ransom (Conquerors)
This document is inside the Crypt of Rimak, The Storyteller. Fast travel to the Plane Fuselage Base Camp then head northwest to the crypt entrance. The document is in small room behind a crumbling wall near the sarcophagus. If you missed it the first time, you can reach it by following the crypt walkthrough. To get back to camp, follow the path in this screenshot. Climb the rocks, swing over to the plane fuselage, and slide down. (Click screenshot to enlarge.)


DOCUMENT 8 - At the Gate (Search for the Hidden City)
This document is in the Underworld Gate Challenge Tomb. If you've already explored the tomb, you can fast travel to the Canyon Ruins Base Camp. Head to the northwest and carefully jump to grab the carved handhold above the spikes. Climb to the right to reach the clearing on the other side of the chasm. The document is there. Climb back to the camp the way you came. (Click screenshot to enlarge.)
If you haven't explored the tomb yet, fast travel to the Jungle Ruins Base Camp. Then follow the tomb walkthrough.
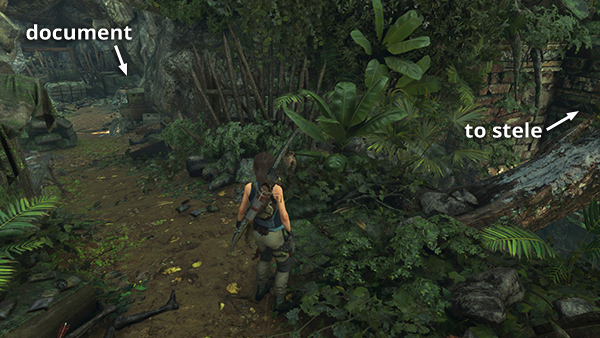
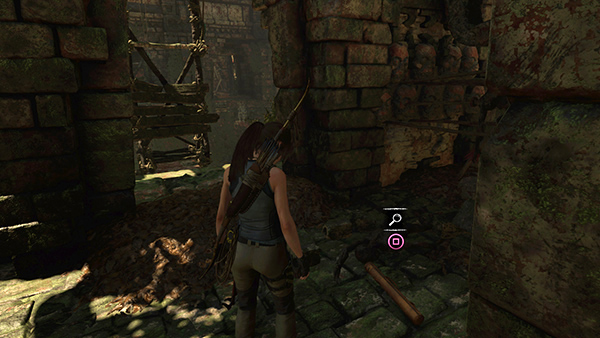
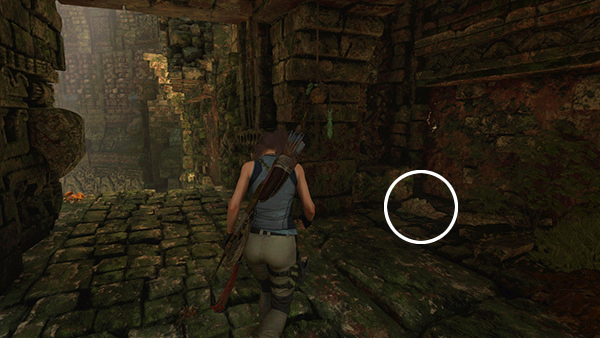
DOCUMENT 9 - Finger Length Away (Search for the Hidden City)
This document is also in the Underworld Gate Challenge Tomb. If you've already explored there, fast travel to the Canyon Ruins Base Camp. Then follow the tomb walkthrough to reach the document, which is just before the fallen tree you must cross to reach the puzzle area. Once you have the document, you don't need to take the circuitous route past the stele to get back to camp. Instead, exit the alcove with the document, turn right, and follow the path shown in these screenshots to get back to the Canyon Ruins camp. (Click screenshot to enlarge.)
DOCUMENT 10 - Jack's Journal (Expedition Unknown 2)
This document is in the Judge's Gaze Challenge Tomb. The entrance is just northwest of the Plane Wreckage Base Camp, but the climbing axe is needed to get in. The document is in the raised hallway on the northwest side of the ladder puzzle area. Follow the tomb walkthrough if you need help finding it. (Click screenshot to enlarge.)
DOCUMENT 11 - Surprise Witness (Metamorphosis)
This document is also found in the Judge's Gaze Challenge Tomb, northwest of the Plane Wreckage Base Camp. The document is in the raised hallway on the southeast side of the ladder puzzle area. Follow the tomb walkthrough if necessary. (Click screenshot to enlarge.)

DOCUMENT 12 - Jack's Journal 4 (Expedition Unknown 2)
This document is on the path to Kuwaq Yaku. If you missed it the first time, fast travel to the Jaguar Den camp. (Watch out for the jaguar, since it does respawn!) Crawl under the wooden barrier about halfway along the north wall and follow the path until you see a light-colored branch on the left. The document is hidden in the bushes here. (Click image for more and larger screenshots.)
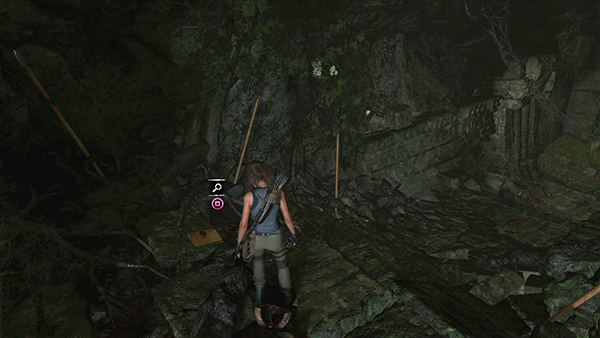
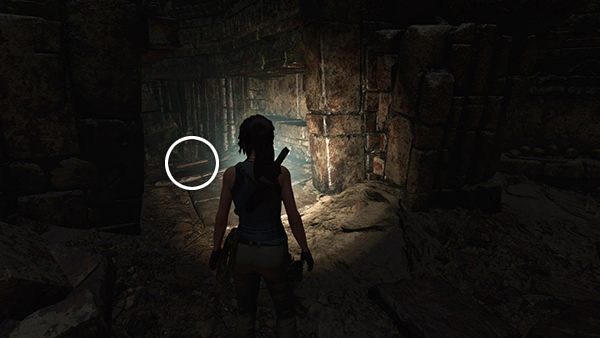
DOCUMENT 13 - Fawcett's Last Letter (Expedition Unknown)
This document is in the same cave as the treasure chest, above, southwest of the Plane Wreckage Base Camp. You can't reach it until you get the climbing axes. To save backtracking, wait until later in the game when you acquire the lock pick. Then return for the document and treasure chest at the same time. The main walkthrough includes details. (Click screenshot to enlarge.)
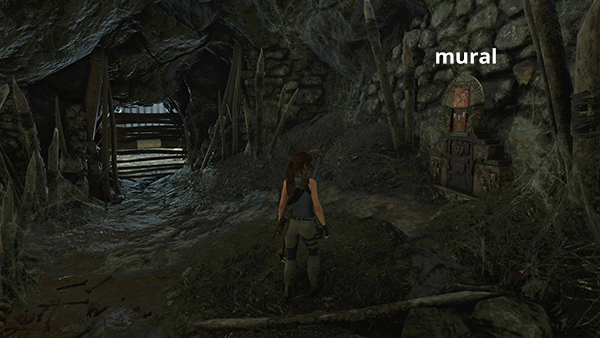
MURAL 1 - Urqu, the Scout (Resting Places)
As you'd imagine, this mural is in the Crypt of Urqu, The Scout. The crypt entrance is northwest of the Plane Wreckage base camp. The mural is on the right side of the tunnel before the slide down into the crypt proper. Check the crypt walkthrough for details. (Click screenshot to enlarge.)
MURAL 2 - Rimak, The Storyteller (Resting Places)
This mural is in Rimak's Crypt. Fast travel to the Plane Fuselage Base Camp then head northwest to the crypt entrance. (Follow the crypt crypt walkthrough if necessary.) The mural is a little way into the tunnel on the right, just before the rope-arrow barrier. To get back to camp, follow the path in this screenshot. Climb the rocks, swing over to the plane fuselage, and slide down. (Click screenshot to enlarge.)
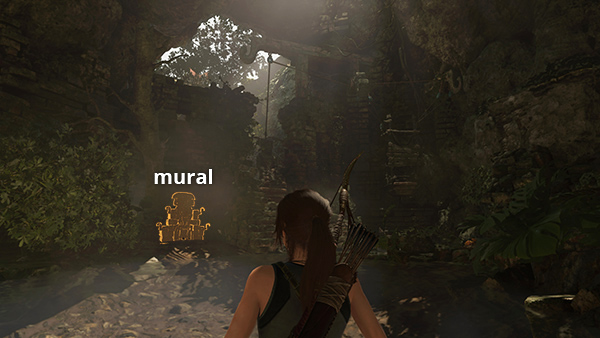
MURAL 3 - Kon (Pantheon of Gods 2)
This mural is in the area with the drawbridge puzzle. The notes for relic #6, above, explain how to get there and back using fast travel. The mural is on the left of the clearing if Lara is facing the steps leading up the tower. (Click screenshot to enlarge.)
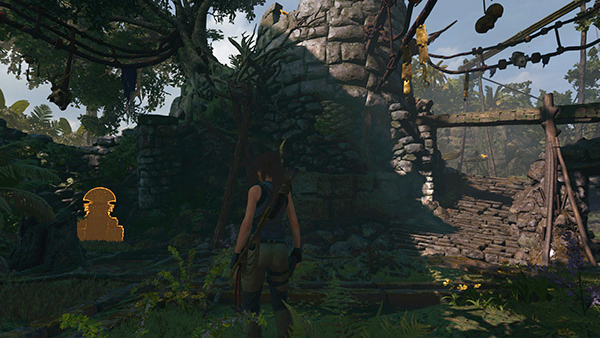
MURAL 4 - Death Lords (Trials of the Gods Story)
This mural is at the top of the steps just south of the Jungle Ruins Base Camp. In this screenshot Lara is standing on the ledge at the northwest entrance to this area. (Click screenshot to enlarge.)


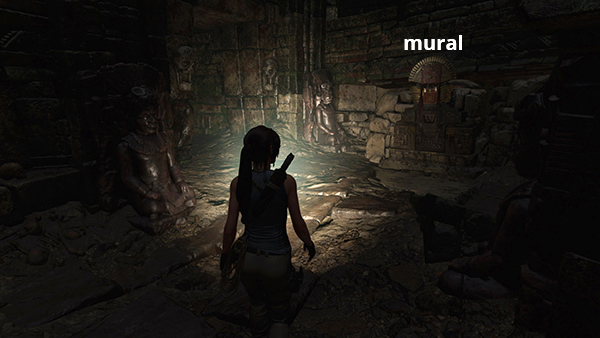
MURAL 5 - Underworld Gate (Trials of the Gods)
This mural is in its namesake Underworld Gate Challenge Tomb, just beyond the dangling crate puzzle. If you missed the mural the first time, you can fast travel to the Canyon Ruins Base Camp and continue from there. If you haven't explored the tomb yet, begin at the Jungle Ruins Base Camp and follow the tomb walkthrough, which also shows how to make your way back to the Jungle Ruins Base Camp so you can fast travel on to your next destination. (Click screenshot to enlarge.)
MURAL 6 - God of Death (Pantheon of Gods 3)
This mural is on the way to the Judge's Gaze Challenge Tomb, northwest of the Plane Wreckage Base Camp. The mural is in the room with the first counterweighted statue, beyond the pool but before the main puzzle area. Follow the tomb walkthrough if you need help finding it. (Click screenshot to enlarge.)
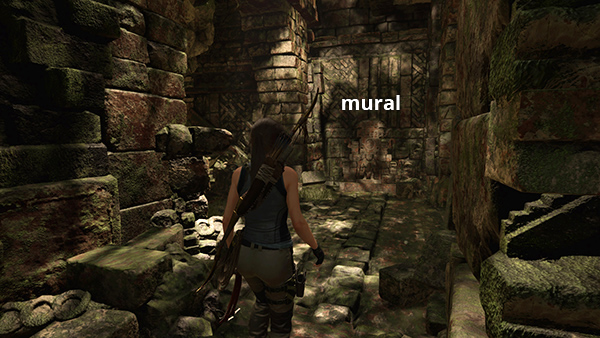
MURAL 7 - Judges' Gaze (Trials of the Gods)
This mural is in the Judge's Gaze Challenge Tomb, specifically in the passageway beyond the rope bridge and just before the main puzzle area. Again, follow the tomb walkthrough if you need help finding it. (Click screenshot to enlarge.)
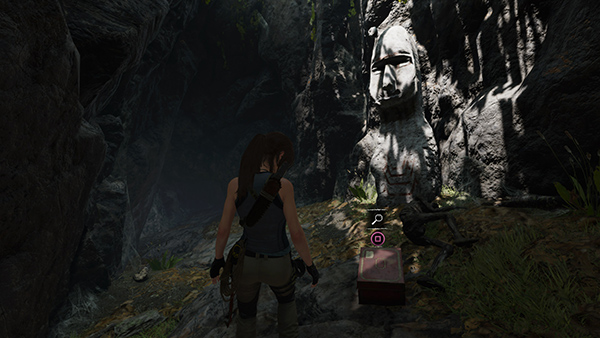
MONOLITH (Proficient Quechua)
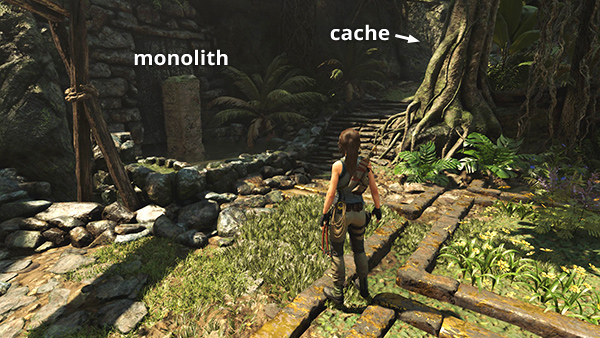
There's only one monolith in this level. It's in the drawbridge puzzle area about halfway between the Plane Fuselage and Jungle Ruins Base Camps. See the section for relic #6, above, for details on how to get there and back later in the game. Deciphering this monolith provides the clue to find survival cache #6, below. (Click screenshot to enlarge.)
SURVIVAL CACHE 1
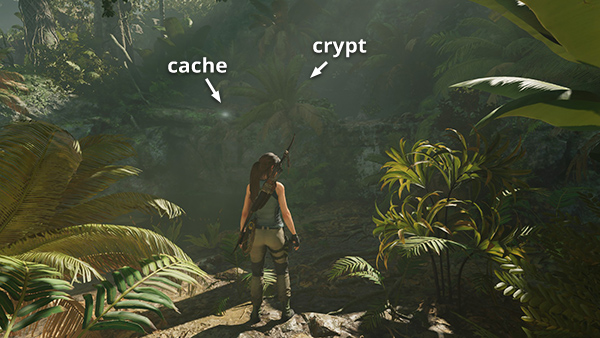
This cache is just outside the entrance to the Crypt of Urqu, The Scout, in the starting area where Lara retrieves her gear after the crash. From the Plane Wreckage Base Camp, head northwest. Climb onto the ledge near the crypt entrance, and you'll find the cache buried a few steps to the left of the tunnel opening. (Click screenshot to enlarge.)
SURVIVAL CACHE 2
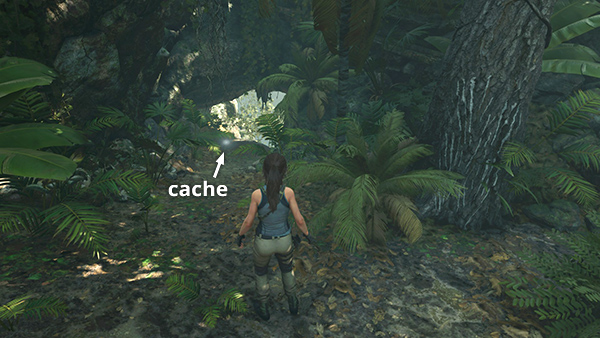
This cache is at the south end of the starting area where Lara retrieves her gear after the crash. To reach it, start at the Plane Wreckage Base Camp and head due south. In the bottom corner of the area, near the tree you climb to reach relic #3 (above), there's an opening in the rocks. The cache is buried on the left side of that opening. (Click screenshot to enlarge.)
SURVIVAL CACHE 3
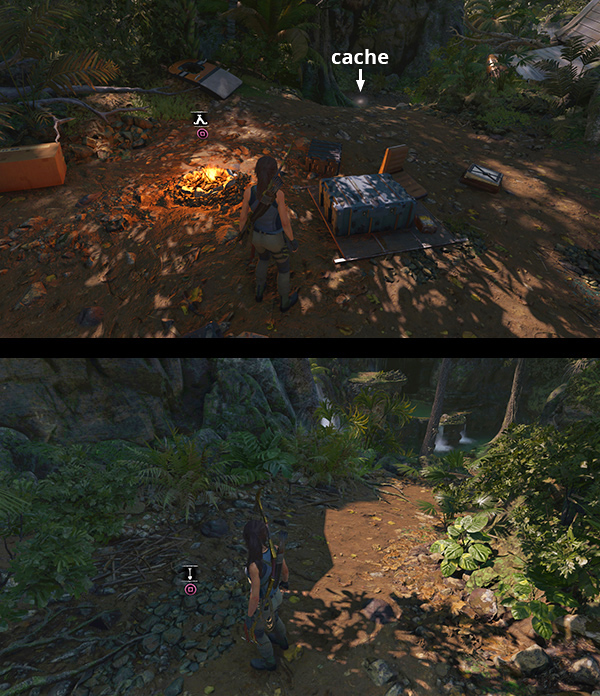
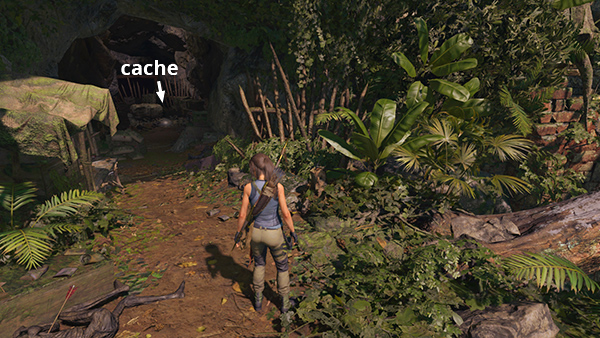
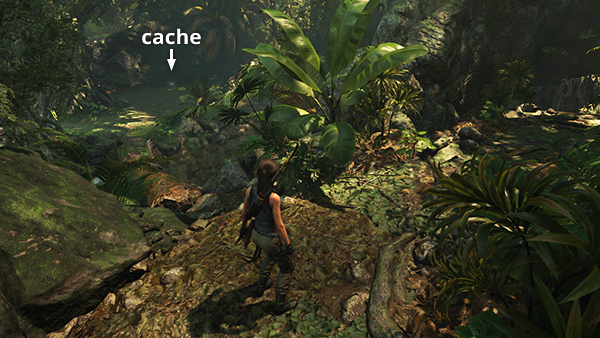
From the Plane Fuselage Base Camp, follow the path down the hill to the northwest, toward the area with the pool and waterfalls. This cache is buried about halfway down that path on the left. (Click image for more and larger screenshots.)
SURVIVAL CACHE 4
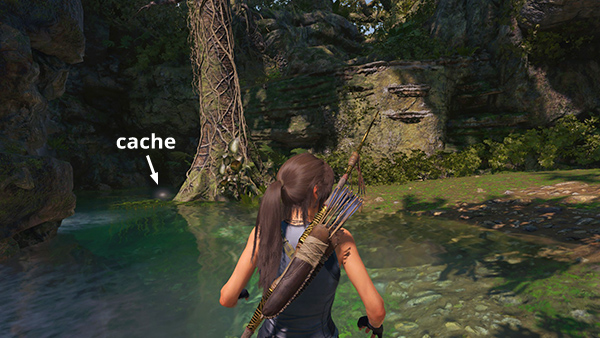
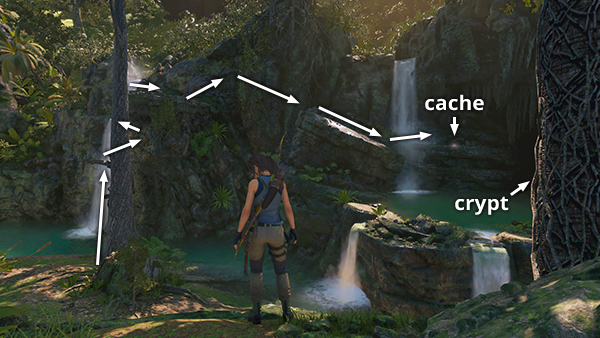
The next cache is in the area with the pool and waterfalls northwest of the Plane Fuselage Base Camp. If you wade through the pool all the way to the north end, you'll find the cache buried near the rock wall, just below and to the right of the Crypt entrance. When you're done, follow the path in this screenshot. Climb the rocks to the south, swing over to the plane fuselage, and slide down to the campsite. (Click screenshot to enlarge.)
SURVIVAL CACHE 5
The next cache is also in the area northwest of the Plane Fuselage Base Camp. It's sitting on a ledge just outside the entrance to the Crypt of Rimak, The Storyteller. To reach it, you'll need to climb one of the trees, jump to the climbable wall, climb onto the ledge, then swing, slide, and jump onto the ledge with the cache. Check the walkthrough for details. When you're done, follow the path in this screenshot. Climb the rocks, swing over to the plane fuselage, and slide down to the camp. (Click screenshot to enlarge.)
SURVIVAL CACHE 6 (Monolith Riches)
This cache only appears after you've deciphered the monolith, which requires that Lara be Proficient in the Quechua dialect. The monolith is in the drawbridge puzzle area about halfway between the Plane Fuselage and Jungle Ruins Base Camps. See the section for relic #6, above. Deciphering the monolith reveals a clue: "Two serpents guard life and death. I lie trapped within their eternal struggle." Climb the nearby steps to find the cache buried between the two stone serpent heads. Check the main walkthrough for more info. (Click screenshots to enlarge.)
SURVIVAL CACHE 7
This cache is also in the drawbridge puzzle area. Check the section for relic #6, above, for directions. When you reach the west side of the drawbridge, head down the curved staircase below the tower to find the cache buried at the end of the ledge. (Click image for more and larger screenshots.)
SURVIVAL CACHE 8
This cache is in the Underworld Gate Challenge Tomb. If you've already completed the tomb, fast travel to the Canyon Ruins Base Camp. Then follow the tomb walkthrough. The cache is just before the fallen tree you must cross to reach the dangling crate puzzle. If that's all you need in this area, you don't need to solve the puzzle again. Just exit the alcove where you found the cache, turn right, and follow the path shown in these screenshots to get back to the Canyon Ruins camp. (Click screenshot to enlarge.)
SURVIVAL CACHE 9
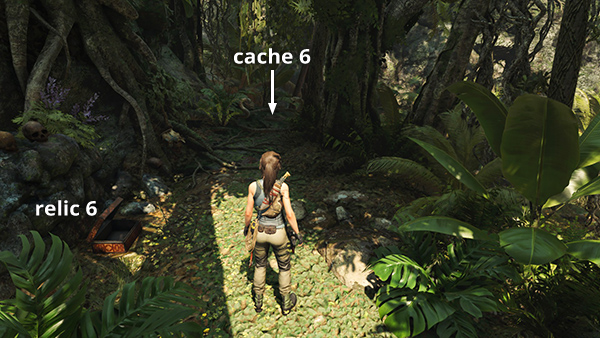
The last cache is in the same area as relic #9. It's reachable from the Plane Wreckage or Jaguar Den Base Camp. Follow the instructions and map for the relic, above. When you have the cache, you can return to either camp for fast travel or continue on to Kuwaq Yaku via the path to the east. (Click screenshot to enlarge.)
EXPLORER BACKPACK 1
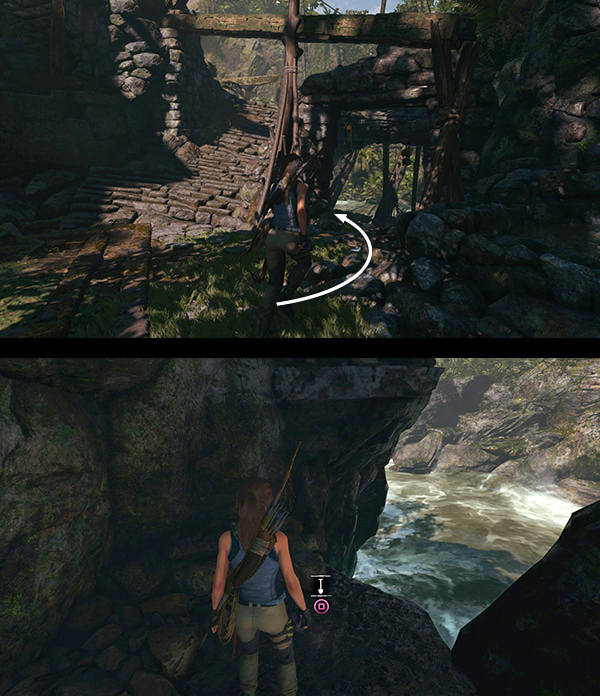
Backpacks are not required for 100% completion, but finding them reveals the locations of other collectibles on your in-game map, so they can be useful. From the Plane Fuselage Base Camp, follow the path down the hill to the west, toward the area with the pool and waterfalls. Dive into the pool and swim over to the little cave ahead on the right to find the first backpack inside. Examining it reveals survival caches #1, #2, #3, #4, #7, and #9 on your in-game map. To get back to camp, climb out on the bank and follow the path on the right. Climb up the rocks, swing over to the plane fuselage, and slide down to the campsite. (Click screenshot to enlarge.)

EXPLORER BACKPACK 2
The second backpack is on the way to the Underworld Gate Challenge Tomb. Fast travel to the Jungle Ruins Base Camp and you'll find the tomb entrance a few steps to the southeast. Crawl through a low passageway and follow the path. After the second spear trap, and before the second deep chasm, look for the backpack near a skeleton on the left side of the path. Examining this pack reveals several things on your in-game map: survival caches #5 and #8; both crypt entrances; and the treasure chest. If all you needed in this area was the map itself, continue east to the Canyon Ruins Base Camp, following the tomb walkthrough if necessary, and fast travel away from there. (Click screenshot to enlarge.)
ARCHIVIST MAP 1
Archivist Maps are also not required for 100% completion, but examining them highlights other collectibles on your in-game map. This one is inside the Crypt of Urqu, The Scout. If you missed it the first time, re-enter the crypt and follow the dark passageway. Just beyond the area where Lara has to squeeze through a gap lined with spears, turn right. Halfway along this passageway on the left is a narrow opening leading into the room with the map. Examining it reveals several collectibles on your in-game map: relics #2, #3, #5, #7, and #9; documents #1, #3, #4, #12, and #13; murals #2, #3, and #4. If this is your first time through, you'll retrieve the map on the way out, as described in the crypt walkthrough. (Click screenshot to enlarge.)
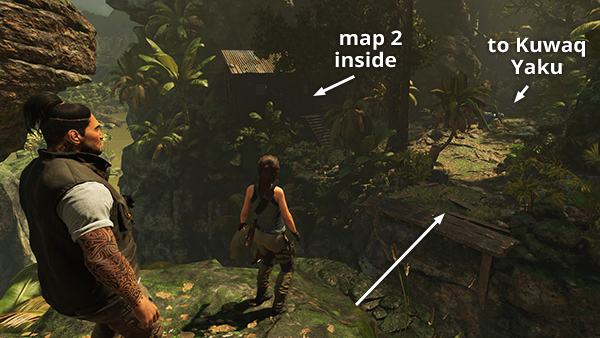
ARCHIVIST MAP 2
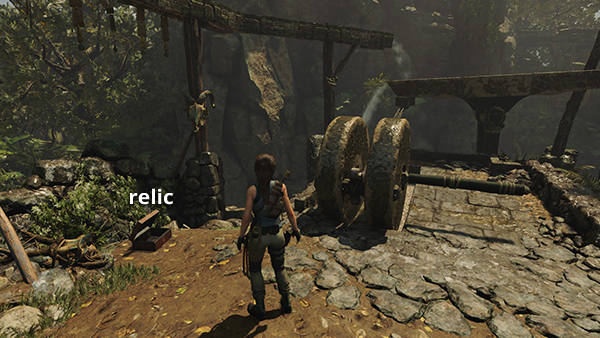
The second map is on the path to Kuwaq Yaku. If you missed it the first time, fast travel to the Jaguar Den Base Camp. (Watch out for the jaguar, since it does respawn!) Crawl under the wooden barrier about halfway along the north wall and follow the path to the northeast until you come to a little shack on the left. The map is inside. Examining it reveals a number of collectibles on your in-game map: relics #4, #6, and #8; documents #2, #,5, #6, #7, #8, #9, #10, and #11; murals #1, #5, #6, and #7. You can then return the way you came or continue on to Kuwaq Yaku. (Click screenshot to enlarge.)
Or, start in Kuwaq Yaku and follow the path south, through the rocky tunnel and past the area with the Trinity vehicles. Beyond the vehicles is a path leading up to the left (northwest). The cabin with the Archivist Map is just ahead on the right. Return the way you came or continue along the path to the Jaguar Den camp.
Other Artifacts
In addition to the collectible documents and relics listed above, certain artifacts and photos are added to Lara's collection automatically as you play through the game. These are mentioned at the relevant points in the main walkthrough and listed on the page with All Artifacts Listed by Story/Dialect.
Photo: Doctor Dominguez (Lara's Notebook) - story progression
Artifact: Silver Mirror (Day in the Life of a Paititian) - inside the treasure chest
Challenges | Walkthrough | Collectibles Guides | Main SOTTR Page
†UPDATE HISTORY: 6/2/19 - Page first posted online.
9/25/21 - Added the specific collectibles revealed by examining the Explorer Backpacks and Archivist Maps. I'm fairly confident but not 100%
sure about these. It can be difficult to reach the packs and maps without passing close enough to other collectibles to mark them on the in-game map.
WAS THIS WALKTHROUGH HELPFUL? If not, I apologize and invite you to contact me with any questions. If you need help right away, I recommend the r/TombRaider subreddit. Other fan-run forums are listed at tombraiders.net/stella/community.html. If this site was useful, please consider supporting it financially or in other ways. For details, visit tombraiders.net/stella/support.html. As always, I welcome your corrections/suggestions. Thank you!
Copyright © Stellalune (). All rights reserved. Feel free to copy or print this walkthrough for personal use. By all means, share it with friends, but please include this credit line so people can send me their feedback. No part of this walkthrough may be reproduced on another site without permission. Follow this link for details about this site's advertising and privacy policy.
Stella's Tomb Raider Site: tombraiders.net.