Rise of the Tomb Raider - Soviet Installation Survival Caches
Updated: 4/24/16(†)
This guide, along with the annotated level maps linked below, should help find any survival caches you missed. If you are playing through this level for the first time, you may want to follow the main walkthrough instead. If you'd rather not wait for clues, survival caches can be collected before you find the Explorer Satchels that reveal them on your in-game map. Just look out for the flashing light that indicates where each cache is buried. If you can't see the light, move around the general location until you see the Interact icon. Then press Interact to dig.
Weapons, Equipment, and Outfits are covered elsewhere. Other collectibles are detailed on separate pages:
Relics · Documents · Murals · Coin Caches · Strongboxes · Archivist Maps · Explorer Satchels · Codices · Crypt Treasures · Challenges · Missions
SURVIVAL CACHE 1
The first cache is buried near the low wall just north of the Installation Vista Base Camp. You should be able to spot its flashing light. Check the map if necessary. (Click screenshot to enlarge.)
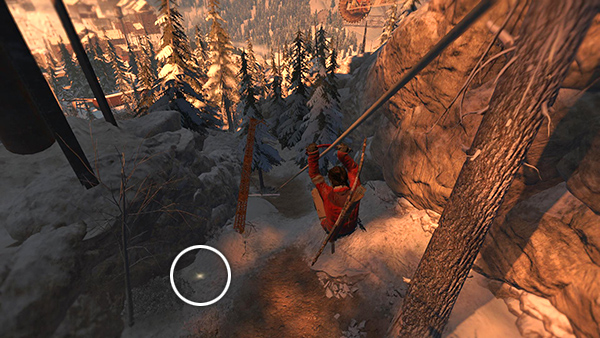
SURVIVAL CACHE 2
The next cache is visible as you're sliding down the zip line from the Installation Vista campsite. It's buried on the left side of the path just before the orange metal pole that anchors the line. It's also numbered on the map. (Click screenshot to enlarge.)
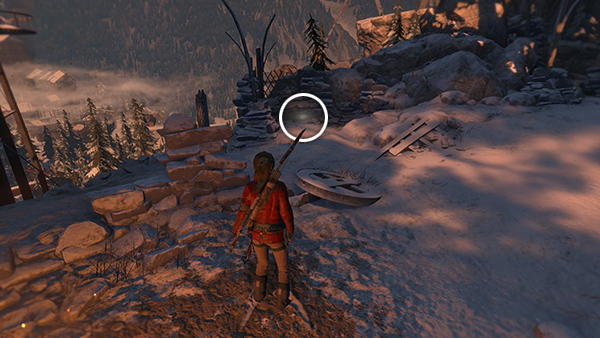
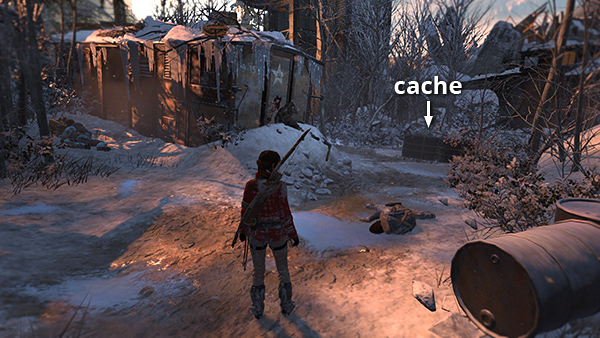
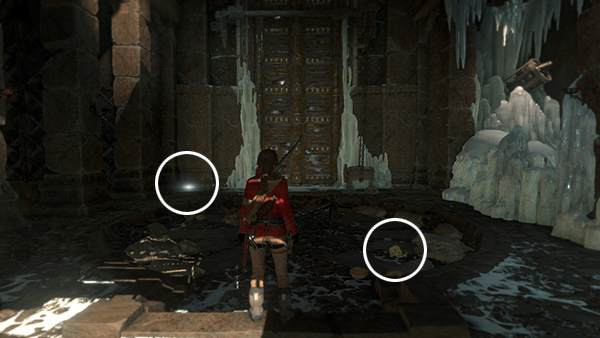
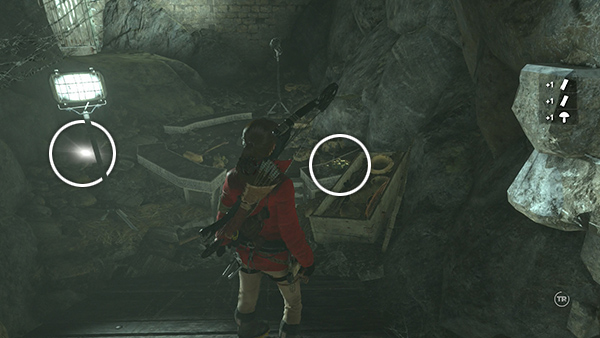
SURVIVAL CACHE 3
In the part of the Installation Vista with the barrels and abandoned boxcar, where you first learn to use distraction by throwing an empty can, there's a survival cache buried behind the boxes with the yellow strapping. Check the map and walkthrough for details. (Click screenshot to enlarge.)
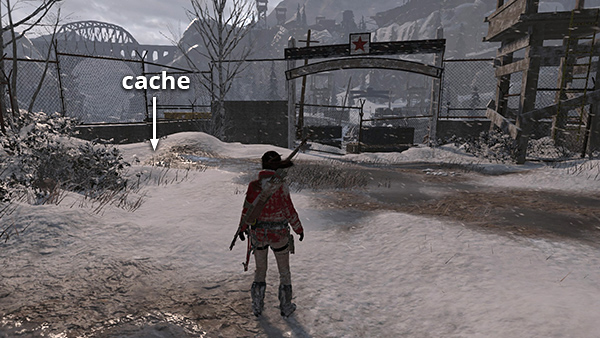
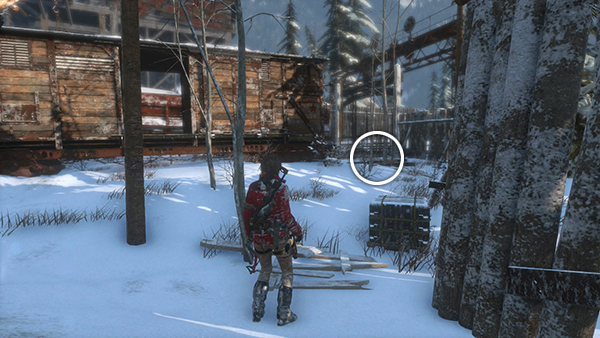
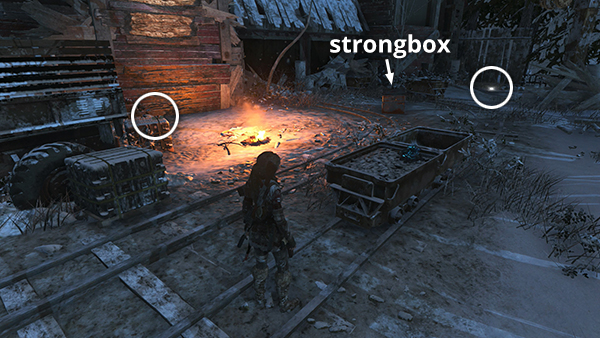
SURVIVAL CACHE 4
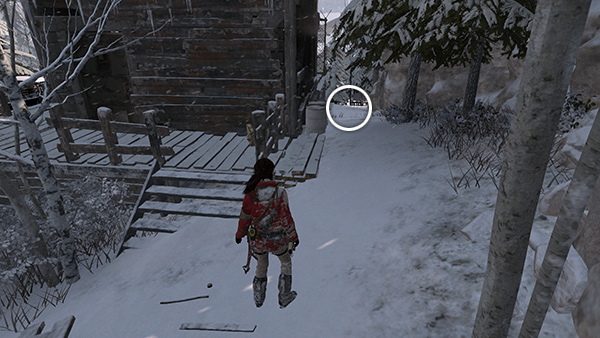
The next cache is just north of the Train Yard Base Camp. It's buried near the chain link fence on the left, just before the guard tower and the gate with the star above. (Click screenshot to enlarge.)
SURVIVAL CACHE 5
This cache is buried behind the Supply Shack, near the Communications Tower Base Camp. Face the entrance to the shack. Then follow the right outer wall to the far (northwest) corner of the building. You should then see the Interact icon showing where to dig. Check the map if necessary. (Click screenshot to enlarge.)

SURVIVAL CACHE 6
There are 3 survival caches in the Gulag area. These are revealed on your map when you find the Explorer Satchel in that area. One cache is buried at the top of the hill with the little shacks where you first fought the armored Trinity heavies. This area is just north of the Gulag Base Camp on the other side of the large gate. (Click screenshot to enlarge.)
SURVIVAL CACHE 7
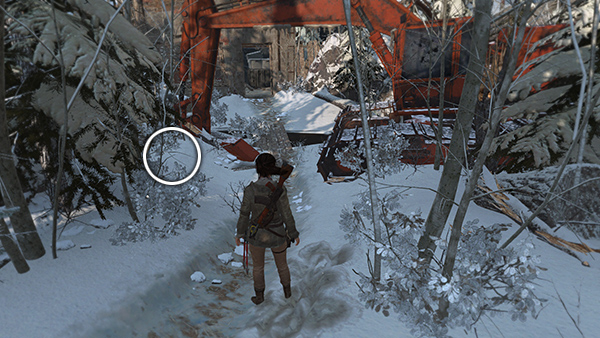
This cache is in the same general area as #7. If you missed it, fast travel to the Gulag Base Camp, squeeze through the gate to the north, go up the hill and through the building shown in the previous screenshot. You'll find the 8th cache buried on the left side of the path just before the abandoned trackhoe. (Click screenshot to enlarge.)

SURVIVAL CACHE 8
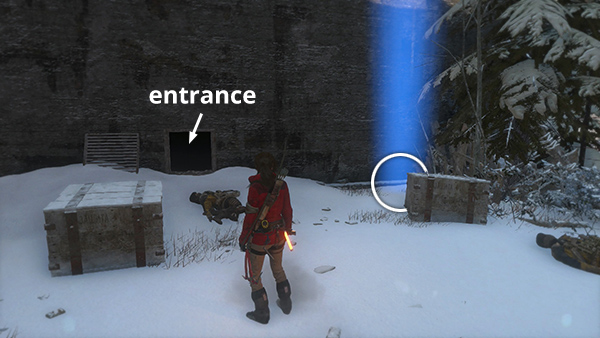
The next cache is beyond cache #8. Pass by the abandoned trackhoe shown in the previous screenshot, enter the next building, and go down the stairs and outside. Climb through the empty boxcar. The cache is buried on the left at the end of the gap between the second and third set of train tracks. (Click screenshot to enlarge.)
SURVIVAL CACHE 9
This cache is in the Train Yard, but you can't reach it during your first visit. After completing the Gulag and unlocking ROPE ARROWS, follow the walkthrough for The Unlucky Ones Mission, which explains how to approach the Train Yard from the northeast. The satchel is sitting near the outer wall of the main building on the east side. It's also marked on the map. (Click screenshot to enlarge.)

SURVIVAL CACHE 10
This cache is buried about halfway between the sawmill and the Sheltered Ridge Base Camp. It's on one of the deer paths between the snow-covered rock formations, nearly due south of the rusty cylindrical water tank near the northern cliff wall. Check the map and walkthrough for details. (Click screenshot to enlarge.)
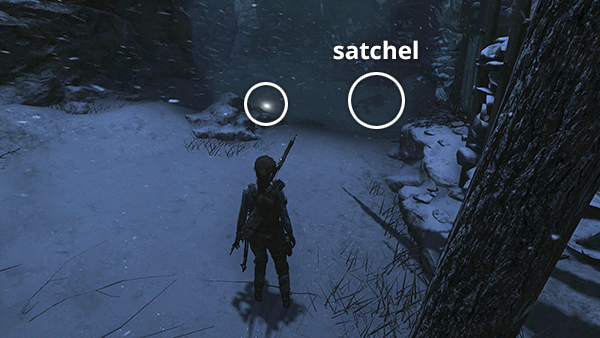
SURVIVAL CACHE 11
The next 3 survival caches are in the Voice of God Challenge Tomb area. Their locations are revealed on your in-game map when you find the Explorer Satchel in front of the tomb entrance. The first of these is buried nearby. See the map and walkthrough for details. (Click screenshot to enlarge.)
SURVIVAL CACHE 12
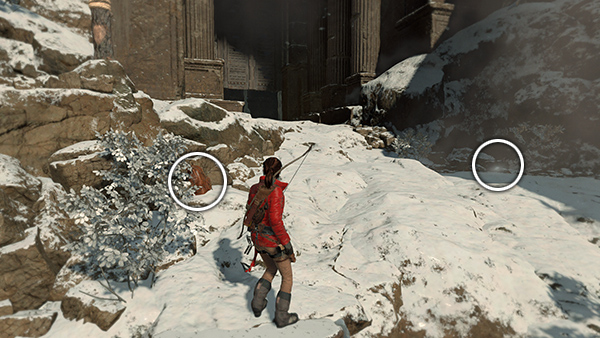
The next cache is inside the Voice of God Challenge Tomb, buried just to the left of the inner gate. There's also a small stack of coins here. (Click screenshot to enlarge.)
SURVIVAL CACHE 13
This cache is on the path leading back from the Voice of God Challenge Tomb, on the ledge just before you slide down the rope line to the second relic. To get it later, return to the Frozen Gorge Base Camp and follow the original route through the canyon, but when you come to the rope line leading to the tomb entrance, don't slide down. Instead climb onto the ledge on the left to find the cache. (Click screenshot to enlarge.)


SURVIVAL CACHE 14
This cache is buried near the edge of the cliff overlooking the river, near the elevated wooden walkway between the main area and the Copper Mill. It's easier to find once you've discovered the 4th explorer satchel. See the walkthrough for details. (Click screenshot to enlarge.)
SURVIVAL CACHE 15
From the Copper Mill Yard Base Camp, go through the gate to the southeast and past the truck and wooden shack. This cache is buried in the corner at the far end of the row of train cars. If you found Explorer Satchel #4 in the cave on the east side of the Logging Camp area (C7 on the annotated map), this cache will be marked on your in-game map. (Click screenshot to enlarge.)
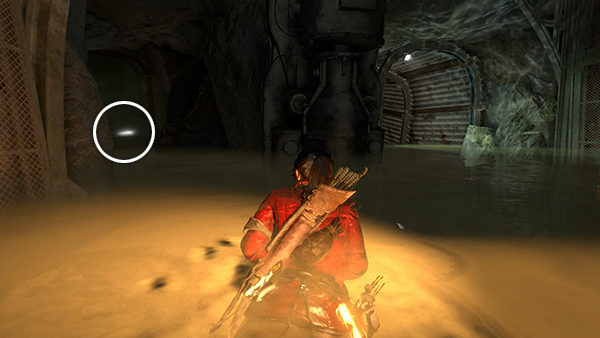
SURVIVAL CACHE 16
The next 3 caches are in the Red Mine Challenge Tomb. It's fairly easy to spot their flashing lights, but once you find Explorer Satchel #5 (here), these caches will also be marked on your in-game map. The first is in the flooded tunnel on the way to the tomb. See the walkthrough for details. (Click screenshot to enlarge.)
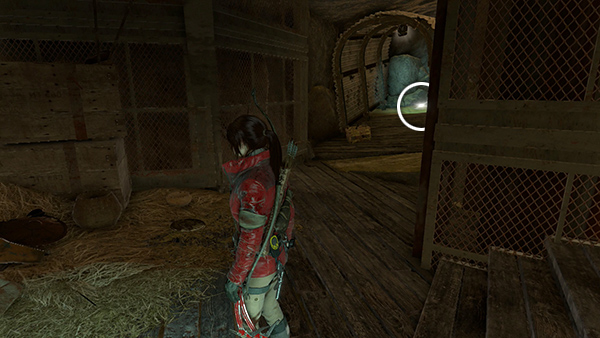
SURVIVAL CACHE 17
This cache is also in the passageway leading to the Red Mine Challenge Tomb. After falling down the mine shaft and sliding into the lower tunnel, continue down the tunnel to the right. A little farther on, the tunnel splits, and this cache is in the dead-end passage on the right. Again, check the map and walkthrough if necessary. (Click screenshot to enlarge.)
SURVIVAL CACHE 18
After completing the Red Mine Challenge Tomb, you'll find this cache (and some gold coins) buried in the room just beyond the codex. If you're backtracking, return to the Excavation Shaft Base Camp, jump over to the platform in the middle of the pit, then to the building on the left. Climb the stairs and go past the codex to find the cache. Again, the map and walkthrough can help if you get disoriented.(Click screenshot to enlarge.)
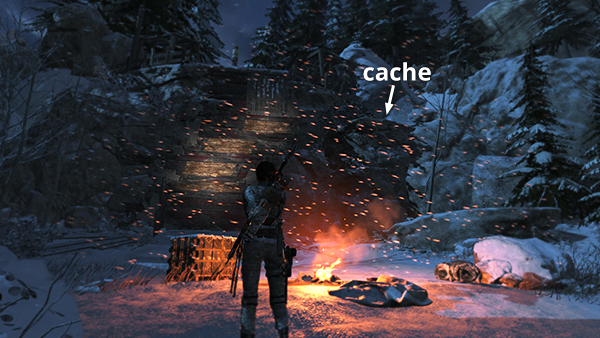
SURVIVAL CACHE 19
You will not be able to reach this cache until you discover the Copper Mill Bridge Base Camp, about two-thirds of the way through the game. The cache is buried just southwest of the campfire. See the map and walkthrough for details. (Click screenshot to enlarge.)
SURVIVAL CACHE 20
This cache is on the ledge above the Communications Tower Base Camp on the way to the Research Base. You won't be able to reach it until you unlock CLIMBING ARROWS by opening the strongbox near the Copper Mill Bridge Base Camp. The cache is right next to Explorer Satchel #6. The walkthrough has details. (Click screenshot to enlarge.)
SURVIVAL CACHE 21
This cache is buried on a small ledge to the right of the high, wooden wall near the Communications Tower Base Camp. Once you unlock CLIMBING ARROWS, you can scale that wall and then drop down onto the ledge with the cache. See the walkthrough for details. (Click screenshot to enlarge.)
Top of Page | Collectible Guides | Main ROTTR Page
†UPDATE HISTORY: 4/24/16 - Page first posted online.
WAS THIS WALKTHROUGH HELPFUL? If not, I apologize and invite you to contact me with any questions. If you need help right away, I recommend the r/TombRaider subreddit. Other fan-run forums are listed at tombraiders.net/stella/community.html. If this site was useful, please consider supporting it financially or in other ways. For details, visit tombraiders.net/stella/support.html. As always, I welcome your corrections/suggestions. Thank you!
Copyright © 2015 - Stellalune (). All rights reserved. Feel free to copy or print this walkthrough for personal use. By all means, share it with friends, but please include this credit line so people can send me their feedback. No part of this walkthrough may be reproduced on another site without permission. Follow this link for details about this site's advertising and privacy policy.
Stella's Tomb Raider Site: tombraiders.net.