STELLA'S TOMB RAIDER 2 REMASTERED WALKTHROUGH
The TR2 Remastered guide is now complete. For the other guides that have not yet been updated, I will continue to link to the ORIGINAL WALKTHROUGHS, which cover all the basics. Please check the introductory notes at the start of the first level for info on my process, modern vs. classic tank controls, etc. This guide covers most but not all possible achievements/trophies. Follow this link for the archived classic guide.
LEVEL 13: CATACOMBS OF THE TALION (Remaster)
Updated: 8/1/26(†)
Pickups: 39, including 2 Tibetan Masks and 3 secrets
Kills: 33
NOTE: The number of pickups includes the three dragon statuettes and the bonus items awarded for finding all three secrets. Also, the regular pickups here will include the UZIS, GRENADE LAUNCHER, and AUTOMATIC PISTOLS if you don't already have them.
LEVEL MAP by VGCartography (used with permission)
Catacombs of the Talion Video Walkthrough by Eldincy‡
OBJECTIVES: Make your way through the caverns to a large cave with a pool and cage. Here you'll find a Tibetan mask, which functions as a key, allowing you to enter the next area. The goal there is to find another mask and use it to enter one of the buildings. Inside is a switch that opens a door elsewhere, allowing you to reach the upper levels, where you'll find a switch that opens yet another set of doors. In the final area, you must navigate a tricky sequence involving a timed door and some spikes. Once you pass it, you'll be able to climb down into the next level.
ENTRANCE AND DARK CAVERN: Walk carefully down the stairs on either outer edge to trip 2 sets of falling icicles without being impaled. (These are icicle traps 9-10 of 19 for the "Public Service" achievement/trophy. The first 8 were in the TIBETAN FOOTHILLS.) In the next room, along the left wall, is a crevice. Grab it and traverse to the right until you can pull up. Drop down behind the wall to find some flares (1) and SECRET #1, the Silver Dragon (2). (screenshots)
Climb back into the opening and jump onto the slippery slope below, slide back, and grab the edge. (Cue the jump-scare music!) Then pull up and quickly press Jump to backflip onto the ledge behind. From here you can kill the Yeti (1) lurking below. If he tries to hide in the cave, take a running jump across the gap onto the slope, slide back, and grab the edge again. Then dangle there for a moment to get his attention before pulling up and backflipping onto the safe ledge. Or, just drop into the pit and kill him quickly with the Uzis. (screenshots)
At the bottom of the dark room where the Yeti was, pull the switch on the right side of the barred opening. This opens a painted wooden door above, letting in a snow leopard (2). Don't worry; it can't reach you down here. Climb the stairs, then the ladder, and dismount on the right. The leopard will soon appear on the ledge opposite the slippery slope. You may be able to shoot it across the hole in the floor. Jump onto the slope once more, slide backward, grab the end, pull up, and backflip onto the ledge. If you didn't kill the leopard at first, it will charge up the stairs now. Walk carefully down the stairs, staying to either side to trip 2 more icicle traps (11-12/19). At the bottom, go through the wooden door you opened with the switch. (screenshots)
CAVERN WITH POOL AND CAGE: As you go down the stairs toward the pool, 2 armed enemies (3-4) will come in behind you through the door at the top of the stairs. They appear when you step on or jump over any of the three steps at the top of the lowest flight of stairs. If you move onto one of the trigger steps then roll, you can shoot the thugs as they descend. Or, move into the open area near the pool and flip side to side while firing. Loot the bodies for a large medi pack, automatic pistol clips, and 2 sets of Uzi clips (3-6). (screenshots)
NOTE: You can avoid these enemies at first if you don't pass over any of the trigger tiles. However, you'll have to climb these stairs later, so you won't be able to avoid them entirely. Also, if you don't already have the UZIS, you'll get them here along with one set of clips.
Approach the far side of the cavern by moving along the right edge of the pool. Two leopards (5-6) charge from the dark, rocky area ahead. Hop/backflip away while firing. Then go through the small doorway beyond the pool on the right. Follow the ramp down to a small room where you can glimpse the next area through the bars and also pick up a small medi pack (7). Return up the ramp to the pool, then climb the stairs to the first landing. [If you avoided the 2 enemies (3-4) that enter at the top of the stairs, you'll have to deal with them now.] (screenshots)
Now it's time to go after the FIRST TIBETAN MASK in the metal cage above. To unlock the achievement/trophy "And I Want It Now!," you must spring the next snowball trap then get the mask within 25 seconds. Begin on the square ledge next to the steep slope leading up from the stairs toward the cage, with the slope and cage on Lara's left. Save the game. Then take a running jump onto the long slope ahead on the left. Keep running up the slope to trip the snowballs, then jump off the right edge just as you reach the snowy area. Try to curve the jump slightly to the left so Lara lands on the ledge below. Continue running onto the breakaway tiles in the far left corner. Do not pause or Lara will fall into the spikes below. Hold Action as you run straight into the ladder. (Do not press Jump.) Lara will automatically jump in place and grab one of the ladder rungs above. As soon as her feet come up onto the ladder, backflip onto the ledge above and behind. Quickly turn around. (Don't roll.) Run forward then take a standing jump up the slope. Pull the switch on the right to raise the cage protecting the MASK. Turn left, run off the edge, slide briefly, then jump onto the ledge near the mask. (Don't grab or you'll waste precious seconds.) Run forward and pick up the FIRST TIBETAN MASK (8). If you made it in less than 25 seconds (from the moment you tripped the snowballs), the achievement/trophy will pop. (screenshots)
NOTES: This sequence is also shown in a short video. If you don't care about achievements, or already have this one, you can take one of the less fussy routes shown on the page with screenshots.
Taking the MASK causes the trapdoor at the bottom of the pool to open and the water to drain away. Climb down to the floor, drop into the empty pool, then down through the trapdoor. Follow the passageway, jumping over the trench lined with spikes. Just around the corner, place the TIBETAN MASK in the niche to open the gate. Save the game before stepping through. (screenshots)
BUILDINGS WITH WOODEN BRIDGE AND SNOWBALL RAMP: At the top of the ramp beyond the gate are more pesky snowballs. For the "Snowballs Champion" achievement/trophy, you must run to the top of the hill, setting off a two-wave avalanche as you go. Then run back to the gate before the second wave of snowballs stops. The first avalanche is triggered when you move under the gate, the second a little farther up the ramp. To complicate things, 4 leopards (7-10) attack when you step onto the snow on either side of the ramp. So, run through the gate and up the slope, taking running jumps to cover the ground faster. As the snowballs approach, veer to the right to get out of their path and continue running/jumping up the hill alongside them. As they pass, veer left and continue up the middle of the ramp to the top of the slope. Just as you reach the top step, roll and race back down the hill. Again, use running jumps to cover ground faster, and try to avoid the leopards, since they can throw Lara off her stride. You don't have make it all the way through the gate. When Lara reaches the snowy tiles just outside it, as long as the second wave of snowballs hasn't stopped, the achievement/trophy should register. You can then reload or finish off the leopards and continue. (screenshots)
If you don't care about achievements, or already have this one, a fairly safe way to deal with all of this is to run under the gate and quickly climb onto the ledge on the right as the snowballs roll past you. Then hop up onto the snowy block beside the gate. Use pistols to kill the leopards from this safe spot while the avalanche plays out. (screenshots)
There's a ladder and another mask receptacle behind the building to the right of the ramp where the snowballs originated. This is a dead-end until you find another MASK. (screenshots)
Start up the ramp. Stand on the lowest of the tiered blocks on the left. Jump and grab the edge of the wide opening in the left wall, and pull up into the cave. The painted wooden door here doesn't open yet. So drop down into the dark cave. Ahead is an open area with a frozen pond. Don't rush forward. (screenshots)
FROZEN POND WITH FIREPOT ABOVE: When you move out into the open, 6 more leopards (11-16) attack. If you advance cautiously, you can trigger them in pairs. Begin by running out just as far as the snowy ground. This causes the first 2 leopards (11-12) to spawn ahead on the right and charge around the corner toward Lara. Don't wait for them to approach. Just quickly roll and run back the way you came. Jump onto the angled block below the cave opening and shoot the cats with pistols. When you pass under the wide archway leading into the area with the frozen pond, the third and fourth cats (13-14) spawn behind you in the dark cave. If instead you back up toward the frozen pond, you can see them as they appear. Then either run back to the safe block or continue hopping backward while shooting. The last two leopards (15-16) charge toward you when you go through the smaller archway near the frozen pond. If you jump backward while firing, you should be able to take them down before they reach Lara. (screenshots)
OPEN AREA WITH ICE WALL: Once the coast is clear, go through the archway where the last pair of leopards emerged into an open area with a frozen waterfall. Climb onto the snowy ledge just inside on the left. On the other side of these rocks is a small cave with a pool of water. Swim down and pick up a SECOND TIBETAN MASK (9). (screenshots)
NOTE: There are a few spots that you won't be able to reach until the next level. These include some of the high ledges above the frozen pool and the bright object sitting on the little platform under the ice. Be patient.
Climb back out of the water and pull up onto the snowy ledge. Two armed thugs (17-18) now lurk below. Take care of them and steal their small medi pack, Uzi clips, and 2 sets of automatic pistol clips (10-13). (screenshots)
Return through the area with the FROZEN POND to the dark cave on the left, where you came in. Use the angled block to climb back over the ledge into the area with the BUILDINGS AND SNOWBALL RAMP. Jump down, cross the ramp (now safe), then go around the left side of the building beyond the ramp. Climb the ladder and retrieve 2 pairs of grenades (14-15) at the end of the ledge. Drop down and place the TIBETAN MASK in the niche to open the door. (screenshots)
PITCH-DARK ROOM WITH YETIS: There are 4 Yetis (19-22) in this very dark room. Fortunately they're caged and can't get out until you free them. Unfortunately, thanks to Tomb Raider Logic™, you can't shoot them through the bars. If you like, you can save the game and explore using flares to see what's what. Then reload and continue without wasting flares. (screenshots)
From the entrance, follow the left wall to the corner. Turn right and continue, keeping the wall on Lara's left, until you come to a series of gaps in the floor. Jump across the first two gaps to the middle ledge, where there's a brazier (not yet lit) and a switch. When you pull the switch, the braziers ignite, providing a little light but not much. The Yeti cages on the lower level open, along with the bars along the wall near the switch, and floor panels rise to fill the gaps between the ledges. This means the Yetis will be able to reach Lara. Equip the Uzis (or another powerful weapon), and shoot the Yetis as they approach. If any of them manage to reach her, hop down to the floor and continue shooting as they stupidly take the stairs down. One Yeti may not attack at first and instead lurk inside either cage. If so, you'll have to go in and draw it out. (screenshots)
Alternatively, you can throw the switch, run back to the entrance, jump into the doorway, and run outside. The Yetis will be able to follow, but you can shoot them as they emerge, and there's more light and room to maneuver outdoors. (screenshots)
When all the Yetis are dead, claim your reward: Downstairs in the cages you'll find a large medi pack and 2 pairs of grenades (16-18) in one cage, another large medipack and 2 sets of Uzi clips (19-21) in the other. There's also a pair of grenades (22) on the floor in one of the small doorways to the left of the switch. (screenshots)
NOTE: The grenades in the doorway near the switch will be the GRENADE LAUNCHER if you've somehow missed it thus far.
On the upper level, in the corner to the right of the switch, is a movable block. Pull/push it into the first of the small doorways with the gates above. In the room beyond is a second switch. Pull it to open the painted wooden door in the cave opening near the FROZEN POND AND FIREPOT area. (screenshots)
NOTE: The second switch also closes the four gates, preventing you from exiting this room unless you have first moved the stone block under one of the gates. If you didn't do that, use the switch again to re-open the gates, and try again.
Return outdoors through the same door where you entered. Just around the corner on the left, 3 bad guys (23-25) try to stop you. You may be able to deal with them one at a time by waiting just outside the door for each man to approach. Then back away toward the ladder and flip side to side while shooting. This doesn't always work, though. Or, if you're low on health or ammo, you can hop up into the doorway and wait for each of the men to approach. Get a pistol lock, then hop back down into the Yeti room and shoot from relative safety. They're carrying 2 boxes of shotgun shells, 2 sets of automatic pistol clips, Uzi clips, and small medi pack (23-28). (screenshots)
NOTE: If you don't yet have the AUTOMATIC PISTOLS, you'll get them here instead of clips.
DOOR WITH FACE AND WOODEN BRIDGES: Head for the ramp where you triggered the avalanche earlier. Jump from the step beside the ramp to grab the ledge and pull up into the cave, just like you did before. The painted wooden door will be open if you used the second switch in the DARK ROOM WITH YETIS. Go through and cross the first wooden bridge. When you step into the doorway between the two bridges, the snowballs ahead begin to roll. Quickly move onto the ledge on the left, just beyond the doorway, and wait for the snowballs to pass. You're now overlooking the OPEN AREA WITH THE WALL OF ICE. Continue to the end of the bridge. Turn right, take a running jump to grab the ladder hanging from the cavern ceiling, and climb to the top. (screenshots)
SERIES OF ICY POOLS: Jump up the short slope to an opening over water. Drop into the pool below. (This is pool was apparently formed by a spring that has been dammed by the ice wall you saw earlier.) Swim to any of the low edges, climb out of the water, and kill the 3 fish (26-28) that try to nibble on Lara. You may need to take another swim to draw them closer then climb out and shoot. Swim/wade through the opening at one end of the pool into the next cave. Step up onto the ledge on the right. Walk forward carefully to trip 3 more icicle traps (13-15/19) for the "Public Service" achievement/trophy. (screenshots)
Follow the ledges around to the far left. When you reach the the snowy ledge between this cave and the next, turn around and you'll see a ladder above. Climb up as far as Lara will go. Then climb back down one rung. Backflip off the ladder onto the ledge behind you. Here you'll find SECRET #2, the Jade Dragon (29). Once you have the secret, walk back to the edge of the slope, take a standing jump, and grab the ladder. (Or step off, slide briefly, jump, and grab.) Then climb down. (screenshots)
At the bottom of the ladder, turn around, jump in the pool, and swim into the next cave, ahead on the left. The large doors at the far end are closed. Climb onto the block in front of them and take a running jump to grab the bottom of the dangling ladder. Climb almost to the top (up as far as you can, then down one rung) and backflip onto the ledge behind you. Use the switch to open the big doors below. Then either drop into the pool on the side farther from the doorway, where the water is deeper, or use the safety-drop maneuver or "fake grab" to land on the block. (screenshots)
Draw weapons, step into the doorway, and kill a leopard (29) that charges from the left. Then pull the switch on the side of the block to open the big blue doors at the top of the SNOWBALL RAMP. (screenshots)
To get back there, step out onto the ledge overlooking the hanging firepot. Follow the ledge to the left end. Turn around so the firepot is on Lara's left and the open cavern is behind her. Then safety drop onto the slope below and slide to the ground. Turn around and head into the dimly lit cave where you fought the leopards earlier. Use the angled block in the corner to climb into the cave opening. Jump down on the other side near the SNOWBALL RAMP. (screenshots)
AREA BEYOND THE DOORS AT THE TOP OF THE RAMP: If you used the switch above the firepot, the doors at the top of the ramp will now be open. Advance cautiously. There's a wide gap in the floor just inside and 3 leopards (30-32) lurking in the room below. If you have flares to spare, you can drop one into the hole for a better view, but Lara will aim even in the dark. For a better angle, take a running jump across the hole then turn around and fire from above. If the cats run off, either dangle from the edge and pull up, or jump back over to the lower ledge, then back to the higher one to draw them out. Or, if you're feeling brave, ready guns and drop in. When they're dead, retrieve some grenades, a large medi pack, and 3 sets of M16 clips (30-34) in the far corners of the room. When you flip the switch in the alcove below the entrance, the side doors open, and a fourth leopard (33) enters through the door on the right (when facing the switch alcove). Kill it then head back outside. (screenshots)
Return to the top of the ramp, go through the big doors, and take a running jump across the gap. As you start up the slope, the camera zooms out to show the snowballs perched on the hilltops ahead and to the left. You'll need to bring them down in order to proceed. First, position Lara at the base of the wide slope, just left of center. Jump forward onto the slope to trigger the avalanche. Continue to hold Jump so Lara springs back off the slope. Then immediately side flip to the right to land near the square ice window. The snowballs should then roll past harmlessly on Lara's left. (screenshots)
To trigger the snowballs at the top of the narrow slope, stand at its base facing uphill. Jump onto the slope and continue holding Jump to backflip off it. As the snowballs roll down toward Lara, immediately side flip to the right to get out of the way. The snowballs will then roll by, breaking down the ice window so you can enter the next room. (screenshots)
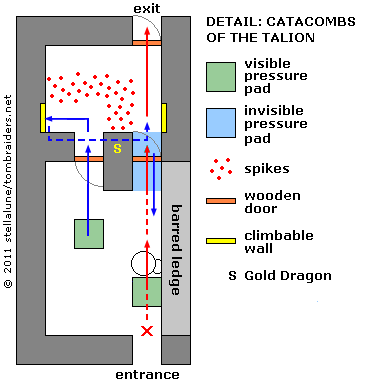
TIMED DOORS AND SPIKES: Enter the room beyond the ice window. Here you'll see two floor tiles that don't match the others. These are pressure pads. Step on the pad on the left to open the wooden door directly in front of it. This door is on a timer, but it's not particularly fast. Climb/jump into the doorway before it closes. Then stop so you don't run into the spikes. The exit, just beyond the spikes, is not open yet. There are two climbable areas on the side walls. (They're a little easier to spot using classic graphics.) Use either one to reach the ledge above the two doors. There you'll find SECRET #3, the Gold Dragon (35), and a bonus of 2 pairs of grenades and 2 sets of M16 clips (36-39) if this is your third secret. (The path to and from the secret is indicated by the blue arrows in the diagram and shown in these screenshots.)
Drop down on the left side of the ledge (right side when facing out over the spikes). Approach the left door, which opens automatically, but don't hop down into the room with the pressure pads yet. (screenshots)
The floor tile just below the doorway contains an invisible pressure pad that closes the door if Lara steps on it. To keep the door from closing, walk to the edge of the doorway and jump forward to land near the snowballs. Then jump over the snowballs or go around them to the doorway beyond. (screenshots)
Turn around to face the snowballs and the door on the right, which should still be open. The pressure pad near the snowballs opens the exit, directly ahead, on the far side of the spike room. It is timed to close after about 8 seconds. To get through, position Lara just inside the doorway facing the snowballs (i.e., on the spot marked with a red "X" in the diagram). Now press and hold Forward and almost immediately press and hold Jump to take two continuous running jumps (indicated by the red arrows in the diagram). The first jump will take Lara over the pressure pad and snowballs, opening the exit in the process. The second will land her in the doorway. (Pulling up is too slow.) Then you can run straight on through the exit before it closes. Once you've cleared the timed door, jump and grab the ladder, climb down, and follow the passage to the end of the level. (screenshots)
NOTE: If you don't reach the exit in time, just turn around and return to the doorway overlooking the room with the pressure pads. Walk to the edge, hop over the tile that closes the door and try again. If you accidentally step on the invisible pressure pad and close the door leading back into the spike room, use the pressure pad on the left (when facing the two doors) to open the left door. Enter the spike room that way. Walk through the spikes and around to the other door.
†UPDATE HISTORY: Updates made prior to the Tomb Raider I-II-III Remastered release, including credit for tips sent in by other players, are tracked in the archived classic guide.
8/1/26 - Remastered guide posted. Better late than never. :D
‡NOTE ON VIDEO GUIDES: Eldin's videos don't always follow the same strategies I use in my walkthroughs, but if you prefer that format, I think you'll find them very helpful.
DARK MODE: I plan to add optional dark mode for these pages, but my current priority is updating the walkthroughs. Meanwhile, may I suggest a reputable dark mode browser extension, such as Dark Reader? (Download only from trusted sites, like darkreader.org or your browser's official add-on/extension site.)
WAS THIS WALKTHROUGH HELPFUL? If not, I apologize and invite you to contact me with any questions. If you need help right away, I recommend the r/TombRaider subreddit. Other fan-run forums are listed at tombraiders.net/stella/community.html. If this site was useful, please consider supporting it financially or in other ways. For details, visit tombraiders.net/stella/support.html. As always, I welcome your corrections/suggestions. Thank you!
Copyright © 1998- - Stellalune (). Feel free to copy or print this walkthrough for personal use. By all means, share it with friends, but please include this credit line so people can send me their feedback. No part of this walkthrough may be reproduced on another site without permission. Follow this link for details about this site's advertising and privacy policy.
Stella's Tomb Raider Site: tombraiders.net.