STELLA'S TOMB RAIDER 2 REMASTERED WALKTHROUGH
The TR2 Remastered guide is now complete. For the other guides that have not yet been updated, I will continue to link to the ORIGINAL WALKTHROUGHS, which cover all the basics. Please check the introductory notes at the start of the first level for info on my process, modern vs. classic tank controls, etc. This guide covers most but not all possible achievements/trophies. Follow this link for the archived classic guide.
LEVEL 2: VENICE (Remaster)
Updated: 8/1/26(†)
Pickups: 30, including automatic pistols, 2 keys, and 3 secrets
Kills: 24
NOTE: The number of pickups includes the three dragon statuettes and the bonus items awarded for finding all three secrets. See the footnote following the first level for details on how kills, pickups, and the related achievements/trophies are tracked.
LEVEL MAP by VGCartography (used with permission)
Venice Video Walkthrough by Eldincy‡
OBJECTIVES: Obtain a motorboat. Then go through the dark, flooded tunnel to the second part of the level. Once there, open two gates, clear away the underwater mines blocking the exit, and proceed to the next level.
With its various interconnected canals, multiple switches, doors, etc., this level can be a bit confusing. The map below shows the basic layout of the area, along with points of interest, which are labeled (A-V) and referenced in the walkthrough. (To open the map in a separate window, click here.) The isometric map by VGCartography offers a more detailed view.
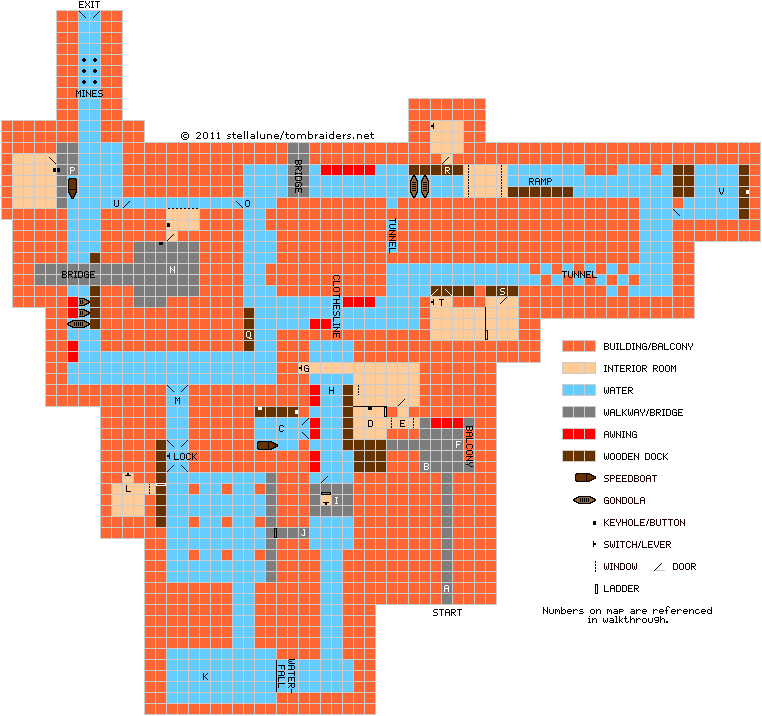
FIRST CANAL WITH BOATHOUSE: This level begins in a narrow alley (A on the map). Turn around and advance, pistols drawn. As you near the end of the alley, a Doberman (1) appears in the courtyard ahead. As soon as you get a lock on it, hop back while shooting, and you should be able to kill it before it reaches Lara. (screenshots)
Continue into the courtyard. A sniper (2) will fire at you from a balcony above on the right, so take care of him too. Here it may help to run out of the alley into the near left corner of the courtyard (B on the map), roll, and shoot at the sniper while jumping straight up and down. Don't enter the next alley on the left yet, though, since this will trigger the appearance of more enemies. (screenshot)
The sniper drops a key, but you can't reach it from below. So for now, proceed down the other alley leading out of the courtyard. Another dog (3) and a club-wielding thug (4) emerge from the building on the right. To avoid being surrounded, run forward, get a lock on the dog and hop/backflip away shooting. Then repeat the process with the man. Afterward, be sure to pick up the small medi pack (1) he drops. (screenshot)
For now, bypass the small wooden building where the man and dog came from. Across the canal there's a BOATHOUSE with a large wooden door. Swim underneath the door to get inside (C on the map).
IMPORTANT: If you're going for the achievement/trophy "I'm Not Your Tourist," you must finish the Venice level without ever getting on a boat. "Let's Saddle Up" and "Cooler than Moonraker" require you to drive the boats, so if you want to unlock all three in the same playthrough, you'll need to replay parts of the level. See the footnote for details.
Ignore the speedboat and climb out of the water on the wooden walkway to the right. Here you'll find a button on the left and a keyhole on the right. You don't have a key yet. So push the button to open a door elsewhere. Swim back under the door and across the canal. Then climb out of the water and enter the small wooden building (D on the map). Take the flares (2) off the table. Push the button to open the trapdoor above. Then either climb the ladder or pull up through the opening to the second floor. Push another button here to open a second trapdoor and close the first. Climb onto the roof. (screenshot)
Climb onto the windowsill on the left. Step back to the edge of the sill. Then jump forward into the glass window. It should shatter, unlocking the "Emergency Exit" achievement/trophy ("Break any window with yourself"). You can also shoot glass windows with your pistols. So if you miss this opportunity, there are many other windows in the various Venice levels. (screenshots)
Ignore the room off to the left for now. Shoot the window opposite the one where you just came in (E on the map). This window overlooks the courtyard near the level entrance. Jump across the gap onto the red awning. Cross the awning and hop over to the balcony ahead on the right. Take the BOATHOUSE KEY (3) (F on the map) from the sniper you shot earlier. To get back onto the awning, move to the corner of the railing, step back a little, then take a standing jump. Walk to the far end of the awning and take a standing jump into the window. (screenshots)
Draw pistols and follow the hall to the right. There's a Doberman (5) on guard in the checkerboard-tiled room. Get a lock on it and hop back firing. Cross the checkerboard floor, follow the glassed-in walkway to the end, and throw the switch (G on the map) to open a door outside, above the canal. (screenshots)
NOTE: If the door to the checkerboard-tiled room is still closed, you missed a button. Climb back out the window onto the wooden building with the trapdoors. Drop into the canal and swim under the wooden doors into the boathouse. Climb out on the ledge and press the button to open the door to the checkerboard room. (screenshots) Then climb back up through the trapdoors like you did earlier. Kill the dog and pull the switch.
Return to the checkerboard room and shoot out the window. Take a running jump from the windowsill to grab the red awning on the other side of the canal (H on the map). Pull up. Turn left and jump across the red awnings to the door you just opened with the switch. Climb inside and throw another switch (letter I on the map) to open the door in the fence below. (screenshots)
NOTE: Some people have trouble here because they try to jump from the top of the wooden building to the awning, which is too far. In order to make the jump across the canal, Lara must begin in the window of the room with the checkerboard floor, which is slightly higher. This is also the first place in the game where it's really important to set up your running jump in order to make it. This process is detailed in the screenshots, as well as in a short video on the main Strategy page.
After pulling the switch, jump down into the water, swim under the boathouse door once more, and use the BOATHOUSE KEY to open the door. A masked thug with a gun (6) appears on the dock by the small wooden building. Swim across the canal and climb out of the water near the middle of the dock. This will give you room to maneuver. When the enemy comes around the corner, hop back along the dock while firing. Relieve him of his AUTOMATIC PISTOLS (4). (screenshots)
IMPORTANT: If you're hunting achievements/trophies, save the game before using the boat, and do not overwrite this save. Then, when you've beaten the level normally, you can replay without boats for "Not Your Tourist" (below). The speedboat controls are listed on the TR2 Controls page.
Swim back into the boathouse, climb into the speedboat and drive out into the canal. If you don't care about achievements, skip to the next section. Otherwise, to unlock the "Let's Saddle Up" achievement/trophy, position the boat facing away from the door in the chain-link fence, with the red-and-white striped pole on your right. (screenshots)
Once you have the boat in place, press Jump + Left or Right to get out. Climb out of the water. Then climb up through the wooden building with the buttons and trapdoors, just as you did earlier. Climb in through the window and return to the room with the checkerboard floor. Take a running jump across the canal to grab the red awning. Pull up and once again make your way across the awnings to the raised alcove with the switch. (screenshots)
Walk to the edge of the switch alcove overlooking the canal. Save the game just in case. Then take a standing jump and hold Action to (hopefully) land in the boat and unlock the achievement/trophy. (screenshots)
DARK, FLOODED TUNNEL & BOAT LOCK: Drive through the door in the chain-link fence. On the right, just beyond the entrance, is a small passageway (J on the map). Steer the boat alongside it and press Jump + Right to hop out of the boat into the passage. Here you'll find SECRET #1, the Silver Dragon (5), plus some flares (6). (screenshots)
NOTE: Since flares are limited at this early stage, you can try to conserve them by saving your game before entering dark areas. Then you can use as many flares as you like during your initial exploration. Once you know where key items are located, reload your save and head straight toward them, using only as many flares you need. If you run out of flares, try cranking up the brightness in the Controls menu, or fire your basic pistols for light.
Just beyond the flares is a ladder leading down and 2 rats (7-8) on the ledge below. You must avoid taking damage from rats during the three Venice levels if you want the "No Time for the Plague" achievement/trophy. You can just avoid these two and not miss any pickups. But if you do want to kill them, you'll have a better angle shortly. (screenshots)
Hop back in the boat and continue through the dark tunnel. Turn right then drive over a small waterfall. On the bottom of the pool below the falls is SECRET #2, the Gold Dragon (7) (K on the map). After retrieving it, hop back in the boat and take the only exit from this room into a DARK ROOM WITH MANY SQUARE PILLARS. (screenshots)
Underwater, just to the left of the entrance, are 2 sets of Uzi clips (8-9). On the right is the ledge with the 2 rats (7-8). Again, you can just ignore them, but if you want all kills, climb out of the water at the right end of the ledge and quickly shoot them before they bite Lara. (screenshots)
BOAT LOCK: In the far left corner of the DARK ROOM WITH MANY SQUARE PILLARS there's a wooden ledge with a small door, a window, and a ladder going up. Maneuver the boat into the flooded alcove to the right of the ladder. Note the lever high on the left wall. This alcove is actually a lock, which will raise your speedboat up to the next area. (screenshots)
Hop out of the boat, swim to the ledge, and climb out of the water. There's a rat (9) on this ledge as well; kill it quickly before it can bite Lara. The door doesn't open, so shoot out the window and continue firing to dispatch the thug (10) in the next room. Grab his automatic pistol clips (10) and the shotgun shells (11) in the dark corner near the door. Pull the switch to close the boat lock doors and raise the water level. (There's a sound of rushing water.) Go back out the window, climb the ladder, jump in the water, and pull the lever, which is now submerged. This opens the doors leading to the next area (L on the map). (screenshots)
SECOND MAIN AREA - CANALS: As you enter this area from the BOAT LOCK (M on the map), turn left, then right. Ram the speedboat through the 3 gondolas to clear a path (hold Action + Forward for a speed boost) then stop and reverse a little if necessary. Hop out on the wooden dock on the right, where the gondolas were parked. If you move to the far end of the dock, below the stone bridge, you can probably target the armed thug (11) patrolling the CONCRETE DOCK in front of the next building. If not, don't worry; you can deal with him later. (screenshots)
STONE BRIDGE & ROOF GARDEN: Climb onto the raised wooden block at the other end of the dock. Walk to the edge and jump to grab the red awning on the other side of the canal. Pull up and walk to the right edge of the awning. Take a standing jump onto the stone bridge. Then immediately backflip onto the awning to avoid the Doberman (12) and bat-wielding thug (13) that rush you from the left. They can't jump far, so you can shoot them from safety. (screenshots)
Jump back onto the stone bridge and advance cautiously to the right. Another armed baddie (14) lurks in this lovely roof garden. There's plenty of room to avoid him as you fight. You can also backflip away onto the bridge. Just take care not to fall off. The bat thug drops a large medi pack (12). (I guess the big oaf forgot to use it while you were shooting at him.) The enemy with the gun has a STEEL KEY (13). Use it to unlock the door in the roof garden (N on the map). Enter, drop through the hole in the floor, and flip a switch to open a TALL METAL GATE (O on the map). When you climb back up to the roof garden, another guy with a gun (15) is waiting. Kill him and take 2 sets of automatic pistol clips (14-15) off his corpse. (screenshots)
CONCRETE DOCK: If you weren't able to kill the armed thug (11) on the concrete dock farther down the canal before, you can now target him from the bridge. When he's dead, go and lift 2 sets of M16 clips (16-17) off him. There's a locked door here (P on the map), and you don't yet have the key. There's also a second speedboat parked alongside the steps. (screenshots)
CLEARING THE MINES: You still have work to do here, but if you like, you can take a few minutes to unlock the "Cooler Than Moonraker" achievement/trophy. Get into either boat and maneuver it into the narrow alley with the huge clock at the end. Don't go too far in, or you'll set off the underwater mines. (The big door under the clock is the LEVEL EXIT. You'll return here later.) Position the boat near the left wall, just before the mines. Swim to the other boat and position it underneath the hanging lantern and facing the big clock. Save the game, since this may take a few attempts. Race forward toward the clock and the mines (hold Action + Forward for a speed boost) and jump out on the left side, just before you reach the second boat. Hold Action to land in the driver's seat, as the first boat continues forward, detonating the mines. If your timing is good, the achievement/trophy should pop. If not, reload and try again. (screenshots)
Now, drive the remaining boat back the way you came. Just beyond the entrance to the BOAT LOCK (M), now on your right, is another wooden dock with yet another armed thug (16) (Q on the map). Either park next to the dock and jump out onto it or leave the speedboat near the BOAT LOCK, swim to the corner, pull up onto the dock, and take out the bad guy. Two shotgun blasts at close range will do the trick. He drops a large medi pack and 2 boxes of shotgun shells (18-20). (screenshots)
Get back in the boat and continue straight past the dock where you killed that last thug. Ignore the canal off to the right. At the next corner, pass the gate you just opened (O) and turn right, under another stone bridge. (screenshots)
SECOND WOODEN DOCK WITH GONDOLAS: Ahead is a dock with 2 parked gondolas (R on the map). Ram the gondolas to destroy them, since you'll need a clear path here later on. When you step on the dock, a bad guy (17) with a bat comes through the door. Kill him quickly. Or, to conserve health and ammo, immediately jump into the water and swim to the corner beyond the boat, where Lara can stand in the shallow water and shoot from safety. Retrieve the small medi pack (21) the bat man drops. Step into the doorway, then step back and shoot 2 rats (18-19) that emerge. (Don't let them bite Lara if you want the "No Time for the Plague" achievement/trophy.) Enter and flip the switch to open a door elsewhere. (This door is marked S on the map.) (screenshots)
Now go after a secret. Just above the dock outside the room with the switch, there's a glassed-in walkway. You can see the secret through one of the windows. Stand below the walkway and jump straight up to grab the edge. If Lara doesn't grab it at first, just hold Action + Jump and she'll gradually hop her way forward until she's able to grab. Pull up and shoot out the window. Enter and pick up SECRET #3, the Jade Dragon (22), plus 4 sets of automatic pistol clips (23-26) if you also found the other two secrets. (screenshots)
NOTE: This is also a good spot for the "Emergency Exit" achievement/trophy, if you didn't get it earlier. Just jump forward through any of these windows to shatter it with Lara's body. If you missed the secret and moved on, don't worry. You'll be able to get it later from the other side.
COVERED DOORWAY & FLOODED ROOM WITH LADDERS: Return to the boat and drive through the narrow waterway across from the dock. (This is labeled "TUNNEL" on the map.) When you emerge from this tunnel, turn left and proceed forward. Stop the boat near the covered doorway (S) just beyond the small wooden dock. This is the door that you opened with the last switch. When you step out here, another masked gunman (20) appears on the small dock just to the right. You can kill him now or wait and do it from above, which is probably easier. (screenshots)
Go through the door into a room with shallow water on the floor and ladders on the walls. The door closes behind you. Pick up an IRON KEY (27) and climb up through the hole in the ceiling. There are enemies—a thug (21) with a bat and a dog (22)—waiting on the floor above. To avoid being ambushed, climb the section of ladder on the right when facing the corner below the opening. At the top, pull up, run forward into the room while drawing weapons, and then quickly roll and start shooting. Jump and dodge as needed, but watch out for the hole in the floor. (screenshots)
Afterward, take a small medi pack (28) off the thug and pull the switch that opens the double doors nearby (T on the map). If you didn't kill the gunman below (20) earlier, you can shoot him through the gap between the door on the right and the wall. Just equip pistols, get a lock on him, and hold Action. Lara will do the rest. (screenshots)
The IRON KEY you found in the flooded room opens the door back at the CONCRETE DOCK (P on the map). So return to your boat. Turn around so the covered doorway where you entered this building is on your left. Then drive forward along the canal as it bends slightly to the left. Pass beneath a CLOTHESLINE (labeled on the map) and continue straight on to the wooden dock where you shot another gun-toting bad guy earlier (Q). Turn left there, then right, and go past the entrance to the BOAT LOCK (M). Turn right at the next corner, pass under the STONE BRIDGE that leads to the ROOF GARDEN, and continue straight on to the CONCRETE DOCK (P), which will be on the left side of the canal. (screenshots)
CONCRETE DOCK (again): If you didn't deal with the armed goon (11) here before, you'll need to fight him now. He drops 2 sets of M16 clips (16-17). Use the IRON KEY to unlock the door and take out another goon (23) with a gun who emerges. Relieve him of a small medi pack (29). Go inside and flip the switch to open the SECOND TALL GATE (U on the map). (screenshots)
OPENING THE EXIT: If you haven't already done so, you'll need to destroy the underwater mines blocking the LEVEL EXIT, which is under the big clock beyond the CONCRETE DOCK (labeled "EXIT" and "MINES" on the map). You can use two speedboats and earn the "Cooler Than Moonraker" achievement/trophy, detailed above. Or, drive either boat toward the mines (Action + Forward for speed boost) and jump out at the last minute, so the boat continues forward, detonating the mines. (screenshots)
Now proceed to the room with the button that opens the LEVEL EXIT. In true Tomb Raider style, this button is as far away from the door as it could possibly be. ;-) From the CONCRETE DOCK, drive through the narrow waterway with the TALL IRON GATES you opened earlier (U and O on the map). Take a slight jog to the left and continue straight, under the stone bridge. Approach the next wooden dock (S), and if you didn't smash the 2 gondolas here earlier, do that now. Turn right into the narrow, covered alleyway (marked "TUNNEL" on the map), then left past the COVERED DOORWAY (S), and on through a wider TUNNEL. Now turn left again and you'll end up near two doorways—a smaller door at water level and a large, open bay—both leading into the same DARK, LOW-CEILINGED ROOM. Inside is the button that opens the exit, guarded by a bad guy (24) with a gun. If you pull your boat up alongside the open bay, you can jump out onto the wooden ramp and shoot him from there. Search his corpse for some auto pistol clips (30). (screenshots)
IMPORTANT: Make sure you have everything, since we're about to finish the level. Every part of the level is still accessible in case you need to backtrack. You won't be able to climb the waterfall in the dark, flooded area, but the ladder in the DARK ROOM WITH MANY SQUARE PILLARS leads back up to the starting area.
If you missed SECRET #3, the Jade Dragon (22), it's easy enough to get it now. Just swim across to the steep, wooden ramp that runs along the wall beside the canal. Run up the ramp, shoot out one of the windows, and enter the glassed-in walkway to find the dragon sitting on a low pedestal. Then return to your speedboat. (screenshots)
RACE TO THE EXIT (OR NOT): The button on the wall in the dark, flooded room (V on the map) opens the LEVEL EXIT, which is located beneath the clock, beyond the underwater mines you cleared earlier. When you press the button, a brief cutscene shows the doors opening. As soon as you pass over the wooden threshold, a timer starts, a bell in the clock tower begins to ring, and you have about 24 seconds to get to the exit before the bell tolls thirteen and the doors close.
There are basically two ways to do this: One is an exiting, James Bond-style speedboat race; the other—geared toward tourists and type-B personalities—involves a more leisurely ride through the canals. Take your pick.
NOTE: Both strats are detailed with screenshots below and shown in this gameplay video. This was made in the classic game but the layout of the level is exactly the same.
BOND METHOD: First, set things up for a smooth run. Drive the speedboat through the small doorway into the DARK, LOW-CEILINGED ROOM with the button. (If this door is still closed, just pass through the wide opening at the top of the wooden ramp, and the door should re-open.) Position the boat just in front of the button, facing out toward the left side of the wide opening and the steep ramp leading up to the glassed-in walkway. Press the button to open the EXIT DOORS. The timer doesn't start until you cross the threshold, so there's no need to hurry yet. Hop into the boat, and save the game. Then, if you don't reach the exit on the first try, you can just reload and try again, rather than having to drive all the way back and reposition the boat. (screenshots)
When you're ready to go, press Forward + Action to gun the engine and take off over the wooden threshold. This is when the timer starts. Keep holding Forward + Action for turbo speed as you cruise up the wooden ramp, crash through the glassed-in walkway, and land in the canal below. (As you race up the ramp, you can lightly tap the Left/Right controls if necessary to stay on course, but if you lined up the boat correctly before takeoff, you won't need to do much.) (screenshots)
Continue straight ahead under the stone bridge. Ease off the Action button as you steer left then immediately right, into the narrow passageway with the raised metal gates at each end (O and U on the map). Hold Action again for a speed boost as you race through the narrow passageway. At the other end, release Action, turn hard right, then press Action again to zoom past the CONCRETE DOCK (hopefully you detonated them earlier), then the underwater mines (hopefully you detonated them earlier), and on to the exit. Brava! (screenshots)
- OR -
RELAXED METHOD: Park the speedboat outside the dark room with the button. Go in, press the button, to open the exit, then swim out under the door. (screenshot) Then the timer never starts, and you can proceed to the exit at your leisure. You can follow the same route as in the previous set of screenshots if you like, or go any which way. Even if you decide to swim all the way to the exit, there will be a new speedboat waiting for you in the next level.
NOTE: Now, if you want the "I'm Not Your Tourist" achievement/trophy, save the game in BARTOLI'S HIDEOUT and follow the guide in the footnote.
†UPDATE HISTORY: Updates made prior to the Tomb Raider I-II-III Remastered release, including credit for tips sent in by other players, are tracked in the archived classic guide.
8/1/26 - Remastered guide posted. Better late than never. :D
"I'M NOT YOUR TOURIST" ACHIEVEMENT/TROPHY: This one requires you to complete the level without ever getting on a boat. Since some of the other achievements/trophies require you to use the boats, you will need to replay this level at least once to unlock everything. I recommend saving the game near the beginning of the level, before getting into the first boat. Then change save slots. Do a normal playthrough, with all pickups, to get the lay of the land and unlock the boat-related achievements. Then, when you reach the next level, BARTOLI'S HIDEOUT, save the game in a new slot, and reload the save you made before using the boat.
If you accidentally got into a boat before realizing this achievement exists, make a new save in BARTOLI'S HIDEOUT. Then reload any VENICE save and restart the level: Let Lara die (drown, shot, etc.). Then press Action/Enter to open the Passport menu. Page to the right and choose "Restart Level."
Now, follow this route to complete the level quickly without boats:
Do everything normally in the first area, except there's no need to bother with the sniper and the BOAT HOUSE KEY he drops. Once you've pulled the switch (letter I on the map) to open the door in the chain-link fence at water level, swim through into the dark, flooded area. Climb into the passageway on the right (J) with the Silver Dragon, which you can ignore, assuming you got all pickups in your first playthrough. Drop down onto the ledge with the 2 rats. Swim across the dark room with square columns to the far right corner. Kill the rat here, shoot out the window, and kill the enemy inside. Pull the switch (L) to cycle the BOAT LOCK. Then climb the ladder, jump in the water, and swim out under the door into the second area. (All this is covered in the main walkthrough. You're just doing it without the boat and avoiding unnecessary steps.)
In the second main area, follow the canal to the right. Swim underwater past the enemy on the dock at the next corner. Then take the next right. Swim under the CLOTHESLINE (labeled on the map). Pass the next wooden dock (S), which will be on your right, and continue through the wide TUNNEL. At the next corner, turn left and approach the doorway just ahead on the right. Stand in the shallow water in the doorway and shoot the enemy guarding the button (V).
Press the button to open the LEVEL EXIT. Then swim out under the door, the same way you came in. As long as you don't cross the wide threshold at the top of the wooden ramp, the timer won't start. Swim across to the steep, wooden RAMP, and follow it up to the glassed-in walkway with the Jade Dragon. Shoot out the windows and dive into the canal on the other side (R). Now swim straight on, under the stone BRIDGE. Take a slight jog to the left and swim under the TALL METAL GATE (O). Swim/wade through the narrow alley, then swim out under the second TALL GATE (U). Turn right and swim underwater to minimize damage from the enemy standing on the CONCRETE DOCK (P). Finally, swim past the underwater mines (Lara won't set them off), toward the big clock, and wade on to the exit. The achievement/trophy should pop along with the statistics screen. (screenshot) Now reload your previous save from BARTOLI'S HIDEOUT and continue.
NOTE ON LEVEL MAPS: Special thanks to VGCartography for the excellent level maps, which are used here with permission. Visit VGCartography on DeviantArt and follow on Twitter/X and YouTube for more fantastic game maps.
‡NOTE ON VIDEO GUIDES: Eldin's videos don't always follow the same strategies I use in my walkthroughs, but if you prefer that format, I think you'll find them very helpful.
DARK MODE: I plan to add optional dark mode for these pages, but my current priority is updating the walkthroughs. Meanwhile, may I suggest a reputable dark mode browser extension, such as Dark Reader? (Download only from trusted sites, like darkreader.org or your browser's official add-on/extension site.)
WAS THIS WALKTHROUGH HELPFUL? If not, I apologize and invite you to contact me with any questions. If you need help right away, I recommend the r/TombRaider subreddit. If this guide was useful, please consider supporting my work financially or in other ways. For details, visit tombraiders.net/stella/support.html. As always, I welcome your corrections/suggestions. Thank you!
Copyright © 2000- - Stellalune (). Feel free to copy or print this walkthrough for personal use. By all means, share it with friends, but please include this credit line so people can send me their feedback. No part of this walkthrough may be reproduced on another site without permission. Follow this link for details about this site's advertising and privacy policy.