Shadow of the Tomb Raider - Mission of San Juan Documents
Updated: 10/31/21(†)
This guide focuses on revisiting the level after completing it. If you are playing through for the first time, you may want to follow the main walkthrough instead to avoid possible spoilers. Collectibles are numbered in the order they appear in the main walkthrough and on the annotated level map.
Follow this link for a List of All Artifacts by Story/Dialect.
Treasure Chest · Relics · Documents · Murals · Monolith · Survival Caches · Explorer Backpacks · Archivist Maps · Artifacts & Photos · Challenge
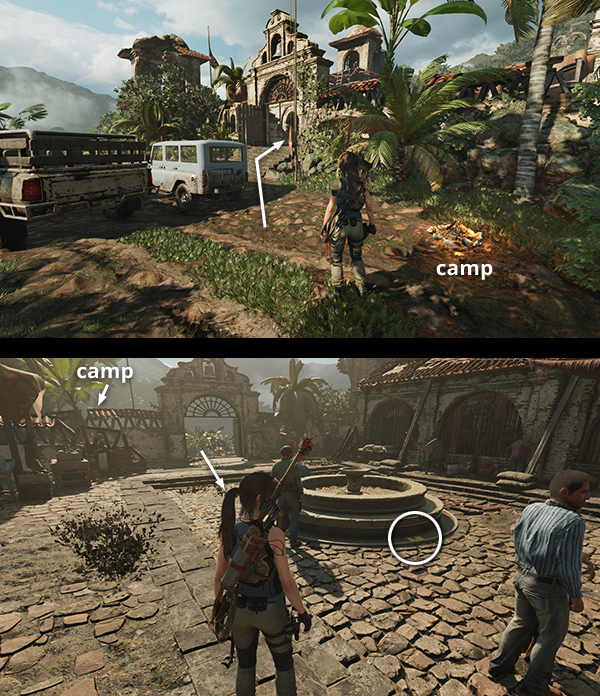
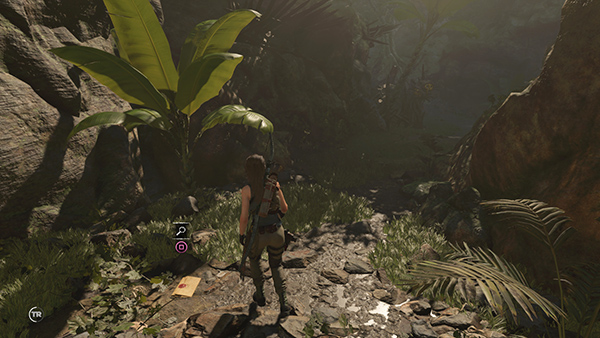
DOCUMENT 1 - Disaster Upon Disaster (Miracle Mission)
This document is sitting at the base of the dry fountain in the middle of the main courtyard, between the Mission Gate Base Camp and the merchant's stall. (Click image for more and larger screenshots.)
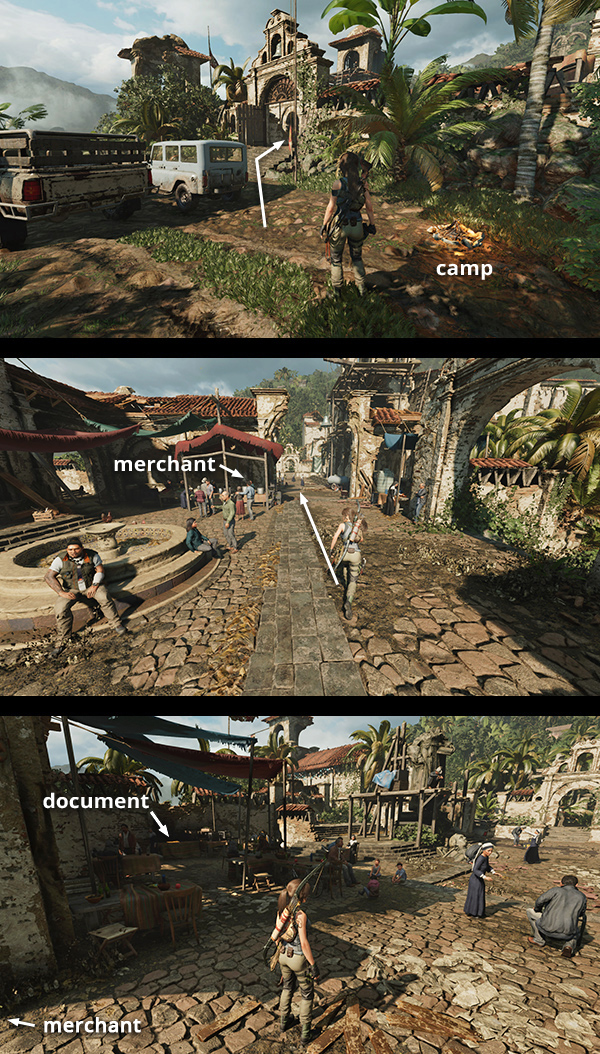
DOCUMENT 2 - Mission of Saint John (Miracle Mission)
This document is in the area northwest of the main courtyard, where makeshift dining tables are set up. Start at the Mission Gate Base Camp. Go up the steps into the couryard and continue straight on past the merchant's stall. Then look to the left to spot the document sitting on a table near the west wall. (Click image for more and larger screenshots.)
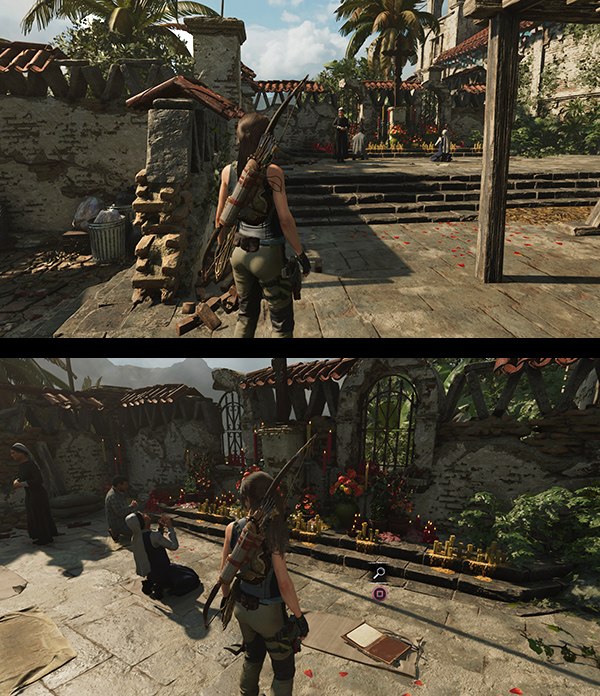
DOCUMENT 3 - The Miracle Club (Miracle Mission)
A few steps north of document #2, there's a shrine with flowers and other offerings. This document is lying on the ground here. (Click image for more and larger screenshots.)
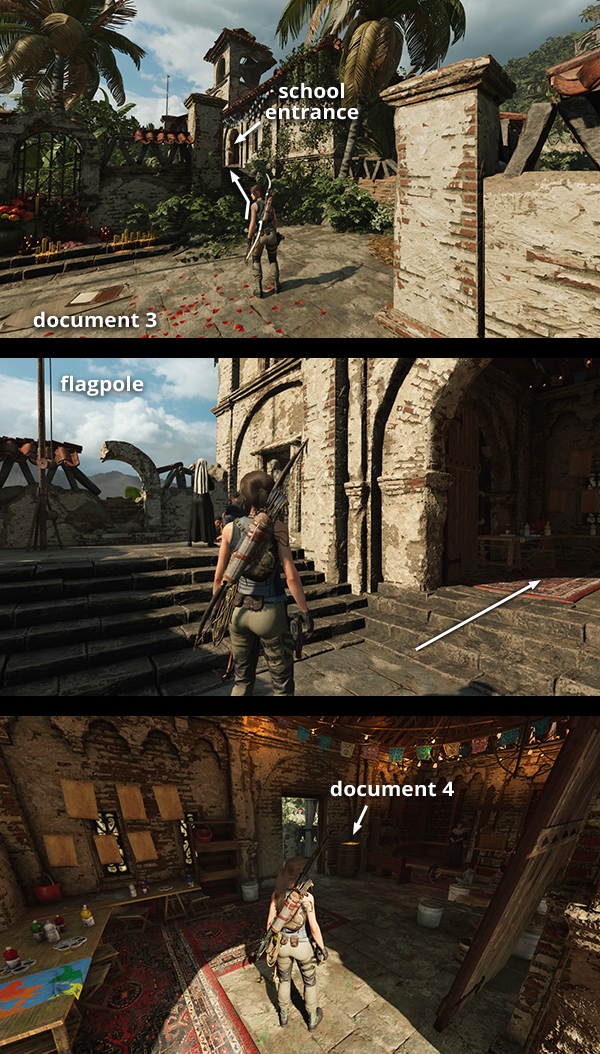
DOCUMENT 4 - Damage Repair (Miracle Mission)
This document is inside the schoolhouse in the northern corner of the mission. Start at the Mission Gate Base Camp and follow the directions for the first 3 documents, above. The schoolhouse is just beyond document #3. It's also marked 'school' on the annotated map. Document #4 is inside the classroom on a wooden barrel. (Click image for more and larger screenshots.)
DOCUMENT 5 - On This Spot (Miracle Mission)
This document is on the north side of the mission. From the Mission Gate Base Camp, go through the main courtyard, past the merchant's stall, and on toward the white archway. Just before the archway, turn left and head up the dirt road toward the closed wooden gate. Just before this gate, on the right, is a ruined building. Inside two women sit talking. The document is on the table near them. (Click image for more and larger screenshots.)

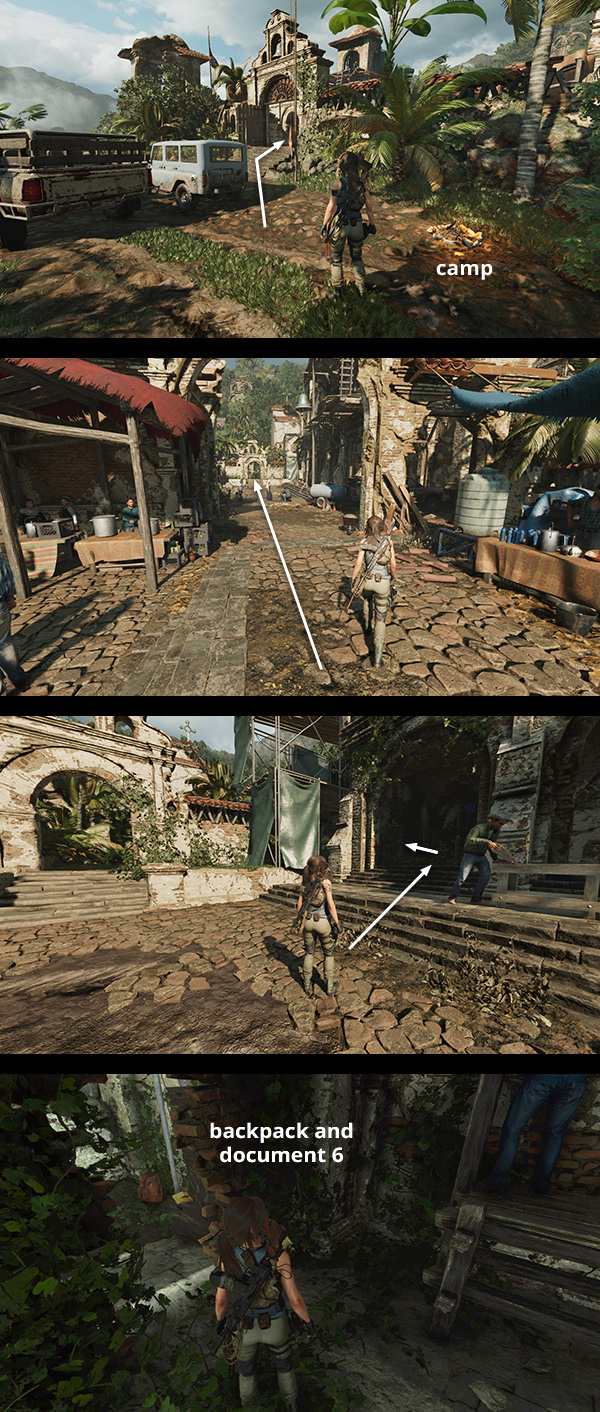
DOCUMENT 6 - Journal of T. Serrano 12 (Angel de la Cruz)
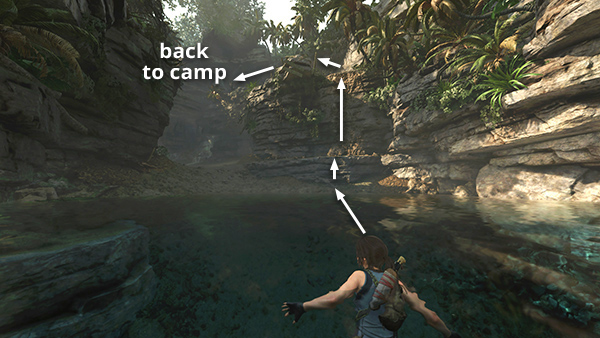
From the Mission Gate Base Camp, go up the steps into the courtyard and continue straight on past the fountain and merchant stalls. Just before the white archway leading to the church and graveyard, there's some scaffolding draped with green tarps. Climb the steps to the right of the scaffolding. Then turn left and move through a narrow opening in the brick wall to find the document and explorer backpack #1. (Click image for more and larger screenshots.)
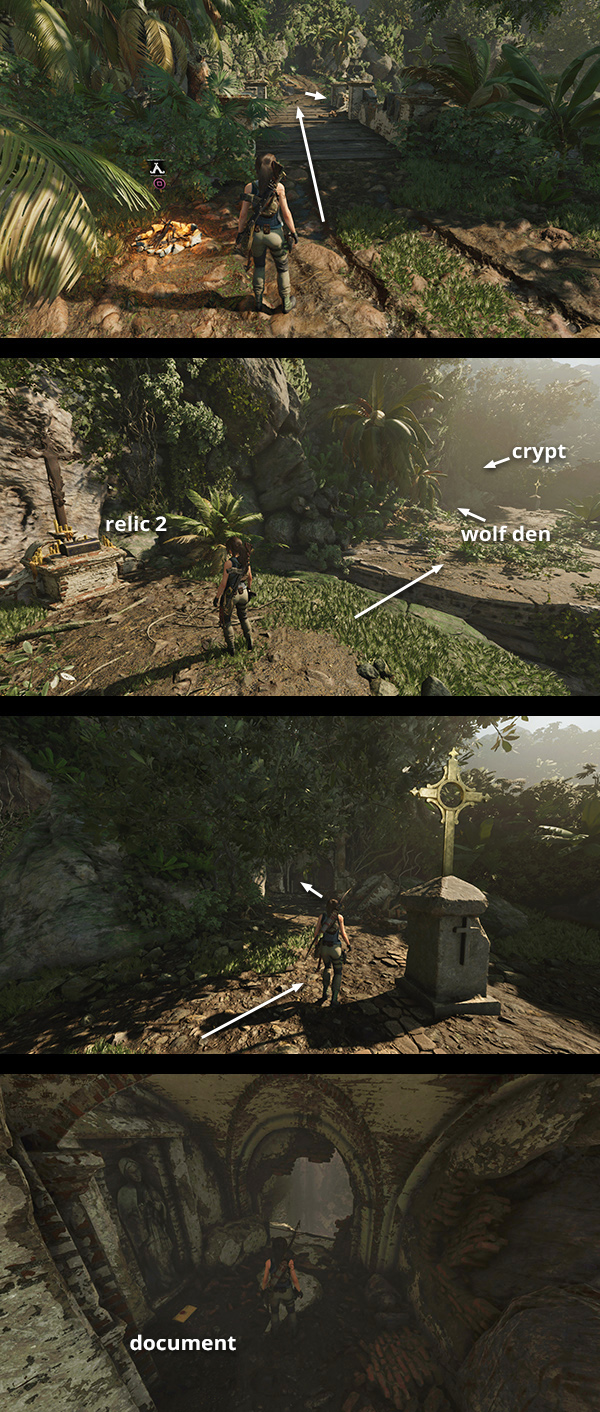
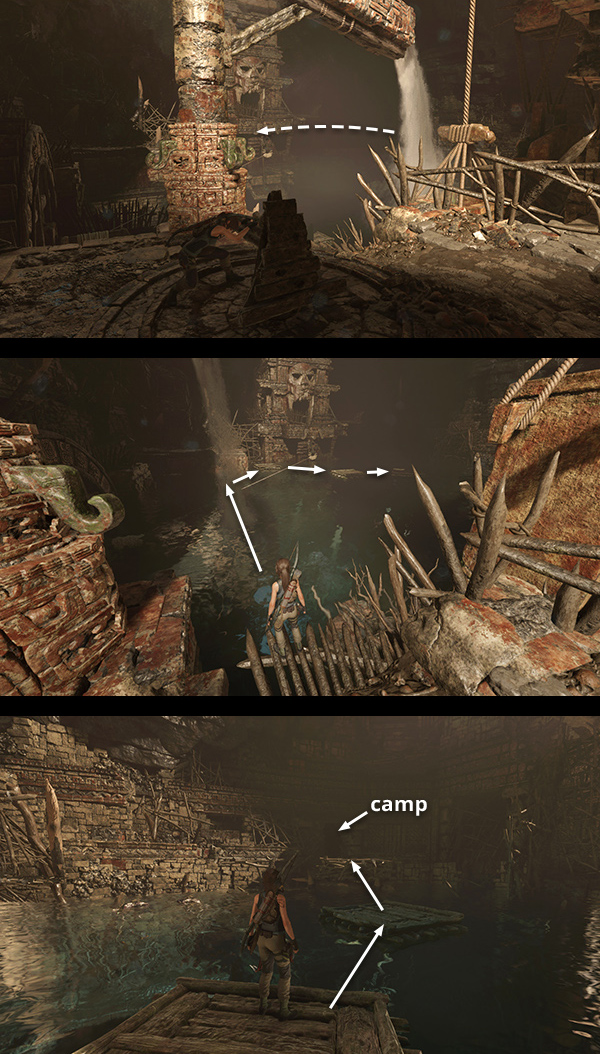
DOCUMENT 7 - The Chosen One (Cult of de la Cruz)
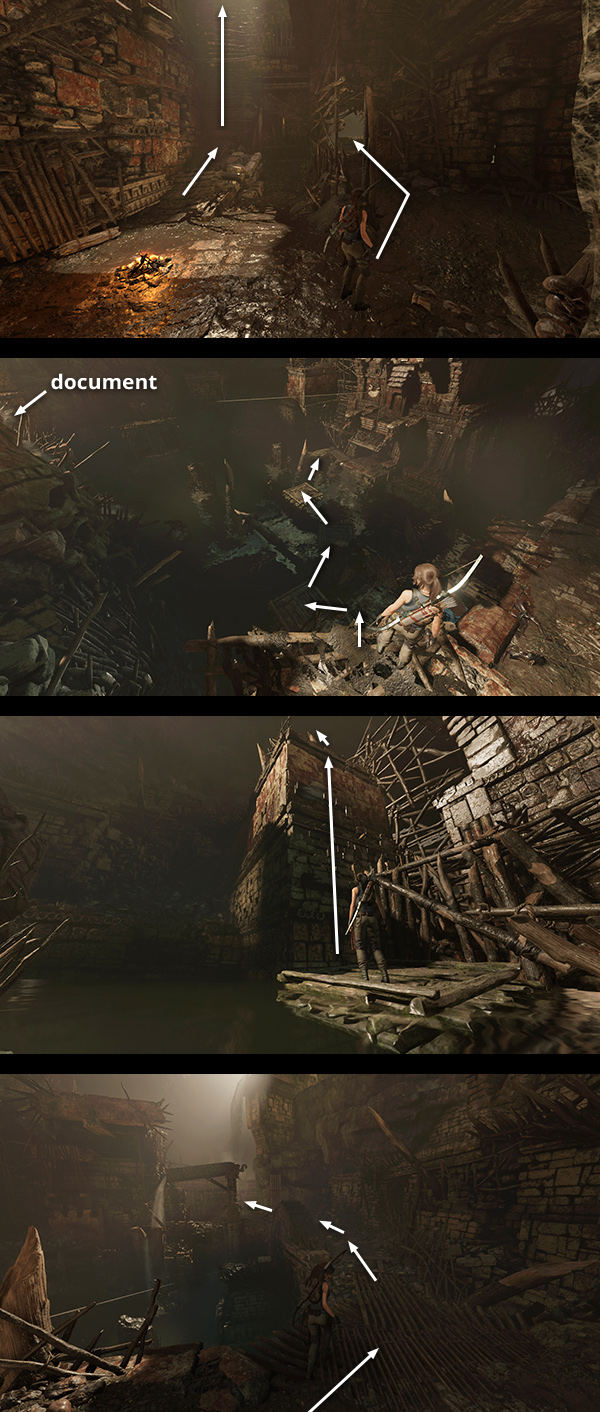
This relic is just inside the entrance to the Crypt of Huascar, the Syncretist. The crypt can only be accessed during or after completing the Star-Crossed Side Mission. If you completed the mission but missed the relic, start at the Mission Gate Base Camp and follow the road across the bridge to the southeast. Just beyond the carved stone heads and metal cross, turn right (south). Head down the slope, past relic #2, and across the gap in the cliffside. As you pass the entrance to the wolf den, watch out for respawning wolves. The crypt entrance is just to the left of the final metal cross. The document is lying on the ground on the left side of the tunnel, before the vertical shaft leading deeper into the crypt. (Click image for more and larger screenshots.)
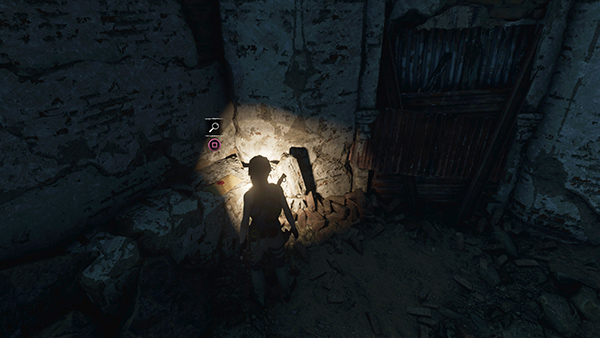
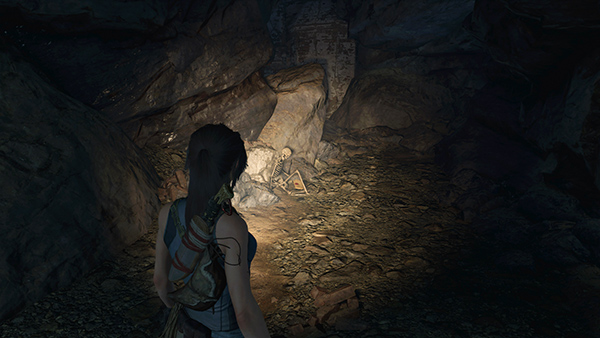
DOCUMENT 8 - Believer's Journal,
DOCUMENT 9 - Hubris, and
DOCUMENT 10 - Pure of Heart
(all Cult of de la Cruz)
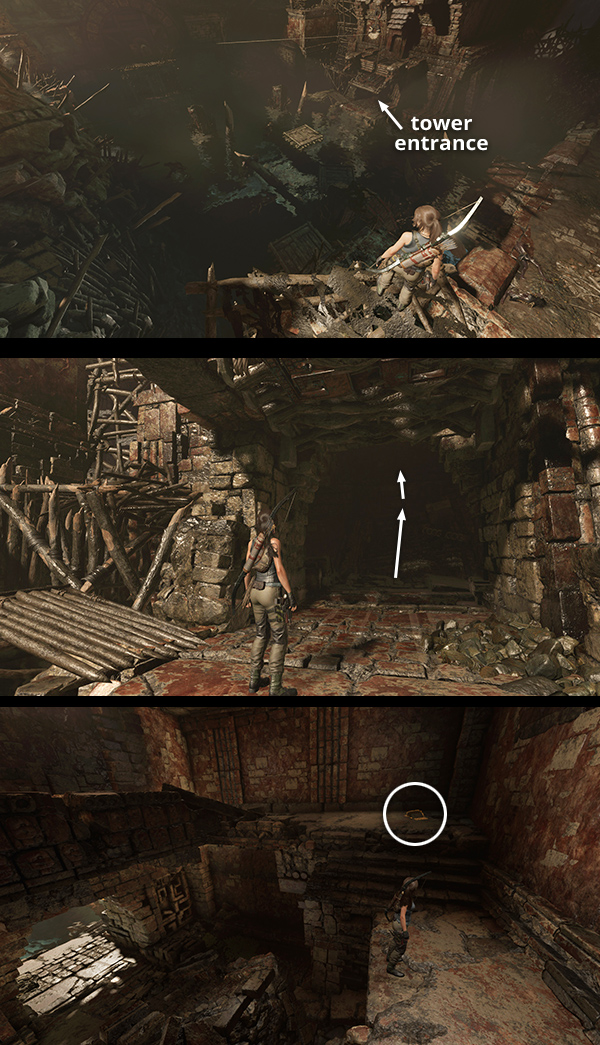
These 3 documents are inside the Crypt of Huascar, the Syncretist, which can only be accessed during or after completing the Star-Crossed Side Mission. If you completed the mission but missed any of them, follow the guide for document #7, above, to reach the crypt entrance. Then follow the main walkthrough to descend into the crypt, find the documents, and climb out again.
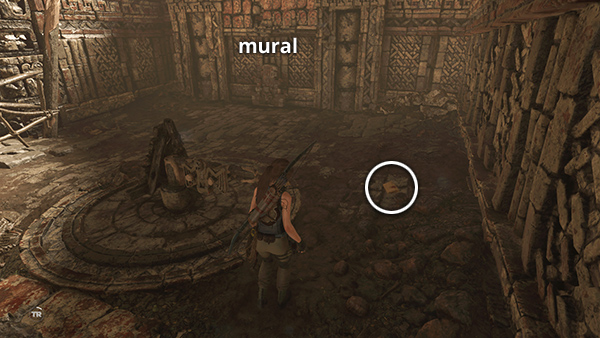
#8 is near the metal shotgun barrier. #9 is lying next to a skeleton just beyond the narrow opening near the Huascar the Syncratist mural. #10 is sitting on a shelf on the far side of the large spike pit Lara grapple-swings across.
(Click screenshots to enlarge. The walkthrough includes many more pictures to help you get oriented.)
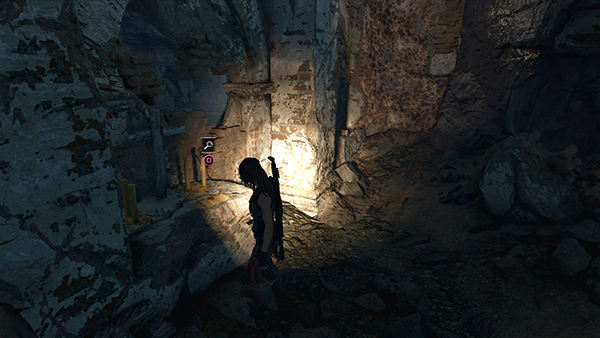
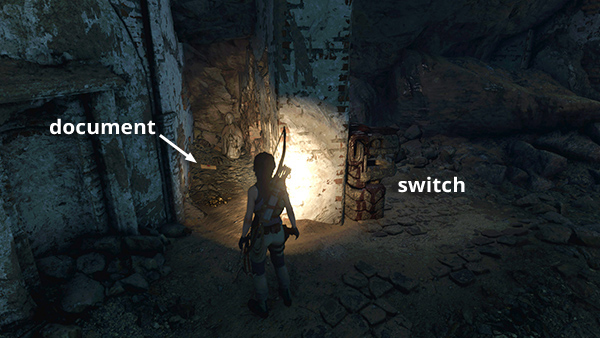
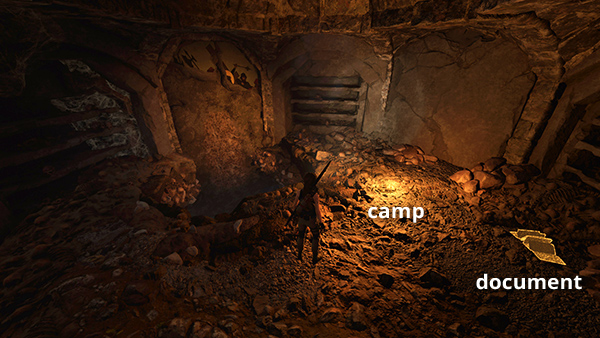
DOCUMENT 11 - Demons (Cult of de la Cruz)
This document is also in the crypt of Huascar, the Syncretist, in a small, dark alcove near the jaguar-head switch. If you're missing other items in that area, I recommend following the main walkthrough to descend into the crypt, locate what you need, and climb out again. If you only need this document and/or relic #3, take this shortcut instead. (Click screenshot to enlarge.)
DOCUMENT 12 - Journal of T. Serrano 13 (Angel de la Cruz)
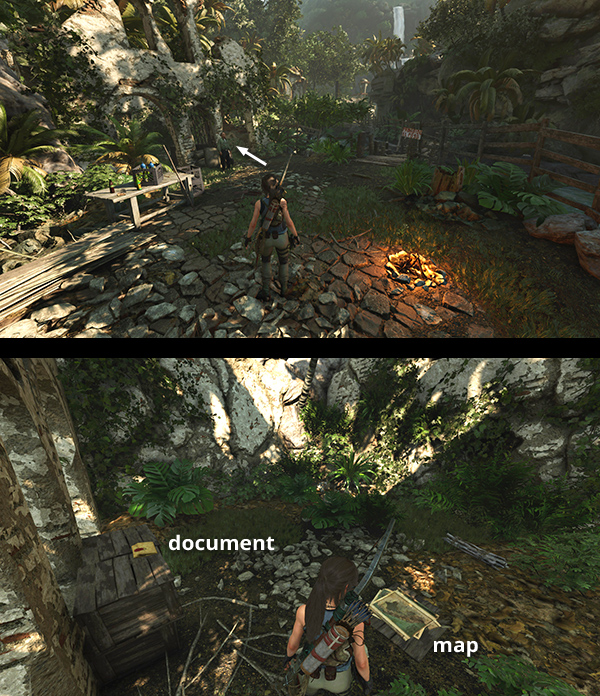
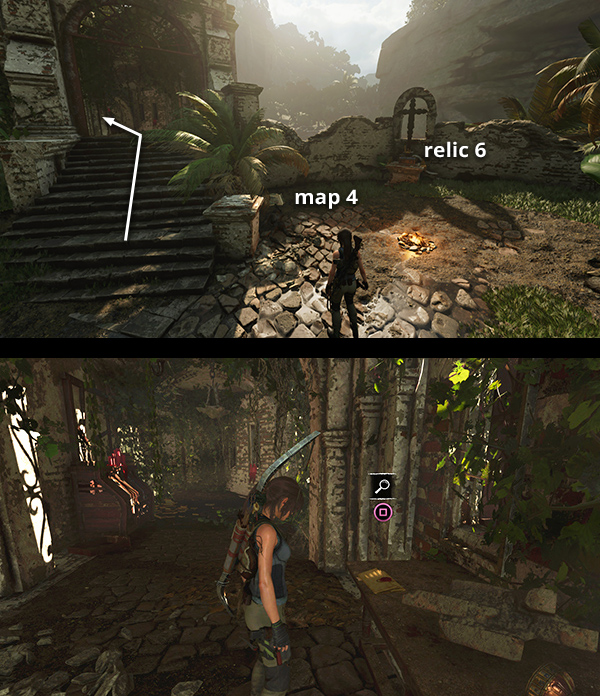
This document is in the small ruined building near the Riverside Base Camp. If you haven't discovered this camp, start at the Mission Gate Base Camp and go up the steps into the courtyard. Turn right near the dry fountain and follow the steps down to the southeast. Continue past the NPCs Sara and Guillermo (the Star-Crossed Mission giver) and on to the southeast until you reach the Riverside camp. The document is sitting on a table inside the ruined building. Archivist map #2 is also here. (Click image for more and larger screenshots.)
DOCUMENT 13 - The Hills Are Alive (Homecoming)
This document is near the entrance to the Tree of Life Challenge Tomb. Fast travel to the Deserted Cloister Base Camp and go up the stairs into the nearby building. The document is sitting on a table in the hallway that leads to the tomb entrance. (Click image for more and larger screenshots.)
DOCUMENT 14 - Chechen and Chaka Trees (Legends of the Maya)
This document is near the entrance to the Tree of Life Challenge Tomb. If you raided the tomb but missed the document, fast travel to the Mountain Catacombs Base Camp. You'll find the document sitting on the ground next to the campfire.
If you haven't explored the tomb yet, fast travel to the Deserted Cloister or Ruined Tower Base Camp. Then follow the main walkthrough. (Click screenshot to enlarge.)
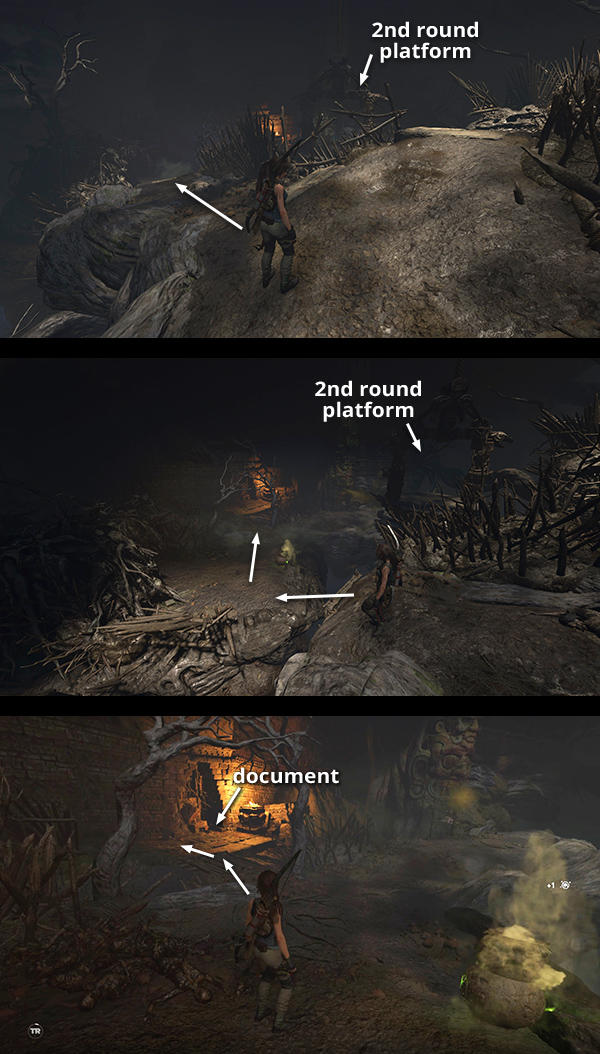
DOCUMENT 15 - World Tree (Legends of the Maya)
This document is deep within the Tree of Life Challenge Tomb. If you haven't explored the tomb yet, fast travel to the Deserted Cloister or Ruined Tower Base Camp. Then follow the main walkthrough.
If you completed this area but missed the document (or any other collectibles in the tomb), fast travel to the Mountain Catacombs Base Camp. Then retrace the route you took on your first pass through the caverns in order to find what you need, reach the tomb stele, and get back to the base camp. You won't need to solve the puzzles again, but there will be a few stray Yaaxil trying to impede your progress. This guide with screenshots details the route. Document #15 is in the area between the first and second large circular platforms.
(Click image for more and larger screenshots. The linked guide includes additional details.)
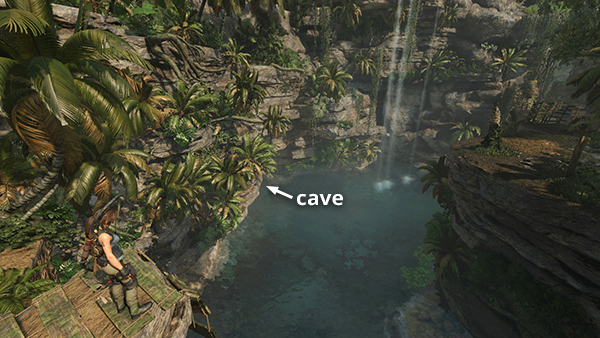
DOCUMENT 16 - Missionary Work (Conquerors)
This document is in a small cave on the northeast side of the large pool located southeast of the mission. Start at the Ruined Tower Base Camp and follow the directions for the treasure chest, which is in the same area. Those directions also show how to climb back up to the campsite. (Click screenshot to enlarge.)
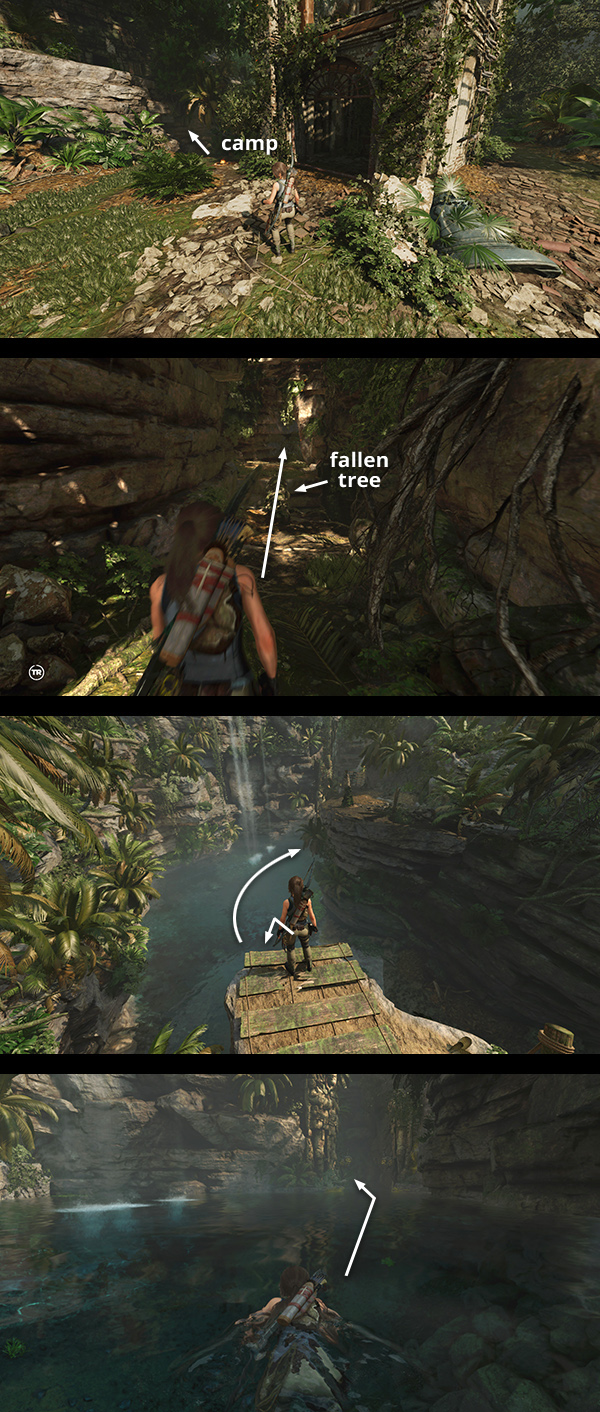
DOCUMENT 17 - Last Words (Cult of de la Cruz)
This document is on the way to the Thirsty Gods Challenge Tomb. If you haven't explored this area yet, follow the main walkthrough.
If you completed the tomb but missed the document, fast travel to the Ruined Tower Base Camp. Now you're headed for the large pool to the east. You can approach from either direction, but we'll head northeast, past the campfire, through the cave, and across the fallen log, to emerge on a ledge overlooking the pool. Dive in and swim to the tomb entrance on the south side. Like all challenge tombs, it's marked with golden totems. Swim on through the narrow canyon until you can step out of the water onto a dirt path. The document is sitting on the left side of the path before the next set of totems.
When you have it, return to the large pool, swim across to the northeast side, scale the climbable wall, and return through the cave and across the fallen log the way you came. You can then use the base camp to fast travel to wherever you left off. (Click images for more and larger screenshots.)
DOCUMENT 18 - Testament of T. Serrano (Cult of de la Cruz)
This document is in the Thirsty Gods Challenge Tomb. If you haven't explored the tomb yet, fast travel to the Deserted Cloister or Ruined Tower Base Camp. Then follow the main walkthrough.
If you raided the tomb but missed the document, fast travel to the Flood Basin Base Camp. Go through the doorway to the west at ground level (or, if you didn't pull down the wooden barrier earlier, climb the ladder) to reach the water wheel cavern. Then hop across the floating platforms to the north side of the pool, in order to avoid the piranhas. Climb the wall next to the last floating platform and follow the ledge around to the left, behind the waterwheel, and across the log bridge, to the southwest corner. The document is lying on the floor near the mural and the rotating handle that controls the spigot. (Click first and second screenshots for more.)
To get back to the base camp, you'll need to raise the water level if you haven't already done so. Turn the handle counterclockwise and the pool should begin to fill. Swim along the west wall to the floating platform on the north side of the pool. Hop across the platforms to the southeast corner and go through the doorway. (Use a rope arrow to pull down the barrier if necessary.) The base camp is just ahead. From here, you can fast travel to wherever you need to go next. (Click third screenshot for details.)
DOCUMENT 19 - Alux (Legends of the Maya)
This document is also in the Thirsty Gods Challenge Tomb. Follow the instructions for document #18, above, to reach the entrance to the tower on the north side of the water wheel cavern. Inside the tower, climb the broken stairs, jump across the gap, and pull up onto the ledge at the back of the room. (If you didn't lower the water level, just swim through the submerged gate into the tower and climb out of the water.) The document is sitting in the corner at the top of the next flight of steps. To get back to the base camp, follow the instructions for document #18. (Click image for more and larger screenshots.)
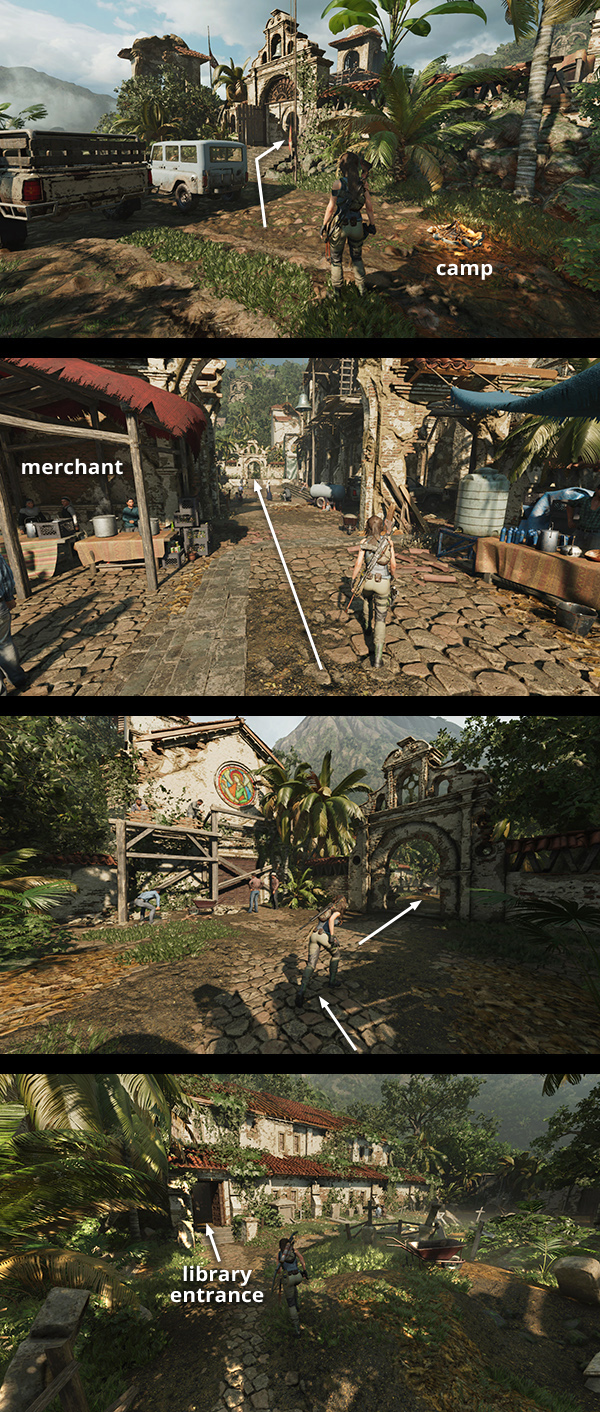
DOCUMENTS 20-27 are all found in the LIBRARY on the north side of the mission. To return there later in the game, fast travel to the Mission Gate Base Camp. Go up the steps into the courtyard and proceed northeast to the white archway. Pass under this archway, turn right (southeast), and continue through the next archway into the cemetery. The library entrance is just ahead. (Click image for more and larger screenshots.)
Once inside the library, the notes below should help you locate specific documents. The main walkthrough may also be useful.
DOCUMENT 20 - Journal of T. Serrano 8 (Gates of Hell) and
DOCUMENT 21 - De la Cruz Leaves (Angel de la Cruz)
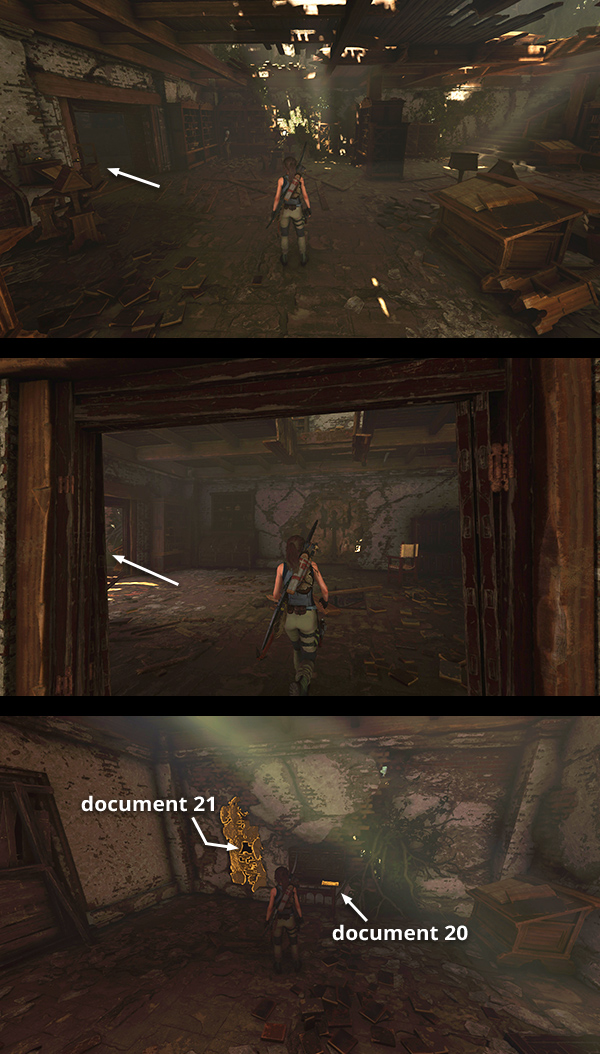
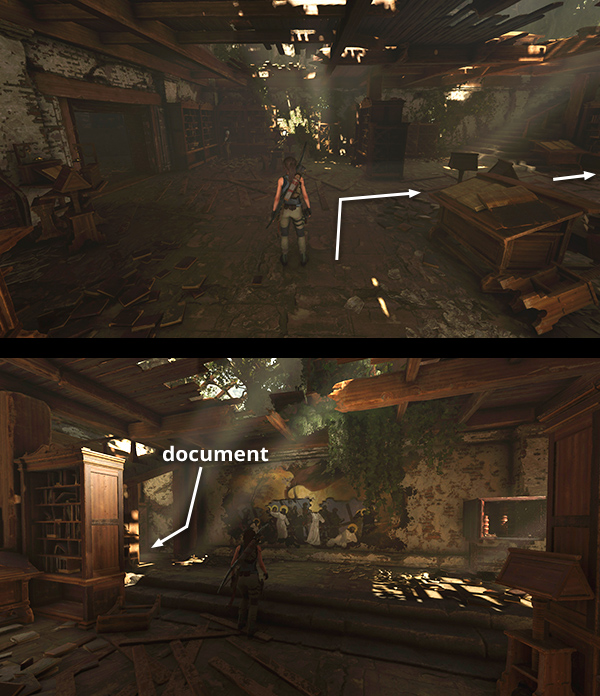
These two documents are in the western (left) corner room on the lower level of the library. Follow the instructions above from the Mission Gate Base Camp to the library entrance. Inside, go through the doorway on the left into the room with the destroyed mural and the hole in the floor. Continue into the next room on the left. Document #20 is sitting on a small side table. Document #21 is behind a section of crumbling wall. (Click image for more and larger screenshots.)
DOCUMENT 22 - Journal of T. Serrano 10 (Angel de la Cruz)
This document is in a small alcove in the eastern corner of the library's lower level. Follow the instructions above from the Mission Gate Base Camp to the library entrance. Inside, turn right and approach the large mural of the heron and eclipse on the far (southeast) wall. After completing the level, the mural is partly destroyed, revealing a previously hidden mural depicting the stations of the cross. The document is in the alcove to the left of this mural. (Click image for more and larger screenshots.)
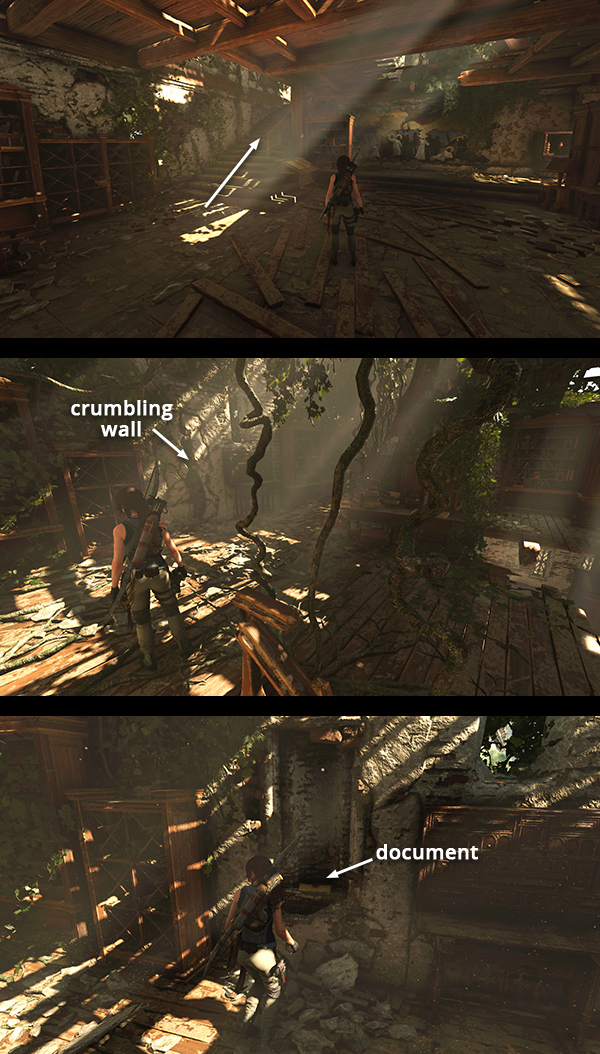
DOCUMENT 23 - Journal of T. Serrano 11 (Angel de la Cruz)
This document is on the upper level of the library. Follow the instructions above from the Mission Gate Base Camp to the library entrance. Inside, turn right and head up the stairs in the western corner. Break down the crumbling section of wall at the top of the stairs to to find the document. (Click image for more and larger screenshots.)
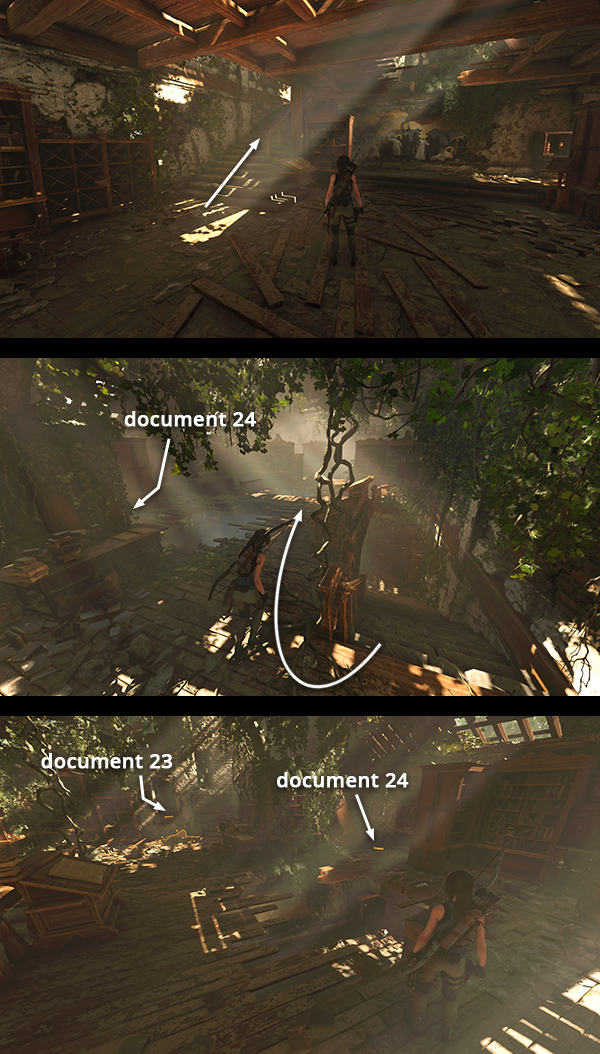
DOCUMENT 24 - John the Apostle (Miracle Mission)
This document is also on the upper level of the library. Follow the instructions above from the Mission Gate Base Camp to the library entrance. Inside, turn right and head up the stairs in the western corner. At the top of the stairs, make a U-turn. Then go around the large hole in the floor to find the document lying on the floor in the south corner. (Click image for more and larger screenshots.)
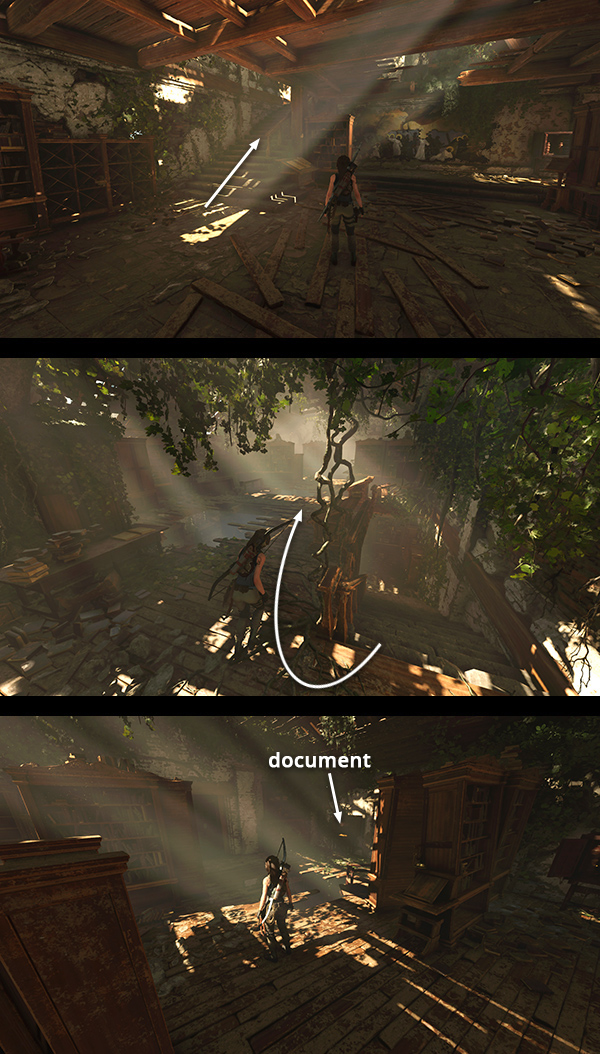
DOCUMENT 25 - Repelling the Demons (Homecoming)
This document is also on the upper level of the library. Follow the instructions above from the Mission Gate Base Camp to the library. Once inside, turn right and head up the stairs in the western corner. At the top of the stairs, make a U-turn and continue toward the far end of the main room. The document is sitting on a desk in the northeast corner. (Click image for more and larger screenshots.)

DOCUMENT 26 - De la Cruz Arrives (Angel de la Cruz) and
DOCUMENT 27 - Ranting (Trinity)
The last two documents are also on the upper level of the library. Follow the instructions above from the Mission Gate Base Camp to the library. Once inside, turn right and head up the stairs in the western corner. At the top of the stairs, make a U-turn and continue all the way to the far (northeast) end of the large room. Hop across the hole in the floor, go through the doorway, and turn left. You'll find document #26 lying on the floor just ahead and document #27 in the little side room with the round, stained-glass window. (Click image for more and larger screenshots.)
†UPDATE HISTORY: 10/31/21 - Page first posted online.
WAS THIS WALKTHROUGH HELPFUL? If not, I apologize and invite you to contact me with any questions. If you need help right away, I recommend the r/TombRaider subreddit. Other fan-run forums are listed at tombraiders.net/stella/community.html. If this site was useful, please consider supporting it financially or in other ways. For details, visit tombraiders.net/stella/support.html. As always, I welcome your corrections/suggestions. Thank you!
Copyright © Stellalune (). All rights reserved. Feel free to copy or print this walkthrough for personal use. By all means, share it with friends, but please include this credit line so people can send me their feedback. No part of this walkthrough may be reproduced on another site without permission. Follow this link for details about this site's advertising and privacy policy.
Stella's Tomb Raider Site: tombraiders.net.