IMPORTANT: The material in this section pertains only to Tomb Raiders 1 through 5. Angel of Darkness and the newer games are built using different engines and thus require different approaches. I will eventually add useful bugs for those games, but for now, I recommend searching YouTube for the name of the game plus keywords like "bug," "glitch," etc.
NOT ALL BUGS ARE BAD. Like most computer/video games, the Tomb Raider series has its share of glitches. Some are mildly annoying, some are deadly—to Lara, that is. (The nastier bugs are covered in the walkthroughs in the levels where they occur.) But there are a few that can actually enhance your gaming experience. Some can get Lara to places she wouldn't otherwise be able to go. Some can even save her life. To find out all you need to know about these good bugs, read on.
For more information on where and how to apply these bugs, check out these sites: Tomb Raider Tourist, TR Tourist's YouTube Channel, Tomb Runner and the Tomb Raider Bugs section of TReditor.hu. In addition to the basic bugs covered here, these sites include variations on regular moves like the standing jump, running jump and backflip, where you can do special set-ups to cover more distance.
Special thanks to Theresa Jenne, whose site, tombraiders.com, is no more. Theresa was known as the queen of the Expert Challenge and she inspired many diligent bug-finders over the years. Some of her walkthroughs can still be found in the Web Archives. We miss you, T.!
Basic Corner Bug or "Jump Trick"
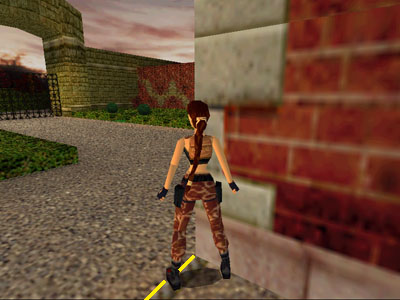
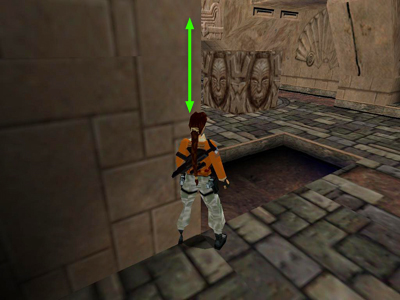
screenshot 1
screenshot 2
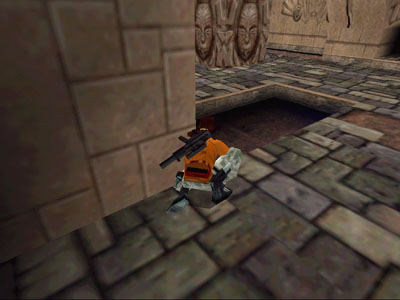
screenshot 3
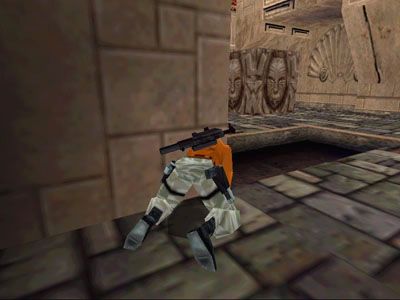
screenshot 4
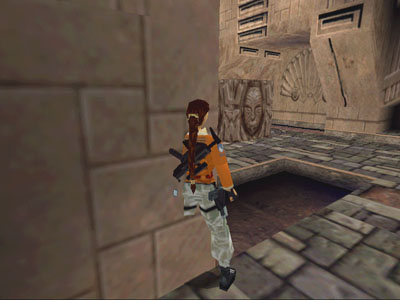
screenshot 5
screenshot 6
screenshot 7
This bug works in Tomb Raiders 1-5. It is used to get Lara on top of high blocks and ledges she wouldn't normally be able to reach. It was originally discovered by Jason McAllister, though I first learned about it a bit later on the Croft Times and tombraiders.com sites. TheReaper suggested the refinement in step 2a.
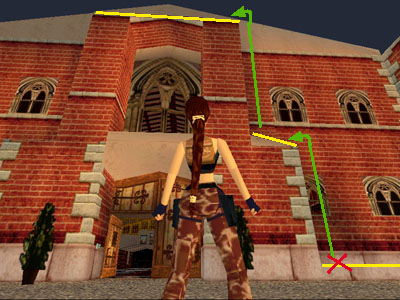
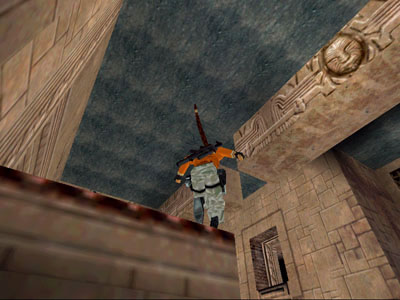
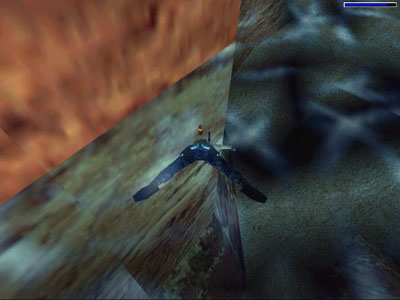
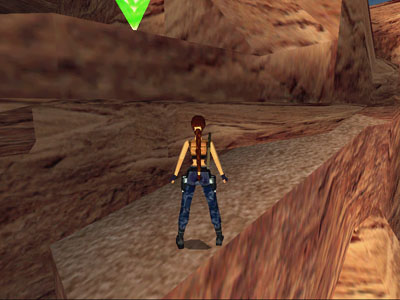
The corner bug works best at a convex corner with a flat surface on top. It won't work if there's a ceiling (e.g., an overhanging arch or ledge) or solid "sky" above, though modified versions can be used where an arch is present. (See the Crawling Corner Bug and Other Corner Bug Variations.) It also helps to have a drop-off in front of the corner, though this isn't necessary once you get the hang of the move. For example, the spot marked with the red X in the first screenshot at right is perfect. If you start here on the low ledge near the front door of Lara's mansion in the TR3 training level, you can use the corner bug to get up on the roof. (You'll need to use it twice as shown by the green arrows.) Here are the basic steps:
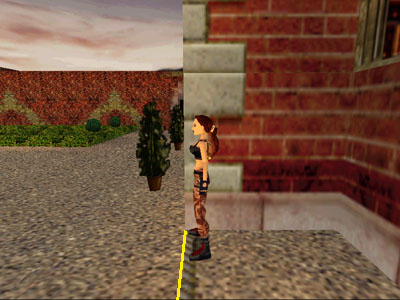
Position Lara at the edge of the drop-off, facing out, with one shoulder against the side of the convex corner. (screenshot 2) Or, if there is a drop-off in front of the corner, position Lara with her chest against the wall that forms the corner and then sidestep to the edge until she won't go any further. (screenshot 3)
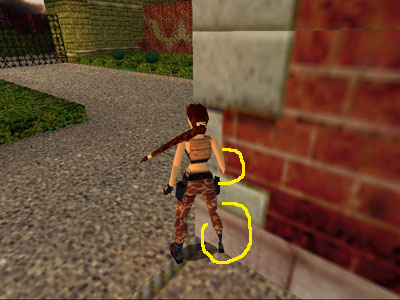
Turn Lara about 45 degrees toward the corner, keeping her arm and inside foot against the wall and her outer foot as close to the edge as possible. (screenshot 4)
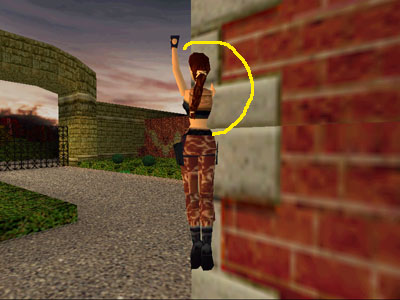
Press and hold the jump button to make Lara jump in place. As she jumps, she'll inch forward little by little. You'll notice her arm and lower leg start to creep into the wall. (screenshots 5 and 6)
Keep jumping and Lara will reach a critical point. The game will interpret her position as being inside the wall, reject this information as impossible, and reposition her in a 'legal' spot on top of the corner. (screenshot 7)
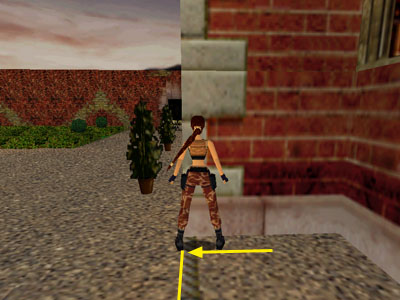
If you want to get all the way up on the roof, use the corner bug again in the spot marked with the yellow X in screenshot 7.
Click on each screenshot to see a larger version. For all screenshots on one page, click here. Or watch the short instructional video below.
This variation on the basic corner bug was found by the ever-sharp Stiletto. It can be used in TR3 through Chronicles. (Lara doesn't crawl in the earlier games.) There's no need to have a drop-off in front of the corner, but it sometimes won't work if there's an overhanging ledge or archway. The example shown in these screenshots is from TR3 Lost City of Tinnos. Here the bug can be used to get around another bug, enabling Lara to get a secret in that level.
Position Lara near a convex corner as you would for the basic corner bug. One foot and arm should be touching the edge of the corner, and she should be angled about 45 degrees toward the outside of the corner. (screenshot 1)
Jump up and down on the spot just once. As in the basic corner bug, this should cause Lara's inside arm and leg to creep into the corner a little. (screenshot 2)
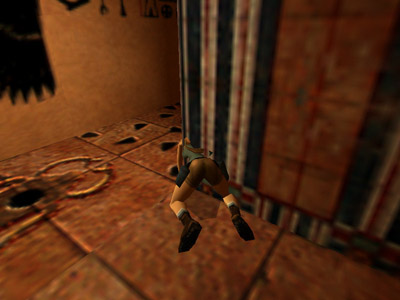
Press and hold Duck to make Lara go into a crouch. If Lara is positioned correctly, her inside shoulder will creep into the corner a little. (screenshot 3)
While still holding the Duck button, press Forward so Lara goes onto her hands and knees. Again, the shoulder closer to the corner should creep into the corner texture a little (screenshot 4)
Release the Duck button so Lara stands. At this point, the bug may kick in, causing Lara to spring up onto the ledge above. If not, press and release Duck again to work Lara a little farther into the corner texture. (screenshot 5)
As in the basic corner bug, the game will interpret her position as being inside the wall, reject this information as impossible, and reposition her in a 'legal' spot on top of the corner. (screenshot 6)
Click on each screenshot to see a larger version. For all screenshots on one page, click here.
Unless you get the angle just right, you may need to repeat the crouch, crawl, straighten routine a couple of times before Lara will spring up to the top of the corner. The more precisely you position her in step #1, the fewer tries it will take. Check out this video to see it done:
Swimming Corner Bug
screenshot 1
screenshot 2
screenshot 3
screenshot 4
screenshot 5
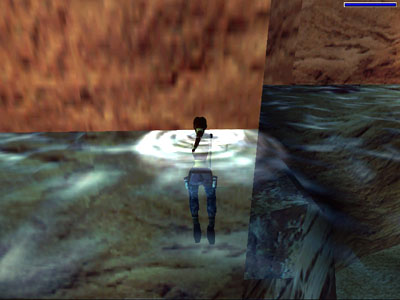
This variation on the basic corner bug, also found by Stiletto, works in all the classic games. It's quite a bit trickier than the basic or crawling bugs. Just be patient; you'll get it.
Begin with Lara treading water near a convex corner with a flat spot on top. When swimming, it helps to start a little farther from the corner than you would for the other corner bugs. Here Lara is in the canyon pool in TR3's Nevada Desert level. (screenshot 1)
Turn Lara 45 degrees relative to the corner, as in the basic corner bug. (screenshot 2)
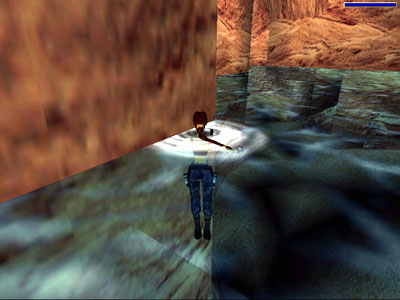
Press Jump to dive under the surface. If you've gotten the angle right, Lara's head and upper body will disappear into the wall. If this doesn't happen, try again using a slightly different starting position. (screenshot 3)
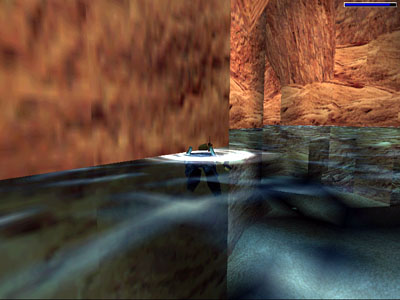
Once Lara is embedded in the corner, continue to press Jump and tap Forward to angle her downward a little. Don't press Left or Right, as this will cause her to come out of the wall and you'll need to start over. Use Jump and Forward to work Lara downward inside the corner. (screenshot 4)
Release Jump (in this particular situation, releasing it when Lara reaches the bottom works best) and the bug should take effect, popping her up to the ledge above. (screenshot 5)
Click on each screenshot to see a larger version. For all screenshots on one page, click here.
One very useful variation is the Trigger Bug, discovered by Ewil. As far as I know, it's only used in a couple of levels in The Last Revelation. It enables you to trigger retracting floor spikes using corner bug techniques. Once they are triggered, Lara can pass over them safely. Use of the trigger bug is detailed in the walkthrough for Cleopatra's Palaces. (It can also be used in the Catacombs level to open the carved door near the beginning of the level, enabling you to take a nice shortcut. This is shown in Ewil's Catacombs speedrun video on YouTube.)
In addition, there are many spots where the regular corner bug won't quite cut it, but you can still finesse Lara into otherwise unreachable spots using some clever variations. I encourage all bug-hounds to visit Tomb Raider Tourist for details on the arch bug and "flicker motion" variations, as well as other useful bugs and game-by-game tours of some interesting spots you can reach with old "Buggsy".


 Custom Search