Stella's Tomb Raider Underworld Mobile/Cell Phone Game Walkthrough
CATACOMBS 2 – Part 1 (Map 9)
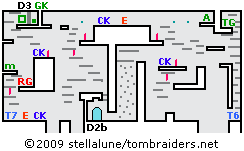
 From the entrance at the bottom right corner of the map, turn left and shoot a bat. Wait for the wooden spike to retract into the floor and run past it. Climb the handholds to the ledge above and move carefully past the next retracting spike.
Turn around to face left. Step as close to the spike as possible without being injured and jump straight up to grab the ledge above. Pull up and take the GREEN GEM (GG).
Climb the next set of handholds and pull the switch to open the exit on the other side of the wall.
Climb back down the handholds to the ledge with the spike. Take a running jump from the right to grab the ledge above and to the right. Or, use the pole to swing over to that ledge. Pull up. Climb down the handholds on the right to find treasure #1.
Climb back up the handholds and continue up the right side of the map to another ledge with a retracting spike. Move past it to the exit.
CATACOMBS 2 – Part 1 (Map 10)

From the entrance at the top of the map just to the right of center, head to the right and drop down to the ledge below.
The movable crate will enable you to reach the ledge above on the left, but you don't yet have the GREEN KEY needed to open the door (D6a) there. So just climb over the crate for now and continue to the right.
Grab the nearest handhold, climb to the right and drop down twice. Climb to the right along the longest handhold in this group. Then drop to the one below it. Climb off the right end of this handhold to fall and grab the handhold above the 2 wooden spikes. Drop to the ledge below. Then jump to the next ledge, then the narrow ledge near the right wall.
Drop down to the floor, shoot the giant spider and pick up treasure #2.
Go to the left, climb over the low ledge and then roll through the low opening beyond. (CHECKPOINT)
Jump across the pit, continue to the left and climb onto the low wall ahead. Turn around and jump to grab the ledge with the retracting spike. Pull up. Grab the handhold above, wait for the spike to retract and quickly traverse past it. Climb the handholds to the ledge above on the right. Pick up treasure #3. Then climb back down the handholds the way you came and jump down to the top of the wall.
Drop down on the left side of the wall. Shoot another giant spider and a bat. (Don't forget you can angle Lara's guns upward by pressing 2/Up.) Continue to the left to find treasure #4.
Return to the low wall on the right. Climb onto it and jump to grab the ledge above on the right. Pull up. Now climb the handholds upward, along the ceiling, then to the left to a ledge with a puzzle panel. Solve the SHORT CIRCUIT PUZZLE to open the stone door (D1). Enter and take the BLUE KEY. (CHECKPOINT)
Climb down the handholds to the ledge just below on the left. Move past the retracting spike and climb onto the small ledge to get the large medipak. Drop down and move back past the spike.
Now, if you don't mind losing just a little health, hang from the edge and drop to the ledge below. Move carefully past the wooden spike on the right and jump to grab the ledge above on the right. Pull up. Or, if you'd rather not lose any health, climb along the handholds to the right then downward. When you come to the handhold with the abseil point, instead of sliding down, climb to the left and drop down onto the ledge. (CHECKPOINT)
Hang from the left edge and let go. Lara will fall quite a long way but she'll grab the ledge below. Pull up and take treasure #5.
Jump across the pit to the left. Jump to grab the ledge above the next pit and then drop down on the other side and shoot a bat.
Use the BLUE KEY you found above to open the wooden door (D2a). Go through.
 CATACOMBS 2 – Part 1 (Map 11)
The entrance (D2b, CHECKPOINT) is near the bottom center of the map. Roll under the wall to the right. Then scale the climbing wall to reach the handholds above. Drop down on the ledge to the right. Jump over to the next ledge on the right. (CHECKPOINT)
Wait for the wooden spike to retract and then run to the right and jump to the next ledge, then the next. Climb down the handholds along the right edge of the map. At the bottom pick up treasure #6 and then climb back up the handholds. Keep climbing up the edge of the map all the way to top right corner. Drop onto the ledge and take THOR'S GLOVE (TG).
Climb down to the handhold directly below the ledge where you got the glove. Then climb to the left and drop onto the thin ledge. Climb across the handholds to the left. There are 2 poles protruding from the wall above. Position Lara on the handhold directly below the left pole and jump straight up to grab it. Swing across the poles to the ledge on the left and pick up some explosive ammo.
Either swing across the poles or drop down to the handholds and climb back to the left to reach the ledge with the wooden spike. Move past it and climb onto the ledge above. Kill a giant spider and continue to the left. (CHECKPOINT)
Hang from the edge of the ledge above the retracting spike but don't drop down. Instead jump to the left to grab the pole. Swing and jump to grab the small ledge on the left. Pull up and jump to the next ledge. (You can see the GREEN KEY on the other side of the wall, but you can't reach it yet.) Hang from the edge and drop to the ledge below. Move past the wooden spike when it retracts. (CHECKPOINT)
Climb the handholds to the top left corner of the map. Use the GREEN GEM from MAP 9 to open the stone door (D3). Go through and pick up the GREEN KEY (GK).
Climb down the handholds to the small ledge protruding from the left wall. Hang from the edge and drop to the ledge with the small medipak. Then climb or jump down to the ledge on the right and pick up the RED GEM (RG).
Climb down the handholds, avoiding the spike, and drop to the floor. Shoot the giant spider and get treasure #7. (CHECKPOINT) Avoid the 2 pits on the right.
Climb back up the handholds to the ledge where you found the small medipak. Jump to the right to grab the edge of the wall on the right. Pull up. (CHECKPOINT)
NOTE: When making the jump from the ledge where the medipak was to the wall with the checkpoint, I found it worked to just stand at the edge and jump to the right, but this doesn't seem to work for everyone. If you can't make the jump that way, try taking a running jump to the right.
Move past the spike and jump to grab the handholds on the right. Watch out for the spike protruding below one of the handholds as you climb to the right and downward. Drop onto the ledge above the entrance and use the small handholds on the right to drop down near the doorway (D2b). Go through.
CATACOMBS 2 – Part 1 (Map 10 - again)
You re-enter this map through the door with the blue lock (D2a). (CHECKPOINT) Climb onto the ledge on the right. Jump to grab the next ledge on the right. Pull up, run past the spike when it retracts and jump to grab the next ledge. Pull up. (CHECKPOINT) Climb the handholds and abseil down to the floor.
Head to the right across the bottom of the map, climbing over a low wall, jumping across a pit and rolling through a low opening. (CHECKPOINT)
When you come to the next low wall (near where you found treasure #2 earlier), climb onto it and jump to grab the ledge above. Pull up. When the wooden spike retracts, run and jump to grab the ledge on the right. Pull up and climb onto the smaller ledge above.
Now climb the ledges and handholds to the top right corner of the map. Use the RED GEM you found in MAP 11 to open the stone door (D4). Go through and take the RED KEY (RK).
Now climb back down to the floor. Head to the left across the bottom of the map. After jumping across the pit, climb onto the low wall and jump to grab the ledge on the left. Climb the handholds upward and to the left, then down and to the left toward the abseil point. Don't abseil down, though. Instead drop onto the ledge on the left. (CHECKPOINT)
Hang from the left edge and drop to grab the edge of the ledge where you found treasure #5 earlier. Jump across the first pit. Grab the ledge on the left and use it to cross over the second pit. Then drop down near the door with the blue lock (D2a).
Climb the handholds next to the door to reach the ledge above on the left. Grab the edge of the ledge above, wait for the wooden spike to retract and then quickly pull up and run past it. Climb onto the ledge above, jump to the ledge on the right, then to the one above on the left. Then jump to the next ledge on the left and kill another giant spider. Continue to the left. (CHECKPOINT)
Hang from the left edge of this ledge and drop to grab the handhold below. Climb to the right and drop onto the ledge below. Climb down and to the right to reach a small ledge with treasure #8.
Drop down, avoiding the pit on the right. Turn left and use the RED KEY, which you found at the top right corner of this map, to unlock the door (D5a) beyond the pit on the left. Jump across and go through.
 CATACOMBS 2 – Part 1 (Map 12)
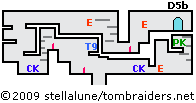
From the entrance (D5b) at the top right corner of the map (CHECKPOINT), step to the left, shoot a bat and climb down to the ledge with the retracting spike. Carefully move past it. Then climb the handholds to the ledge above on the left and kill another bat.
Cross to the left side of the map and climb down to the floor. (CHECKPOINT)
Go right, climb the handholds and step past the wooden spike when it retracts. Drop down to the ledge below and take a running jump to the right to grab the edge of the ledge with treasure #9. Hang from the edge, wait for the spike below to retract and then drop down and move to the right.
Jump across the pit and continue to the right. (CHECKPOINT) Roll through the low opening and shoot the giant spider on the other side. Climb the handholds to the ledge with the PRISON KEY (PK).
Once you have the key, climb back down and retrace your steps across the map to the left side, upward, then back to the right to the entrance (D5b). Go through.
CATACOMBS 2 – Part 1 (Map 10 - again)
When you re-enter this area through the door with the red lock (D5a), jump across the pit and climb back to the top of the room. Cross to the right and climb down the ledges and handholds to the door with the blue lock (D2a). Go past it and climb the ledges to the checkpoint on top of the wall to the right. Grab the handholds and climb over to the abseil point. Then lower Lara to the floor near where you found treasure #4 earlier.
Once again, cross the bottom of the map to the right, climbing over the wall, jumping across the pit and rolling through the low opening. When you come to the low block protruding from the floor, climb onto it and jump to grab the ledge above. Watch out for the wooden spike. Jump to grab the small ledge on the right. Then climb to the ledge above.
Now make your way across the ledges and handholds to the left and upward. When you reach the ledge below the entrance, drag the movable crate to the right and use it to climb up to the wooden door with the green lock (D6a). Use the GREEN KEY you found in map 11 to open the door. Go through.
CATACOMBS 2 – Part 1 (Map 13)
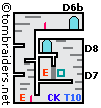
 From the entrance at the top right corner of the map (D6b, CHECKPOINT), head to the left. Move past the retracting spike and climb down the handholds and ledges but wait a moment before dropping to the floor.
Watch the giant spider moving around below, and when it moves off to the right, drop down, crouch and shoot it through the low opening. Wait for the wooden spike to retract and then roll to the right through the opening. (CHECKPOINT)
Pick up treasure #10 and climb the handholds to the locked cage (D7). After the dialogue with Natla, use the PRISON KEY that you found in MAP 12 to open the cage.
When Natla is gone, climb up to the door (D8) on the ledge above. Go through to trigger a dialogue with Zip and the end of the level.
Walkthrough text and diagrams copyright © 2009- Stellalune (). Feel free to copy or print this walkthrough for personal use. By all means, share it with friends, but please include this credit line so people can send me their feedback. No part of this walkthrough may be reproduced on another site without permission. Follow this link for details about this site's advertising and privacy policy.
WAS THIS WALKTHROUGH HELPFUL? If not, I apologize and invite you to contact me with any questions. If you need help right away, I recommend the r/TombRaider subreddit. Other fan-run forums are listed at tombraiders.net/stella/community.html. If this site was useful, please consider supporting it financially or in other ways. For details, visit tombraiders.net/stella/support.html. I also welcome any and all suggestions to improve things. Thank you!
Stella's Tomb Raider Site: tombraiders.net.