Stella's Tomb Raider Mobile/Cell Phone Game Walkthrough - The Osiris Codex
 LEVEL 9 – TREE OF LIFE (MP4366)
Jump the gap, climb down the ladders and drop onto the stacked movable blocks.
Before going on, I recommend heading to the left, dropping down into the hallway below and killing the 3 enemies. Climb back up and, if Lara is injured, use the medikit on the ledge to the left.
Climb back onto the movable blocks and pull the upper block once to the left. Hop down and pull/push the rightmost block underneath the rightmost ladder and climb up. At the top, turn left and jump to grab the next ladder, climb up and jump over to the statue.
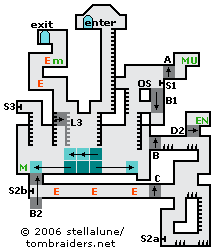
Press Action to view your inventory, select the Ornamental Scepter (which you obtained in level 3) and use it. This opens three previously sealed passageways, one of which is just above on the right. (This is marked A on the map, the others B and C.) Climb up there and get the Uzi and a medikit.
Climb down and use the switch (S1) near the statue to lower the block (B1) on which Lara standing. Climb back down the ladder to the movable block. Jump to grab the ledge on the right and pull up. There are several sets of retracting spikes ahead. As you make your way to the right, then down along the right wall, wait for each set of spikes to retract so Lara is not injured.
Use the switch (S2a) in the room at the bottom right corner of the map to reveal another switch (S2b) in the hallway above. Climb the first two ledges above the switch you just used (S2a). Kill the 3 enemies in the hallway if you didn't do it earlier. Continue to the left and use the new switch (S2b) to raise the block (B2) on which Lara is standing.
Using this switch also opens a door (D2) back in the spike area. Go to the right, climb onto the block you moved earlier and jump to grab the ledge with the spikes. Make your way carefully past the first set of spikes. Then when the second set retracts, climb into the opening above. Here you'll find the Explorer's Notebook (CX6350). Drop down carefully, avoiding the spikes, and return to the left to the movable blocks.
Move the leftmost block beneath the leftmost ladder and climb up. Use the switch (S3) to extend a ledge (L3) with a ladder just to the right. Climb down.
Now move the left and right blocks back against the middle block. Climb up and push the upper block to the left, directly beneath the ladder you just extended. On the way up to the exit, kill a couple of snakes and pick up a medipack.
 |
|
NOTE ON ITEM & MAP CODES: Each level and item has a code, which can be found on the map screen or item info screen. Once you have a code, you can enter it on a page at the Tomb Raider Mobile or Eidos Mobile UK web site to access a level map or detailed item information. My walkthroughs include all of the item info, as well as my own maps, which are a bit more detailed than the unlockable ones.
Copyright © 2006- Stellalune ( or contact me via web form). In-game item descriptions copyright © Eidos, Ltd. Feel free to copy or print this walkthrough for personal use. By all means, share it with friends, but please include this credit line so people can send me their feedback. No part of this walkthrough may be reproduced on another site without permission. Follow this link for details about this site's advertising and privacy policy.
WAS THIS WALKTHROUGH HELPFUL? If not, I apologize and invite you to contact me with any questions. If you need help right away, I recommend the r/TombRaider subreddit. Other fan-run forums are listed at tombraiders.net/stella/community.html. If this site was useful, please consider supporting it financially or in other ways. For details, visit tombraiders.net/stella/support.html. I also welcome any and all suggestions to improve things. Thank you!
Stella's Tomb Raider Site: tombraiders.net.