Stella's Tomb Raider Mobile/Cell Phone Game Walkthrough - The Osiris Codex
 LEVEL 6 – BURIAL CHAMBER (MP0580)
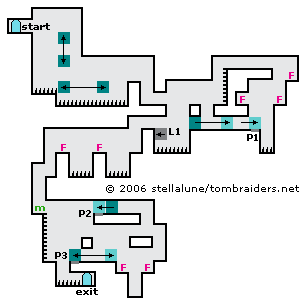
Walk to the edge. Wait until the moving block is moving upward and not quite level with the ledge Lara is standing on, then jump to grab it. Pull up then drop and hang from the right side of the block. Don't let go or Lara will fall into the spikes. As the block moves up and down, watch the second block moving below. When it is directly underneath Lara, let go to land on it. Step to the right edge of the block, ride it to the right and jump to the ledge beyond.
Go to the right, jump the gap and climb down behind the movable block. Pull it to the right as far as you can. Walk to the right edge. Ignore the pressure pad (P1) for now.
The next several ledges have flame jets that cycle on and off. Try to time your movements so Lara pulls up as the jets are going out. First, jump straight up to grab the ledge overhead; pull up. Turn and jump to grab the ledge to the right. Pull up and immediately climb onto the ledge above, turn and jump to grab the ledge to the left. Pull up.
Go left, climb down the ladder and drop down behind the block you just moved. Push it all the way to the right onto the pressure pad (P1). This extends a stone ledge (L1) to the left. Go left, jump over the spikes to grab the ledge you just extended, and pull up.
Drop down on the left side, walk to the edge, and jump across the next spike pit to grab the opposite ledge. Wait for the flame to go out before pulling up. Then quickly step to the left edge and jump over the second spike pit to grab the opposite edge. Again, wait for the flame to go out before pulling up. Climb down the ledges to find a medipack.
Climb down the ladder and jump across the next spike pit to grab the edge of the movable block. Pull up, climb over the ledge and drop down on the other side.
Pull/push the block all the way to the right. Climb onto it and jump to grab the next ledge. Pull up and climb onto the ledge above. Push the second movable block all the way to the left onto the pressure pad (P2). This retracts one of the 2 sets of spikes near the exit below.
Climb down along the right wall until Lara is above a ledge with a flame jet. When the flame goes out, hop down, jump the gap and climb up onto the movable block. Pull/push the block back to its original position on top of the other pressure pad (P3). This lowers the second set of spikes. Climb down and go through the exit.
NOTE ON ITEM & MAP CODES: Each level and item has a code, which can be found on the map screen or item info screen. Once you have a code, you can enter it on a page at the Tomb Raider Mobile or Eidos Mobile UK web site to access a level map or detailed item information. My walkthroughs include all of the item info, as well as my own maps, which are a bit more detailed than the unlockable ones.
Copyright © 2006- Stellalune ( or contact me via web form). In-game item descriptions copyright © Eidos, Ltd. Feel free to copy or print this walkthrough for personal use. By all means, share it with friends, but please include this credit line so people can send me their feedback. No part of this walkthrough may be reproduced on another site without permission. Follow this link for details about this site's advertising and privacy policy.
WAS THIS WALKTHROUGH HELPFUL? If not, I apologize and invite you to contact me with any questions. If you need help right away, I recommend the r/TombRaider subreddit. Other fan-run forums are listed at tombraiders.net/stella/community.html. If this site was useful, please consider supporting it financially or in other ways. For details, visit tombraiders.net/stella/support.html. I also welcome any and all suggestions to improve things. Thank you!
Stella's Tomb Raider Site: tombraiders.net.