Stella's Tomb Raider Mobile/Cell Phone Game Walkthrough - The Osiris Codex
 LEVEL 5 - TEMPLE OF KHEPRI (MP1758)
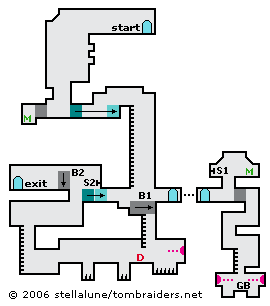
Go to the left and drop down the ledges. Jump the gap to the left and drop down once more. There's a medikit behind a crumbling wall. Getting it requires dynamite, which you'll also need later in the level, so I recommend not doing this unless Lara is near death.
Push the movable block all the way to the right. Climb over it and down the ladder. Drop to the floor. Pull the movable block to the right. Now go through the door on the right.
You emerge in a separate side area. If you still have dynamite from before, use it now to blow up the crumbling wall. Climb onto the ledge above, get the medikit, jump to the opposite ledge and use the switch (S1) to open a trapdoor (D1) in the previous area.
(NOTE: If you don't have dynamite, return through the door to the left and climb down the ladder that was previously blocked by the trapdoor. At the bottom, drop onto the platform and immediately duck to get the dynamite and avoid the darts flying from the right. After the next dart passes, jump to grab the ladder and quickly climb back up. Return through the door to the side area and use the dynamite to destroy the stone wall.)
Go through the opening where the stone wall was and climb down to the bottom of the room. Stand above the Golden Beetle (CX1943) and tap Down twice—once to crouch and take the beetle and again to stay down as darts fire from the statues' mouths. This only happens once. After the darts have passed, climb back up to the door and return to the larger area.
Climb down the ladder that was previously blocked by the trapdoor (D1). At the bottom, drop onto the platform and duck avoid more darts. (If you didn't get the dynamite before, you will now.) Wait for a dart to pass overhead. Stand, step carefully to the left and duck again. Wait for a dart to pass, stand and press Action to jump over the first spike pit. Duck again. Repeat the process to cross the second pit.
Continue to the left and climb the ladder, again watching out for darts. At the top, jump the gap to the right. If you moved the block earlier, you will be able to climb up and use the switch (S2) to lower a block (B2) to the left. Hop down, walk to the edge and jump to grab the ledge. Pull up and continue to the exit.
 |
|
NOTE ON ITEM & MAP CODES: Each level and item has a code, which can be found on the map screen or item info screen. Once you have a code, you can enter it on a page at the Tomb Raider Mobile or Eidos Mobile UK web site to access a level map or detailed item information. My walkthroughs include all of the item info, as well as my own maps, which are a bit more detailed than the unlockable ones.
Copyright © 2006- Stellalune ( or contact me via web form). In-game item descriptions copyright © Eidos, Ltd. Feel free to copy or print this walkthrough for personal use. By all means, share it with friends, but please include this credit line so people can send me their feedback. No part of this walkthrough may be reproduced on another site without permission. Follow this link for details about this site's advertising and privacy policy.
WAS THIS WALKTHROUGH HELPFUL? If not, I apologize and invite you to contact me with any questions. If you need help right away, I recommend the r/TombRaider subreddit. Other fan-run forums are listed at tombraiders.net/stella/community.html. If this site was useful, please consider supporting it financially or in other ways. For details, visit tombraiders.net/stella/support.html. I also welcome any and all suggestions to improve things. Thank you!
Stella's Tomb Raider Site: tombraiders.net.