Stella's Tomb Raider Mobile/Cell Phone Game Walkthrough - The Osiris Codex
 LEVEL 13 – CAVERNS OF HORUS (MP3156)
Unless Lara is near death, leave the medikit for now. Lara's health bar will have to be at least half full to survive a long drop near the end of this level. So try and save this kit as long as you can. Hop across the gap and climb down the ladder.
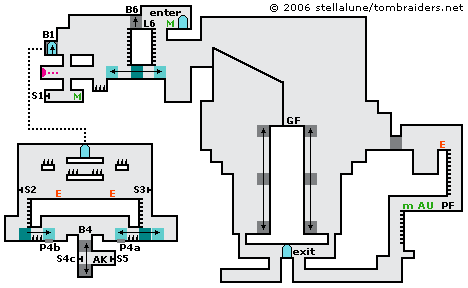
Push the movable block to the left as far as it will go. Climb onto it and jump over the spike pit to grab the ledge. Pull up and continue to the left. Drop down through the opening in the floor. Use the medikit and then pull the switch (S1) to raise a block (B1) above, revealing a door.
Climb out of the pit on the right side, run to the right, jump across the spikes to grab the movable block and pull up. Turn left and climb up to the door. Go through to a new area.
Drop and hang from either edge of the ledge near the entrance. Drop again to grab the ledge with spikes but don't pull up. Watch the shaman and snake below. When both move off, drop down, draw guns and kill the shaman first. Then crouch to shoot the snake. Ignore the switches (S2 and S3) on the walls for now.
Do not use the ladder on the left, as it is impossible to enter the room below without triggering a deadly spike trap. Instead, climb down the ladder on the right. Pull the movable block to the right and climb over it. Now pull the block into the room on the left.
When Lara passes over the pressure pad (P4a), this extends a set of spikes in the floor below the ladder. As long as Lara is pulling the block and not pushing it, she won't be injured. Pull the block onto the pressure pad.
Cross the room to the left and pull the second block into the room and onto the second pressure pad (P4b). Depressing both pressure pads lowers a block (B4) between the two low steps.
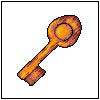
Drop through the opening and pick up the Ancient Key (CX7187). Use the switch on the right (S5) to retract some of the spikes on the ledges high up near the entrance. Then use the left switch (S4c) to raise the block (B4) Lara is standing on. Go to the right and push the movable block out of the room. Climb the ladder to the room above.
If you didn't do so earlier, shoot the 2 switches (S2 and S3) on the left and right walls to retract any remaining spikes on the ledges above so you can climb out safely. Return through the doorway to the previous area.
Jump the gap to the right, cross the ledge and hop down onto the movable block. Pull it to the right as far as it will go. Then climb the ladder to the ledge opposite the entrance. (If you can make it a little farther without using that medikit, try and wait.)
IMPORTANT: While Lara is standing near the lock and the '?' icon is activated, check your inventory for dynamite. You'll take a different path near the end of the level if you have some.
Use the Ancient Key in the lock (L6) to raise the block (B6) just to the left. Go through and climb down the ladder on the other side of the wall. Wait for a dart to pass below and then drop down. As quickly as possible, push the movable block once more to the right. (It should now be as far to the right as it will go.) Run out to the left and climb the ladder to avoid being hit by any more darts.
Use the medikit near the entrance if you didn't do so before. You'll need at least half health to survive the upcoming fall. Climb down the ladder below the lock. Step to the edge of the movable block, jump the gap to the right and pull up.
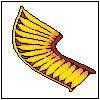
Slide down the angled cable to the bottom. Lara will be injured in the long fall, but if you've conserved health and used the medikit near the entrance just before the cable slide, she will survive. Pick up the Golden Feather (CX2322) and immediately jump to the right to land on the descending block.
If you have dynamite in your inventory, step to the right edge of the block as it descends. When the block moves alongside a ledge to the right, jump across to grab it. Pull up.
Climb the ledges to the right and use dynamite to destroy the crumbling wall. Enter the room beyond, kill the mummy on the next ledge and jump over there. Climb down the ladder and pick up a bunch of goodies: a Parchment Fragment (CX2822), the Uzi and an ammo clip, plus a medipack. Climb down the ladder and ledges and go to the left. Climb up to the exit.
If you have no dynamite, you should not jump off the descending block or you'll be stranded on the high ledge. Instead ride the block all the way to the bottom. You'll miss a few items, but none are required. Climb down to the floor and then up to the exit.
 |
|
 |
|
 |
|
NOTE ON ITEM & MAP CODES: Each level and item has a code, which can be found on the map screen or item info screen. Once you have a code, you can enter it on a page at the Tomb Raider Mobile or Eidos Mobile UK web site to access a level map or detailed item information. My walkthroughs include all of the item info, as well as my own maps, which are a bit more detailed than the unlockable ones.
Copyright © 2006- Stellalune ( or contact me via web form). In-game item descriptions copyright © Eidos, Ltd. Feel free to copy or print this walkthrough for personal use. By all means, share it with friends, but please include this credit line so people can send me their feedback. No part of this walkthrough may be reproduced on another site without permission. Follow this link for details about this site's advertising and privacy policy.
WAS THIS WALKTHROUGH HELPFUL? If not, I apologize and invite you to contact me with any questions. If you need help right away, I recommend the r/TombRaider subreddit. Other fan-run forums are listed at tombraiders.net/stella/community.html. If this site was useful, please consider supporting it financially or in other ways. For details, visit tombraiders.net/stella/support.html. I also welcome any and all suggestions to improve things. Thank you!
Stella's Tomb Raider Site: tombraiders.net.