Stella's Tomb Raider Mobile/Cell Phone Game Walkthrough - The Osiris Codex
 LEVEL 11 – SLAVE GALLERY (MP2901)
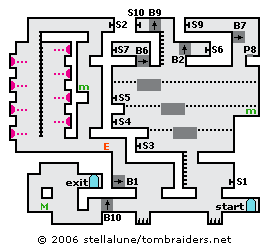
Jump over the spike pit. Climb onto the ledge above, turn right and jump over to the switch (S1). Use it to extend a block (B1) off to the left.
Hop back to the ledge on the left, climb down and continue left. Just before the next spike pit, turn around and climb onto the ledge above. Jump the gap to the left and climb onto the block (B1) you just extended. Climb up, shoot the snake and continue to the left.
Climb the rope ladder on the left side, avoiding the darts if possible. (Don't climb up on the right or Lara won't be able to reach the ledge above.)
At the top, go to the right and use the switch (S2) to raise a block (B2) in the area to the right.
Climb down the ledges, picking up a medipack on the way. Continue down then to the right. Drop onto the block (B1), jump the gap above the spikes, drop down again and continue to the right. Before the spike pit near the starting point, climb onto the ledge above on the left. Then climb the ladder.

 Spanning the room are 3 platforms on chains. Three switches on the left wall move the blocks in different combinations: The bottom switch (S3) moves only the lower platform. The middle switch (S4) moves the middle and lower platforms, and the top switch (S5) moves all three platforms. It's a little tricky to align the platforms the way you want them, but each switch can be used over and over again. So if you mess up, you can always return them to the starting position and begin again. The Glyphed Parchment from Level 5 somewhat enigmatically indicates you should use the upper switch first.
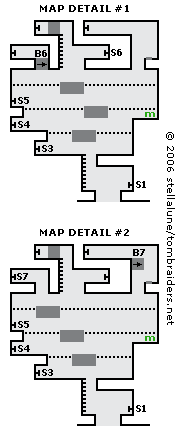
Beginning with the blocks arranged as they are when you enter (as shown in the main level map at the top of the page), climb to the top switch (S5) and use it twice to move the platforms into the position shown in Map Detail #1. Climb down to the ledge below, jump over to the lower platform, then climb to the middle, then the top platform. From there, climb up to the switch (S6) and use it to move another block (B6) just to the left. Climb down the platforms then back up the left wall to the top switch.
Use the top switch (S5) 12 times to move the top platform to the right and then all the way back to the left. Drop down to the middle switch (S4) and use it 4 times to move the middle and lower platforms into the position shown in Map Detail #2. Climb the ledges to the switch you just uncovered.
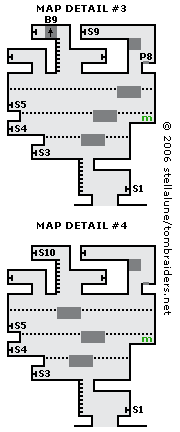
Use that switch (S7) to extend a block (B7) in the upper right corner of the room. Return to the switches on the left and use the top switch (S5) 7 times to move the upper platform all the way to the right, then use the middle switch (S4) twice to move the middle and lower platforms into position beneath it (as shown in Map Detail #3).
Climb the movable platforms to the ledge with the pressure pad (P8) just below the block (B7) you just extended. (Ignore the medipack for now.) When Lara steps on the pad, the platforms move again. Turn left, jump up to grab the block and pull up. Go left to the next switch (S9). Use it to move another block (B9) just to the left. Return to the right and drop down onto the pressure pad.
Hop up and down on the pad (P8) until the upper platform is directly beneath Lara. Drop onto it and from there, drop to the ledge with the medipack. Drop to the ledge below. Climb onto the lower movable platform and jump back over to the switches.
Pull the top switch (S5) 5 times, or until the upper platform is directly below the ladder, as shown in Map Detail #4. Climb up to the final switch (S10). Use it to raise a block (B10) far below and to the left, which will enable you to reach the exit.
Climb down the ladder and movable platforms. Then climb down the ladder below the movable ledges. Drop to the floor between the 2 spike pits and go to the left. Jump across the second spike pit and continue to the left. Climb onto the ledge and use the medikit. Climb onto the square block above and jump across to the exit.
NOTE ON ITEM & MAP CODES: Each level and item has a code, which can be found on the map screen or item info screen. Once you have a code, you can enter it on a page at the Tomb Raider Mobile or Eidos Mobile UK web site to access a level map or detailed item information. My walkthroughs include all of the item info, as well as my own maps, which are a bit more detailed than the unlockable ones.
Copyright © 2006- Stellalune (). In-game item descriptions copyright © Eidos, Ltd. Feel free to copy or print this walkthrough for personal use. By all means, share it with friends, but please include this credit line so people can send me their feedback. No part of this walkthrough may be reproduced on another site without permission. Follow this link for details about this site's advertising and privacy policy.
WAS THIS WALKTHROUGH HELPFUL? If not, I apologize and invite you to contact me with any questions. If you need help right away, I recommend the r/TombRaider subreddit. Other fan-run forums are listed at tombraiders.net/stella/community.html. If this site was useful, please consider supporting it financially or in other ways. For details, visit tombraiders.net/stella/support.html. I also welcome any and all suggestions to improve things. Thank you!
Stella's Tomb Raider Site: tombraiders.net.