Stella's Tomb Raider Mobile/Cell Phone Game Walkthrough - Quest for Cinnabar
 Level 6: Mandala Grotto (MP8211)
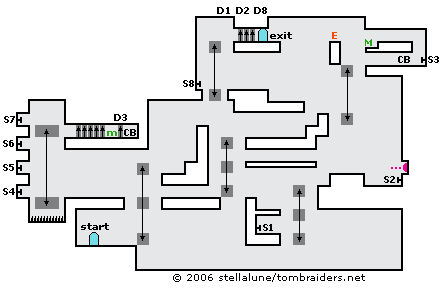
Jump and grab the moving block just to the right of the entrance. Ride it upward and jump off on the first ledge on the right (not the one above it). Cross this ledge to the right. Jump across the gap and continue to the right. (You'll ride the second moving block later.)
There's a third moving block just ahead. Jump onto it, move to the right edge and ride it downward. Jump off on the ledge with the switch (S1). Pull it to open the left door (D1) of the three barring the exit high above. When the moving block descends again, jump onto it. Ride it upward and jump off on the right.
Wait for a fireball to pass overhead. Climb over to the right and use the switch (S2) to open the middle door (D2) of the three near the exit.
Avoid the fireballs as you return to the left and climb onto the thin ledge overhead. Go left across the thin ledge and jump onto the moving block. Ride up and jump off on the ledge with the three green Buddha statues. Cross this ledge and climb the blocks on the right.
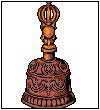
When the next moving block descends, jump onto it. Ride it upward and jump to the ledge below the medikit. Pick up the Copper Bell (QC9382) and use the switch (S3) to open a door (D3) on the left side of the map. Climb onto the ledge above and immediately shoot to the left to kill the monk on the next ledge. Pick up the medikit. Then climb back down on the right side near the switch (S3).
Walk to the edge of the ledge, wait for the moving block and jump onto it. Ride it down and jump off on the left. Climb back down to the ledge with the Buddha statues. Go to the left and jump onto the moving block. Ride it down and jump off on the left.
Cross this ledge and jump onto the next moving block. (This is the first moving block you encountered; the entrance is just below on the left.) Jump off on the left near the red-and-yellow striped columns.
Go to the left to the edge of a spike pit. Wait for the moving platform to descend and jump onto it. As the platform moves up and down, it passes four alcoves along the left wall, each with a switch (S4-S7). High above is a hallway with a medipack and another bell. There are 5 doors before the medipack (and one door between the medipack and the bell, which you opened already using switch S3). The switches open and close the five doors in various combinations. To get all five doors open, use only the bottom and second highest switches (S4 and S6). Then ride the platform almost to the top and jump off on the right. Take the medipack and second Copper Bell.
Jump back onto the platform, ride it back down and jump off on the right. Cross the ledge above the entrance, jump onto the moving block, and then jump to the lower of the two ledges on the right. Go right and jump onto the next moving block. Ride it up to the ledge with the four green Buddha statues and jump off. Cross in front of the statues and climb onto the ledge above.
Go left and jump across the gap to the switch (S8). Use it to open the third door (D8) barring the exit. When the moving block descends, jump onto it. Ride it upward and jump over to the exit.
 |
|
NOTE ON ITEM & MAP CODES: Each level and item has a code, which can be found on the map screen or item info screen. Once you have a code, you can enter it on a page at the Tomb Raider Mobile or Eidos Mobile UK web site to access a level map or detailed item information. My walkthroughs include all of the item info, as well as my own maps, which are a bit more detailed than the unlockable ones.
Copyright © 2006- Stellalune (). In-game item descriptions copyright © Eidos, Ltd. Feel free to copy or print this walkthrough for personal use. By all means, share it with friends, but please include this credit line so people can send me their feedback. No part of this walkthrough may be reproduced on another site without permission. Follow this link for details about this site's advertising and privacy policy.
WAS THIS WALKTHROUGH HELPFUL? If not, I apologize and invite you to contact me with any questions. If you need help right away, I recommend the r/TombRaider subreddit. Other fan-run forums are listed at tombraiders.net/stella/community.html. If this site was useful, please consider supporting it financially or in other ways. For details, visit tombraiders.net/stella/support.html. I also welcome any and all suggestions to improve things. Thank you!
Stella's Tomb Raider Site: tombraiders.net.