Stella's Tomb Raider Mobile/Cell Phone Game Walkthrough - Quest for Cinnabar
 Level 7: Padmesambhava's Well (MP1434)
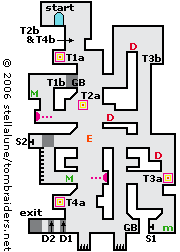
Walk to the edge and jump to the narrow ledge below on the right. Turn left and jump down to the teleporter (T1a). Go through to emerge just below near a crumbling wall (T1b). You'll need to find some dynamite to destroy it.
The low ceiling prevents Lara from jumping to the ledge with the medikit. So hang from the edge, wait for the gargoyle below to shoot out a fireball, then drop to the floor. If you need health, quickly climb onto the ledge above the gargoyle and get the medikit. Otherwise, get the dynamite first, then get the health.
To reach the dynamite, follow the fireball to the left, drop and hang from the edge as you wait for another fireball to pass. Then pull up, turn right and jump the gap to grab the opposite ledge. Wait for another fireball to pass, pull up, take the dynamite, then hang from the edge before another fireball comes.
Timing your moves to avoid fireballs, pull up, turn left, jump the gap, pull up, run toward the gargoyle and climb onto the ledge above it. Use the medikit if you didn't before. Jump over to the ledge with the crumbling wall. Set the dynamite and hang from the edge to avoid injury. Take the Golden Bell (QC1764).
NOTE: The teleporter below on the right (T2a) deposits Lara on the ledge near the first teleporter (T2b). You shouldn't need to use it.
Again, timing your moves to avoid fireballs, drop down, go to the right, jump the gap, cross the ledge to the right and drop down. Draw guns and immediately shoot the purple spirit off to the left.
Get more dynamite on the ledge below, but don't drop down into the teleporter (T3a) yet. Instead, go left and jump across two gaps (above the skull blocks). Set the dynamite near the crumbling wall and quickly hang from the ledge on the right to avoid injury.
Don't drop down here yet. Instead, pull up and jump back over to the left. Hang from the rightmost skull block. Let go to grab the smaller ledge below. Let go again and grab the ledge below that one. Pull up and climb down to the small room on the right with the medikit. Use the switch (S1) to open one of the doors (D1) blocking the exit.
Climb up two ledges to the teleporter (T3a). Go through to emerge on a ledge near the top right corner of the map (T3b). Jump over and get the dynamite. Then drop down on the left.
Jump the gap to the left (to the ledge where you found the Golden Bell). Again drop down in front of the flame-shooting gargoyle, jump the gap to the right, cross that ledge (where the first dynamite was) and drop down on the right.
Jump back across the two gaps above the skull blocks. Hang from the leftmost skull block. Let go to grab the smaller ledge below. Let go again and grab the ledge with the medikit. Wait for the gargoyle to the right to shoot a fireball. Then pull up, use the health if you need it, run to the left and climb the ladder. Use the switch (S2) to open the second door (D2) barring the exit.
Climb down the ladder, move to the right edge and jump down to the narrow ledge below the gargoyle. Hang from this ledge and drop to the floor.
Jump over the spike pit on the right and collect the second Golden Bell. Jump back over the spikes, then over the second spike pit. After using the switches (S1 and S2) above, the doors here will be open. Use dynamite to destroy the crumbling wall and reveal the exit.
NOTE: If you missed one of the switches or forgot to pick up more dynamite, climb onto the ledge with the teleporter (T4a). It deposits Lara on the ledge near the first teleporter (T4b). You can continue your explorations and return to the exit when ready.
 |
|
NOTE ON ITEM & MAP CODES: Each level and item has a code, which can be found on the map screen or item info screen. Once you have a code, you can enter it on a page at the Tomb Raider Mobile or Eidos Mobile UK web site to access a level map or detailed item information. My walkthroughs include all of the item info, as well as my own maps, which are a bit more detailed than the unlockable ones.
Copyright © 2006- Stellalune (). In-game item descriptions copyright © Eidos, Ltd. Feel free to copy or print this walkthrough for personal use. By all means, share it with friends, but please include this credit line so people can send me their feedback. No part of this walkthrough may be reproduced on another site without permission. Follow this link for details about this site's advertising and privacy policy.
WAS THIS WALKTHROUGH HELPFUL? If not, I apologize and invite you to contact me with any questions. If you need help right away, I recommend the r/TombRaider subreddit. Other fan-run forums are listed at tombraiders.net/stella/community.html. If this site was useful, please consider supporting it financially or in other ways. For details, visit tombraiders.net/stella/support.html. I also welcome any and all suggestions to improve things. Thank you!
Stella's Tomb Raider Site: tombraiders.net.