Stella's Tomb Raider Mobile/Cell Phone Game Walkthrough - Quest for Cinnabar
 Level 5: Cave of Mandarava (MP5199)
Go to the left and shoot the purple spirit. Continue left and jump to grab the edge of the moving platform when it descends. Pull up, ride it to the top, and get off on the left.
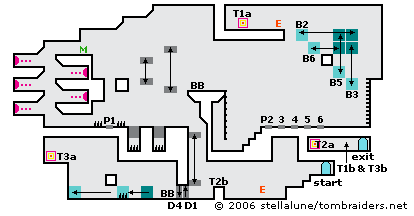
Advance to the left carefully. Jump over the break-away floor above the first spike pit. Wait until the moving spikes just begin to retract. Then jump over the second pit. Step onto the pressure pad (P1). This opens one part (D1) of a two-part door down below. Wait for the second set of spikes to retract and then run to the left.
To climb up past the fireball traps, first stand beneath the ledge on the right. Just after a fireball shoots from the gargoyle to the left, jump straight up to grab the ledge. Pull up, turn left and jump to grab the next ledge. Pull up, turn right, jump and grab, then pull up again. Repeat until you reach the top. Rather than trying to avoid the fireballs, just climb up as fast as you can. There's a medikit (GN9500) at the top.
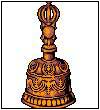
Climb down on the right and jump to the square ledge. Jump from there to the first moving platform, then to the second (when they move level with each other), then to the ledge with the Bronze Bell (QC8491). Pick it up.
Slide down the rope and climb the stairs to a series of pressure pads (P2-P6). Each of these pads moves one in a series of blocks high above (B2-B6). The goal is to arrange the blocks into a staircase. To trigger a pad, step on it (obviously). To avoid triggering, stand between pads and jump to land between the next set of pads.
From the starting position, walk to the right across all five pads. Some pads have no effect at first because some blocks are preventing others from moving. So, from left to right, P2: no effect yet, P3: moves B3 down, P4: opens a door down below so you can get the second bell (more on that shortly), P5: no effect yet, P6: moves B6 to the left.
Now, stand just to the right of P6 and jump over it so it is not triggered. Lara lands on P5, which moves B5 downward. Step off P5 on the left side. Press Action to jump over P4 and P3. Step on P2 to move B2 to the left. Now the puzzle is solved: The blocks are arranged to form a staircase. To get back across the pads without triggering them again, step off P2 on the right side. Then press Action twice to jump over P3 and P4, then P5 and P6.
If you make a mistake, remember you can step on the pads as many times as you want, rearranging them until they form a staircase. Just be sure to trigger P4 before climbing up; otherwise the door to the room with the second bell will not be open when you get there.
Climb the ladder on the right wall. Jump over to the block staircase and climb to the top. Shoot the monk before he can blast Lara with a blue beam. Step into the teleporter (T1a) to appear several levels below (T1b). Don't exit the level yet. Instead go through the next teleporter (T2a) to appear on the level below (T2b).
Go to the left, through the doors you opened earlier (D1 and D4), and pick up the second Bronze Bell.
To get back to the exit without passing the fireball traps again, push the movable block onto the spikes. Climb onto the block and over the ledge to the left. Pull the block to the left then push it against the left wall. Climb up and go through a third teleporter (T3a) to appear once again near the exit (T3b). Go through.
 |
|
NOTE ON ITEM & MAP CODES: Each level and item has a code, which can be found on the map screen or item info screen. Once you have a code, you can enter it on a page at the Tomb Raider Mobile or Eidos Mobile UK web site to access a level map or detailed item information. My walkthroughs include all of the item info, as well as my own maps, which are a bit more detailed than the unlockable ones.
Copyright © 2006- Stellalune (). In-game item descriptions copyright © Eidos, Ltd. Feel free to copy or print this walkthrough for personal use. By all means, share it with friends, but please include this credit line so people can send me their feedback. No part of this walkthrough may be reproduced on another site without permission. Follow this link for details about this site's advertising and privacy policy.
WAS THIS WALKTHROUGH HELPFUL? If not, I apologize and invite you to contact me with any questions. If you need help right away, I recommend the r/TombRaider subreddit. Other fan-run forums are listed at tombraiders.net/stella/community.html. If this site was useful, please consider supporting it financially or in other ways. For details, visit tombraiders.net/stella/support.html. I also welcome any and all suggestions to improve things. Thank you!
Stella's Tomb Raider Site: tombraiders.net.