Stella's Tomb Raider Anniversary Mobile/Cell Phone Game Walkthrough
 LEVEL 12: MEASURED STEPS
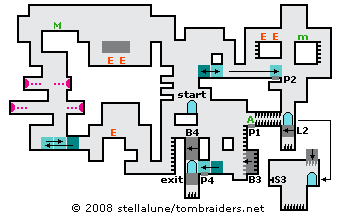
Drop down on the right and jump across two gaps to the right. Pull up, triggering the pressure pad (P1), which extends the spikes to the right. Grab the ammo clip. Ignore the room below for now and jump back across the ledges to the left. Pass beneath the entrance and climb down the ladder to the left.
Climb the ledges and shoot the tribesman. Push the movable block twice to the left, climb over it and push it once to the right. Climb onto the block, face left and jump straight up to grab the ledge below the dart-shooting gargoyles. After two darts pass, pull up and immediately jump up to grab the ledge above. Again, wait for the darts, pull up, grab the ledge above and pull up to safety. Climb up one more ledge, turn right and jump over to the medikit.
Drop down onto the ledge below. There are 2 dogs pacing in the shallow pit to the right. To avoid them, jump three times to cross the crumbling stone platform and land on the next ledge. Otherwise, drop down into the pit, shoot the dogs and climb out on the other side.
Drop down on the right and jump the gap, grabbing onto the movable block. Pull up, climb over the ledge and pull the block underneath the ledge. Climb back over the ledge and push the block all the way to the right onto a pressure pad (P2), which extends another ledge (L2) below.
Climb the ladder and kill the 2 warriors. Jump the gap and get the medipack. Climb down the ladder on the right and drop to the floor. Climb down and go through the doorway.
In the next room, quickly jump across the spike pit to avoid being skewered by spikes that descend from the ceiling.
Pull up and use the switch (S3) to extend a block (B3) with a ladder in the room to the right. The switch also retracts the spikes above the doorway. Jump back across the spike pit and return through the door to the room above.
Climb the ledges on the right, climb the ladder, jump the gap to the left, and climb down the next ladder. Pull the movable block as far as possible to the left. Climb over the ledge and push the block to the left edge. Climb back over the ledge onto the block. Jump the gap and drop down, grabbing each of the small ledges, and landing near the entrance. (Alternatively, you can skip moving the block and drop directly from the right ledge down to the entrance, but Lara will lose quite a bit of health.)
Climb down into the room below and to the right of the entrance. Push the movable block onto the pressure pad (P4) to slide back a block (B4) above the exit. Climb the ladder on the right wall to the spot where you found the ammo clip earlier. At the top, turn left and jump down to the small ledge below. Jump once more to the left and drop down through the opening you just made. Immediately press Up to go through the doorway before the crumbling block collapses and Lara falls into the spikes.
Walkthrough text and diagrams copyright © 2008- Stellalune Stellalune (). Feel free to copy or print this walkthrough for personal use. By all means, share it with friends, but please include this credit line so people can send me their feedback. No part of this walkthrough may be reproduced on another site without permission. Follow this link for details about this site's advertising and privacy policy.
WAS THIS WALKTHROUGH HELPFUL? If not, I apologize and invite you to contact me with any questions. If you need help right away, I recommend the r/TombRaider subreddit. Other fan-run forums are listed at tombraiders.net/stella/community.html. If this site was useful, please consider supporting it financially or in other ways. For details, visit tombraiders.net/stella/support.html. I also welcome any and all suggestions to improve things. Thank you!
Stella's Tomb Raider Site: tombraiders.net.