Stella's Tomb Raider Anniversary Mobile/Cell Phone Game Walkthrough
 LEVEL 11: ECHOES
This level involves three trap-ridden areas that will surely test your reflexes.
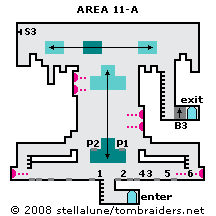
In the first room (see Area 11-A map), climb the ladder to a hallway with various pressure pads on both sides. Stepping on any of the pads causes multiple darts to fire from the traps at the ends of the hallway, most likely killing Lara. (If she has full health at the start, she can survive one round of darts, but it will be much more difficult to get through the rest of the level.)
To avoid stepping on any of the pads, follow this sequence, which is numbered step by step on the map: Starting at the top of the ladder, face right and tap Action to jump once (from 1 to 2), then again (from 2 to 3). Turn left, take one step (from 3 to 4), turn back to the right and jump again (from 4 to 5), then once more (from 5 to 6). Climb the ladder to the ledge above.
Go to the left and climb onto the low step at the end of the ledge. The platform ahead is shaped like an inverted 'T' and has a pressure pad on each side. Jump across the gap, clearing the first pressure pad (P1). Climb over to the other side of the platform and step on the second pressure pad (P2). Either pad causes the platform to start moving up and down, but if Lara is on the left side when it starts upward, she won't be struck by the darts coming from the right. As the ledge rises, climb back over to the right side to avoid being hit by the darts from the left. Then climb on top of the platform and stand at the edge facing left. When the platform reaches its highest point, jump straight up to grab the platform overhead. Pull up. (If you miss the grab, ride the platform back down then up again, taking cover from the darts as you go.)
Once on the high platform, shoot to the left to hit a switch (S3) on the left wall to raise a block (B3) near the exit. This also causes the platform on which Lara is standing to begin moving to the left and right. Hang from the right edge, and when the platform moves above the wall with the ladder, drop down. Climb down the ladder and go through the door.
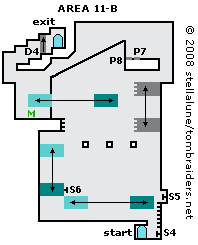
 The next room (Area 11-B) involves a rather complex timed run to the exit. Pull the switch (S4) just inside to open a door (D4) barring the exit at the top left of the room. This stays open for about 45 seconds.
To get there, climb the ladder above the switch. Pull the next switch (S5) to set the platform to the right in motion. Turn right, wait for it to approach and then jump onto it. Walk to the left edge and when the platform Lara is standing on moves against the platform with the switch (S6), press Action to use the switch and then immediately press Up to grab onto the platform where the switch is mounted as it starts moving upward.
Pull up and turn to face right as you ride that platform upward. When the platform pauses at the top, jump to land on one of the tiny square ledges. Jump to the next tiny ledge, then the next. When the platform with the ladder dangling from it descends, jump straight up to grab it. Climb up and step off on the right.
Turn around and climb onto the ledge with the 2 pressure pads (P7 and P8). Crossing these pads makes the platform below begin to move back and forth. To ensure that Lara lands on the moving platform after sliding down the cable, do not hesitate. Just walk across the two pads and jump up to grab the angled cable. By the time Lara reaches the bottom of the cable, the platform should have moved beneath her. As soon as she lands on it, walk to the left edge. When the platform moves all the way to the left and pauses, jump to grab the ledge on the left. Pull up, turn around and climb up to the exit door—hopefully before the door (D5) slides shut again.
Unless Lara is badly injured, ignore medikit on the ledge below. If you must retrieve it, jump back to the moving platform, which is a little lower than the left ledge, then drop from there to the ledge below. Use the health and then climb carefully back down to the first switch (S5), use it and try the climb again. (The paragraph after the next one has tips for climbing down.)
If you don't make it to the exit before the door closes, you'll have to climb back down to the first switch (S5). Do this by dropping from the ledge below the steps leading up to the exit. Or, to conserve health, jump onto the moving platform and drop from there to the ledge below. Use the medikit if you didn't before. Then climb down the short ladder so Lara is hanging from the very lowest rung. When the moving platform below moves upward, press Down to drop and grab onto it. Ride it downward, drop onto the lowest moving platform and from there, drop to the floor. Cross the room to the left and drop down next to the switch. Pull it and then repeat the climb to the exit.
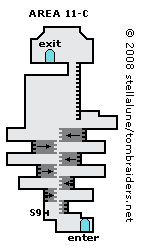
 The final room (Area 11-C) consists of one more tricky timed sequence. Climb onto the ledge to the left and pull the switch (S9). This extends all of the ledges above so that Lara can reach the ladders. They gradually retract, from bottom to top, so you have to move quickly.
Immediately after pulling the switch, turn to face right, but don't step forward. Jump to grab the lowest ladder. Climb up, and without moving from the edge, turn to face left and immediately jump forward to grab the second ladder. Again, climb up, turn around and jump to grab the next ladder. Repeat this four more times to reach the topmost moving ledge. Jump up to grab the ladder overhead before the ledge Lara is standing on retracts completely.
Climb to the top of the ladder and jump over to the exit.
Walkthrough text and diagrams copyright © 2008- Stellalune Stellalune (). Feel free to copy or print this walkthrough for personal use. By all means, share it with friends, but please include this credit line so people can send me their feedback. No part of this walkthrough may be reproduced on another site without permission. Follow this link for details about this site's advertising and privacy policy.
WAS THIS WALKTHROUGH HELPFUL? If not, I apologize and invite you to contact me with any questions. If you need help right away, I recommend the r/TombRaider subreddit. Other fan-run forums are listed at tombraiders.net/stella/community.html. If this site was useful, please consider supporting it financially or in other ways. For details, visit tombraiders.net/stella/support.html. I also welcome any and all suggestions to improve things. Thank you!
Stella's Tomb Raider Site: tombraiders.net.