IMPORTANT: If you haven't already done so, you may want to review the INTRODUCTORY NOTES on the storyline, controls, treasures/relics and saving/checkpoints. These appear at the start of the PROLOGUE walkthrough.
As always, I highly recommend that you do not rely exclusively on the autosave. Instead be sure to save manually at least once or twice each level. Then, if you miss something or run into a bug, you can reload rather than having to replay the entire level. Many common bugs are documented in this walkthrough. They are in hot pink text, like this, so they're easy to spot. I have also included an overview of major bugs without game spoilers. However, not every potential problem is covered here. So be safe; save often in new slots. In case you need them, Underworld Save Files for PC, PS3 and Wii are available.
LEVEL 3: CROFT MANOR - PROTECTED BY THE DEAD | Updated: 7/24/11(†) |
Health Items: 4 Treasures: 13 Relics: 1 Keys/Puzzle Items: 0
Underworld Video Walkthrough by Eldincy‡
NOTE: At the start of the level you can choose between Lara's Casual outfit, Jungle Shorts or Jungle Pants. You can also choose which secondary weapon to equip first. You can always switch weapons later using the PDA. (For more info, see the Underworld Controls page.)
Cinematic: Back at Croft Manor, Lara enlists Zip, Alister and her faithful manservant, Winston, to help carry gear down into the family crypt. Winston opens a secret panel, revealing a dark, cobwebby staircase. Lara grabs a flashlight and leads the way down. Winston follows, and the two younger men bring up the rear, carrying a heavy box of equipment.
Lara locates her grandfather's tomb and begins examining it. She soon finds a concealed switch, flicks it, and the coffin slides to one side, revealing an opening.
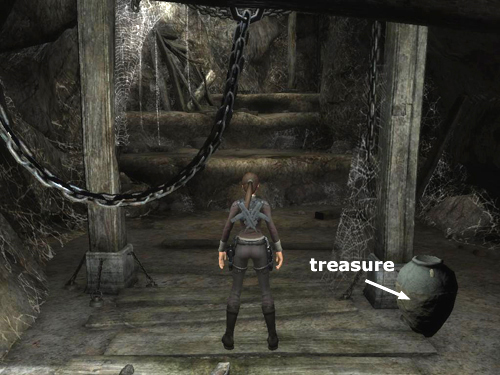
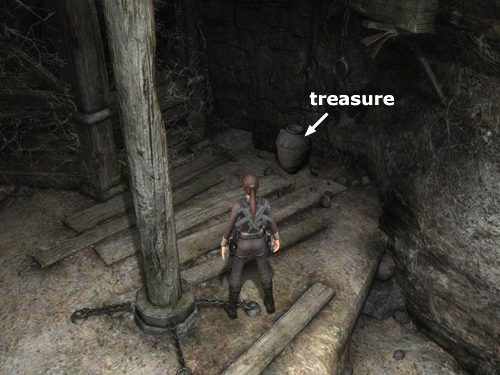
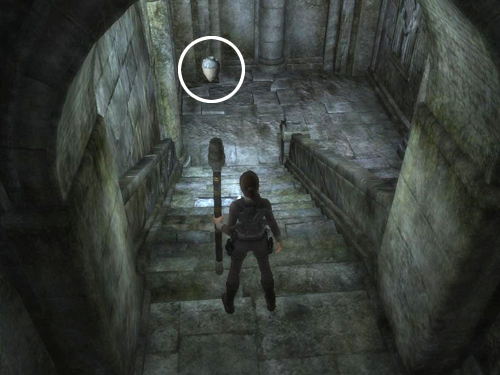
TUNNELS: The level begins in the rough, cobweb-strewn tunnel beneath the crypt. Break the large urn on Lara's right (shown in this screenshot) to find the first treasure (1/13). Vault up onto the ledge with the vertical wooden pole and you'll find another breakable jar, also containing a treasure (2/13). (Again, here's a screenshot, though it's pretty obvious.)
Approach the vertical pole to grab it. Climb all the way up to perch on top of it. Point the camera toward the wooden ledge at the opening of the upper tunnel and jump to land there. Follow the tunnel around to the right to an opening overlooking a large, long-disused chapel.
ENTERING THE CHAPEL: Step out onto the wooden scaffolding and shoot the flock of bats that flies in from the far side of the room.
If you're not collecting treasures, climb down the scaffolding and skip ahead to the CHAPEL FLOOR section, below.
The first treasure in the CHAPEL area can be found on the high ledge ahead on the left. You can see it from the entrance. (These screenshots show the path described below.) Begin by dropping from the highest scaffolding platform, near the entrance, to the one below. Turn left, walk to the edge and jump onto the narrow beam ahead. Turn right, walk to the end of the beam and jump to grab the ledge ahead. Pull up. Small spiders swarm out of a crack in the wall, so deal with them before grabbing the treasure (3/13).
Head for the opposite side of this ledge from the spot where you pulled up. Stand between the center and the right side of the ledge and jump to grab the horizontal pole sticking out of the wall ahead. (If you try and make this jump on the left side where the gap is larger, Lara will fall, and you'll have to climb back up the scaffolding and try again.) Move to the left side of the pole (i.e., closer to the wall), swing and jump to the ledge ahead. Just around the corner to the left you'll find the next treasure (4/13). (Again, there are screenshots if you need them.) To get down safely, swing back to the ledge where you found the previous treasure. Then jump back to the scaffolding and drop down a bit at a time.
CHAPEL FLOOR: When Lara touches the floor, small spiders swarm out from all directions. You'll probably want to shoot them with pistols, as swatting and stomping all of them could take a while.
NOTE: Throughout this area you'll meet lots of spiders and bats. I mention these in the areas where they are triggered, but sometimes you'll run into a few left over from a previous encounter. Just stay alert, and remember that Lara can shoot while climbing as long as she's using dual weapons, such as pistols.
On the dais ahead, behind the angel statue, there's a pressure pad and a pair of closed gates. You can't do anything with these yet, so continue your explorations.
Cross to the right side of the room (i.e., right when Lara's back is to the entrance and she's facing the stone angel) to find another breakable urn containing a treasure (5/13). (This screenshot shows the spot.)
CLIMBING TO THE UPPER LEVEL: Climb the scaffolding and walk or traverse along the top toward the high ledge on the right side of the room (i.e., the right side when facing the dais with the angel statue). Jump from the end of the beam to grab the ledge. Pull up and take the first aid kit. Then take a running jump to grab the horizontal pole sticking out of the wall ahead. To reach the next pole, climb on top of the first one (as shown in this screenshot). Then jump forward to grab the higher pole. Swing, jump and grab the third pole and then swing and jump to the ledge.
UPPER LEVEL CORRIDOR – RIGHT SIDE OF CHAPEL: Kill another swarm of spiders. Then jump up to grab the wooden pole sticking out of the right wall. Pull up to stand on top of it, walk toward the wall and jump straight up to the handhold above. Climb to the right or left and then upward. (This screenshot shows how.) Pull up into a low-ceilinged alcove, where you'll find another treasure (6/13).
After getting the treasure, ease Lara off the ledge slowly, so she drops and grabs the handhold below. Drop down to the wooden pole, move toward the wall and then press Interact to yank the pole free. (This pole is only necessary for obtaining one of the treasures. So if you don't care about that, just leave the pole where it is.)
Continue forward along this hallway. Go down the stairs, pausing on the landing to crack open another vase (shown in this screenshot) and find the treasure (7/13) inside. As you head down the second flight of stairs, more spiders drop from above. Lara will shoot with one pistol if she's carrying the pole, but you won't be able to use a two-handed weapon or do the spider stomp, since Interact is also used to swing the pole. To drop objects, press Crouch.
LOWER LEVEL CORRIDOR – RIGHT SIDE OF CHAPEL: Continue to the bottom of the stairs. When you come to a T, go left to find a first aid kit on the floor. There are still more spiders and a small, square block lying on the floor just around the next corner.
OBTAINING THE RELIC: Behind the grating to the right of the small block, you'll see this level's RELIC. Right now the bars won't open, but you'll fix that shortly. I recommend that you leave the wooden pole here near the relic, so you'll remember where it is when you need it.
If you need visuals, I've included both screenshots and gameplay video showing how to get at the relic.
Pick up the small block and carry it to the far end of the hallway. Press the Crouch button to drop the block onto the pressure pad. Then return along the hallway, past the relic, the way you came. At the end, where you found the first aid kit earlier, turn left and go straight on, past the stairs on your right, into a LARGE ROOM WITH STAINED GLASS WINDOWS.
NOTE: As in the Path to Avalon and Norse Connection levels, some PC players may find it difficult to move the small blocks without them bouncing all over the place when you set them down. This can often be fixed by going into the audio/video setup menu and turning V-Sync ON.
Along with a several interesting switches and levers that don't quite work yet, you'll find another small block just inside on the left. Pick it up, carry it back to the pressure pad and set it down. With both blocks in place, the gate stays open. Hurrah!
Now return along the hallway. After placing the weights on the pad, the bars in front of the RELIC (3/6) are also open. Duck through the low opening and grab it now.
Return to the pressure pad. Stand on it to hold the gate open and throw both blocks out into the next room (using the Grenade key). Then sprint or roll through the gate before it closes.
DAIS WITH STONE ANGEL: There's another pressure pad on the floor at the center of the dais behind the angel statue. When Lara steps on it, the furnace ignites, illuminating the LARGE ROOM WITH STAINED GLASS WINDOWS on the other side of the bars. In order to keep the furnace lit, place the 2 small blocks on the pad to hold it down.
Doing this also opens both side gates. Return through the gate that leads to the hallway where you found the relic (i.e., the one on the right if Lara's back is toward the angel statue). Follow the hallway to the relic niche and pick up the wooden pole that you dropped earlier. Continue along the hallway to the LARGE ROOM WITH STAINED GLASS WINDOWS. Go straight across and out the other side. This doorway leads into another hallway just like the one you came from.
LOWER LEVEL CORRIDOR – LEFT SIDE OF CHAPEL: If you like, you can go around the corner and shoot another swarm of little spiders, but this is not necessary. There's another small stone block on the floor just ahead, as well as another pressure pad at the end of this hallway. You can ignore these, though, since you should have already opened the gates and lit the furnace using the blocks in the other hallway. Climb the stairs leading to the upper level.
UPPER LEVEL CORRIDOR – LEFT SIDE OF CHAPEL: Drop the wooden pole (Crouch) to deal with another flock of bats. There's a fourth small block here but, again, you shouldn't need it. Pick up the pole again and place it in the hole on the wall just above the little block. Climb up to the alcove just as you did before for treasure #6. Take treasure (8/13) and climb back down. Leave the pole in the socket and return down the stairs. At the bottom, turn left.
LARGE ROOM WITH STAINED GLASS WINDOWS: Now that the furnace is lit, the switches here are functional. Solving the next puzzle opens the exit from the chapel, located high on the wall between the two stained glass windows. (The process is illustrated in these screenshots.)
Face the octagonal structure with the 4 golden switches so the wall with the stained glass windows is behind Lara. Pull the front right switch twice. This realigns the golden panels on top of the octagonal structure so that the angel in the stained glass window to the left of the exit is illuminated, but the rest of the window remains dark. When you do this correctly, one of the bars holding the door shut retracts. (A cutscene clearly shows this happening. So if you don't see the cutscene, you haven't done it correctly. Keep pulling.)
Go around to the switch on the exact opposite side of the octagonal structure and pull it three times. This moves the golden panels above so the angel in the right window is illuminated. This retracts the bar on the right side of the exit door. (Again, a brief cutscene shows this happening.)
TIMED RUN TO THE EXIT: Now that the door is unbarred, the turnstile mechanism with the two handlebars will work. Face the wall with the stained glass windows, approach the wheel mechanism and grab the handle on the right. (You could use the other handle, but this one will put Lara in a better position for the next part of the sequence.) Walk forward to push the handle, turning the wheel counterclockwise and gradually cranking open the door above. When you've gone halfway around, the door will be open all the way, and you won't be able to turn the wheel any farther.
Let go of the handle. As soon as you do, the door starts to close again. Run or sprint forward, past the octagonal structure and around to the right side of the big square column near the bars. Grab the lowest handhold on the column. (There are handholds on the other side as well, but running straight from the wheel to the right side of the column is faster.) Climb up the column as far as you can go. The overhanging ledge prevents you from climbing all the way to the top.
Traverse to the right along the narrow band of dark-colored stone until Lara is hanging with her back toward the stone angel below. Jump straight up to grab the top edge of the column and pull up. Step forward to the opposite edge and grapple the metal ring on the ceiling. Step off, swing forward and jump through the big doors before they close.
NOTE: If you don't make it through in time, try saving the game and reloading. The last checkpoint should be the one on top of the column. If the doors are still open, simply grapple swing across. If the doors have already closed, climb down the column, turn the wheel to open the doors and try again.
DARK STAIRWAY: Go up the stairs, killing more spiders as you go. At the top, a cave-in blocks the passage to the left, so follow the hall around to the right. On the way, you'll encounter still more little spiders. At the foot of the next staircase, pick up the first aid kit and smash the ceramic urn to get at the treasure (9/13) inside.
Before continuing up the stairs, follow the hallway forward and left to the back side of the cave-in, where you'll find another treasure (10/13). Return to the staircase and climb to the room above.
Cinematic: Lara approaches the desk at the center of the room and discovers a cassette recorder. She presses Play and hears her father's last message to her. He says that this room contains everything he recovered from the site at Bhogavati. Along with THOR'S RIGHT GAUNTLET, he's left the copy he made of the map showing the locations of the other artifacts needed to open the way to Avalon. He warns Lara to be especially careful with what he refers to as the "thralls" found guarding the gauntlet. She touches the artifact and, as before, it crumbles leaving only a small device, which she attaches to her hand. As she examines it, a pair of skeletal creature resembling large cats climb down from a high ledge and attack.
RICHARD CROFT'S SECRET STUDY: Go ahead and pull out the big guns to fight the tiger thralls. I recommend the submachine guns here, since they're powerful but also allow Lara to maneuver easily. There are no other enemies in this level, so there's no need to conserve ammo.
As you fight, you'll need to avoid the broken floor running along one side of the room. It's a long drop and Lara will die if she falls off the edge. If you need it, there's a first aid kit on the floor near the bent metal cage.
Once you've subdued each thrall with bullets, stand over its body and press Interact to smash its bones. Otherwise, it will revive and start fighting again. Alternatively, if you can manage to kill the thralls using the adrenaline headshot maneuver, they will be permanently destroyed.
A single sticky grenade will also put down a thrall for good, but this can be dangerous when fighting in close quarters. To prevent Lara from being injured, try throwing a grenade and then quickly climbing up onto one of the narrow ledges running around the wide pillars. Or, toss the grenade, run away and then detonate the grenade by shooting it with pistols. You may even be able to kill both thralls with one grenade, since they tend to stay together.
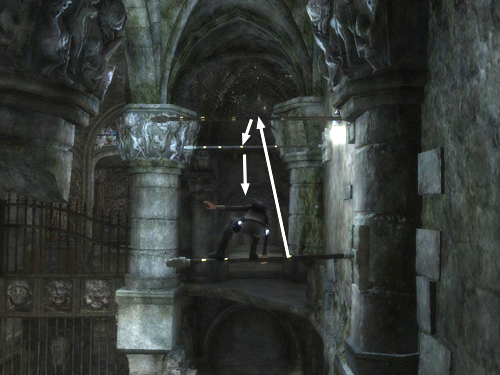
Here are a few alternate strategies if you prefer not to mix it up with these nasty beasts: First, when the cutscene ends, turn right, run and jump onto the small, wooden platform with the tall crate next to it (shown in the first of these screenshots). To get on top of the platform easily, draw weapons (Target Lock) when Lara is a few steps away from it. Then take a running jump forward. With guns drawn, Lara will flip up onto the safe platform. You can shoot the thralls from above and jump down to finish them off, or destroy them with a grenade or two.
Second, when the cutscene finishes, run to the left and grab the narrow ledge running around the fat column that the thralls used to climb down. Be careful not to run past it, since the deep pit lies just beyond. Pull up onto the ledge. The thralls will try and swipe at Lara, but they can't reach her. Oddly, Lara can't throw grenades while standing on the narrow ledge, but you can shoot the thralls from above and then jump down to finish them off. Or, even better, get one of the thralls' attention. Dangle from the ledge if necessary then pull up when the thrall approaches. Then sidestep around to the back of the column. The thrall should follow right to the edge of the pit. Shoot it with pistols to knock it into the hole. Then repeat the process with the second thrall. (The previous series of screenshots also shows this technique. Thanks to Peterking for sharing this great strategy.)
Third, immediately after the cutscene, leap over the desk and run back down the stairs. The thralls won't pursue and instead retreat farther back into the room. Now return to the doorway, move cautiously forward, get a target lock on one of the thralls and toss a grenade. Then run back down the stairs again. Repeat for the second thrall. (Thanks to sham for this suggestion.)
Note that the desk and bent metal cage are not safe spots.
CLIMBING TO THE EXIT TUNNEL: Once you've dealt with the thralls, approach the freestanding pillar with the carved serpent head and notice how the gauntlet causes the runes to glow. Grab this pillar and slide it across the floor, positioning it between the two pillars at the top of the staircase (as shown in the first of these screenshots). Grab the narrow ledge running around either of the normal pillars nearby. Pull up to stand on this ledge and jump to grab the pillar with the glowing runes. Climb on top of it and jump to grab the ledge above the doorway. Pick up another treasure (11/13). Then climb back down the way you came.
Now you're headed for the well-lit opening high on one wall. To reach it, first slide the movable pillar between the metal cage and the tall pillar next to it. Then use either the cage or the small ledge surrounding the tall pillar to reach the top of the movable pillar. From there, jump to grab the flat top of the broken pillar and pull up. (These screenshots show the first part of the climb, as far as the next treasure.)
Turn left to spot a ledge with another treasure. That ledge is too far to reach from here, so jump to the stone beam jutting out from the pillar ahead. Hang from the beam so Lara's back is to the wall. Traverse to the right so Lara is hanging onto the column itself. Then continue climbing around to the right until Lara's back is toward the ledge with the treasure. Jump back to grab the ledge, pull up and take the treasure (12/13).
NOTE: You can skip the jump to that ledge if you don't want the treasure.
Now continue to the exit. (This set of screenshots shows the path from treasure #12 to the tunnel opening.) Jump back to the handhold on the pillar. Climb to the right, pull up onto the stone beam, walk to the end and jump to grab the light-colored stone band on the pillar ahead (i.e., the pillar that extends from the ceiling but is broken off below). Climb around to the right until Lara's back is toward the exit. Jump back to land there.
A brief cutscene shows the power of the gauntlet fading away, as it did the last time.
ROUGH TUNNEL WITH WOODEN SUPPORTS: Follow the tunnel. It turns to the left, then right, then left again, but doesn't branch off at all. After the second turning to the left, look for a breakable jar sitting on the floor. Smash it to find the last treasure (13/13) in the level. Then continue forward to a stone door. Throw the switch to open it and re-enter the mansion.
HOUSE ON FIRE: This section is identical to the Croft Manor sequence in the PROLOGUE. Refer to that walkthrough if necessary. This time, after grapple swinging across the burning staircase and dropping down into the main hall, the action unfolds more fully.
Cinematic: Lara discovers Zip and Winston trying to leave via the main doors. As we saw earlier, Zip shoots at Lara and Winston tries to stop him. This time, Lara draws her own guns and orders Zip to drop his.
"What, so you can shoot me again?" Zip asks.
"It wasn't Lara," Winston insists. "Why would she set fire to her own home?"
Zip then explains how Lara—or someone who looked very much like her—barged in and opened the vault using the retinal scanner. Whoever she was then took the Wraith Stone that Lara obtained from Amanda [during the events of Tomb Raider: Legend].
Lara asks what happened to Alister, but neither of the other men knows. She tells them to wait outside while she takes a look at the security video. Winston then helps Zip out, leaving Lara to her mission.
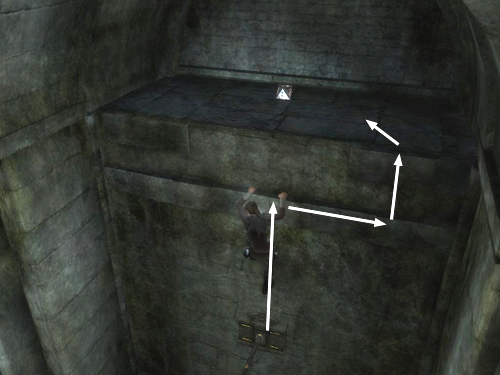
CLIMBING TO THE TECH ROOM: The tech room is the big glass-walled area directly opposite the burning staircase. The doors are sealed from the inside. So you'll need to climb over the glass wall. Start at the fireplace. Grab the small ledge to the right of the hearth and pull up to stand on it. (These screenshots show where to go.) Jump straight up three times to reach the uppermost handhold. Traverse around to the right as far as possible before dropping down, so Lara lands on the ledge below.
Turn around and follow the balcony forward. Turn right and jump to grab the top edge of the glass wall. (There's no need to jump to the horizontal pole first.) Pull up to stand on top of the wall and then drop down on the other side.
Cinematic: As Lara prepares to view the security recordings, she senses something behind her and turns to see a shadowy figure beyond the glass wall. She moves closer to the glass to get a better look, and the other figure also moves in closer, eyes glowing in the firelight. With a shock, Lara realizes this is not just an ordinary intruder but a copy of herself. She draws a pistol, and the copy does the same. In fact, it mimics her every movement.
Alister staggers into the room, but before Lara can do anything to help him, the doppelganger shoots and Alister crumples to the floor. Lara quickly goes for the door switch, but the double is faster. She's on Lara in a flash, dodging her shots and disarming her before she knows what's happened. Then the doppelganger dashes out of the room. With super-human strength and agility, she leaps up the burning staircase and out through a hole in the roof.
Lara rushes to Alister's side, but she's too late to help her friend. With his last breath, Alister says he'll see her in Avalon.
The scene shifts to Zip and Winston waiting outside in the drive. They watch in amazement as the doppelganger drops out of the burning building and darts off into the night. Moments later the real Lara emerges carrying Alister's body.
When Zip demands answers about the double, Lara explains that she's only seen something like it once before. Many years ago she encountered another double, one of Natla's creations and apparently an early prototype, since this new "Lara" is much more sophisticated. [Players of the original Tomb Raider or TR: Anniversary will remember the Atlantean flesh creature that mimicked Lara's movements.] Zip doesn't understand how Natla could have sent it if she is now Amanda's prisoner, but Lara takes a guess: the two must be working together. "Amanda and Natla, her pet Atlantean god," Lara says sarcastically.
Lara then announces her intention to follow the trail her father left, starting with a trip to southern Mexico to retrieve Thor's belt.
"What?!" Zip demands. "Alister's dead and it's just. . . business as usual?" But Lara knows she's going to need more than just guns and brains to deal with Natla.
"I need Thor's belt to get his hammer," she explains, "and I need the hammer to kill a god."
She then turns away, staring into the night as her home burns to the ground. We hear sirens in the distance as the scene fades to black.
†UPDATE HISTORY: 12/1/08 - First draft posted online.
12/17/08 - Removed references to the buggy aspects of setting the stone blocks on the pressure pads. Apparently the blocks bouncing around like water droplets on a hot skillet is just an issue with my system. :(
3/25/09 - Made various small changes for accuracy and clarity. Added various alternate strategies for the thralls, thanks to John C., oharel, Peterking and sham.
7/11/09 - Added video walkthroughs for all relics.
7/24/11 - Added fix for bouncing movable blocks. Thanks to Marcos1 from the Steam forums for the discovery and Kees who told me about it.
‡NOTE ON VIDEO GUIDES: Eldin's videos don't always follow the same strategies I use in my walkthroughs, but if you prefer that format, I think you'll find them very helpful.
WAS THIS WALKTHROUGH HELPFUL? If not, I apologize and invite you to contact me with any questions. If you need help right away, I recommend the r/TombRaider subreddit. Other fan-run forums are listed at tombraiders.net/stella/community.html. If this site was useful, please consider supporting it financially or in other ways. For details, visit tombraiders.net/stella/support.html. As always, I welcome your corrections/suggestions. Thank you!
Copyright © 2008- - Stellalune (). All rights reserved. The screenshots and videos included here were made using Fraps. Feel free to copy or print this walkthrough for personal use. By all means, share it with friends, but please include this credit line so people can send me their feedback. No part of this walkthrough may be reproduced on another site without permission. Follow this link for details about this site's advertising and privacy policy.
Stella's Tomb Raider Site: tombraiders.net.