STELLA'S TOMB RAIDER 2 REMASTERED WALKTHROUGH
The TR2 Remastered guide is now complete. For the other guides that have not yet been updated, I will continue to link to the ORIGINAL WALKTHROUGHS, which cover all the basics. Please check the introductory notes at the start of the first level for info on my process, modern vs. classic tank controls, etc. This guide covers most but not all possible achievements/trophies. Follow this link for the archived classic guide.
CONSERVING FLARES: This level is DARK. Consequently, I brighten the screenshots in Photoshop and use more flares than you'll probably need. To conserve flares, save before entering dark areas. Then use as many flares as you like during your initial exploration. Once you know where to go, reload and proceed, using only as many flares you need. If you run out of flares, try turning up the brightness in the Controls menu, or fire your unlimited-ammo pistols to light the way. (This doesn't work underwater, of course.)
LEVEL 7: 40 FATHOMS (Remaster)
Updated: 8/27/26(†)
Pickups: 14, including 3 secrets
Kills: 16
NOTES: The number of pickups includes the three dragon statuettes and the bonus items awarded for finding all three secrets. Also, two of the regular pickups here will be the SHOTGUN and HARPOON GUN if you didn't get them earlier. You may choose to avoid all sharks for the achievement/trophy (below) and/or avoid, rather than kill, the barracudas. There are 6 human enemies.
LEVEL MAP by VGCartography (used with permission)
40 Fathoms Video Walkthrough by Eldincy‡
OBJECTIVES: Swim into the wrecked ship and find air before Lara drowns. Once inside, navigate a tricky timed sequence to get past a series of burners into a new area. Continue through a flooded passageway and a large cargo hold filled with dirt—each with its own challenges—to reach the level exit.
Cinematic: This level begins with a movie. Lara hitches a ride on the submersible as it dives. When the pilot notices Lara, he tries to dislodge her using the sub's mechanical claw but instead ends up crashing the sub. Lara lets go just in time. She's safe, for now, but stranded at the bottom of the sea without scuba gear.
UNDERWATER - SWIMMING INTO THE WRECKED SHIP: You had better find some air and fast! As soon as you regain control, roll to face away from the damaged sub. Swim forward, veering a little to the left. Then follow the trail of junk on the seafloor toward a sunken ship. The path is much easier to see with classic graphics (F1 on keyboard, Options button on PS4/5, Menu button on Xbox, Plus [+] on Switch). A great white shark (1) appears ahead on the right. Ignore it and continue following the debris toward the left end of the wreck. Swim to the top of the overturned hull. Just behind the rusted anchor is an opening. Swim inside, straight down a short, vertical tunnel, then forward and up to the surface in a room with a pocket of trapped air. (screenshots)
The first shark (1) will follow, along with a second shark (2) not far behind. If you don't care about achievements, you can wait in this room and harpoon the sharks as they come in. Otherwise, take a breath and and get moving: Swim though the large opening on the right (i.e., right if Lara's back is to the tunnel where she came in). In the next room, turn right, then head for the opening on the far side of the room, in the top left corner. Swim through. The next room has a low, curved ceiling. Head for the square opening in the far left corner. The next room is almost a mirror image of the previous one, with the curved hull forming the ceiling. As you enter, make a sharp left. Swim forward, staying close to the left wall. There's a lever on this wall in the far left corner, just above the floor. Use it to open a trapdoor in the floor. (screenshots)
Roll and swim forward then down through the trapdoor. (As far as I know, the sharks won't follow Lara beyond this point.) In the room below the trapdoor, turn left. Swim across the bottom and turn left, the only other way out. There's a square hole in the ceiling just ahead. Swim through and surface in a room with air to breathe and several floating crates where you can climb out of the water. (screenshots)
NOTE: If you've played the first Tomb Raider game, you'll recognize the creepy recycled Atlantis music.
SMALL CARGO HOLD WITH FLOATING CRATES: You're headed for the wide opening on the far wall, but you can't reach it from below. Swim around the tall stack of crates then down through a previously concealed hole in the wall. Surface in the next room. Climb out of the water and go around the corner to the right. Pull the switch to drain the water from this area. Return to the ledge where you climbed out of the water and drop down into the small room, which is now dry. Climb up on the other side. Then vault up onto the wooden crate on the right. Move to the outer corner of this crate then take a standing jump to grab the top of the tall wooden box against the wall; pull up. Then climb into the wide opening. SECRET #1, the Silver Dragon (1) is sitting in plain sight in the next room, but don't rush in or you'll fall into a trap. (screenshots)
ROOM WITH SILVER DRAGON AND LARGE TRAPDOOR: When you hop down into the next room, a guy with a shotgun (3) emerges on the right. As you fight him, avoid the four dark tiles in the middle of the floor, which are actually a trapdoor. If you fall through, you'll encounter more enemies below and miss your chance to get the silver dragon. When the shotgun guy is dead, carefully retrieve his shotgun shells (2) and the secret. (screenshots)
NOTE: If you didn't pick up the SHOTGUN earlier, you'll get it from this guy instead of ammo.
IMPORTANT: Sometimes TR2 enemies die in awkward positions, so the items they drop land in midair or on slopes, making it tricky or impossible to retrieve them. This often happens in the room below. I describe one solution here, but this doesn't always work. Try to save in a new slot a few times each level, just in case.
If you like, you can now fall through the trapdoor and take on the 2 enemies (4-5) in the room below, one with a gun and one with a wrench. However, you may find it easier to kill them from above. Jump over one corner of the trapdoor so it drops open. Then hold Walk to keep from accidentally stepping off the edge as you shoot down into the room below. If the guy with the the gun starts shooting back, step away from the edge until he stops. Then move forward and target him again. (screenshots)
When the coast is clear, safety drop onto the wooden block in the room below so Lara doesn't take fall damage. Then drop down to the floor and grab the small medi pack and harpoons (3-4) the bad guys left. The exit from this room is high in one corner, just below the railing on the ceiling. To reach it, stand on the second highest flat-topped block underneath the trapdoor. Take a running jump to grab the tall block to the right of the exit. Pull up, turn left, and take a running jump to grab the edge of the doorway. Pull up and enter the hallway beyond. (screenshots)
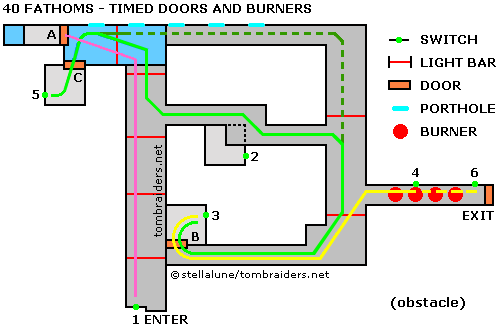 CORRIDORS WITH TIMED DOORS: The next area is made up of several interconnecting passageways. There are two phases: First a manageable timed run to obtain a secret. Then a more complicated timed sequence involving switches, doors, and burners. This map shows the layout of the area, with the various doors and switches marked with letters and numbers, and the paths between them indicated in different colors. The straight, red lines indicate horizontal lighting strips on the floor (i.e., the upside-down ship's ceiling), which you must jump over as you go. You can probably manage without the map, but it may help.
First, go after the secret in the water outside: When you first enter from the room below, turn around to find a switch (1) beside the doorway. This switch opens a door (A) elsewhere. It's on a timer; you'll have a little over 15 seconds to get there before it closes. So pull the switch, then immediately roll and run along the passage, jumping over the light strips on the floor as you go. If you're using classic tank controls, after that first roll, just press and hold Forward and almost immediately press and hold Jump. Lara will then do a smooth series of running leaps over the obstacles. At the end of the hallway, turn left, jump over one more light strip, then jump or vault into the doorway before the door closes. Or, if you're having trouble cornering and clearing that last obstacle, run/jump to the end of the hallway, but instead of turning left, run straight at the the porthole on the wall ahead. Then side flip twice to the left to land in the doorway. Step forward into the passageway, and the door will stay open. (The path from the switch to the door is indicated by the PINK line on the map. It's also shown in this series of screenshots.)
The hole at the end of this short passageway leads outside. Save the game. Then drop into the water and swim out into an open area. SECRET #2, the Jade Dragon (5), rests on the seafloor ahead on the left. (It's much easier to spot using classic graphics. You can also see it through the portholes from inside the wreck.) A shark (6) and 3 barracudas (7-9) patrol this enclosed area. They move in on Lara as soon as she enters the water. You could try and harpoon them, or draw the barracudas back to the opening and shoot them with pistols. However, it's probably easier to just avoid them as much as possible. (Again, you don't want to harm any sharks, or let them bite Lara, for the "No Fish Soup Today" achievement/trophy.) Grab the dragon, quick as you can, roll, and return through the tunnel the way you came. (screenshots)
SERIES OF SWITCHES, DOORS, AND TIMED BURNERS: To reach the next area, you must get past the 4 burners at the far end of this network of corridors. (This sequence is shown in both screenshots and a short video walkthrough. It was made in the classic game, but the mechanics are identical in the remaster.)
After returning inside from getting the Jade Dragon, hop down from the doorway (A) into the area with the wet floor (light blue area on map). Notice the elevated door (C) on the right. You will return here later. For now, jump over the light bar just ahead, turn right, and jump over the next light bar into the wide corridor where you first entered this area, then left into the narrow, dark hallway. (This path is indicated by the LIGHT GREEN line on the map.) At the bend in the hallway, climb through the opening in the ceiling and pull the switch (2) to open a door (B) elsewhere. Door B is not timed, so you don't need to hurry. (screenshots)
To get there, drop down (or, after pulling the switch, side flip to the left) and continue to the end of the narrow, dark hallway (still following the LIGHT GREEN line on the map). Turn right and follow this wide corridor past the narrow hallway with the burners. Jump over another light bar, then turn right again. Continue to the end of the hallway and turn right. Go through the door (B) you just opened into another small room with a switch (3). (screenshots)
Save here if you like. Then flip the switch (3) to turn off the first 2 burners. This switch is on a 30-second timer. So, quickly press Look to regain Lara's perspective, roll, and run/jump like mad to the burners (YELLOW path on map). Flip the switch (4) on the left wall above the second burner to open the door (C) back where you started. Press Look and then side flip twice to the left to get off the burners before they reignite. (screenshots)
You can now slow down again, since door C is not timed. After side-flipping out of the passageway with the burners, continue straight ahead along the wide corridor. Jump over another light bar, turn left, and follow the corridor with the portholes to the area with the wet floor (shaded blue on the map). (Here you're following the DARK GREEN broken line on the map.) Hop over the light bar and climb into the doorway (C) on the left to find another switch (5). (screenshots)
Switch 5 shuts off the second pair of burners and it is timed. So from the moment you pull this switch, you'll have just under a minute to run back to switch 3, use it to extinguish the first pair of burners, then run to a safe spot beyond all four burners before they re-ignite.
NOTE: I'm not sure if this is a new bug caused by the Challenge Mode update, but the cutaway after using switch 5 may incorrectly show all 4 burners off. Trust trust me, the first two burners are still lit.
Here's the sequence: Save the game. Flip switch (5) to turn off the second pair of burners, press Look, roll, and race back to switch (3), behind door (B), as follows: Take a running jump into the doorway. Run off the edge into the shallow water, turn right, and jump over the light bar. Continue straight on through the hallway with the portholes (following the path marked with the DARK GREEN broken line on the map). Take running jumps along the straightaway to go faster. Turn right at the corner, and without pausing, take another running jump over the next light bar (following the LIGHT GREEN line the rest of the way). Run straight on past the corridor with the burners (now on your left), leap over the next light bar, and turn right. Follow the hallway to the end, taking running jumps to cover the ground faster. As you turn right at the end of the hallway, take a running jump into the doorway (B). (screenshots)
Inside, run to the right and pull switch (3) again to turn off the first pair of burners. All the burners should be off now, but they won't stay off for long. So quickly press Look and Roll. (If things have gone well so far, you can save in a new slot. Then you won't have as far to go if you make a mistake and have to reload.) Take a running jump into the doorway, hop down on the other side, turn left, and run like mad to the burners. Be sure to jump over that last light bar just before turning into the burner corridor (YELLOW line on the map). As soon as you've cleared all 4 burners, you can stop and breathe. Lara is safe here. Pull the last switch (6) to open the exit. Whew! (screenshots)
ALTERNATE METHOD FOR BURNERS: If you have medi packs to spare, you can skip the entire timed sequence by running across all 4 burners to switch #6. (Ignore the switch near the second burner.) Lara will of course catch fire. So you'll need to heal as you pull the switch, run through the exit, and drop into the pool to extinguish the flames. Then quickly climb back out of the water before the barracuda (10) in the pool starts biting. (This strategy is included in the video guide.)
NOTE: If you're playing the Steam/GOG version, you can download a save file with Lara on the other side of the burners. Be sure to read and follow the instructions and warnings so you don't lose your progress in the other remastered games. Or use the level-skip cheat.
STACKED FLOODED ROOMS: In the room just beyond the burners, take a dip in the pool to draw out a barracuda (10). Climb out of the water and shoot it from above. (screenshots)
Now comes yet another tricky sequence. To unlock the "Like Caesar" achievement/trophy, you must complete the next section in one breath. Once again, save the game. Swim down and forward, then up through a trapdoor in the ceiling. Swim up through two more narrow, stacked rooms, each with square hole in its ceiling. In the third room, there's a lever just above the hole. (This lever is straight ahead if the decorative ladder is on Lara's right.) Pull the lever to open a door in the bottom room and simultaneously close the first trapdoor, in the room where you started. Now there's now no way to get air. Roll to face away from the lever and swim down through the two square holes. At the bottom, swim through the door you just opened. In a little alcove on the right is is SECRET #3, the Gold Dragon (6), with a bonus of 4 bundles of harpoons (7-10) if you've found all three secrets. (screenshots)
Once you have the secret, don't hesitate. Roll and swim out of the alcove and to the right. Pull the second lever to open the trapdoor at the very top, letting in 3 more barracudas (11-13). (If your air meter is still about 1/4 full, you can save here. Just be sure to use a new slot, just in case.) Roll and quickly swim back up through the stacked rooms to the top. "Like Caesar" should unlock as Lara's head breaks the surface. Climb out of the water and either shoot the fish or move on. (screenshots)
Alternatively, if you don't care about achievements, swim up through the stacked rooms, pull the first lever, swim down, pull the second lever, swim back to the top, climb out of the water, and shoot the barracudas. Then swim back down to get the Gold Dragon, return to the top, and continue.
LARGE CARGO HOLD FILLED WITH DIRT: Follow the passageway to a hole in the floor. Turn around, hang from the edge, traverse to the left, and let go. Lara will land on a steeply angled heap of dirt and slide down to the floor, without losing any health in the fall. Follow the wall around to another hole in the floor and drop into an even bigger dirt-filled room below. (screenshots)
Find the movable crate in the corner below the wide, rectangular alcove high on one walls. Pull the crate twice and use it to climb into the alcove. Throw the switch to open the trapdoor in the ceiling and dump a lot of dirt from the upper room into the lower one. (screenshots)
Hop down from the alcove. Then climb the dirt pile to the two holes in the ceiling along the left wall. (Ladders painted on the wall show where to go but aren't functional.) Climb onto the flat block below the left hole and pull up through the opening. In the upper room, climb the dirt pile and pull up through the square hole in the ceiling. Throw the switch here to flood a large room elsewhere. (There's no cutscene, but the sound of rushing water plays.) (screenshots)
Return to the lowest dirt-filled hold. This time, climb up through the other hole with the painted ladder (i.e., the one on the right when facing the two). Now you're in the room above the trapdoor. Go around the left side of the dirt pile and climb into the large, rectangular opening near the ceiling. Flip another switch here to open a door in the room you just flooded. (screenshots)
Carefully climb back down to the lower dirt-filled room. (You can drop through the trapdoor without injury, but only the far side, where the floor below is higher.) Climb across the dirt pile under the open trapdoors. Beyond them is a square opening in the wall. Enter and follow the winding passageway to the end. (screenshots)
NOTE: If you've just come to this walkthrough, and the large room at the end of the winding passageway is not flooded (screenshot), and/or the door on the wall of the tank is still closed (screenshot), then you missed a step or two. Return to the LARGE CARGO HOLD FILLED WITH DIRT and reread the section above, starting with the movable crate.
FLOODED ROOM AND PASSAGE TO LEVEL EXIT: Jump in the water and head for the small door you opened a minute ago. A scuba diver (14) lies in wait near the end of the passageway. Harpoon him or swim back up to the doorway overlooking the pool and shoot him with pistols. (screenshots)
Save the game. Then swim through the passageway to the end, and quickly climb out of the water to find yourself under attack by 2 very aggressive rig workers (15-16), one with a shotgun and one with a wrench. There's not a lot of room to maneuver. So you may want to break out your own shotgun, roll to face them, and then back up to the wall while firing. You'll probably take a lot of damage, but if you have even a sliver of health left afterward, don't waste a medi pack. The level is all but over. They drop a large medi pack and shotgun shells, and there are 2 bundles of harpoons (11-14) lying on a low platform. When you have everything, pull the switch to open the door, and exit the level. (screenshots)
NOTE: If you don't already have the HARPOON GUN, you'll get it here along with one set of harpoons.
†UPDATE HISTORY: Updates made prior to the Tomb Raider I-II-III Remastered release, including credit for tips sent in by other players, are tracked in the archived classic guide.
8/1/26 - Remastered guide posted. Better late than never. :D
8/27/26 - Updated the note on increasing brightness in the Controls menu, included in the August 20 patch.
‡NOTE ON VIDEO GUIDES: Eldin's videos don't always follow the same strategies I use in my walkthroughs, but if you prefer that format, I think you'll find them very helpful.
DARK MODE: I plan to add optional dark mode for these pages, but my current priority is updating the walkthroughs. Meanwhile, may I suggest a reputable dark mode browser extension, such as Dark Reader? (Download only from trusted sites, like darkreader.org or your browser's official add-on/extension site.)
WAS THIS WALKTHROUGH HELPFUL? If not, I apologize and invite you to contact me with any questions. If you need help right away, I recommend the r/TombRaider subreddit. Other fan-run forums are listed at tombraiders.net/stella/community.html. If this site was useful, please consider supporting it financially or in other ways. For details, visit tombraiders.net/stella/support.html. As always, I welcome your corrections/suggestions. Thank you!
Copyright © 1998- - Stellalune (). Feel free to copy or print this walkthrough for personal use. By all means, share it with friends, but please include this credit line so people can send me their feedback. No part of this walkthrough may be reproduced on another site without permission. Follow this link for details about this site's advertising and privacy policy.
Stella's Tomb Raider Site: tombraiders.net.