Stella's Tomb Raider Mobile/Cell Phone Game Walkthrough - Elixir of Life
 Level 8 – The Computer Room (MP9958)
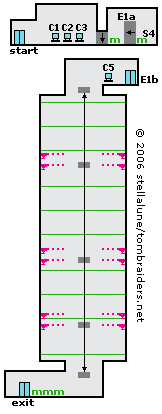
Use the first and third computers (C1 and C3) to open a door to the right. Go through, use the medipacks and then stand in front of the suit of armor. When you see the '?' icon, use the hidden switch (S4), which looks like a small red dot, to open a secret panel revealing an elevator (E1a). Ride down to the floor below (E1b).
Use the computer on the landing (C5) to start the small platform moving up and down. Immediately jump onto it. If it descends too quickly, wait for it to come back up, use the computer again and re-attempt the jump.
The clue in the E-Mail Printout found in the previous level suggests crouching on the platform, but the platform seems to narrow to do this. Instead, hang from either edge as the platform descends. As Lara passes through the laser tripwires, triggering the mounted laser guns, she may take some damage, but there are 3 medipacks at the bottom to heal her. Be sure to let go at the bottom, otherwise Lara will have to ride up again and most likely be killed by the lasers.
Go to the left and get on the elevator to finish the level.
 Level 9 – Below Ground (MP7291)
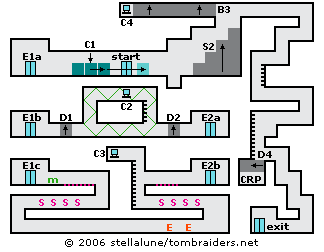
Move the boxes to reveal a computer terminal (C1). Use it to open a door (D1) below. Continue to the left and ride the elevator (E1a) down to the next floor (E1b).
Go to the right. Don't worry about tripping the lasers. When you do, a door (D1) closes to the left but another door (D2) opens to the right. Climb the ladder and use the computer (C2) to raise a staircase (S2) on the floor above. Climb back down and go right.
Ride the elevator (E2a) down to the floor below (E2b). Wait for the electrified floor to cycle off and then run across it. Climb the ladder and use the computer (C3) to raise a block (B3) revealing a hallway near the top of the map. Climb down and go right. When the steam jets turn off, quickly run past them. Drop down to the floor below and shoot the 2 Dobermans.
Follow the hall to the left and climb onto the ledge, where there are more steam jets. Run past them, climb up to the next level, wait for the electrified floor to cycle off and then run across. Grab the medipack and ride the elevator (E1c) back to the top floor (E1a).
Head back to the right, climbing over the boxes you moved earlier and passing the entrance. Climb the stairs you raised earlier (S2). Jump to grab the ledge on the right and pull up. Go to the end of the hall and use the computer (C4) to open a trapdoor (D4) near the bottom right corner of the map.
Return to the top of the stairs and then continue to the right. Climb down the various ledges and ladders to the room you just opened. Pick up the Control Room Plans (EL7676). Climb over the wall on the right and continue down to the exit.
NOTE ON ITEM & MAP CODES: Each level and item has a code, which can be found on the map screen or item info screen. Once you have a code, you can enter it on a page at the Tomb Raider Mobile or Eidos Mobile UK web site to access a level map or detailed item information. My walkthroughs include all of the item info, as well as my own maps, which are a bit more detailed than the unlockable ones.
Copyright © 2006- Stellalune (). In-game item descriptions copyright © Eidos, Ltd. Feel free to copy or print this walkthrough for personal use. By all means, share it with friends, but please include this credit line so people can send me their feedback. No part of this walkthrough may be reproduced on another site without permission. Follow this link for details about this site's advertising and privacy policy.
WAS THIS WALKTHROUGH HELPFUL? If not, I apologize and invite you to contact me with any questions. If you need help right away, I recommend the r/TombRaider subreddit. Other fan-run forums are listed at tombraiders.net/stella/community.html. If this site was useful, please consider supporting it financially or in other ways. For details, visit tombraiders.net/stella/support.html. I also welcome any and all suggestions to improve things. Thank you!
Stella's Tomb Raider Site: tombraiders.net.
