Stella's Tomb Raider Mobile/Cell Phone Game Walkthrough - Elixir of Life
 Level 13 – The Ventilation Shaft (MP1754)
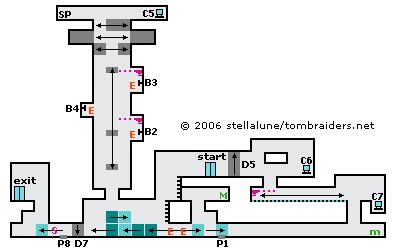
Climb down the ladders, drop down, turn right and shoot 2 Dobermans. Pull the leftmost movable crate four times to the right. Climb up and get the medikit. Climb over to the left and down the ladder to get on the other side of the crate. Now push it on top of the pressure pad (P1). This causes the platform in the vertical shaft to the left to start moving.
Go to the left, climb onto the 2 stacked crates and up into the shaft. When the platform descends, jump to grab it. Pull up and crouch facing right. Draw guns and as the platform moves up and down, shoot the 2 security droids on the ledges. When they are destroyed, turn to the right and deal with the third robot. There's nothing you can do about the mounted laser guns. You may be able to minimize the hits Lara takes by crouching or hanging from the left edge of the platform as you pass the guns. To open the passageway above, you must shoot the 3 switches in a particular sequence: shoot the ones on the right (S2 and S3) once each and the one on the left (S4) 3 times. Then the ledges above will be arranged as shown in the map so Lara can climb up into the opening.
Get the Security Pass Card (EL1161) on the left and use the computer (C5) on the right to open a door (D5) down near the entrance. Climb down, drop onto the moving platform, hang from the left edge to avoid the lasers, and drop off at the bottom. Climb down, go right and climb the ladders.
Pass the elevator where you entered the level and climb over to the computer (C6). Use it to reverse the direction of the conveyor belt below, so it moves toward the right. Drop down onto the conveyor and crouch to avoid the laser fire. Just before Lara reaches the end of the belt, stand and jump to the next ledge. Then quickly hop down on the right. Use the computer (C7) to open a door (D7) near the bottom left corner of the map.
Wait for a laser bolt to pass and then carefully climb over the ledge and drop down into the hallway below. Grab the medipack and head back to the left to the movable crates.
From its position on the pressure pad (P1), push the first movable crate twice. Climb onto it then up through the opening and down the ladder. Go to the second crate (just to the left) and push it against the 2 stacked crates. Return to the first crate and pull/push it against the others. Now you can climb on top of the crates and pull the top crate onto the middle crate.
Pull the leftmost crate into the room on the left. As far as I can tell, you can't avoid taking a hit from the steam jet, which is triggered by the pressure pad (P8). Climb onto the crate to reach the exit.
NOTE ON ITEM & MAP CODES: Each level and item has a code, which can be found on the map screen or item info screen. Once you have a code, you can enter it on a page at the Tomb Raider Mobile or Eidos Mobile UK web site to access a level map or detailed item information. My walkthroughs include all of the item info, as well as my own maps, which are a bit more detailed than the unlockable ones.
Copyright © 2006- Stellalune (). In-game item descriptions copyright © Eidos, Ltd. Feel free to copy or print this walkthrough for personal use. By all means, share it with friends, but please include this credit line so people can send me their feedback. No part of this walkthrough may be reproduced on another site without permission. Follow this link for details about this site's advertising and privacy policy.
WAS THIS WALKTHROUGH HELPFUL? If not, I apologize and invite you to contact me with any questions. If you need help right away, I recommend the r/TombRaider subreddit. Other fan-run forums are listed at tombraiders.net/stella/community.html. If this site was useful, please consider supporting it financially or in other ways. For details, visit tombraiders.net/stella/support.html. I also welcome any and all suggestions to improve things. Thank you!
Stella's Tomb Raider Site: tombraiders.net.