Stella's Tomb Raider Mobile/Cell Phone Game Walkthrough - Quest for Cinnabar
 Level 13: Monastery Heart (MP1780)
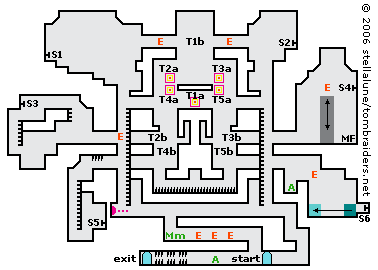
Go to the left and pick up an ammo clip (GN4491). The way to the exit, farther down the hall to the left, is blocked by spikes. The goal in this level is to retract them using various switches.
If you want to, climb up into the hallway above, shoot the 3 monks and run to the left end to get a medipack or medikit (small and large). Use only what you need and save the other in case you need it later. Then drop back down near the entrance and go to the right. If Lara's health is nearly full, you can skip the confrontation with the three tribesmen, but you will need some health to survive a few upcoming falls and encounters with other enemies.
From the entrance, go to the right and climb onto the ledge. Grab the ledge above but wait for a fireball to pass before pulling up. Quickly move to the left and jump to grab the ladder overhead. Climb to the top. Go to the left, jump the gap and pull up.
Now Lara is on a ledge with a teleporter (T1a) in the center. Take one step toward it. Then jump into it. Lara emerges in mid-air near the top of this room (T1b). As the Stone Tablet found in the Buddha Shrine level suggests, jumping into the teleporter causes Lara to emerge jumping on the other side. That momentum will enable her to grab the ledge to the left. If you only step into the teleporter, she'll appear above and fall to the platform below, losing about half her health.
After teleporting and grabbing the ledge, pull up and shoot the 2 purple spirits. Then continue to the left.
Climb down onto the narrow ledge below the opening. Drop onto the ledge below that and then jump across the gap to the left. Climb the steps and use the switch (S1) to retract one set of spikes near the exit. Go back down the steps, and jump the gap to grab the ledge to the right. Let go and grab the ledge below (the one at the top of a long ladder). Don't climb down the ladder. Instead pull up, go to the right and jump across the gap to grab the ledge with the teleporter (T1a). Pull up.
Again, take one step toward the teleporter, then jump into it. Lara emerges above (T1b), sails through the air and grabs the ledge to the right. Pull up.
Go to the right, climb down onto the narrow ledge below and jump across the gap. Climb up to the right and use the switch (S2) to retract one set of spikes near the exit. Climb back down, jump back to the left and drop down onto the ledge below. Drop down again to grab the next lower ledge (the one at the top of a long ladder). Don't climb down the ladder. Instead pull up, go to the left and jump across the gap to grab the ledge with the teleporter (T1a). Pull up.
Again, take one step toward the teleporter, then jump into it. Lara emerges above (T1b), sails through the air and grabs the ledge to the left. This time, instead of pulling up, drop onto the platform below. (Lara will lose a little health but not as much as she would if she fell from the ceiling.)
Walk to the left edge of the platform and jump into the upper teleporter (T2a). Lara emerges jumping (at T2b) and grabs the ledge to the left. Pull up, shoot the purple spirit, then continue to the left to a vertical shaft with a ladder. Don't climb the ladder. Instead jump across the shaft to a room with windows and ladders.
Pass beneath the first ladder and climb the second. Climb onto the highest ledge, turn left, crouch and shoot the switch (S3) to retract another set of spikes near the exit. Climb back down to the floor and return to the right. Jump across the gap and then climb the ladder to the top. (To grab the ladder, drop and hang from the left edge of the ledge and then pull up onto the ladder.) At the top of the ladder, follow the passage back toward the teleporters and jump across.
Take one step toward the teleporter, then jump into it. Lara emerges above (T1b), sails through the air and grabs the ledge to the right. Again, instead of pulling up, drop onto the platform below.
Walk to the right edge of the platform and jump into the upper teleporter (T3a). Lara emerges jumping (at T3b) and grabs the ledge to the right. Pull up and go to the right to another vertical shaft with a ladder. Don't climb the ladder. Instead jump across the shaft to a room with a tall pillar moving up and down.
Stand next to the pillar, wait for it to move downward, then jump up and grab the edge. Pull up, draw guns and shoot the purple spirit. Then shoot the switch (S4) on the right wall to retract another set of spikes near the exit. Holster guns, hang from the right edge of the pillar, and when it descends again, let go. Pick up the Mural Fragment (QC8916). Ride thei pillar up then down again, dropping off on the left side when it descends.
Return to the left to the vertical shaft with the ladder. Jump the gap and climb the ladder to the top. (Again, to grab the ladder, drop and hang from the edge of the ledge and then pull up onto the ladder.) At the top of the ladder, follow the passage back toward the teleporters and jump across.
Again, take one step toward the teleporter (T1a) and then jump into it. Again Lara emerges above (at T1b), sails through the air and catches the ledge on the left. Again drop onto the platform below.
Walk to the left edge and press the Down key so Lara lowers herself off the platform into the bottom teleporter (T4a). Lara emerges hanging from a ledge below (T4b). Let go to drop onto the ledge below. Turn and jump into the hallway to the left. Continue left to the vertical shaft with the ladder. Jump past the ladder into another short passage with spikes on the ceiling. Wait for the spikes to retract then move past them. Climb down into the room below and pull the switch (S5) to retract another set of spikes near the exit.
Climb back up the ladder, carefully pass beneath the spikes and jump across the shaft to the ladder. Climb to the top, go to the right and jump back to the first teleporter.
NOTE: If Lara's health is getting low at this point, and if you killed the 3 monks at the start of the level and left one of the health packs, you might want to get it now. Instead of climbing up the ladder and jumping over to the first teleporter, climb to the bottom of the ladder, wait for a fireball to pass below you, drop down and run to the right. Lara will fall down the first hole and land on top of the health pack(s). Naturally, if you didn't kill the 3 monks, they'll be waiting here too. After topping off Lara's health, head to the right, drop down, continue to the right past the entrance and climb up to the first teleporter the way you went the first time.
One last time, take a step toward the teleporter (T1a) then jump into it. Lara emerges above (at T1b) and grabs the ledge ahead. Drop onto the platform below. Walk to the right edge and press the Down key so Lara lowers herself into the bottom teleporter (T5a). Lara emerges hanging from a ledge below (T5b). Let go to drop onto the ledge below. Turn and jump into the hallway to the right. Continue right to the vertical shaft with the ladder. Don't climb the ladder. Instead jump across into a room with a floating purple spirit.
Drop down, grab the ammo clip, climb onto the block on the right and shoot the spirit. Drop down into the room below. Slide the movable block away from the alcove with the switch (S6) and shoot it to retract the final set of spikes blocking the exit. Push the movable block against the left wall and climb out.
Climb up to the vertical shaft with the ladder and jump across. Climb to the bottom of the ladder and wait there for a fireball to pass. Drop to the floor, run to the right and drop down near the entrance. (NOTE: If you killed the monks on the floor above earlier and left one of the health packs, you might want to get it now. After using the health, drop back down on the right near the entrance.)
Go to the left. The spikes should all be retracted now. Exit the level.
 |
|
 |
|
NOTE ON ITEM & MAP CODES: Each level and item has a code, which can be found on the map screen or item info screen. Once you have a code, you can enter it on a page at the Tomb Raider Mobile or Eidos Mobile UK web site to access a level map or detailed item information. My walkthroughs include all of the item info, as well as my own maps, which are a bit more detailed than the unlockable ones.
Copyright © 2006- Stellalune (). In-game item descriptions copyright © Eidos, Ltd. Feel free to copy or print this walkthrough for personal use. By all means, share it with friends, but please include this credit line so people can send me their feedback. No part of this walkthrough may be reproduced on another site without permission. Follow this link for details about this site's advertising and privacy policy.
WAS THIS WALKTHROUGH HELPFUL? If not, I apologize and invite you to contact me with any questions. If you need help right away, I recommend the r/TombRaider subreddit. Other fan-run forums are listed at tombraiders.net/stella/community.html. If this site was useful, please consider supporting it financially or in other ways. For details, visit tombraiders.net/stella/support.html. I also welcome any and all suggestions to improve things. Thank you!
Stella's Tomb Raider Site: tombraiders.net.