Stella's Tomb Raider Anniversary Mobile/Cell Phone Game Walkthrough
 LEVEL 8: THE LABYRINTH
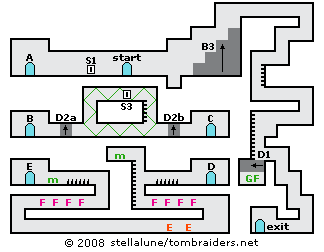
Go to the left and use the switch (S1) to open a stone trapdoor (D1) off to the right and below. You can see a glistening object in the room below this trapdoor. You'll be getting that shortly. Continue to the left, go through the door (A) to emerge through another door (B) on the floor below.
Go to the right. If you don't mind missing a couple of kills and pickups, you can do this next section more quickly by taking care not to pass through the moving light beams as you climb to the switch on the ledge above. The light doesn't harm Lara; it just closes the door on the left side of this hallway (D2a) and opens the door on the right (D2b), forcing you to take a longer and more dangerous route to get back to the upper level.
To avoid taking the long route, stand just to the left of where the light beams reach and observe as the reflected beam moves clockwise around the ledge. Wait for it to pass moving upward and then quickly run along the floor to the right until the block door (D2b) prevents you from going any further. If Lara stands here, the light beam will pass without touching her. As soon as it moves off to the left, quickly climb the ladder to the switch (S3) and use it to raise a block staircase (B3) on the floor above. Then quickly climb back down the ladder and run to the right to avoid the light beam. When it passes to the left once again, follow it to the left. Then continue back to the doorway (B) and go through to re-emerge on the upper floor. Thus, you avoid the lower levels with various enemies and traps. (Skip the next three paragraphs.)
If the light beam does touch Lara, you'll have to take the long route back to the entrance. First climb up onto the ledge and use the switch (S3) to raise the block staircase (B3) above. Then, since the door below on the left (D2a) has closed, preventing you from getting back to the doorway (B) leading upstairs, head to the right through the hallway that was previously blocked by the other door (D2b).
Go through the doorway (C) to emerge from another doorway (D) on the floor below. Wait for the spikes to retract and then run across. Walk to the edge and jump to grab the ladder. Climb up and use the medipack at the top. Climb all the way down to the floor and turn right. When the flame jets turn off, quickly run past them. Drop down to the floor below, crouch and shoot the 2 dogs.
Follow the hall to the left and climb onto the ledge, where there are more flame jets. Run past them, climb up to the next level, wait for the spikes to retract and then run across. Grab the medipack and go through the doorway (E). This leads back to the first doorway (A) on the top floor.
Head back to the right, past the entrance. Climb the set of block stairs you raised earlier (B3). Go to the right and climb down the various ledges and ladders to the room you opened earlier using the first switch. Pick up the GOLDEN FEATHER (GF). Climb over the wall on the right and continue down to the exit.
Walkthrough text and diagrams copyright © 2008- Stellalune (). Feel free to copy or print this walkthrough for personal use. By all means, share it with friends, but please include this credit line so people can send me their feedback. No part of this walkthrough may be reproduced on another site without permission. Follow this link for details about this site's advertising and privacy policy.
WAS THIS WALKTHROUGH HELPFUL? If not, I apologize and invite you to contact me with any questions. If you need help right away, I recommend the r/TombRaider subreddit. Other fan-run forums are listed at tombraiders.net/stella/community.html. If this site was useful, please consider supporting it financially or in other ways. For details, visit tombraiders.net/stella/support.html. I also welcome any and all suggestions to improve things. Thank you!
Stella's Tomb Raider Site: tombraiders.net.