Stella's Tomb Raider Anniversary Mobile/Cell Phone Game Walkthrough
 LEVEL 7: A DISCOVERY
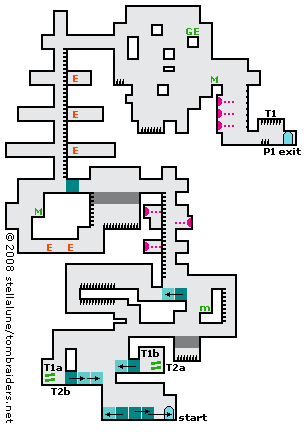
You start at the bottom of this map. Pull the first of 3 movable blocks to the right. Climb over it and push it once more to the right, so it blocks the entrance. Pull the middle block once to the right. Then push the leftmost block once to the left. Now you can climb onto it to reach the ledge above.
Climb up and pull the movable block once to the right. Climb onto it and jump to grab the ledge above on the left. Pull up and drop down on the other side. Step into the green vortex, which is actually a teleporter (T1a), to emerge in a room to the right (T1b). Push the movable block to the left and step into the other teleporter (T2a) to return to the first teleporter room (T2b).
Push the movable block all the way to the right edge and climb onto it. Jump to grab the other block, which you moved earlier. Pull up into a hallway above the second teleporter room.
If Lara is very low on health, run to the right across the crumbling floor above the spike pit, climb the ladder, drop down on the other side and get the medipack. Return down the ladder the way you came and jump back across the spike pit to the left. If you don't need the medikit right now, leave it, since you'll return this way shortly.
Climb onto the ledge above on the left and wait for the spikes on the ceiling to retract before running past. Turn around, grab the ledge above, wait for the spikes on the floor to retract and then pull up and run to the right. Continue to the right and pull the movable block once to the left. Return past the two sets of cycling spikes to the hallway above the room with the second teleporter.
Jump across the spike pit (or run across the crumbling floor above it if you didn't do that earlier). Climb the ladder, drop down on the left and get the medipack (if you didn't before). Jump the gap, climb onto the block you moved earlier and then go up the long ladder. Continue climbing past the dart traps.
At the top, run to the left across another crumbling floor above spikes. If you don't need the medikit in the room on the left, push the movable block twice and climb the ladder past the magic-wielding tribesmen. (Skip the next paragraph.)
If you do want the health, leave the movable block where it is. Climb down the ladder, drop to the floor and kill the 2 tribesmen. Climb the ledges on the left and use the medikit. Then climb the long ladder, avoiding the other 3 tribesmen as you go.
At the top, walk to the right and jump to grab the nearest block. Pull up, jump to grab the next block to the right and pull up again. Drop down on the other side to land on a square block. Walk to the right side of that block and jump to grab the edge of the next block above and to the right. Pull up and take the GOLDEN EYE (GE). Jump back down onto the previous block. Drop and hang from the left side of that block, let go and drop again to grab a thin block below, and then drop onto the block below that one. Turn right, walk to the edge and then drop and hang from the edge. Let go and drop onto the ledge below. To the left is a pit of spikes, which you should avoid. Instead climb the ledges to the right and pick up a medikit.
Walk to the edge above a series of dart-spitting gargoyles. Jump across the gap to the right, but don't bother pulling up. Wait for the gargoyle below to shoot a dart, and then slide down the rope. Jump over the spikes and exit the level.
Walkthrough text and diagrams copyright © 2008- Stellalune (). Feel free to copy or print this walkthrough for personal use. By all means, share it with friends, but please include this credit line so people can send me their feedback. No part of this walkthrough may be reproduced on another site without permission. Follow this link for details about this site's advertising and privacy policy.
WAS THIS WALKTHROUGH HELPFUL? If not, I apologize and invite you to contact me with any questions. If you need help right away, I recommend the r/TombRaider subreddit. Other fan-run forums are listed at tombraiders.net/stella/community.html. If this site was useful, please consider supporting it financially or in other ways. For details, visit tombraiders.net/stella/support.html. I also welcome any and all suggestions to improve things. Thank you!
Stella's Tomb Raider Site: tombraiders.net.