Stella's Tomb Raider Anniversary Mobile/Cell Phone Game Walkthrough
 LEVEL 14: DON'T LOOK DOWN
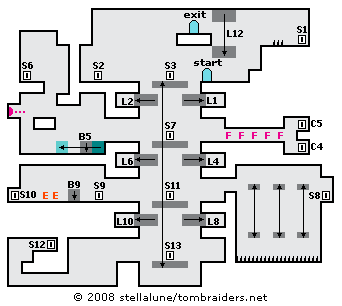
To the left is a platform above a vertical shaft. This lift is designed to move but can't because two ledges block it from descending. Climb the ledges to the right of the entrance, hop over the spikes and use the switch (S1) to retract one of the ledges (L1) below. Return to the left, jump across the shaft and use the switch (S2) to retract the second ledge (L2). Now when you stand on the movable platform and use the switch there (S3), the platform can descend.
When it reaches its new position below, two ledges again block the platform. Go to the right. Wait for the flame jets to begin to cycle off then run past into the next room. Use the 2 switches (S4 and S5). One retracts one of the ledges (L4); the other retracts a block (B5) in the room to the left. Return to the lift shaft and jump across to the room on the left.
With the block in the floor removed, you can position the movable block beneath the ledge. Climb up carefully to avoid the darts and use the next switch (S6) to retract the second ledge blocking the lift shaft. Climb back down and return to the right to the platform. Use the switch (S7) to lower the platform to the next floor.
Once again, ledges prevent further descent. Climb up on the right and carefully jump across the moving platforms to the alcove on the other side of the room. Be careful not to fall into the spikes. Use the switch (S8) to retract one of the ledges (L8). Jump back across to the left and cross the lift shaft. In the room to the left, use the switch (S9) to retract the block (B9) next to it. Immediately draw guns and shoot the dog and hostile tribesman. Use the switch (S10) to retract the other ledge (L10) below the lift platform.
Return to the right, hop on the lift and pull the switch (S11) to lower it once more. Hop off on the left and follow the hallway to a ledge. Climb up and use the switch (S12) to lower a ledge (L12) near the top of the map. Get back on the lift and use that last switch (S13) to move the lift all the way to the top of the shaft.
Hop off on the right, climb the ledges, avoiding the spikes ahead. Turn around and jump to grab the ledge you just lowered (L12). Climb up to the exit.
Walkthrough text and diagrams copyright © 2008- Stellalune Stellalune (). Feel free to copy or print this walkthrough for personal use. By all means, share it with friends, but please include this credit line so people can send me their feedback. No part of this walkthrough may be reproduced on another site without permission. Follow this link for details about this site's advertising and privacy policy.
WAS THIS WALKTHROUGH HELPFUL? If not, I apologize and invite you to contact me with any questions. If you need help right away, I recommend the r/TombRaider subreddit. Other fan-run forums are listed at tombraiders.net/stella/community.html. If this site was useful, please consider supporting it financially or in other ways. For details, visit tombraiders.net/stella/support.html. I also welcome any and all suggestions to improve things. Thank you!
Stella's Tomb Raider Site: tombraiders.net.