TOMB RAIDER: CURSE OF THE SWORD - DOCKS PART 1
This walkthrough covers maps 1 through 7, up to the point where you enter the main area of the Chemical Plant. Part 2 continues from there.
NOTE: Letter designations for switches (S#), doors (D#), save crystals (C#), etc., in the text refer to labels on the corresponding level maps. The switches are numbered to match their corresponding doors (e.g., switch 1 opens door 1, switch 3 extends ledge 3, etc.). All pickups are marked on the map (I hope). Enemies and hazards are noted in the walkthrough but not on the maps.
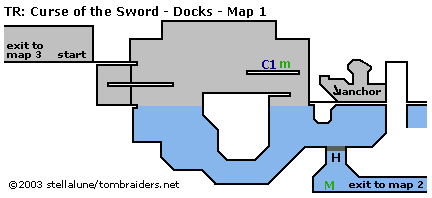
Docks - Map 1 (click for printable map/map key)
You start the level at the left side of the first map. Ignore the arrow pointing left for now. Draw guns, duck and roll to the right. Shoot the thug with the gun and continue right. At the end of the wooden ledge, Look down below. Hop down when the Doberman heads to the left and shoot it before it can touch Lara. Jump into the water and swim down and to the right, under the wall and up to the surface. Climb out of the water on the right near the decaying boat hull. Shoot the anchor (A), which falls through the dock and breaks open a hole (H) underwater.
Before going on, find the first save crystal: take a running jump off the end of the dock to the left. Pull up onto the wooden platform. Shoot the Doberman and climb up onto the level above, where you'll find the save crystal (C1) and a small medipak.
Save and jump back in the water. Swim down and right, then down through the hole you made (H). Pick up the large medipak on the bottom and continue to the right to a new area.
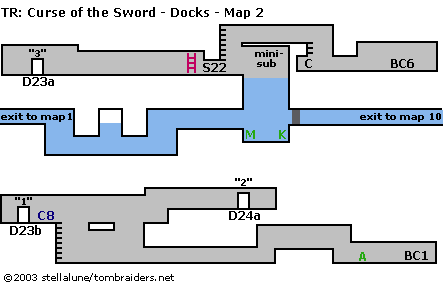
Docks - Map 2 (click for printable map/map key)
Follow the underwater passage to the right. After the first "Danger" sign, there's an air pocket above. Take a breath and continue on to the right. When the passage widens into a larger pool, pick up a large medipak and a DOOR KEY (K). Swim up for air. There's not a lot more you can do here yet, so swim back through the tunnel to the previous area.
Docks - Map 1 (again)
Swim left/up to the surface. Climb out of the water near the wrecked boat. Take a running jump to the left and pull up onto the wooden platform. Climb onto the ledge above and use the save crystal (C1) again. Jump into the pool on the left and swim across. Climb up the wooden platforms and go left past the spot where you started the level. Continue left to the next area.
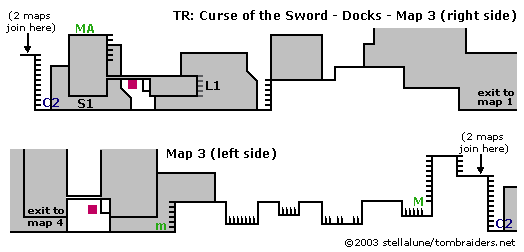
Docks - Map 3 (click for printable map/map key)
You enter this area at the right side. Shoot the thug with the club and climb up to the left. Shoot another bad guy on the next level before climbing up. Continue left, shoot the Doberman on the level below and hop down. Continue left, climb down the ladder and continue past the building with the purple awning.
There's a guy operating a crane who tries to drop a crate on Lara. You can't exit on either side of the screen until you kill him. So load up those heavy or rapid bullets to get the job done faster. Don't hesitate to pause the game if necessary to use a medipak or two. When the crane operator is dead, go to the left and use the red switch (S1) to extend a ladder (L1) back to the right. Climb that ladder, cross the rooftop, climb the next ladder and pick up a large medipak and rapid bullets on the high roof. Climb back down the way you came and continue to the left.
Use the save crystal (C2) and climb the ladder next to it. Climb the next short ladder, cross the rooftop and climb down the other side. Pick up the large medipak and walk through the spikes. Continue to the left. Safety drop into the next spike pit, walk across and climb out the other side. Jump over the next small spike pit and either walk through the fourth or take a running jump across it to grab the other side and pull up. Shoot another thug with a club and continue to the left.
Climb down the ladder, pick up a small medipak and continue to the left. Now there's a repeat of the sadistic crane operator scenario. This guy is a bit faster on the stick, so be sure to use heavy or rapid bullets and dodge that box. When the fight is over, keep going to the left to the next area.
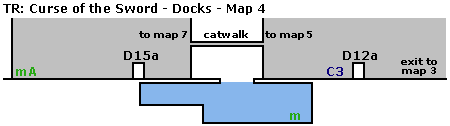
Docks - Map 4 (click for printable map/map key)
Go left, shoot the Doberman and the thug a bit farther on, and use the save crystal (C3). Jump into the water and pick up the small medipak at the bottom right. Then use the DOOR KEY you found in Map 2 to open the wooden door (D2a) near the crystal.
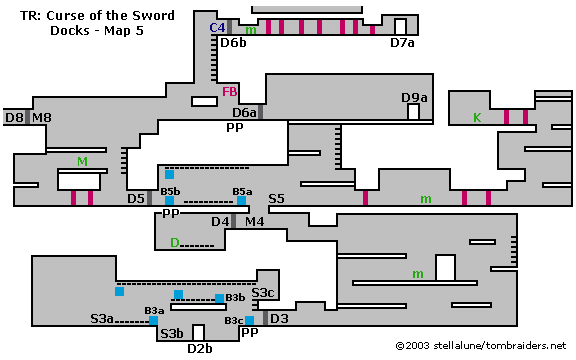
Docks - Map 5 (click for printable map/map key)
(NOTE: This map is wider than a standard 8½" x 11" sheet of paper. Unless your printer automatically scales images to fit the paper, be sure to print it using landscape (horizontal) orientation, or the edges will be cut off.)
You enter this warehouse at the bottom, just left of center (through door D2b). The black-and-white door (D3) above on the right opens when Lara steps on the pressure pad (PP) in front of it; however, it closes once she steps off the pad. You'll need to operate switches on three separate machines to move a box onto the pressure pad. The first switch (S3a) is to the left, next to one of the conveyor belts. (This moves the box to position B3a on the map.) The second switch (S3b) is below, near the door where you came in. (This moves the box to B3b.) The third switch (S3c) is on the ledge above the black-and-white door. When you use it, the box ends up on the pressure pad (B3c), and the door stays open so Lara can go through.
In the next room, shoot a rat and continue to the right under some steel girders. Climb onto the girder to the left of the window. Shoot the thug on the level above and climb up to get a small medipak. Climb back down, go to the right and climb onto the girder above the stack of boxes. Climb up once more and then jump to grab the girder above and to the right. Pull up and climb the ladder. Backflip onto the girder behind. Cross over it and jump down onto the yellowish wall. Take a running jump to grab the girder to the left. Pull up and shoot another bad guy here. (If you're low on health, you can drop down to the level below, do the deed and then retrace your steps up the girders and ladder.) Cross the uppermost girder to the left and climb up two ledges to a machine (M4) that needs a KEYCARD.
Climb through the opening above and go right. Shoot the rat on the girder above if you like. Then continue right. To get through the chomping machine without injury, crouch next to it and roll through as the two sections begin to separate. Continue right, pick up a small medipak, and go through two more chomping machines. (It may help to roll through the first, stand up and take one step forward, then duck and roll through the second.)
(NOTE: Getting past the machines isn't too difficult once you get the hang of it. If you're having trouble, you might want to play up to this point, return outside and use the save crystal and then come back and try again.)
Climb onto the next girder, jump to grab the ledge to the left, pull up and shoot a rat on the girder above. Climb up there and then onto the ledge with the chomping machines. Carefully roll through and pick up the KEYCARD (K).
Return past the chomping machines, down the girders and to the left through the other chomping machines. Continue left to the gap in the floor. Hop down and use the KEYCARD in the machine (M4) to open the black-and-white door (D4) to the left. Go through, hop down and shoot a rat. Pick up the DYNAMITE STICKS (D) and climb back up. On the ledge above is a machine with a switch (S5). Use this to move a box (from B5a to B5b) onto a pressure pad (PP). This opens the black-and-white door (D5) to the left of the pad. Go through that door.
Roll through the 2 chomping machines and climb onto the girder ahead. Turn and jump to grab the girder to the right. Pull up and take the large medipak. Take a running jump to grab the ladder to the right. Climb up and shoot the thug with the gun on the girder to the left. There's no need to jump over there yet. Instead, climb the ledges to the right.
At the top is an area with water pipes and sprinklers. Climb onto the small platform. Shoot the flaming barrel (FB) to spill burning fuel on the floor and activate a pressure pad (pp). This opens the black-and-white door (D6a). You can't reach it yet because of the flames. It also opens another black-and-white door (D6b) above. Jump to grab the ladder, climb to the top and use the save crystal (C4).
Position Lara below the open door (D6b), duck and roll to the right to get the small medipak. Roll back to the left. The starting position for this part makes all the difference. Walk to the right until Lara stops before the low ceiling. Duck and roll once toward the first of 7 chomping machines. Wait until it starts to open and then roll through. Repeat this process for remaining machines. If you started from the right spot, you shouldn't have to reposition Lara to roll through each of the remaining traps. On the other side, go through the door (D7a) to a new area.
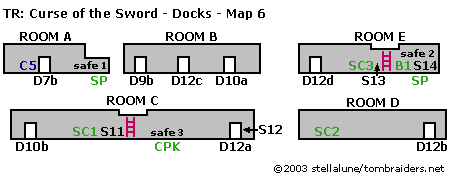
Docks - Map 6 (click for printable map/map key)
ROOM A: You first enter the small office on the top left of this map (through door D7b). There's a save crystal (C5) just to the left. The cabinet is empty. Use DYNAMITE to blow up safe #1 (place it where the green arrow indicates) and retrieve the blue SECURITY PASS (SP). Return to the previous area.
(NOTE: If you missed the dynamite earlier, it's near the middle of Map 5. See the walkthrough above for details. Once you have the dynamite, return to the area where you shot the flaming barrel and take a running jump to clear the flames and grab the left edge of the platform. Pull up and then climb the ladder, etc., as described above, to get back to the office.)
Docks - Map 5 (again)
Back in the main warehouse area, make your way from the top right of the map (near door D7a) back to the left past the chomping machines to the save crystal (C4). Climb down the ladder and hop down off the platform on the left side to avoid the flames. Continue left and down two ledges. Jump the gap above the ladder. (Be sure to shoot the bad guy first if you didn't earlier.) Climb up on the left and use the SECURITY PASS in the machine (M8) to unlock the black-and-white door (D8). Go through to a new area.
(NOTE: If you're missing the security pass, it's in an office on the top floor of this building. See the walkthrough above for details.)
Docks - Map 4 (again)
You're only on this map for a moment as you cross the catwalk between the two buildings. There's a guy with a club on patrol. Shoot him or just run past into the next area.
Docks - Map 7 (click for printable map/map key)
You enter this map, the Chemical Plant, near the top left corner. On this visit, you only need to use the machine (M9) to turn on the sprinklers in the other building. If you want to, you can shoot the thug on the level above. Then exit the way you came in. You'll be back soon to explore further.
Docks - Map 4 (again)
Cross the catwalk and re-enter the warehouse.
Docks - Map 5 (again)
Back inside the warehouse, return to the right, past the door and machine (D8/M8). Hop down, cross the girder and take a running jump across the gap. Climb up two ledges and continue to the right. Once you've activated the sprinklers, they will extinguish the fire and you can go through the open black-and-white door (D6a). Continue right to an open door (D9a). Go through into the office area.
Docks - Map 6 (again)
Room B: You re-enter the office area through a different door this time (the one marked D9b on the map). Cross the room to the right, past a locked door (D12c). There is nothing in the lockers or the computer, so go through the open door (D10a) to another office.
Room C: From the door (D10b), go to the right. The middle of the three lockers contains a BIT OF SAFE CODE (SC1). The computer (S11) deactivates the laser-trap so you can pass to the right side of the room. None of the computers or shelves here holds anything. If you try to use safe #3, you'll see you need the complete SAFE CODE (three bits) to open it.
Use the computer (S12) at the far right side of the room to open the door (D12a) next to it, as well as the locked door (D12c) you passed in Room B. For now, go through the door near the computer (D12a).
Room D: From the door (D12b), go left. None of the cabinets or lockers contain anything, except for the cabinet with the gooseneck lamp on top (second from left), which holds a bit of the SAFE CODE (SC2). Get it and return through the door to Room C.
Room C: Cross the room and return through the door (D10b) at the left end to Room B.
Room B: After using the computer (S12) in Room C, the locked door (D12c) at the middle of this room is now open. Go through to another office.
Room E: From the door (D12d), go left. You'll find a bit of SAFE CODE (SC3) on the bulletin board. Use the computer (S13) to deactivate the laser trap. Continue into the right side of the room. Pick up an EMPTY BATTERY (B1) and use the computer (S14) on the far right to open safe #2 next to it. Pick up a white SECURITY PASS (SP). Cross back to the right and return through the door (D12d) to Room B.
Room B: Go through the door (D10a) on the right side of the room to Room C.
Room C: Cross to the right, open safe #3 and pick up the CHEMICAL PLANT KEY (CPK). (NOTE: This only works if you've picked up all three bits of the SAFE CODE from the various offices.) Return to the left, and go through the door (D10b) back to Room B. Cross to the left side of Room B and exit through the door (D9b) back to the main warehouse.
Docks - Map 5 (again)
Return to the left, through the black-and-white door (D6a) near the sprinklers. Continue left, down two ledges and a ladder. At the bottom, go right through the door (D5) and past the conveyor belt. Hop down at the gap in the floor and continue right and down to the girders. Climb down to the floor and go left. Beyond the door (D3) with the blue crate holding it open is the exit door (D2b). Exit the building.
Docks - Map 4 (again)
Use the save crystal (C3) again and go left to the water. Swim down to the bottom left and get the small medipak if you didn't before. Surface and climb out on the left. Shoot the thug with the gun and go past the Chemical Plant door and two garage doors to find shotgun rounds and a small medipak. Return to the Chemical Plant door (D15a) and enter.
(NOTE: If you're missing the CHEMICAL PLANT KEY, check the walkthrough above. It's located inside the warehouse, Map 5.)
WAS THIS WALKTHROUGH HELPFUL? If not, I apologize and invite you to contact me with any questions. If you need help right away, I recommend the r/TombRaider subreddit. Other fan-run forums are listed at tombraiders.net/stella/community.html. If this site was useful, please consider supporting it financially or in other ways. For details, visit tombraiders.net/stella/support.html. As always, I welcome your corrections/suggestions. Thank you!
Walkthrough and maps copyright © 2004- - Stellalune (). All rights reserved. Feel free to copy or print this walkthrough for personal use. By all means, share it with friends, but please include this credit line so people can send me their feedback. No part of this walkthrough may be reproduced on another site without permission. Follow this link for details about this site's advertising and privacy policy.
Stella's Tomb Raider Site: tombraiders.net.