IMPORTANT: If you haven't already done so, you may want to review the INTRODUCTORY NOTES on the storyline, controls, treasures/relics and saving/checkpoints. These appear at the start of the PROLOGUE walkthrough.
As always, I highly recommend that you do not rely exclusively on the autosave. Instead be sure to save manually at least once or twice each level. Then, if you miss something or run into a bug, you can reload rather than having to replay the entire level. Many common bugs are documented in this walkthrough. They are in hot pink text, like this, so they're easy to spot. I have also included an overview of major bugs without game spoilers. However, not every potential problem is covered here. So be safe; save often in new slots. In case you need them, Underworld Save Files for PC, PS3 and Wii are available.
LEVEL 6: ANDAMAN SEA - RITUALS OLD | Updated: 5/4/09(†) |
Health Items: 3 Treasures: 0 Relics: 0 Keys/Puzzle Items: 0
Underworld Video Walkthrough by Eldincy‡
At the start of the level, choose Lara's outfit—Jungle Heavy, Jungle Pants or Jungle Shorts—and starting secondary weapon. The latter makes no difference this time, since you now possess Mjolnir, the best weapon in the game.
Cinematic: Lara pulls her boat alongside the Tisiphone, anchored off the southwestern coast of Thailand.* The fierce weather seems a perfect complement to Lara's new toy—and perhaps her mood as well. We get a long view of the upper deck, hinting at the route to Lara's objective: Natla.
MAIN DECK – CARGO CONTAINER AREA: The layout of this ship is nearly identical to that of Amanda's other vessel. And, as in the God of Thunder level, you begin on the upper deck near the bow. There are no enemies in sight at the moment, and none will appear until you go down the stairs. First, equip Thor's Hammer. Mjolnir is not one of the choices on the Weapon Selection screen in PDA, so press the Change Weapon key twice to cycle from the pistols to the regular secondary weapon to the hammer.
Now try it out. You can use Mjolnir in three different ways: Pressing the Fire button makes Lara swing the hammer, shooting a lightning bolt at the nearest target. As with other weapons, you can hold Target Lock to keep a single enemy targeted, or not. If you hold Target Lock and then press Interact, Lara does a sort of ground pound, sending out a shockwave that destroys any fragile objects in the immediate vicinity and knocks enemies off balance. You can also use Precision Aim with the hammer to target enemies at a distance or to hit individual objects—for example, wooden crates or fuel tanks, which then explode damaging nearby foes.
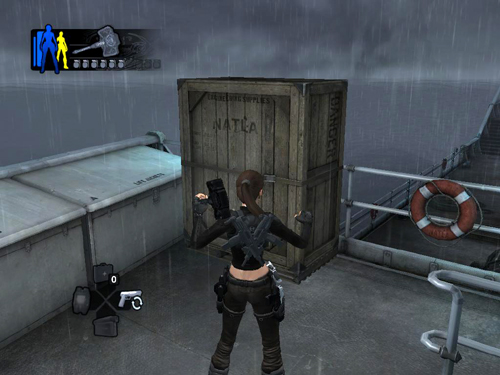
When you've got the hang of it, smash the crate in front of the starting position (shown in this screenshot) to get the first aid kit inside. Then head down the stairs.
Amanda's goons begin to appear once Lara steps onto the deck with the big cargo containers. You'll encounter 5 mercenaries to start—three in the center aisle between the stacks and one on each side of the ship. If you take your time and explore every inch of the deck, more enemies will appear her and on the higher deck where you started. Once you begin climbing the containers, however, the respawn should stop. So get moving if you want to avoid more fighting. Or, if you're the slightly sadistic type and enjoy blasting baddies off the deck into the ocean, take your time. It's OK. We understand. ;)
To reach the upper deck, first locate the blue container that doesn't have anything else stacked on top of it. It's in the middle of the row of containers on the left side of the center aisle if Lara is facing away from the stairs she just descended. (These screenshots show where to go.) Climb on top of the blue container and turn to face the way you came. Step to the edge and jump forward to grab the edge of the stacked blue and gray containers ahead. Then pull up to get another first aid kit. Turn around and take a take a running jump to grab the edge of the three stacked containers beyond the blue one where you first climbed up. Pull up and then jump across the tops of the containers onto the deck ahead.
Alternatively, chimney jump between the closely stacked containers to reach the top. Then jump over to get the first aid kit and back across the containers to the upper deck.
UPPER DECK: As on the ship in the Mediterranean, you can go to the left or right to reach the stern. In either case, you'll encounter 2 more men lurking behind the wooden crates stacked along the side walls. You can destroy the mercenaries' cover by blasting the crates, but that means the bad guys can also target Lara more easily. So take them out quickly and continue moving toward the back of the boat.
Two mercenaries are stationed at the circular grate—presumably the opening of the shaft that houses Natla's cage—and 2 more soldiers come up the stairs at the back of this deck, one on each side. If you linger longer than you have to, another soldier follows.
NOTE: As long as you keep moving on, you won't meet any more soldiers here. But if you circle around to the front of this deck, additional enemies will appear. This is true for the stern areas as well.
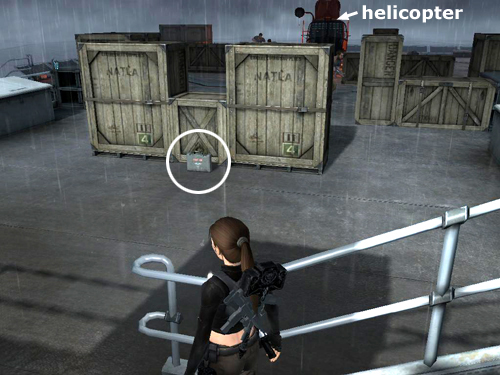
HELIPAD: Descend either set of stairs toward the helipad. Three mercenaries surround the chopper but come toward Lara when she reaches the deck. They'll try and use the wooden crates for cover, but you can easily blast those out of the way. There's a convenient first aid kit on the floor just in front of the crates in the middle of the deck. (It's shown in this screenshot.)
STERN: After clearing this area, go down the stairs on either side of the deck and make your way toward the back of the boat, where you'll encounter another trio of soldiers. You don't have to do this, but if you happen to continue all the way around to the stairs on the other side of the ship and then backtrack to the stern, 3 more soldiers will appear.
BELOWDECKS: The doors at the back of the boat open as you approach. Enter and go downstairs. The next set of doors also open automatically. Continue forward. There's only one possible route here, which takes you deeper inside the ship.
In the engine room 2 of Amanda's men try and block Lara's way. Take them out and go on. Around the next corner, behind the wooden crates, there are 2 more mercenaries. A quick shockwave (Target Lock + Interact) will take care of the crates. Then you can blast the two guys. A third man stands at the foot of the next short flight of stairs. If you arrive there soon after killing the last two men, he'll be hiding behind the crates near the wall. But if you dawdle in the previous hallway, he may come sniffing around.
The last 2 soldiers appear a little farther on, on the right side of the T-intersection at the end of the hall. But, again, if you spend too much time exploring in the previous areas, they may come forward to see what's going on. Kill them and head to the left at the T.
Cinematic: Lara enters the large room housing Natla's glass cage and demands to know the location of Helheim. True to form, Natla stalls a bit by complimenting Lara's tenacity, but when Lara presses, she channels energy through her fingertip to scribble something on the glass.
"Before you put me to death," Natla says, "tell me, are you prepared to wait for Odin to appear and perform the ritual to open Helheim?"
Lara now understands Natla's plan. As the inscription in Valhalla suggested, both "rituals old and the power of Mjolnir" are required to open the seals of Helheim. As much as Lara detests the idea, they'll have to cooperate, at least for the time being. Lara musters a bit of bravado and assures Natla that the moment she steps out of line, Lara will kill her.
But before Lara can release Natla, Amanda appears with the doppelganger and orders Lara not to break the glass.
Lara turns on her former friend with cold fury. "You destroyed my home," she accuses. "You killed Alister!"
"I got what I wanted," Amanda replies, dangling the Wraith Stone for Lara to see. "Isn't that all we care about?"
Amanda begins to draw power from the stone, as Lara stands poised to wield the hammer. But the standoff is broken when the doppelganger intervenes. Perhaps at some subtle signal from Natla, she hoists Amanda and tosses her off the walkway. Lara hurls several lightning bolts at her double, but the doppelganger is too fast. She dodges them easily then runs off.
"Ah, Lara, you really are a woman after my own heart," Natla croons.
The taunt nearly sends Lara over the edge. She shrieks as she smashes the cage but manages to restrain herself before doing Natla any harm. She knows she'll need the Atlantean queen's help to enter Helheim.
"Get out of my sight," Lara growls.
Natla nudges a shard of glass with her toe, indicating the coordinates she etched upon it earlier.
"Meet you there," she says before escaping through the vent above.
†UPDATE HISTORY: 12/20/08 - First draft posted online.
5/4/09 - Made several small changes for clarity while editing the entire walkthrough, but nothing major was changed in this level.
*FYI: Along with her sisters Alecto and Megaera, Tisiphone is one of the three Furies (or Erinyes) in Greek mythology. Tisiphone was the fury responsible for punishing the crime of murder. She was the guardian of Tartarus, an underworld even deeper than Hades, and was also known for having fallen in love with a mortal, Cithaeron. When he spurned her, she used a lock of her hair, which took the form of a snake, to kill him.
‡NOTE ON VIDEO GUIDES: Eldin's videos don't always follow the same strategies I use in my walkthroughs, but if you prefer that format, I think you'll find them very helpful.
WAS THIS WALKTHROUGH HELPFUL? If not, I apologize and invite you to contact me with any questions. If you need help right away, I recommend the r/TombRaider subreddit. Other fan-run forums are listed at tombraiders.net/stella/community.html. If this site was useful, please consider supporting it financially or in other ways. For details, visit tombraiders.net/stella/support.html. As always, I welcome your corrections/suggestions. Thank you!
Copyright © 2008- - Stellalune (). All rights reserved. The screenshots and videos included here were made using Fraps. Feel free to copy or print this walkthrough for personal use. By all means, share it with friends, but please include this credit line so people can send me their feedback. No part of this walkthrough may be reproduced on another site without permission. Follow this link for details about this site's advertising and privacy policy.
Stella's Tomb Raider Site: tombraiders.net.