Stella's Classic Tomb Raider: Last Revelation Guide
NOTES ON THE REMASTER: This guide has not yet been updated for the remastered game. Revisions are in progress but will take time. I hope this version, based on the classic game, will still be helpful. Thanks for your patience.
LEVEL 33: KHUFU'S QUEEN'S PYRAMIDS
Updated: 2/21/25(†)
LEVEL MAP by VGCartography (used with permission)
Last Revelation Remastered Video Walkthrough by Eldincy‡
Kills: 22 (24) Items: 21, including Eastern Shaft Key Secrets: 1*
NOTES: There are 22 enemies and 2 friendly soldiers in this level. If you kill the soldiers yourself, rather than letting the scorpions kill them, you can achieve the maximum 24 kills. Unlike the MENKAURE'S PYRMAID level, however, you don't need to spare the soldiers for tactical reasons. It's just the right thing to do. ;-) Also, the regular pick-ups include the CROSSBOW, GRENADE GUN, REVOLVER, SHOTGUN, and UZIS if you didn't find them earlier.
OUTSIDE NEAR BUNKER: When you round the corner after sliding down the face of the GREAT PYRAMID, you meet 2 soldiers fighting a giant scorpion (1). A second scorpion (2) joins the battle from the southwest as you approach. (screenshot) If you can help the soldiers without accidentally shooting either of them, they won't attack you. (Remember to tap the Look button to switch targets.) As in previous levels, the giant scorpions not only cause physical damage, their stings can also poison Lara. If that happens, you'll need to use a medipack to antidote the poison.
On the south side of this open area is a stone BUNKER. Each of the two ramps at the front leads down to a door. Go down the first ramp to the left door and press Action to open it. (screenshot) Enter and shoot the various wooden crates to get a load of supplies: a small medipack, wideshot shells, Uzi ammo, normal grenades, revolver ammo, poison arrows, and super grenades (1-7).
Go back up the ramp, head to the left, go down the other ramp, and open the right door. (screenshot) The wooden crates on the right are empty. If you obtained the ARMOURY KEY by saving the soldier in the MENKAURE'S PYRAMID level, use the key now to unlock the wrought iron gate. (screenshot) Inside is a SECRET (69/70), more crates containing a small armory indeed: normal arrows, a SHOTGUN, UZIS, a CROSSBOW, a GRENADE GUN, shotgun shells, and a REVOLVER (8-14) (or ammo for these if you already have the weapons). When you return up the ramp, you'll encounter another giant scorpion (3). (screenshot) Kill it with explosives, revolver, etc.
NOTES: As far as I know, the third giant scorpion does not appear unless you obtain the secret. If you were not able to save the soldier from the giant scorpion in the MENKAURE'S PYRAMID level, you will be unable to get this secret. PC players can download save files in which Lara has the key.
EXCAVATION PIT BETWEEN THE PYRAMIDS: Approach the deep pit to the northwest, between the GREAT PYRAMID and the two smaller pyramids. First jump onto the small, square ledge on the left (west) side of the pit. Take a running jump angled to the left to land in the space between the two small pyramids. Immediately turn left and kill another giant scorpion (4) that charges out of the gap between the pyramids. Take care not to hop back into the pit as you fight. (screenshots)
Move out onto the downward sloping ledge and take a running jump across the pit to grab the block ledge on the opposite side. Pull up, turn right, walk to the edge, and take a standing jump to the next block ledge. Kill the giant beetle (5) that buzzes in from above on the left. Here it may help to turn and hop back against the wall as you shoot to avoid accidentally hopping/rolling off the ledge. Then turn around and pull up onto the ledge where the beetle came from. Turn left and take a running jump, without pressing Action, to land on the next ledge jutting out from the sandy slope. Walk forward onto the far left corner of the ledge and take a standing jump over the sloping sand to the next ledge. Turn left and take a running jump along the right side of this ledge to grab the middle or left side of the block ledge on the far side of the pit. Pull up and turn right. (screenshots)
There's a giant beetle (6) sitting on the rock ledge ahead. Shoot it from here using pistols or revolver. Now ready a more powerful weapon and take a running jump to the ledge just below the one where the beetle was. Run up the slope and blow up another giant scorpion (7) as it comes around the corner from between the pyramids. (If you don't kill the beetle first, you'll have to deal with both at the same time.) (screenshots)
PYRAMID ENTRANCE: Go between the two small pyramids, where the scorpion came from, and you'll find a small medipack (15) lying on the ground. There's no need to light a flare here, but if you do so, it's easier to see the faint bird symbol carved into the ground next to the medipack. Go around behind the large, uneven stone block and push it onto the symbol. This opens a door in the small pyramid on the left. Enter, open the trapdoor, and climb down the ladder into one of KHUFU'S QUEEN'S PYRAMIDS. (screenshots)
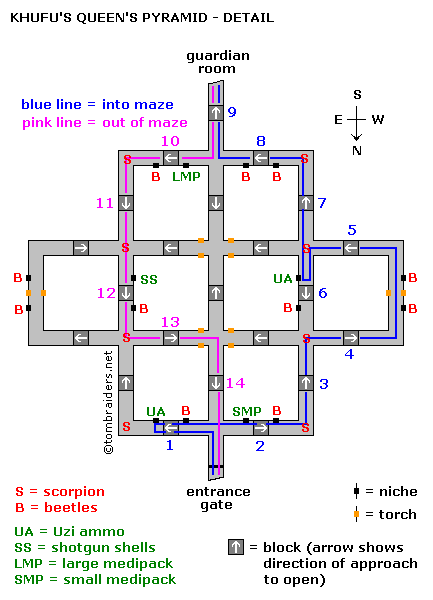
THE MAZE: This diagram may help you navigate this maze. The layout is fairly simple, but getting through it is complicated by the stone blocks that raise and lower when you step on the gray pressure pads in the floor. The result is that each hallway can only be traveled in one direction. In the diagram, each block is marked with an arrow showing the direction you must travel in order to pass that block. The blocks along the path in and out of the maze are numbered in both diagram and text.
In addition, there are small, rectangular niches at various points on the walls (also indicated in the diagram). Some of these contain goodies, but most contain swarms of beetles. If you trigger the beetles, you can either run away and let the beetles disperse or reload. There are also 8 normal-size black scorpions (numbered as you encounter them) at the locations marked on the map.
As you enter the maze, the gate closes behind you. At the first intersection, turn left (east). When you step on the first pressure pad, the block (1) ahead recedes. Kill the black scorpion (8) in the passageway, then advance just as far as the second niche on the right-hand wall. Inside you'll find some Uzi ammo (16). (The first niche contains a swarm of beetles, so don't reach in.) Don't go any farther, or you'll step on the next pressure pad, raising the block and sealing the passage behind you. Instead, backtrack (westward) to the intersection near the gate.
NOTE: If you take a wrong turn or go too far and accidentally seal off the passageway behind you, don't worry. Just use the map to navigate back to wherever you left off so you can try again.
Continue straight ahead (west). The pressure pad just beyond the intersection lowers the next block (2). Kill another black scorpion (9) in the passageway. Reach into the first niche on the left for a small medipack (17). (Skip the second niche, which contains beetles.) Continue, stepping on the next pad, which raises the block behind you. Turn the corner to go south. Step on the pressure pad to lower the next block (3). Shoot another scorpion (10). Continue southward to the next intersection. Turn right (west), and follow the passage, lowering and raising another block (4) as you go. When you turn the corner to head south again, you'll see two torches and two niches. Avoid the niches, as both contain beetles. Turn the corner to head east. Step on the pad that lowers the next block (5) and kill another scorpion (11) in the hall beyond.
At the next intersection, turn left (north). The next block (6) will come down in front of you. Proceed only as far as the first niche, where you'll find more Uzi clips (18). After getting them, backtrack to the south to the intersection you just passed. Continue straight on (southward), lowering and raising another block (7) as you go and killing the scorpion (12) ahead. Round the corner to the east. Continue eastward raising yet another block (8) as you go. Skip the two niches (both have beetles inside) and turn right (south) at the next intersection.
GUARDIAN'S ROOM: Ready weapons before stepping on the next pressure pad. When the block (9) comes down you'll be face to face with the HAWK-HEADED GUARDIAN (13) in the next room. If you have grenades or explosive arrows to spare (about 7 should do the trick), advance just far enough so Lara targets the guardian and start firing. The energy bolts the guardian shoots from his staff aren't too powerful, as long as you keep your distance. This way you avoid triggering 3 black scorpions (14-16) that emerge from behind the pillars when you enter the room. You can deal with them after disposing of the guardian. (screenshots)
If you're out of explosives, use one of the tricks introduced in CLEOPATRA'S PALACES. Instead of running up to the guardian, crouching, and shooting with pistols (which will also trigger the scorpions), as soon as the block comes down, hop back to the intersection. Then step back into either of the side passageways just far enough so the guardian can't see (and shoot) Lara. Draw pistols, crouch, and wait for the guardian to come to you. When it reaches the corner, start shooting and keep the fire button depressed. The guardian will shoot energy bolts over Lara's head, causing little or no damage. After about 200 rounds (100 shots with dual pistols), the guardian will fall and fade away. You can then enter the room and deal with the 3 scorpions (14-16). (screenshots)
Use the CROWBAR to pry the EASTERN SHAFT KEY (19) from the wall with the huge star. (screenshot)
Cutscene: Taking the key causes the gate to open back at the entrance to the maze.
RETURNING THROUGH THE MAZE: The path back to the entrance is indicated by the pink line on the diagram above. Exit the guardian's room and turn right (east) at the first intersection. The block (10) lowers as you approach, and you'll need to kill another scorpion (17) at the end of the passage. Reach into the first niche on the left for a large medipack (20). (Avoid the second niche, which has only beetles.) Turn the corner to head north. When the next block (11) comes down, shoot another scorpion (18) a little farther along the passage. Continue straight (north) through the next intersection, raising yet another block (12) and killing another scorpion (19). This section of hallway also contains two niches on the left side. The first niche has shotgun shells (21) inside; the second beetles. At the next intersection, turn left (west). Continue, past another block (13) that lowers and raises as you pass. The next intersection has torches mounted on the walls. Turn right (north) here. Continue past one more moving block (14) to reach the gate where you entered the maze.
NOTE: If you missed any of the items in the niches, you can go through the maze again. The blocks reset as you pass over the various pressure pads, and the gate should remain open.
Go through the gate at the north end of the maze, which opened when you took the EASTERN SHAFT KEY. Then climb the ladder to get back to the desert.
SCALING THE GREAT PYRAMID (again): Exit the small pyramid and head to the right, toward the excavation pit. Take a running jump across the pit (to the east side). You're aiming for the square ledge on the other side a little to the left. Turn left (north) and take a running jump to the next ledge. Take a standing jump up to the next flat block, where you'll need to kill a giant beetle (20). You may want to use the revolver here if you have ammo, since the beetle can knock Lara off the edge if she doesn't kill it quickly. (screenshots)
Climb up two tiers on the side of the pyramid. Then take a diagonal standing jump to the next flat spot above and to the left. Take another diagonal standing jump to the next flat ledge above and to the left. Wait for several falling blocks to tumble down before moving to the far (north) end of this ledge. From there, take another standing jump to the next flat ledge above and to the left. Kill the 2 giant beetles (21-22) that fly out of the doorway. (screenshots)
Finally, climb to the doorway and use the GUARD'S KEYS (which should still be in your inventory from previous levels) in the keyhole on the left to open the door. Enter the pyramid to finish the level. (screenshot)
IMPORTANT: Do not leave this level without the EASTERN SHAFT KEY. Since taking it opens the exit from the maze, this shouldn't be a problem unless you miss the maze area altogether or use the level-skip cheat. You will need this key, along with the three others you collected in previous levels, to proceed. If you accidentally bypassed the MAZE, follow these directions (with screenshots) to get back there.
*NOTE ON SECRETS: There are 70 secrets in the entire game. These are marked "(x/70)" in this walkthrough. To check your progress in-game, press Pause (P on keyboard, Start on PlayStation or Dreamcast controller) then choose Statistics. At the end of this level, you should have 69/70.
†UPDATE HISTORY: 11/29/01 - Last tracked update before 2019. Unfortunately the details on what actually changed have been lost.
5/5/19 - First major update since this walkthrough was created in 1999. This revision includes many new screenshots as well as various other corrections and clarifications.
1/23/25 - Added running item and kill counts, which hopefully will be useful in the upcoming Remaster.
2/21/25 - Added VGCartography's level maps, with permission. Visit VGCartography on DeviantArt and follow on Twitter/X and YouTube for more fantastic game maps.
ACKNOWLEDGEMENTS: Special thanks are given to the participants in the alt.games.tombraider newsgroup and the old tombraiders.com forum, without whom parts of this walkthrough could not have been written. Thanks also to Cindy, Graeme, Mike, and Trancid for their help on this level.
‡NOTE ON VIDEO GUIDES: Eldin's videos don't always follow the same strategies I use in my walkthroughs, but if you prefer that format, I think you'll find them very useful.
WAS THIS WALKTHROUGH HELPFUL? If not, I apologize and invite you to contact me with any questions. If you need help right away, I recommend the r/TombRaider subreddit. Other fan-run forums are listed at tombraiders.net/stella/community.html. If this site was useful, please consider supporting it financially or in other ways. For details, visit tombraiders.net/stella/support.html. As always, I welcome your corrections/suggestions. Thank you!
Copyright © 1999- Stellalune (). Feel free to copy or print this walkthrough for personal use. By all means, share it with friends, but please include this credit line so people can send me their feedback. No part of this walkthrough may be reproduced on another site without permission. Follow this link for details about this site's advertising and privacy policy.
Stella's Tomb Raider Site: tombraiders.net.