Shadow of the Tomb Raider - Cenote Collectibles
Updated: 9/17/21(†)
This guide focuses on revisiting the level after completing it. If you are playing through for the first time, you may want to follow the main walkthrough instead to avoid possible spoilers. Collectibles are numbered in the order they appear in the main walkthrough and on the annotated level map.
Follow this link for a List of All Artifacts by Story/Dialect.
Relics · Documents · Survival Caches · Explorer Backpack · Archivist Map · Challenges
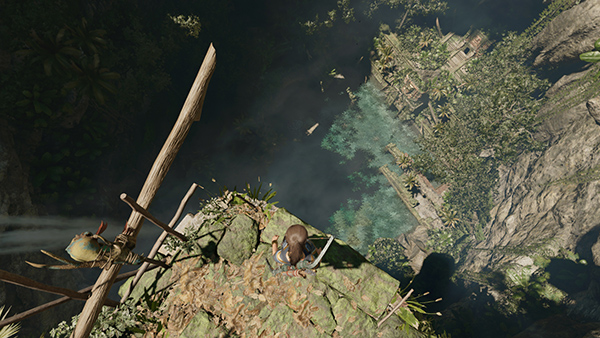
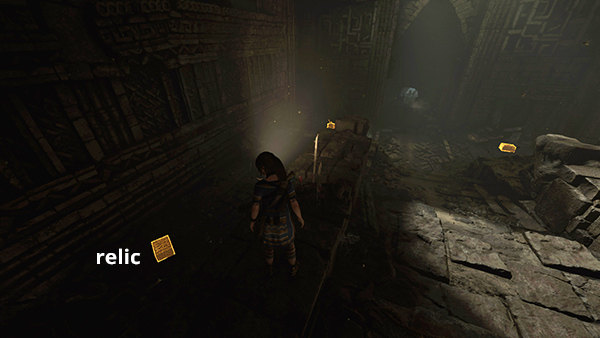
RELIC 1 - Crucified Figure (Homecoming)
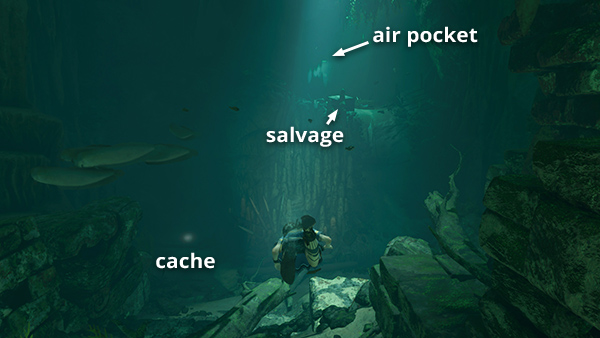
This relic is on the bottom of the piranha-infested pool near the start of the level. If you missed it, fast travel to the Cenote Vista Base Camp. Go through the doorway to the north, follow the path down to the ledge overlooking the pool, and jump in. Use the annotated map and Survival Instinct to zero in on the relic and other collectibles in this area.
It's not possible to climb back up to the Cenote Vista camp, so once you have what you need, swim through the doorway to the west and follow the flooded passageway to its end. Continue on foot through the cavern to the Cenote Temple Ruins Base Camp. From there, you can fast travel away. If you need a refresher for navigating this area, check the walkthrough. (Click screenshots to enlarge.)
RELIC 2 - Knight's Morion (Gates of Hell)
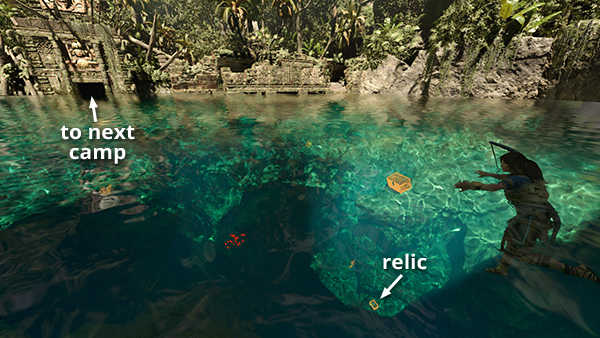
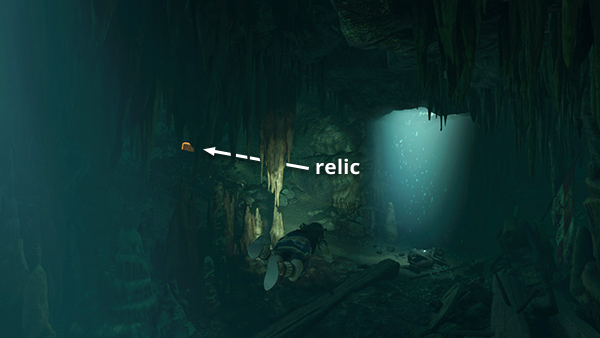
This relic is in the flooded passageway between the pool at the beginning of the level and the caverns. Fast travel to the Cenote Vista Base Camp. Go through the doorway to the north, follow the path down to the ledge overlooking the pool, and jump in. Then swim through the doorway to the west (as shown above for relic #1). Follow the flooded passageway straight on to the first trapped air pocket. Take a breath then swim down to the left (south) to find the relic.
It's not possible to climb back up to the camp on the cliff, so follow the flooded passageway to the west end. Then continue on foot through the cavern to the Cenote Temple Ruins Base Camp. From there, you can fast travel away. Again, check the walkthrough for details. (Click screenshot to enlarge.)
RELIC 3 - Primitive Doll (Handmade Dolls)
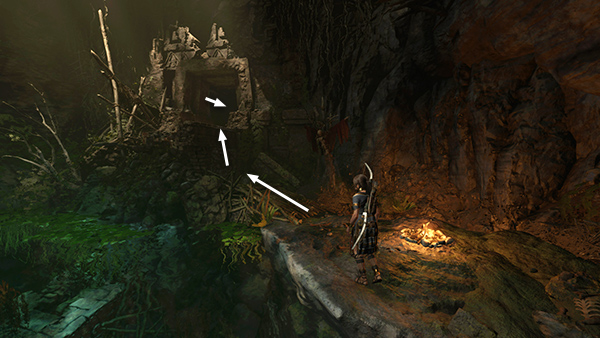
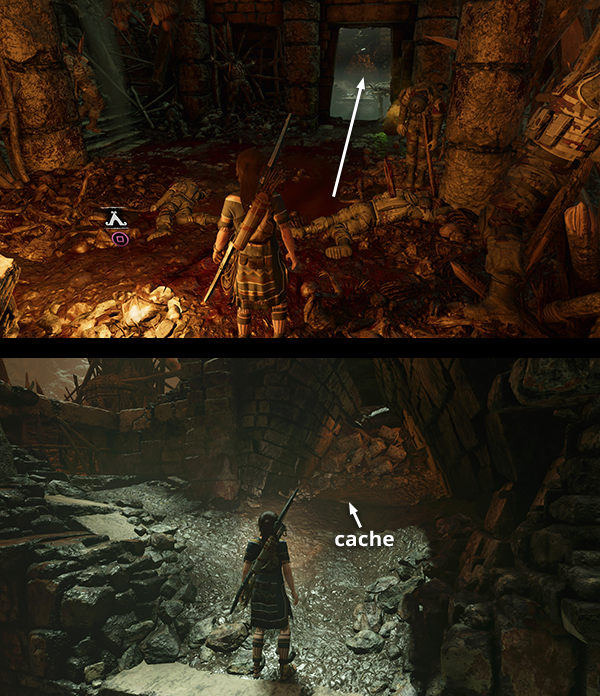
This relic is on the way to the San Cordoba Challenge Tomb. If it's your first time exploring that area, fast travel to the Cenote Temple Ruins Base Camp and follow the tomb guide. If you completed the tomb but missed this relic, fast travel to the Collapsed Temple Base Camp. Climb up to the doorway to the southeast and squeeze through the narrow opening into the dark hallway with the arrow-riddled corpses. The relic is just inside on the left. If that's all you need, return to the campfire and fast travel away. (Click screenshots to enlarge.)
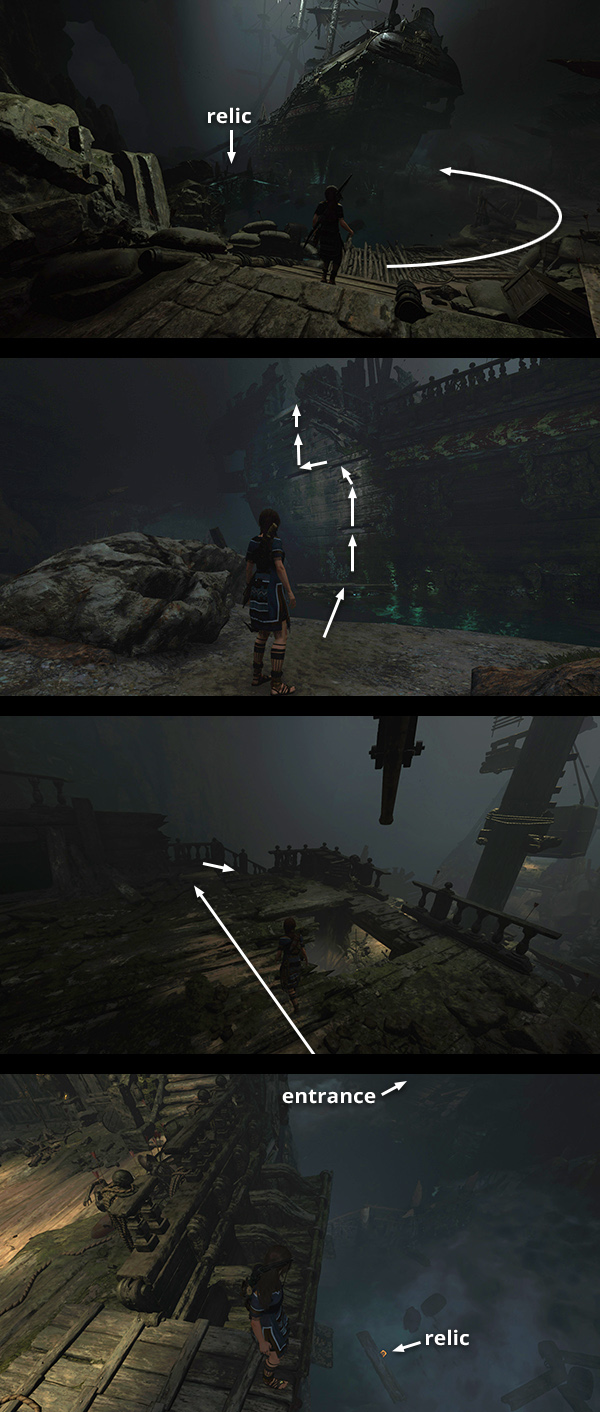
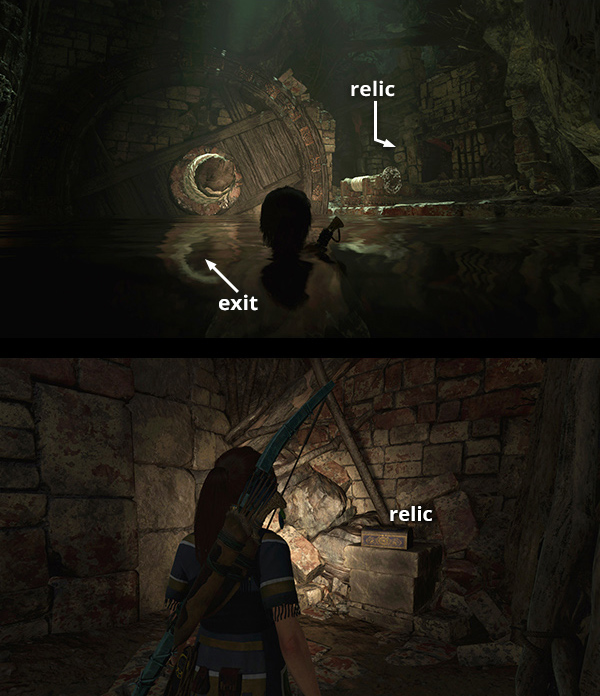
RELIC 4 - Rusty Sword (Conquerors)
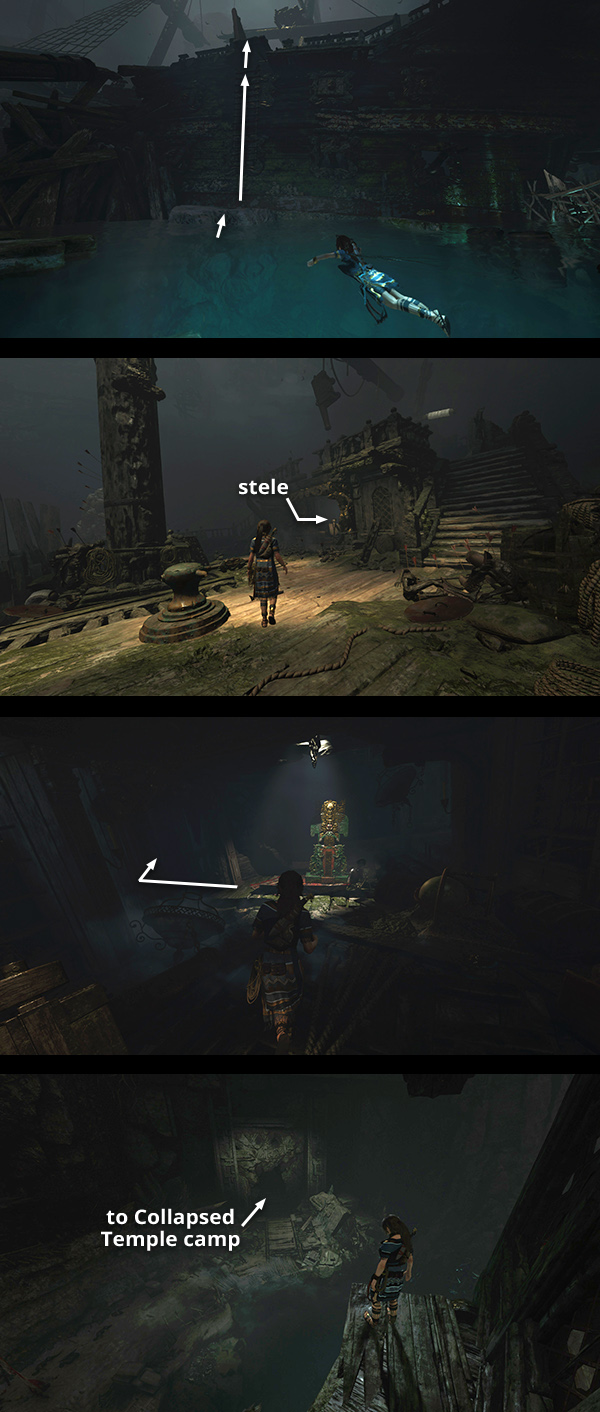
This relic is in the San Cordoba Challenge Tomb. If it's your first time exploring that area, follow the walkthrough. If you raided the tomb but missed the relic, fast travel to the Collapsed Temple Base Camp. Climb up to the doorway to the southeast and squeeze through the narrow opening into the dark hallway with the arrow-riddled corpses (shown above for relic #3). Continue straight ahead to the cavern with the galleon. The relic is on the left (southwest) side of the wrecked ship.
A wooden barrier prevents you from swimming over there directly. So follow the path on the right around to its end, kick the square raft into the water, and use it to climb up onto the galleon's deck. Cross over to the other side and jump into the pool. You'll find the relic on the bottom. (Click first image for more and larger screenshots.)
Climb the ladder to get back onto the deck, then go through the captain's quarters, where you found the tomb stele earlier. Exit through the doorway in the dark corner to the left of the stele. (If you didn't do so earlier, you'll need to pull down the wooden barrier with a rope arrow.) Dive into the water and return up the wooden ramp and through the dark corridor to the base camp. (Click second image for more.)
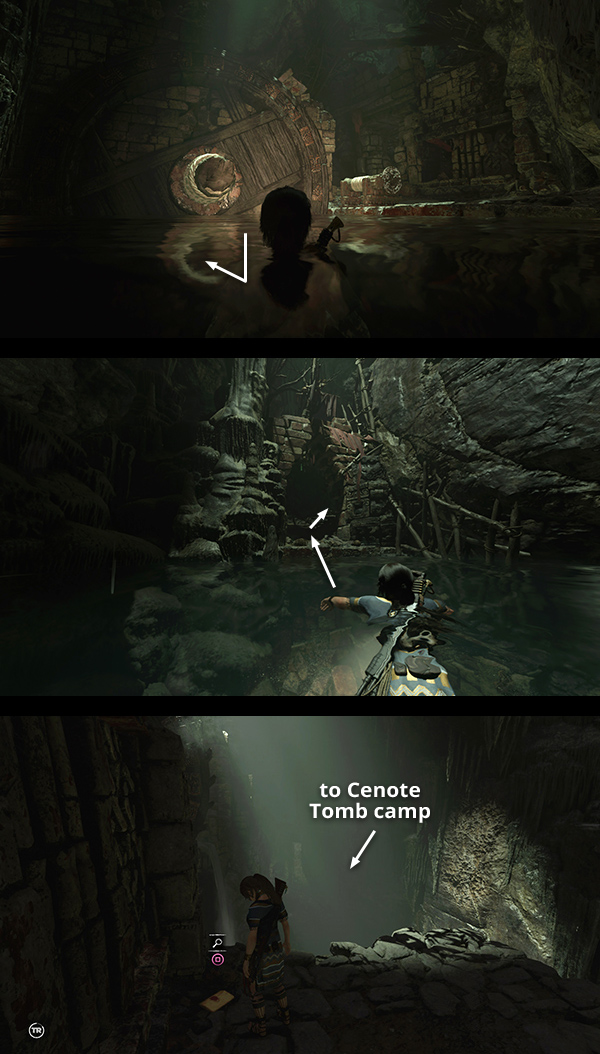
RELIC 5 - Brigittine Rosary (The Missionary).
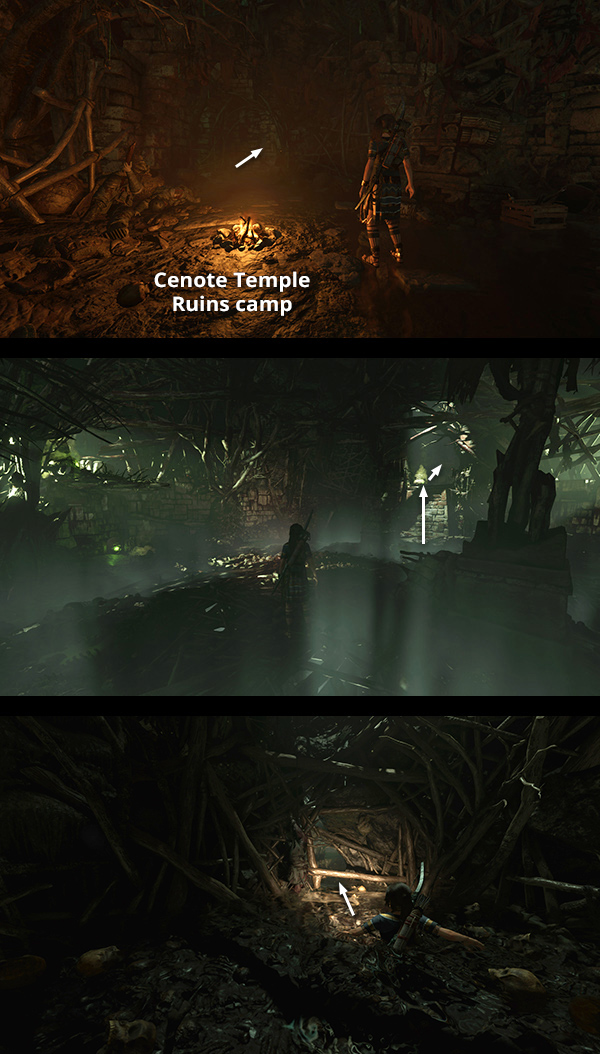
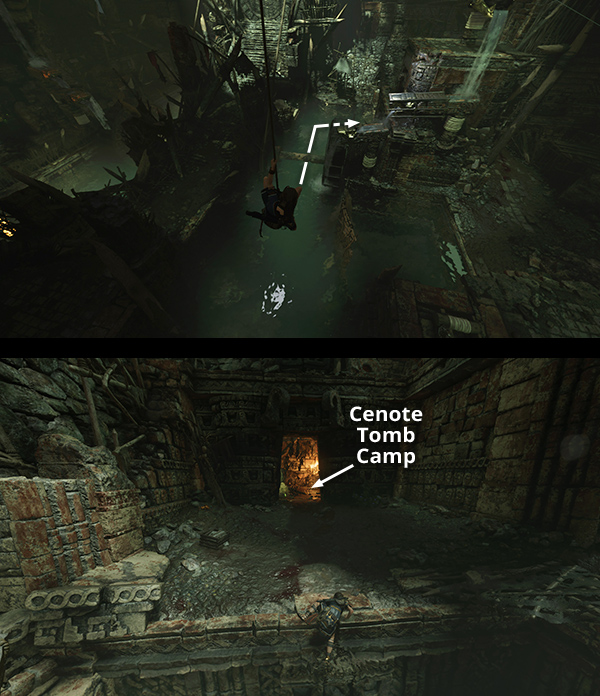
This relic is in the area with the first small water wheel puzzle. If you missed it while playing through the story, fast travel to the Cenote Temple Ruins Base Camp. Squeeze through the narrow opening to the west and follow the passageway into the Yaaxil warren. (So far, I have not encountered any enemies when revisiting this area.) When you reach the drop-off, grapple the climbing wall ahead and rappel down. Continue to the room with the green explosive jars. Climb out on the right (southwest) side and follow the partially flooded passageway to the water wheel room. (Click first image for more and larger screenshots.)
Climb out of the water near the winch that controls the water wheel. You'll find the relic in a little side room behind a wooden barrier. (Click second image for more.)
It's not possible to get back to the Cenote Temple Ruins camp from here, so swim down through the waterwheel and continue southward to the huge cavern with the round stone gate. Follow the main walkthrough if you need help navigating. Head for the southwest corner of this area to find the Cenote Tomb Base Camp, which only appears after completing this area in the story. Fast travel to wherever you left off. (Click third image for more.)
DOCUMENT 1 - Journal of T. Serrano 2 (The Missionary)
The first document is in the manmade alcove just north of the Cenote Vista Base Camp. (Click screenshot to enlarge.)
DOCUMENT 2 - A Warning (Gates of Hell)
This document is in the flooded passageway between the pool at the beginning of the level and the caverns. Fast travel to the Cenote Vista Base Camp. Go through the doorway to the north, follow the path down to the ledge overlooking the pool, and jump in. Swim through the doorway to the west (as shown above for relic #1) and follow the flooded passageway straight on to the first trapped air pocket. Take a breath and continue forward (west) into the flooded cavern with the giant carved skull. Turn right (north) and surface in the little side cave indicated on this map detail. The document is inside.
It's not possible to climb back up to the camp on the cliff, so follow the flooded passageway to the west end. Then continue on foot through the cavern to the Cenote Temple Ruins Base Camp. From there, you can fast travel away. The walkthrough can help navigate if you get disoriented. (Click images for more and larger screenshots.)
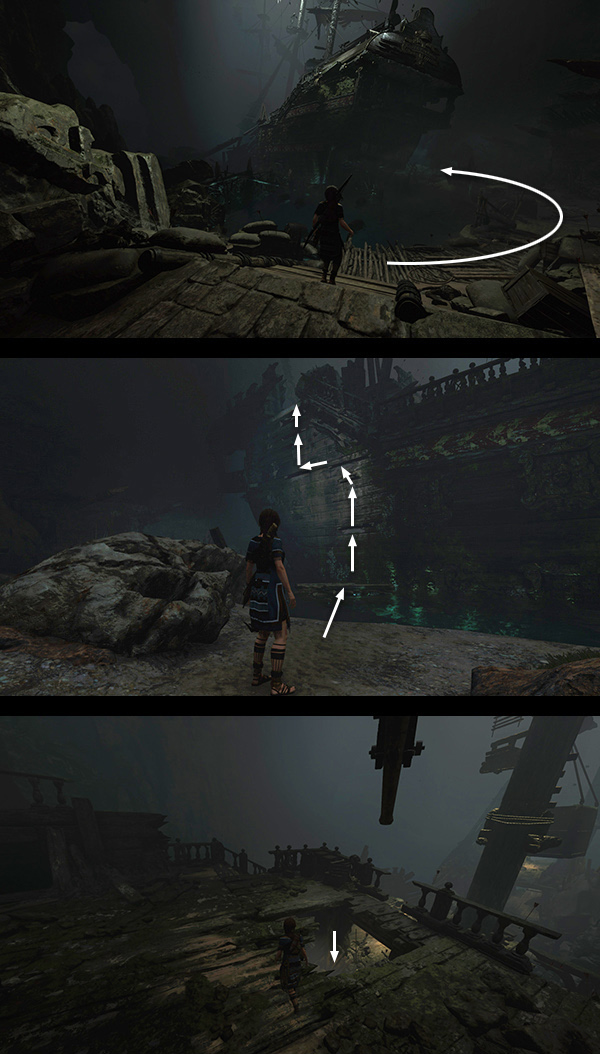
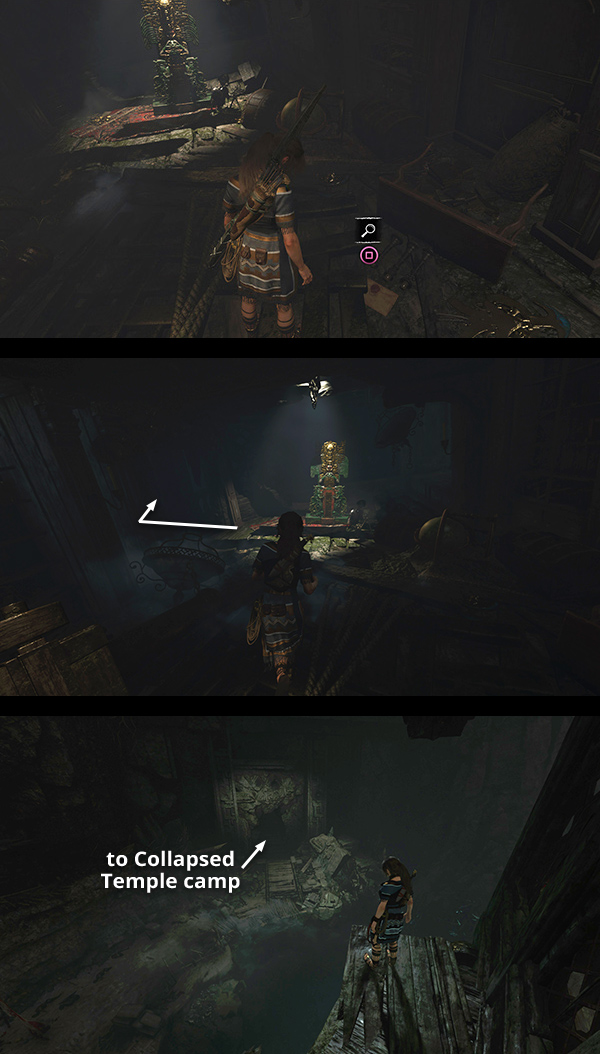
DOCUMENT 3 - Captain's Note (Conquerors)
This document is on the wrecked Spanish galleon in the San Cordoba Challenge Tomb. If it's your first time exploring that area, follow the tomb guide. If you completed the tomb but missed this document, fast travel to the Collapsed Temple Base Camp. Climb up to the doorway to the southeast and squeeze through the narrow opening into the dark hallway with the arrow-riddled corpses (shown above for relic #3). Continue straight ahead to the cavern with the galleon.
To get back onto the ship, follow the path on the right around to its end, kick the square raft into the water, and use it to climb onto the deck. Drop through the hole in the deck into captain's quarters. The document is sitting on the floor near the tomb stele.
When you have what you need, exit through the doorway in the dark corner to the left of the stele. (If you didn't do so earlier, you'll need to pull down the wooden barrier with a rope arrow.) Dive into the water and return up the wooden ramp and through the dark corridor to the base camp. (Click images for more and larger screenshots.)

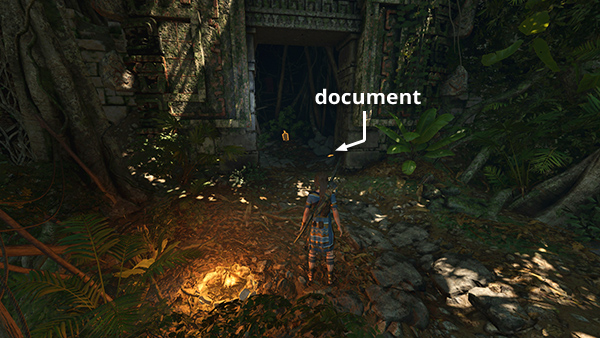
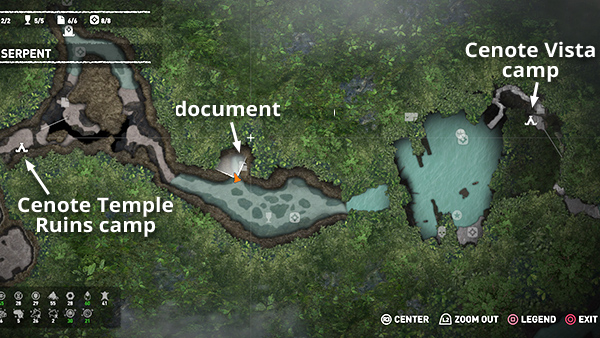
DOCUMENT 4 - Journal of T. Serrano 5 (Gates of Hell)
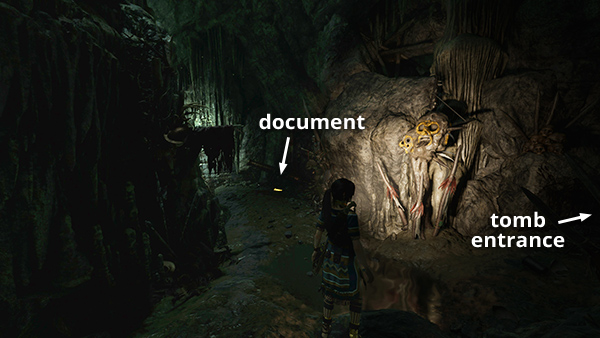
This document is in the caverns near the entrance to the San Cordoba Challenge Tomb. If you missed it, fast travel to the Cenote Temple Ruins Base Camp. Head down the slope to the east, bearing right at the square column. Jump down onto the ledge below then jump across the chasm onto the path below and to the northeast. Turn left and squeeze through the gap in the rocks to emerge near the challenge tomb entrance. Turn left (northwest) and you'll find the document sitting on the ground near a ruined cannon and some conquistador skeletons.
To get back to the base camp, climb the wall to the west, shimmy along the narrow ledge, jump across the chasm to the climbing wall, rappel down, wall run and jump to the left, then work your way up and around to the camp.
This series of screenshots shows the entire sequence from camp, to document, and back to camp. (Click screenshots to enlarge.)
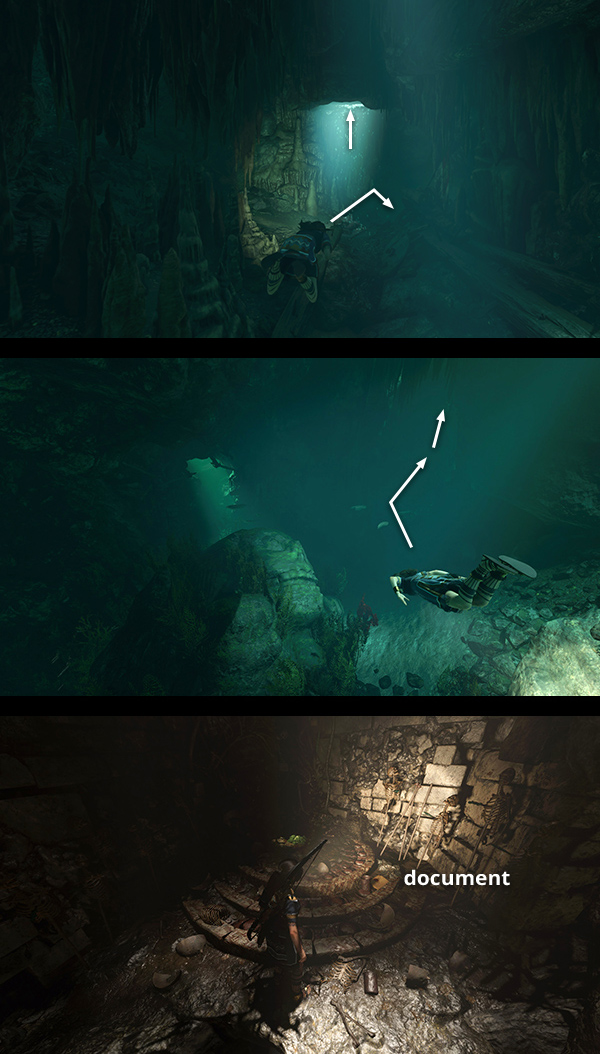
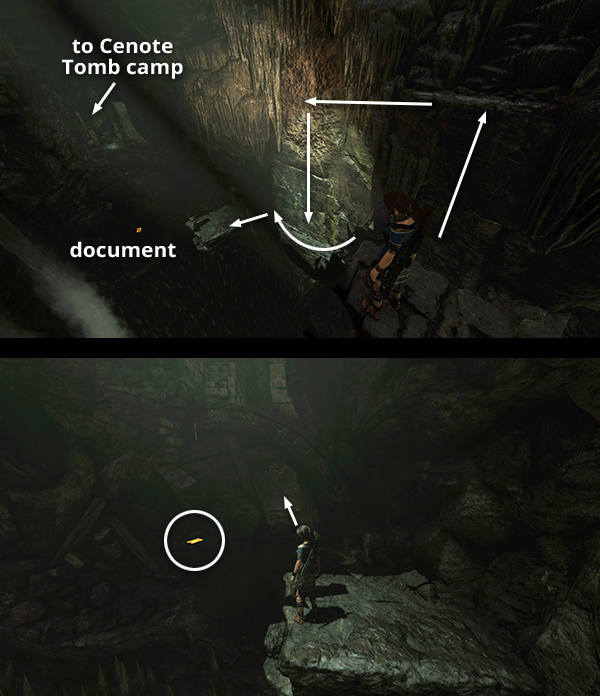
DOCUMENT 5 - Journal of T. Serrano 7 (Gates of Hell)
The next two documents are in the tunnels between the first small water wheel puzzle and the huge cavern with the round stone gate. If you missed either of them, fast travel to the Cenote Temple Ruins Base Camp. Squeeze through the narrow opening to the west and follow the passageway into the Yaaxil warren. (So far, I have not encountered any enemies when revisiting this area.) When you reach the drop-off, grapple the climbing wall ahead and rappel down. Continue to the room with the green explosive jars. Climb out on the right (southwest) side and follow the partially flooded passageway to the water wheel room. (Click first image for more and larger screenshots.)
Swim down through the moving wheel and continue through the flooded tunnel until you can surface and climb out of the water. Continue up the stairs and under the spear trap. The document is just around the next corner on the left. (Click second image for more.)
It's not possible to get back to the Cenote Temple Ruins camp from here, so swim down through the waterwheel and continue southward to the huge cavern with the round stone gate. Follow the main walkthrough if you need help navigating. Drop into the pool and head for the southwest corner of this area to find the Cenote Tomb Base Camp, which only appears after completing this area in the story. Fast travel to wherever you left off. (Click third image for more.)
DOCUMENT 6 - Journal of T. Serrano 6 (Gates of Hell)
This document is just beyond the previous one, so follow the instructions for document #5, beginning at the Cenote Temple Ruins Base Camp and making your way through the caverns to the southwest. From the ledge where document #5 was, jump over to the handhold on the right (south) wall. Climb, rappel, and wall run your way over to the other side of the spike pit. (The walkthrough has details.) You'll find the document on the ground just ahead.
Continue to the opening above the huge cavern with the round stone gate. Drop into the pool and head for the southwest corner of this area to find the Cenote Tomb Base Camp, which only appears after completing this area in the story. Fast travel to wherever you left off. (Click images for more and larger screenshots.)
Examining the Explorer Backpack near the start of the level (details below), reveals the location of all 8 survival caches on your in-game map, making them much easier to find.
SURVIVAL CACHE 1
This cache is on the bottom of the piranha-infested pool near the start of the level. If you missed it, fast travel to the Cenote Vista Base Camp. Go through the doorway to the north, follow the path down to the ledge overlooking the pool, and jump in (as shown above for relic #1). Use the annotated map and look for the telltale flash to zero in on the cache.
It's not possible to climb back up to the Cenote Vista camp, so once you have what you need, swim through the doorway to the west and follow the flooded passageway to its end. Continue on foot through the cavern to the Cenote Temple Ruins Base Camp. From there, you can fast travel away. If you need a refresher for navigating this area, check the walkthrough. (Click screenshot to enlarge.)
SURVIVAL CACHE 2
This cache is buried on the south bank of the piranha-infested pool near the start of the level. If you missed it, fast travel to the Cenote Vista Base Camp. Go through the doorway to the north, follow the path down to the ledge overlooking the pool, and jump in (as shown above for relic #1). You should be able to spot the flashing light marking the cache from the part of the pool where Lara splashes down. See cache #1 for notes on reaching the next camp so you can leave this area. (Click screenshot to enlarge.)
SURVIVAL CACHE 3
This cache is in the flooded passageway between the pool at the beginning of the level and the caverns. Fast travel to the Cenote Vista Base Camp. Go through the doorway to the north, follow the path down to the ledge overlooking the pool, and jump in. Swim through the doorway to the west (as shown above for relic #1) and follow the flooded passageway. The cache is buried on the left side of the passageway just before the the ledge with the salvage crate. The first trapped air pocket is a short distance beyond.
You can't climb back up to the camp on the cliff, so follow the flooded passageway to the west end. Then continue on foot through the cavern to the Cenote Temple Ruins Base Camp. From there, you can fast travel away. Again, check the walkthrough for details. (Click screenshot to enlarge.)
SURVIVAL CACHE 4
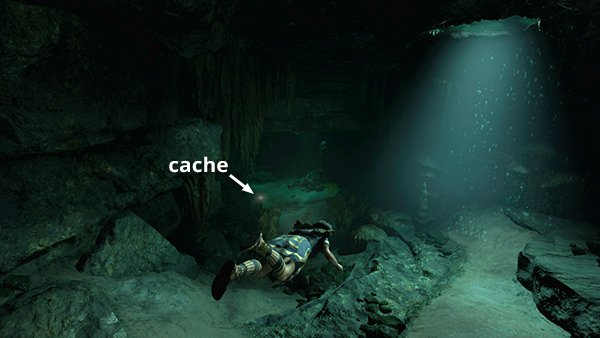
This cache is on the way to the San Cordoba Challenge Tomb. If it's your first time exploring that area, follow the tomb guide. If you completed the tomb but missed this cache, fast travel to the Cenote Temple Ruins Base Camp. Make your way along the ledges to the east, then jump across the chasm to the north to get back to the tomb entrance. Follow the tunnel to the flooded section. swim through and you'll find the cache buried on the bottom just beyond the first trapped air pocket, near the T-intersection.
This series of screenshots shows the entire sequence from camp, to cache, and back to camp. (Click screenshots to enlarge.)
SURVIVAL CACHE 5
This cache on the way to the San Cordoba Challenge Tomb. If it's your first time exploring that area, follow the tomb guide. If you raided the tomb but missed this cache, fast travel to the Collapsed Temple Base Camp. Climb up to the doorway to the southeast and squeeze through the narrow opening into the dark hallway with the arrow-riddled corpses. The cache is just inside on the right. If that's all you need, return to the campfire and fast travel away. (Click screenshots to enlarge.)
SURVIVAL CACHE 6
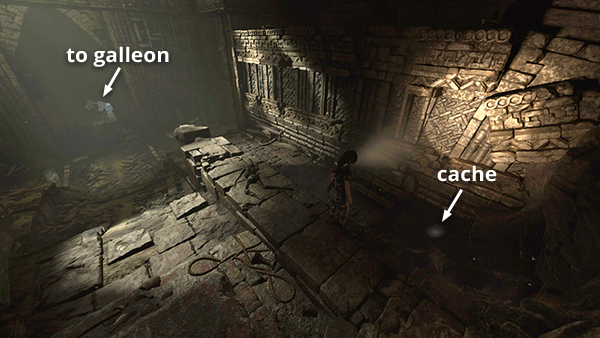
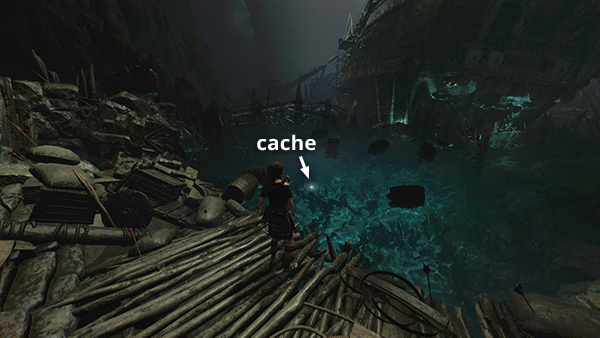
This cache is in the San Cordoba Challenge Tomb. If it's your first time exploring that area, follow the tomb guide. If you explored this area but missed the cache, fast travel to the Collapsed Temple Base Camp. Follow the passageway to the southeast (see cache #5, above) to get back to the wrecked galleon. The cache is buried underwater just to the left of the ship's stern. If that's all you need in this area, return to the camp and fast travel away. (Click screenshot to enlarge.)

SURVIVAL CACHE 7
This cache is in the flooded passageway beyond the first small water wheel puzzle. If you missed it, fast travel to the Cenote Temple Ruins Base Camp. Follow the directions for relic #5, above and click the first screenshot for more and larger images.
When you reach the water wheel room, swim down through the moving wheel and into the flooded tunnel. Proceed to the end of the tunnel and surface for air. The passage continues on to the south, but before heading that way, turn around to face the direction you came from (northeast). The cache is buried underwater inside the small, dead-end passageway on the left. (Click second image for additional screenshots.)
It's not possible to get back to the Cenote Temple Ruins camp from here, so climb out of the water and continue southward to the huge cavern with the round stone gate. Follow the main walkthrough if you need help navigating. Drop into the pool and head for the southwest corner of this area to find the Cenote Tomb Base Camp, which only appears after completing this area in the story. Fast travel to wherever you left off. (Click third image for additional screenshots.)
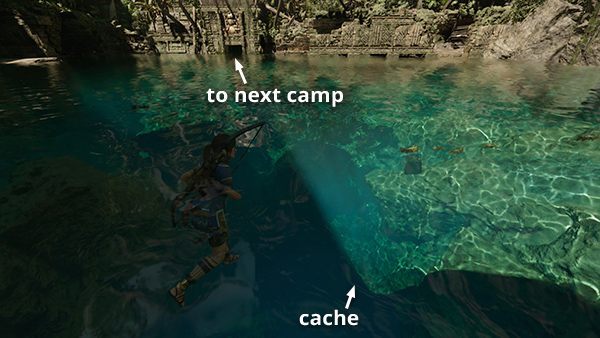
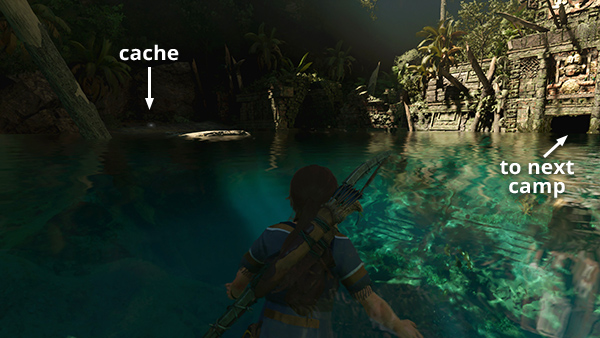
SURVIVAL CACHE 8
This cache is in the huge cavern with the round stone gate. If you missed it while playing through the story, fast travel to the Cenote Tomb Base Camp, which appears after you've cleared this area. The cache is directly across the pool to the northeast of the campfire. It's buried under a crumbling stone arch. Dig it up, return to the camp, and fast travel away. (Click image for more and larger screenshots.)
EXPLORER BACKPACK
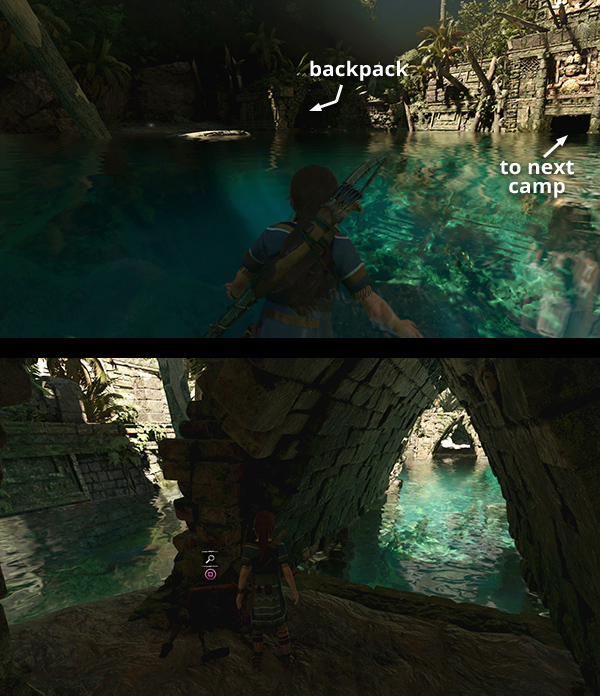
Backpacks are not required for 100% completion, but finding them reveals the locations of other collectibles on your in-game map, so they can be useful. This one is near the piranha-infested pool near the start of the level. Fast travel to the Cenote Vista Base Camp. Go through the doorway to the north, follow the path down to the ledge overlooking the pool, and jump in (as shown above for relic #1). Surface and swim into the crumbling stone archway on the south shore. The backpack is here. Examining it reveals the locations of all 8 survival caches on your in-game map.
It's not possible to climb back up to the camp on the cliff, so follow the flooded passageway to the west end. Then continue on foot through the cavern to the Cenote Temple Ruins Base Camp. From there, you can fast travel away. Check the walkthrough if you need help navigating. (Click image for more and larger screenshots.)
ARCHIVIST MAP
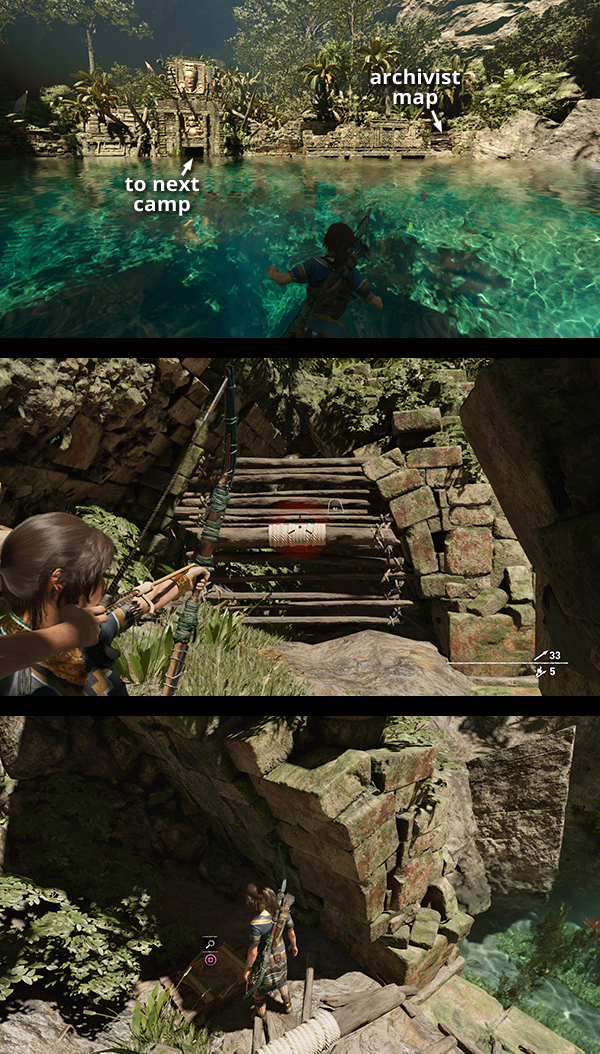
Archivist Maps are also not required for 100% completion, but they are useful for locating other collectibles. This map is near the start of the level, below the just across the pool from the Explorer Backpack, above. Climb out of the water on the northwest side of the pool and use a rope arrow to pull down the wooden barrier, revealing an alcove containing the map. Examining it reveals the locations all 5 relics and all 6 documents on your in-game map.
Proceed through the caverns to the west in order to reach the Cenote Temple Ruins Base Camp and fast travel out of this level. Check the walkthrough if necessary. (Click screenshot to enlarge.)
Challenges | Walkthrough | Collectibles Guides | Main SOTTR Page
†UPDATE HISTORY: 9/17/21 - Page first posted online.
WAS THIS WALKTHROUGH HELPFUL? If not, I apologize and invite you to contact me with any questions. If you need help right away, I recommend the r/TombRaider subreddit. Other fan-run forums are listed at tombraiders.net/stella/community.html. If this site was useful, please consider supporting it financially or in other ways. For details, visit tombraiders.net/stella/support.html. As always, I welcome your corrections/suggestions. Thank you!
Copyright © Stellalune (). All rights reserved. Feel free to copy or print this walkthrough for personal use. By all means, share it with friends, but please include this credit line so people can send me their feedback. No part of this walkthrough may be reproduced on another site without permission. Follow this link for details about this site's advertising and privacy policy.
Stella's Tomb Raider Site: tombraiders.net.