STELLA'S LARA CROFT GO WALKTHROUGH - Android, iOS, PS4 and Vita, Steam, and Windows Phone/PC/Tablet
MAZE OF SPIRITS - PART 4: A WELL-PLACED ARROW
Updated: 9/11/15(†)
Relic Fragments: 1
Gems: 3
Follow this link for my video walkthrough.
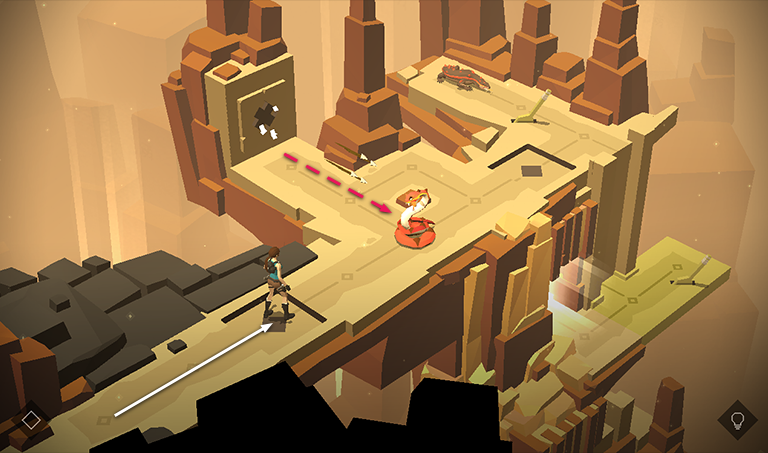
This level introduces a new hazard: the arrow
trap. Step forward onto the pressure pad to trigger the arrow trap on the wall to the upper left. Arrows shoot from the trap, killing the snake blocking your path.
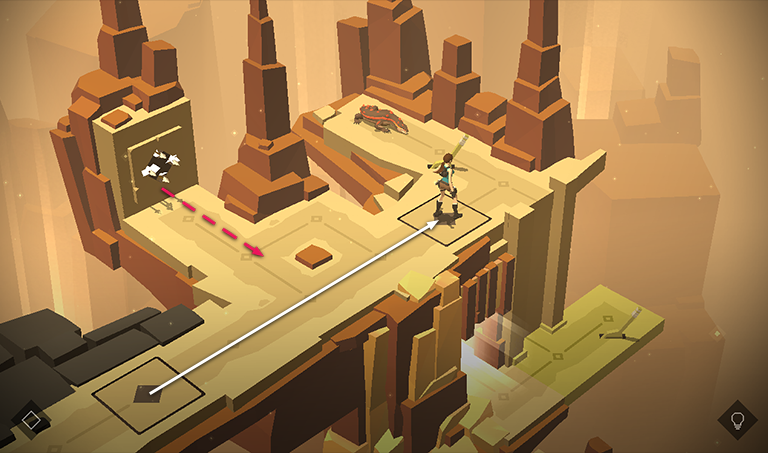
Continue to the right, passing over the second pressure pad, which also triggers the arrow
trap.
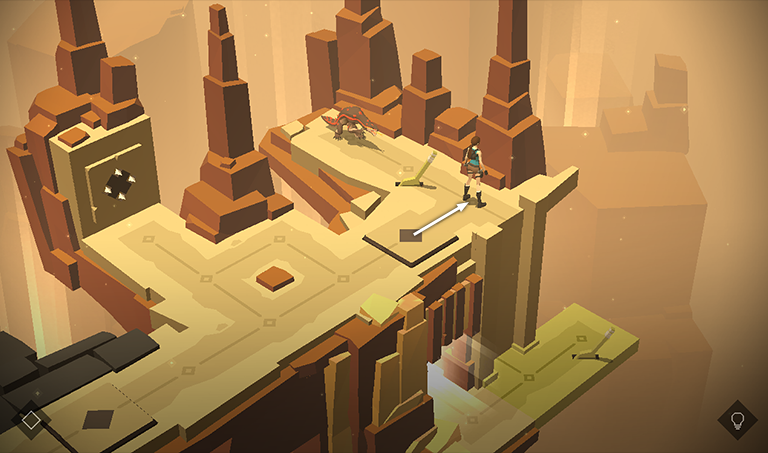
Move forward to the right corner, attracting the attention of the lizard sitting off to the left.
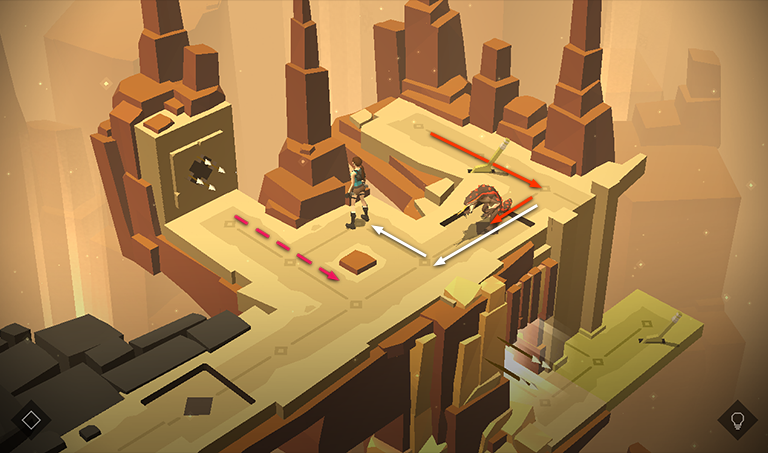
Now move back to the left two spaces, then to the upper left, so that when the lizard steps on the right pressure pad, Lara is not standing in front of the arrow trap.
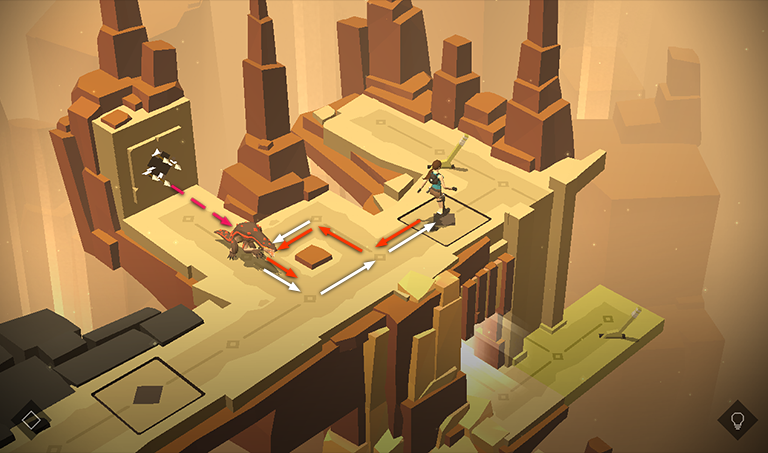
Now move around the little square section of the path and back onto the right pressure pad. The lizard continues to follow so that when Lara steps on the pad, the lizard will be standing directly in front of the arrow trap.
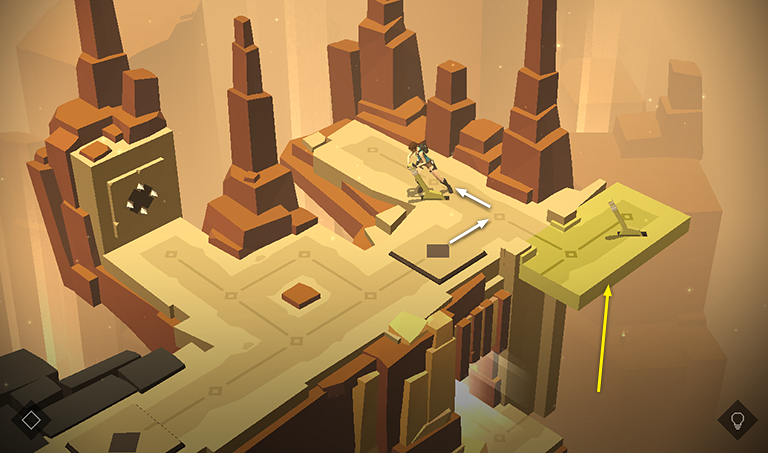
Now the coast is clear. Return to the right and pull the lever to raise the yellow ledge to the upper level.
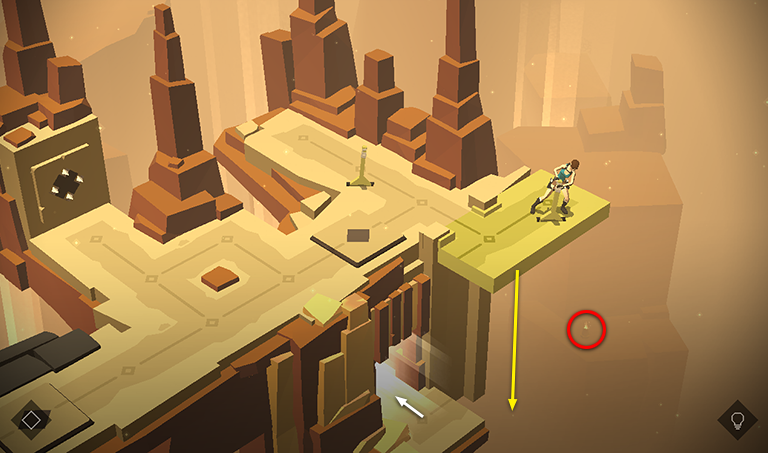
Step onto the yellow ledge and break the vase in the background below to obtain another RUBY (6/17). Then pull the lever to lower the ledge to the exit.
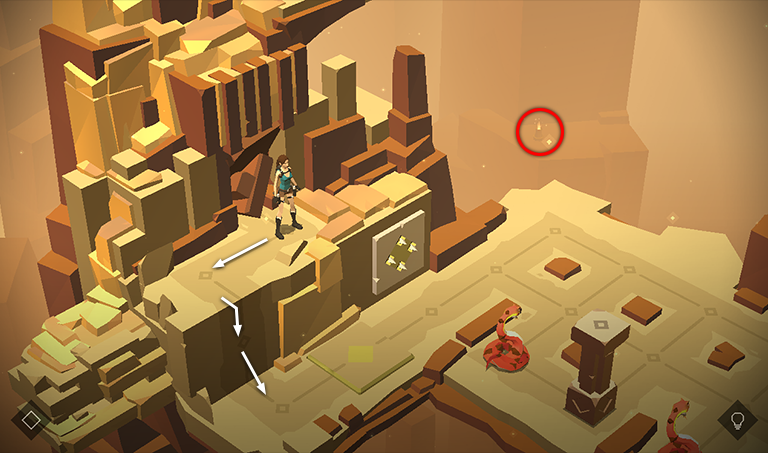
If you missed the vase with the RUBY (6/17) before, you can still see it sitting in the background in the new area. Smash the vase and then climb down to the floor.
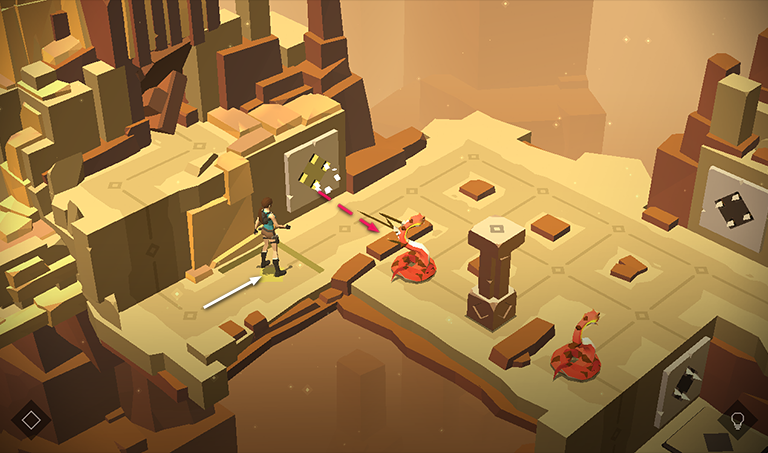
Move onto the pressure pad to activate the arrow trap, killing the first snake off to the right. The freestanding pillar shields the second snake from the arrows. Good to know.
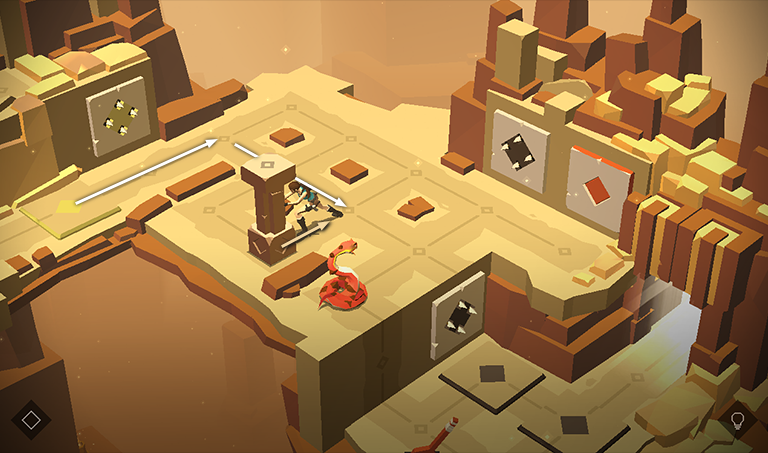
Move around to the right side of the pillar and pull it once, into the middle of the room.
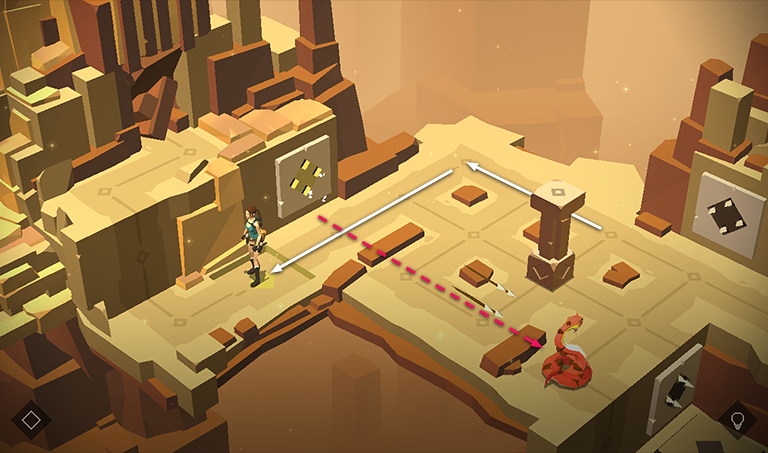
Return to the pressure pad to trigger the arrow trap, killing the second snake.
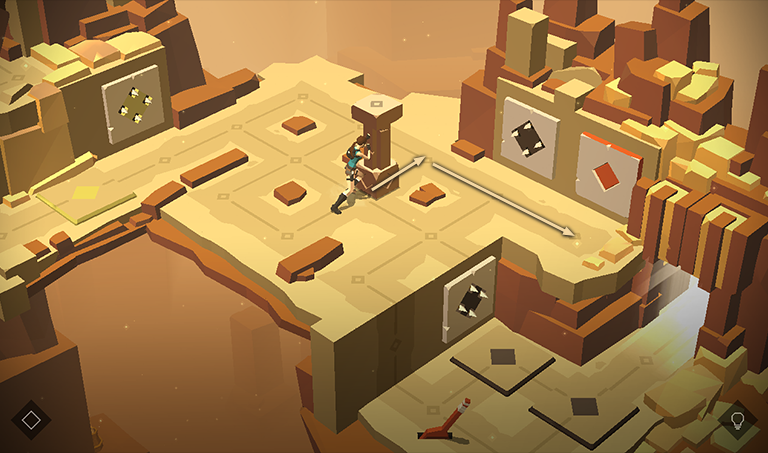
Now maneuver the pillar into the right corner, in front of the orange block trap.
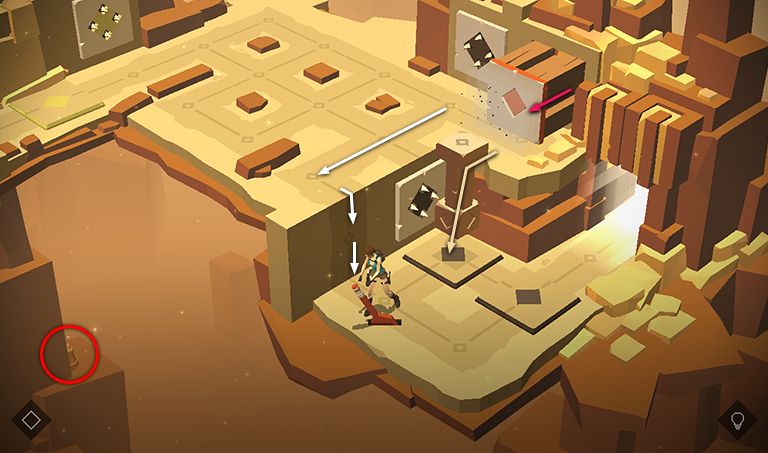
Climb down to the lower level, taking care to avoid the 2 pressure pads, which trigger the arrow traps. Smash the vase on the ledge to the left to get another RUBY (7/17). Then pull the lever to activate the block trap, shoving the pillar off the ledge onto the left pressure pad.
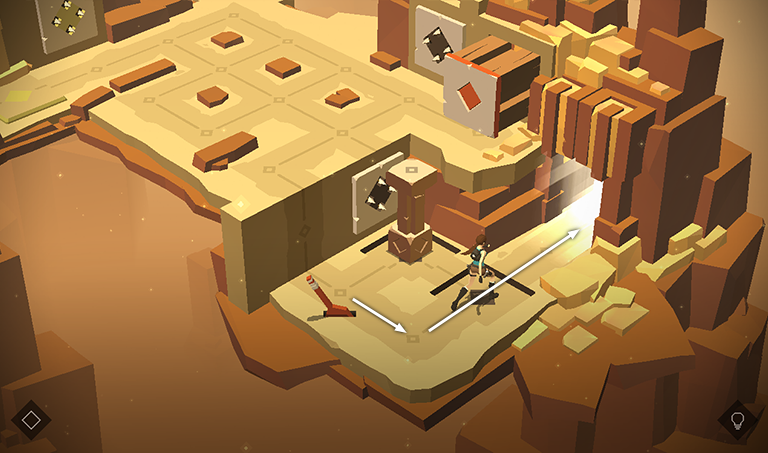
With the left pressure pad depressed, arrows fire from the traps every turn, but the pillar protects Lara as you move over the right pressure pad to the exit.
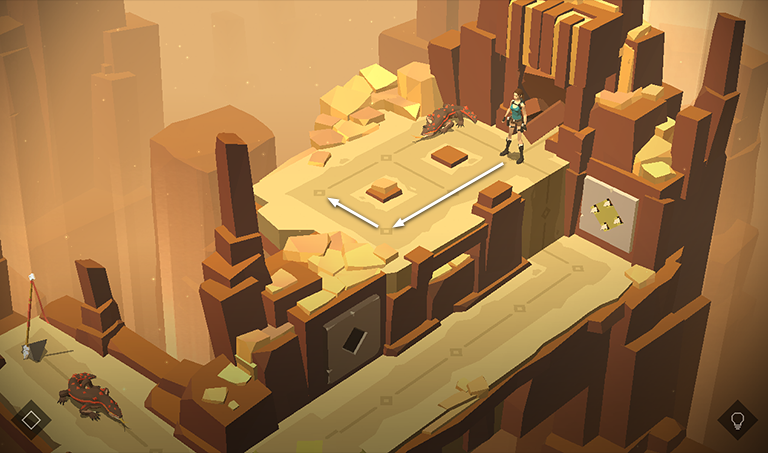
In the next area, move forward two spaces, then left once, so the lizard sitting in the upper corner notices Lara.
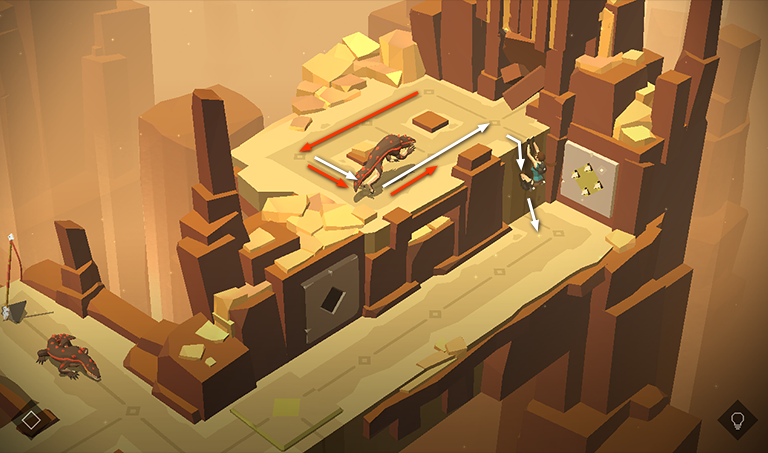
Retrace your last three moves and then drop down onto the lower ledge in front of the arrow trap. The lizard follows two spaces behind Lara.
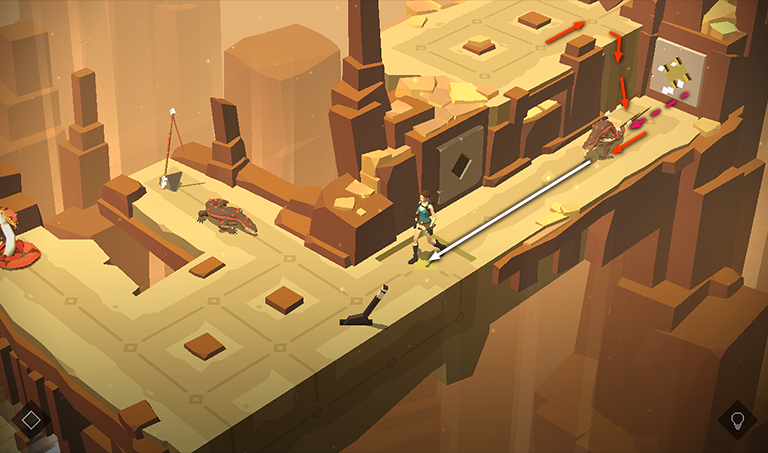
Continue to the left. The lizard climbs down after Lara, so when she steps on the pressure pad, triggering the arrow trap, he takes the hits, shielding Lara from damage.
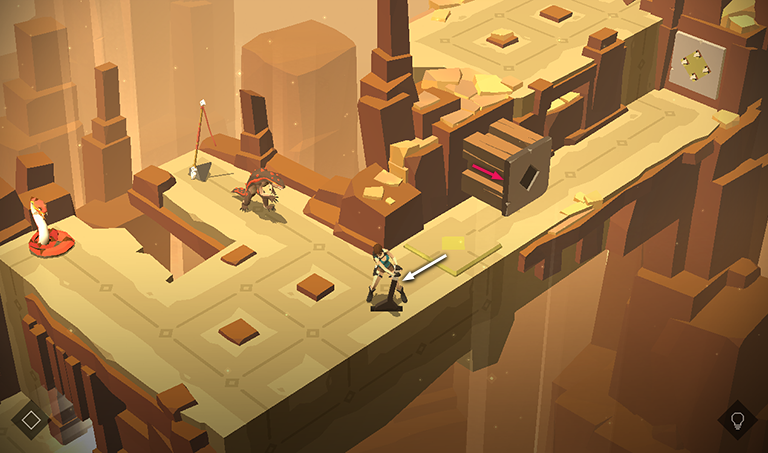
Step to the left, attracting the attention of the second lizard. Pull the lever to extend the block trap behind you. This will protect Lara from the arrows next time the pressure pad is depressed.
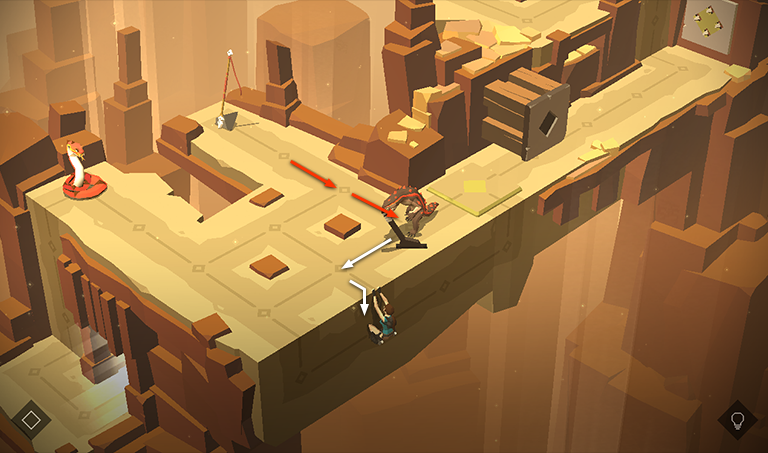
Move to the left one space. Then drop and hang from the ledge. In these two turns, the lizard moves forward toward the lever.
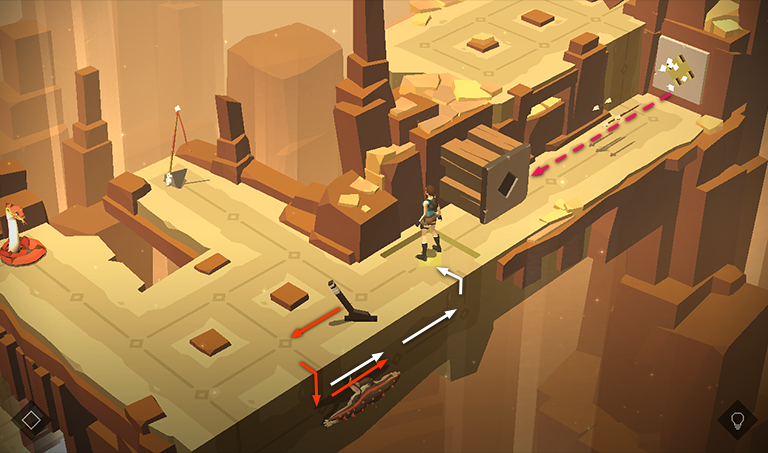
Climb to the right twice and pull up onto the pressure pad, triggering the arrow trap off to the right. The block shields Lara from the arrows. Meanwhile, the lizard climbs down onto the wall and moves to the right.
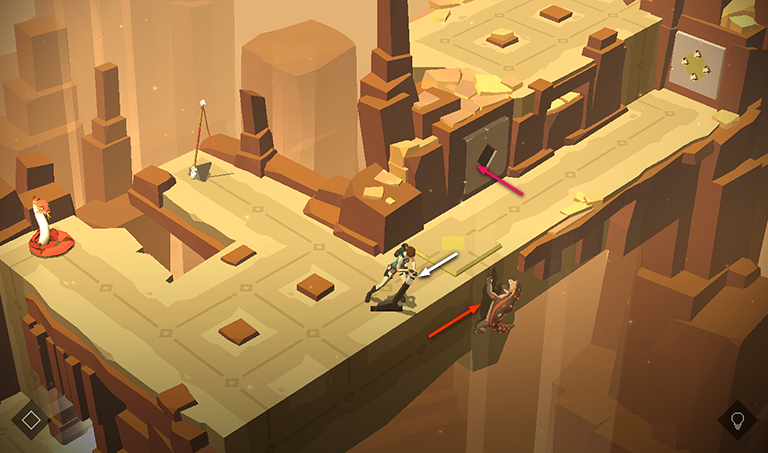
Move from the pressure pad to the lever and pull it to retract the block. The lizard moves one space to the right.
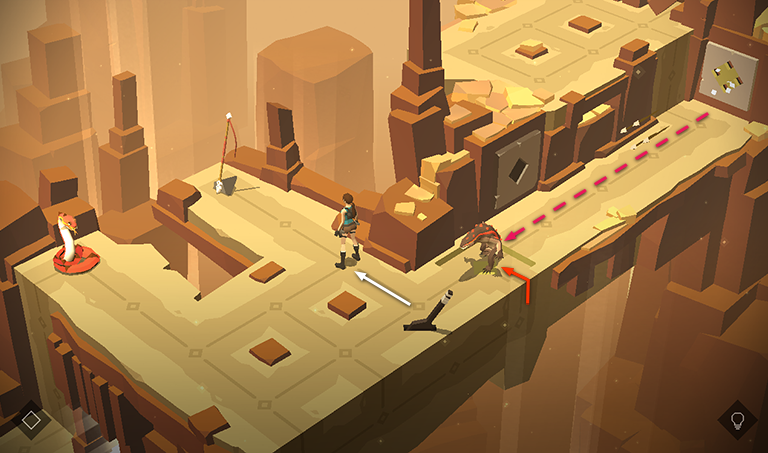
Now move to the upper left. As you do this, the lizard climbs onto the ledge, stepping on the pressure pad and triggering the arrow trap. That, my darlings, is what happens when you let appetite rule over common sense.
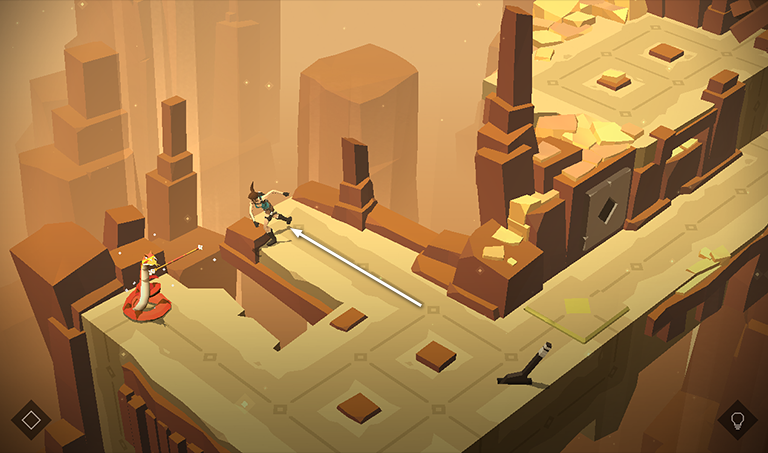
Move forward, grab the SPEAR, and use it to kill the snake across the gap.
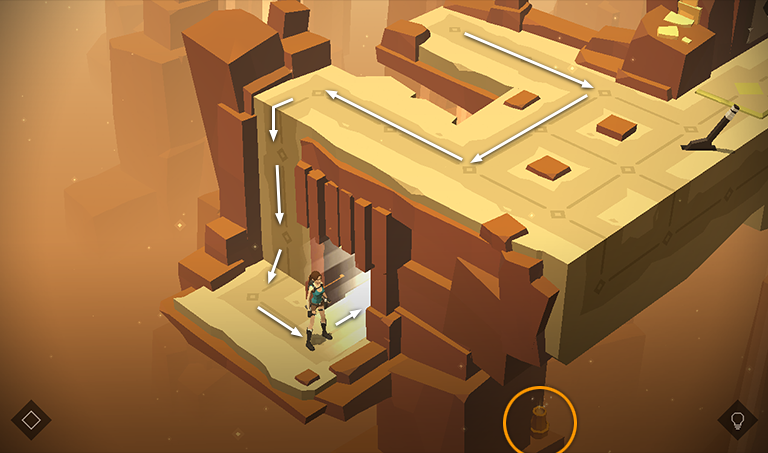
Move to where the snake was sitting, climb down the wall, step to the right, and smash the vase to get a fragment of THE BLOOD SALAMANDER relic (3/7). Then proceed through the doorway.
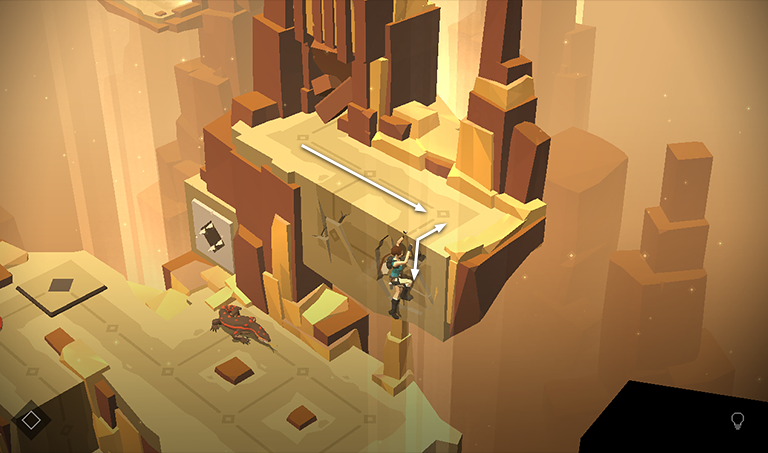
In the next area, move to the right twice and hang from the ledge in front of the right section
of cracked wall. Pull up onto the ledge...
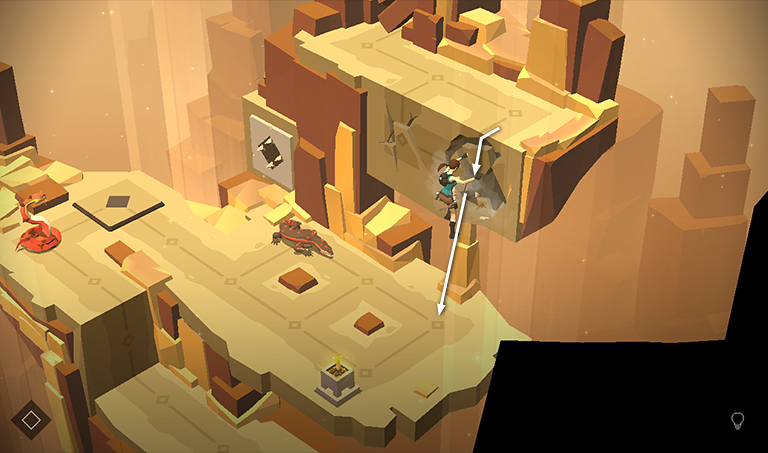
...then drop back once more to break the wall and fall onto the ledge below, causing the nearby lizard to spring to attention.
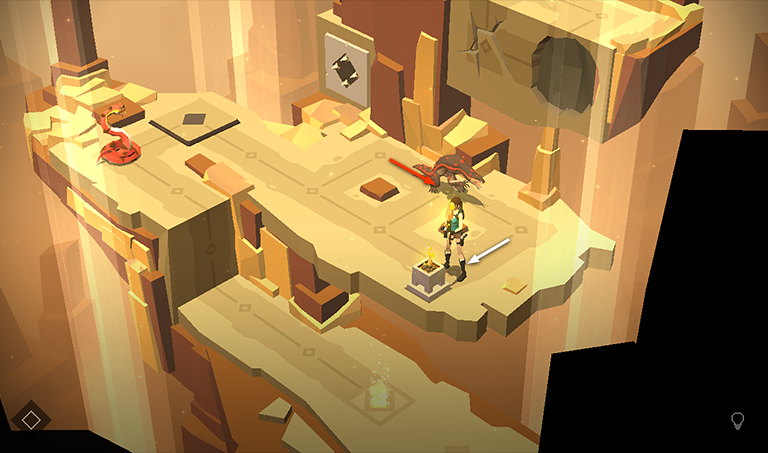
Approach the brazier to get a TORCH. As you do this, the lizard moves one space toward Lara.
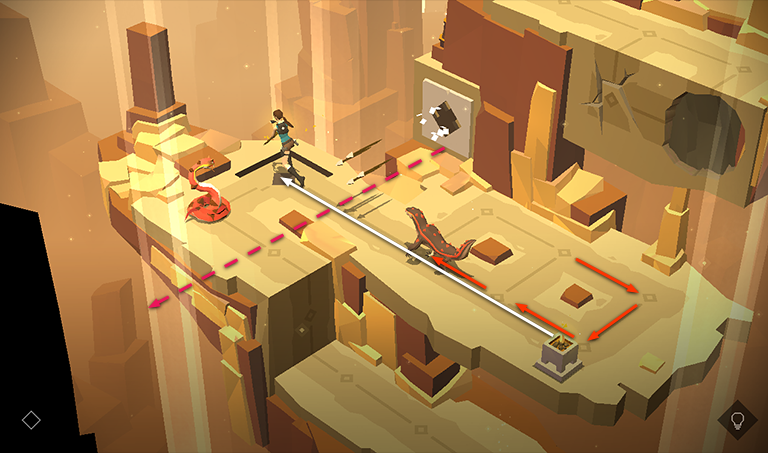
Now move to the upper left and step on the pressure pad, triggering the arrow trap. The arrows don't hit anything this turn, and since Lara is holding the torch, the snake does not attack.
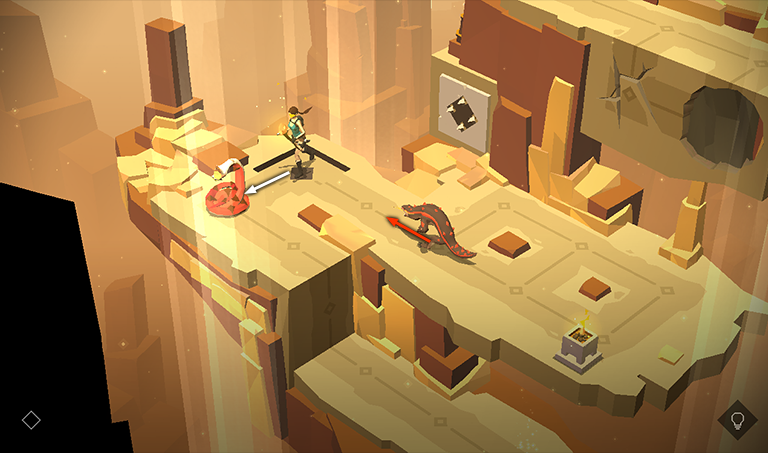
Move to the left to kill the snake. Meanwhile, the lizard moves forward one space as well.
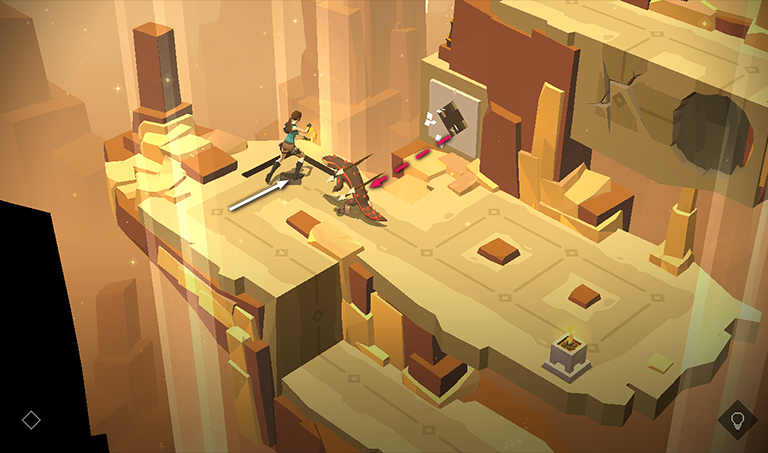
Step back onto the pressure pad to trigger the arrow trap once more, killing the lizard.
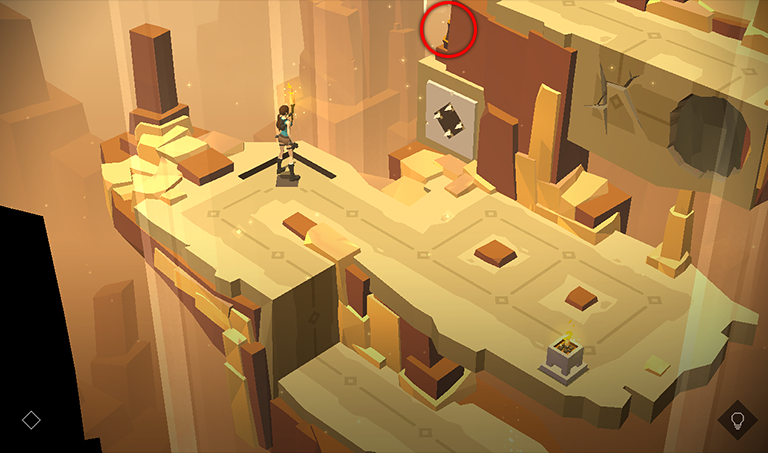
Break the vase on the ledge above the arrow trap to obtain another RUBY (8/17).
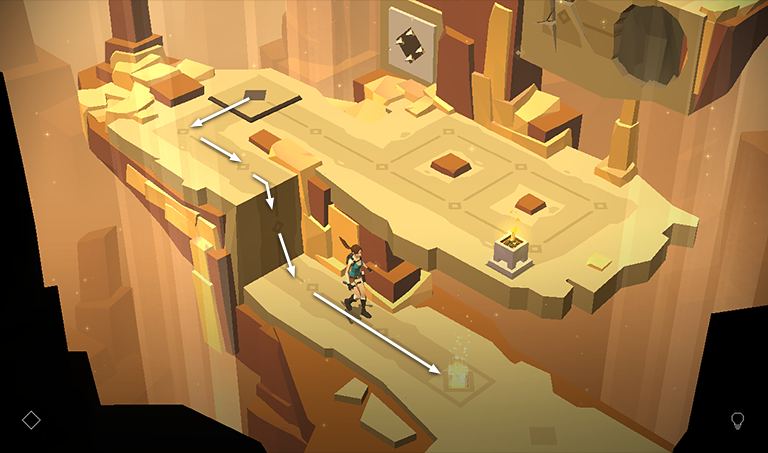
Then climb down onto the ledge below and proceed to the exit.
†UPDATE HISTORY: 9/11/15 - Walkthrough first posted, along with video.
WAS THIS WALKTHROUGH HELPFUL? If not, I apologize and invite you to contact me with any questions. If you need help right away, I recommend the r/TombRaider subreddit. Other fan-run forums are listed at tombraiders.net/stella/community.html. If this site was useful, please consider supporting it financially or in other ways. For details, visit tombraiders.net/stella/support.html. As always, I welcome your corrections/suggestions. Thank you!
Copyright © - Stellalune ( ). Screenshots were made using the Andy Android emulator. Feel free to copy or print this walkthrough for personal use. Share it with friends if you like, but please include this credit line so people can send me their feedback. No part of this walkthrough may be reproduced on another site without permission. Follow this link for details about this site's advertising and privacy policy.
Stella's Tomb Raider Site: tombraiders.net.