STELLA'S LARA CROFT GO WALKTHROUGH - Android, iOS, PS4 and Vita, Steam, and Windows Phone/PC/Tablet
MAZE OF SPIRITS - PART 3: THE CLIFFS OF FIRE
Updated: 9/11/15(†)
Relic Fragments: 1
Gems: 2
Follow this link for my video walkthrough.
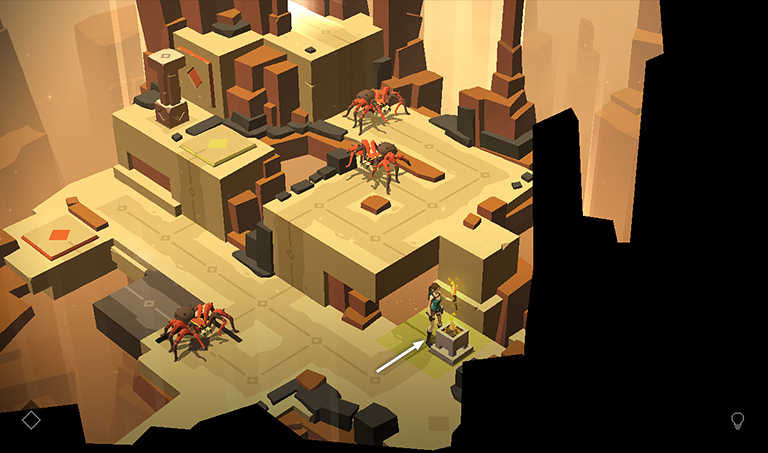
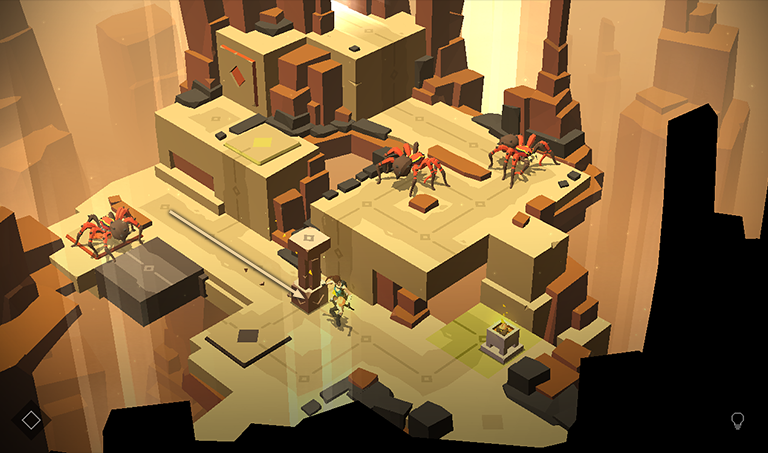
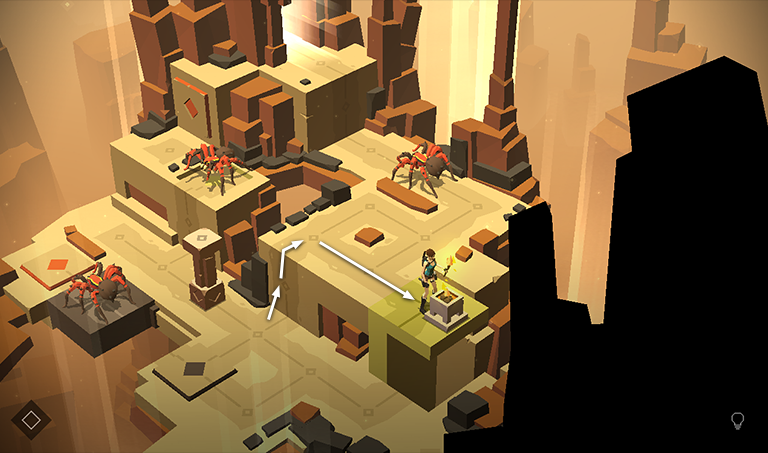
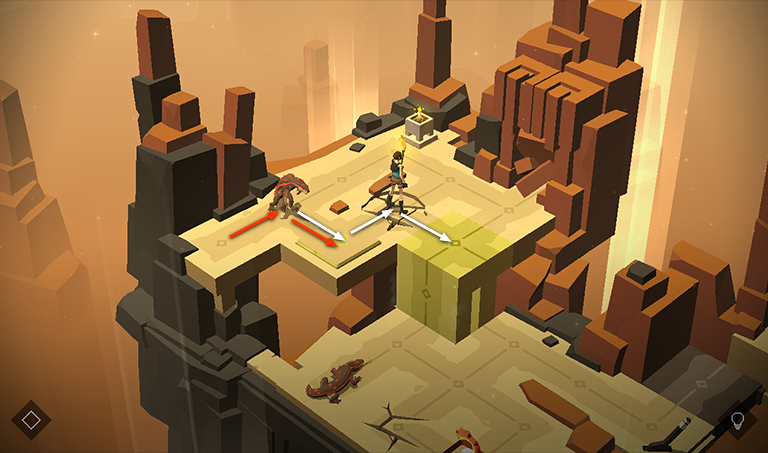
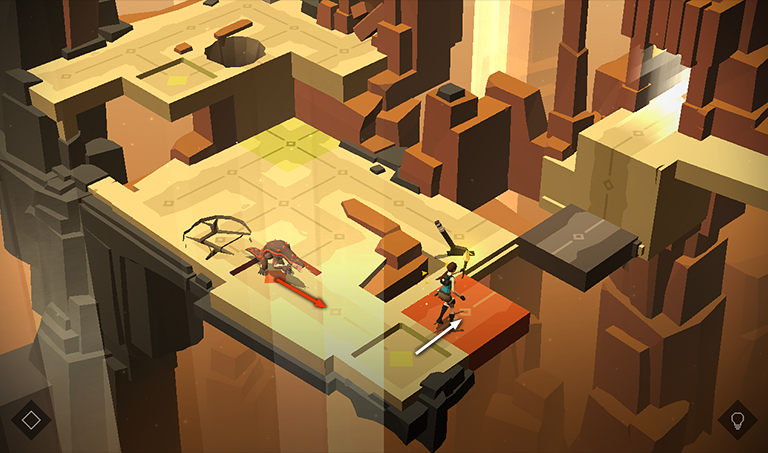
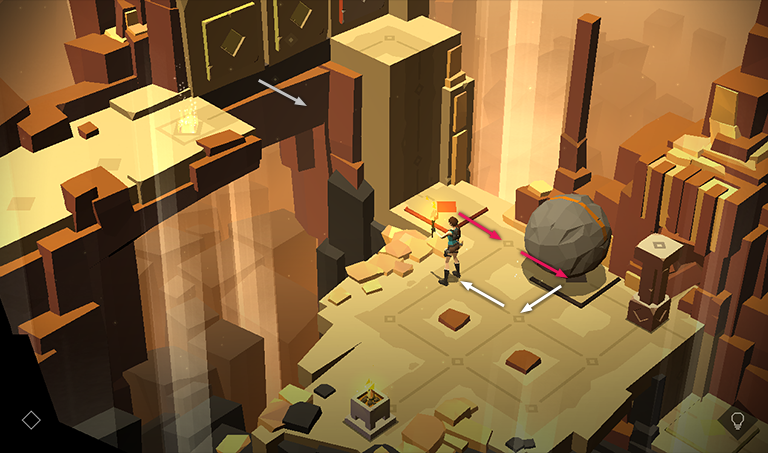
Approach the brazier on the right to get a TORCH.
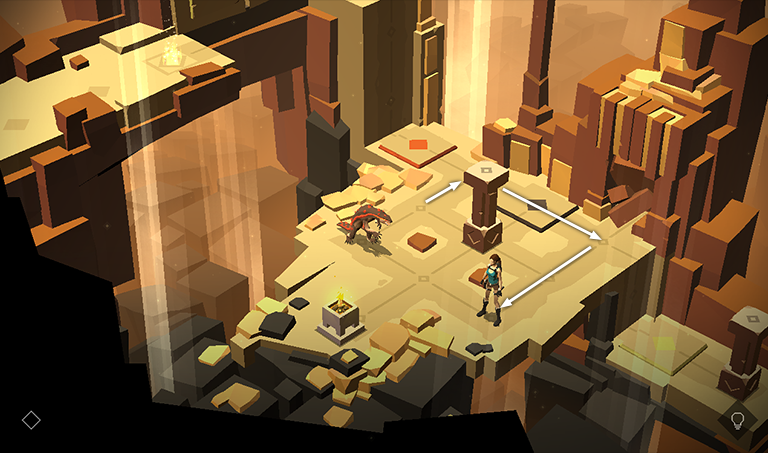
Move back onto the main path, then forward, then left, to drive the spider onto the gray platform. Once the spider is no longer standing on the pressure pad with the gray diamond, the gray platform moves away to the upper left with the spider on it.
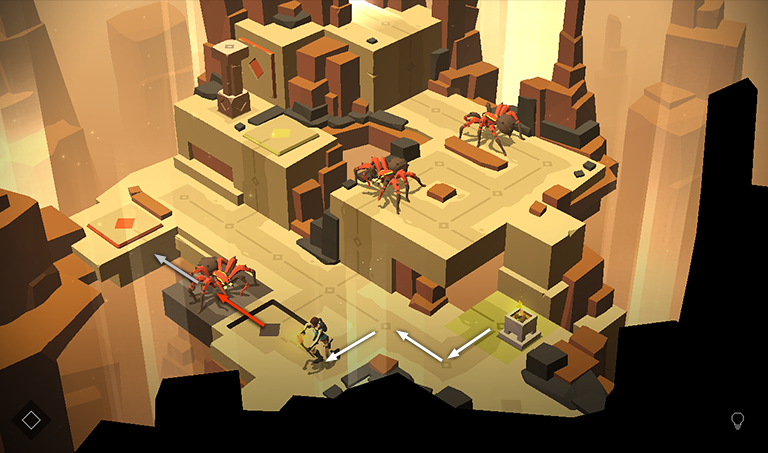
When you step back to the right, the spider moves forward onto the pressure pad with the orange diamond. This activates the orange block trap on the ledge above, pushing the freestanding pillar off the ledge.
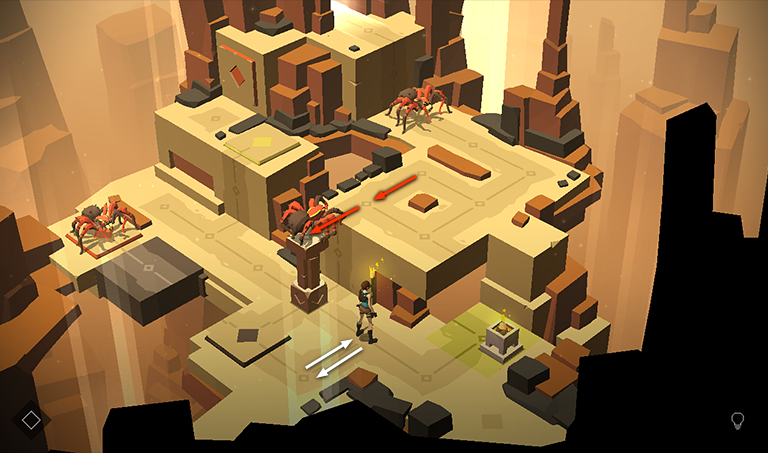
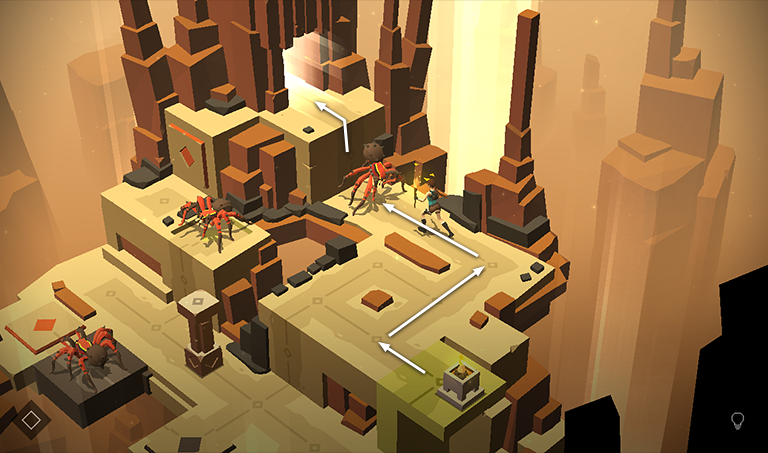
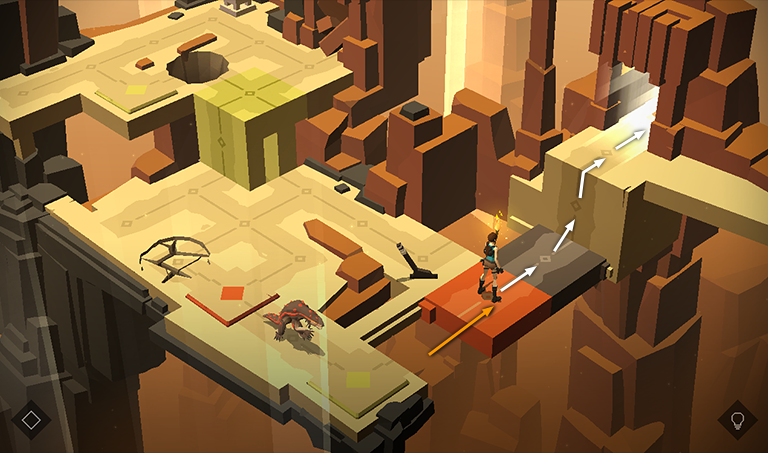
Move toward the pillar. Smash the vase far below the gray platform to get a RUBY (4/17).
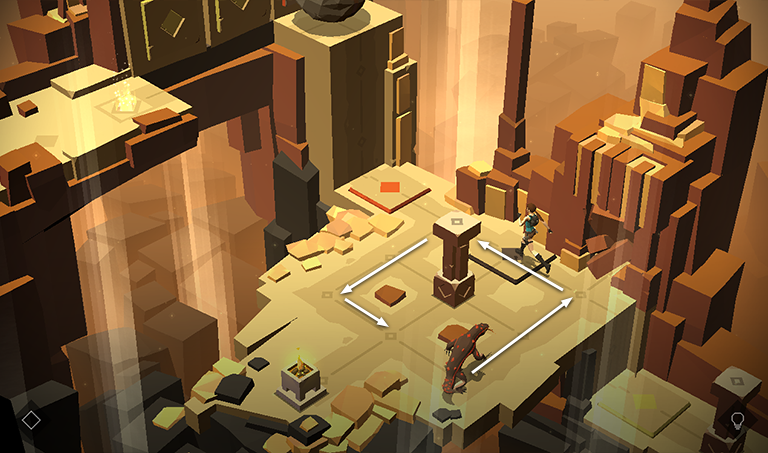
Then drag the pillar back three spaces so it lines up with the path leading up to the ledge with the 2 spiders.
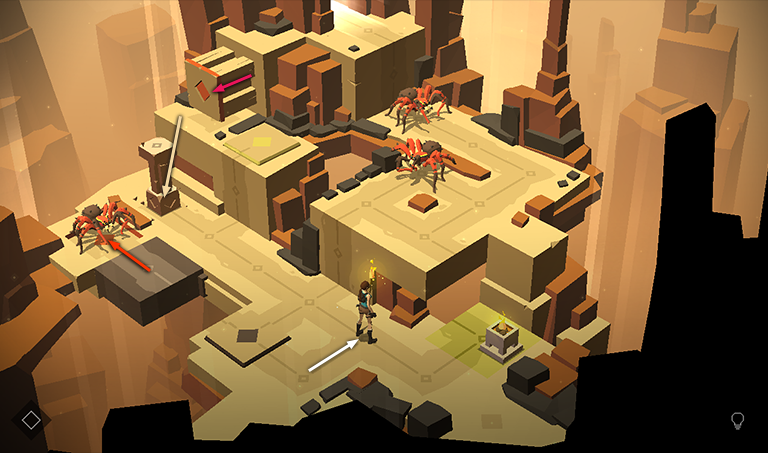
Move away from the pillar one space, then back toward it. During these two turns, the spider above moves onto the pillar.

Now push the pillar two spaces to the upper left.
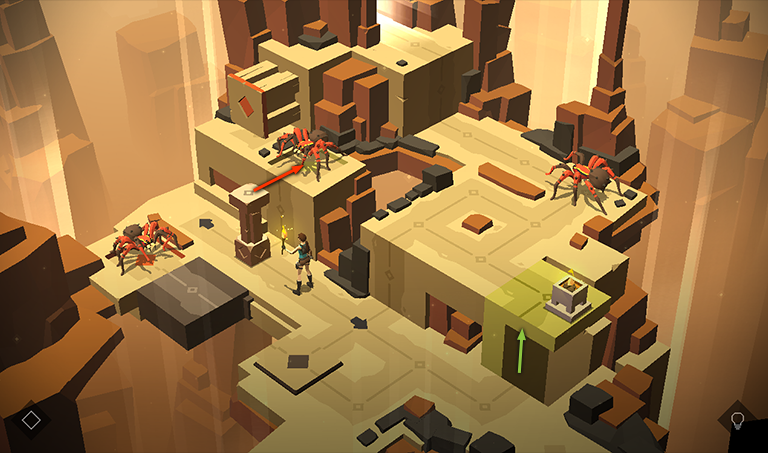
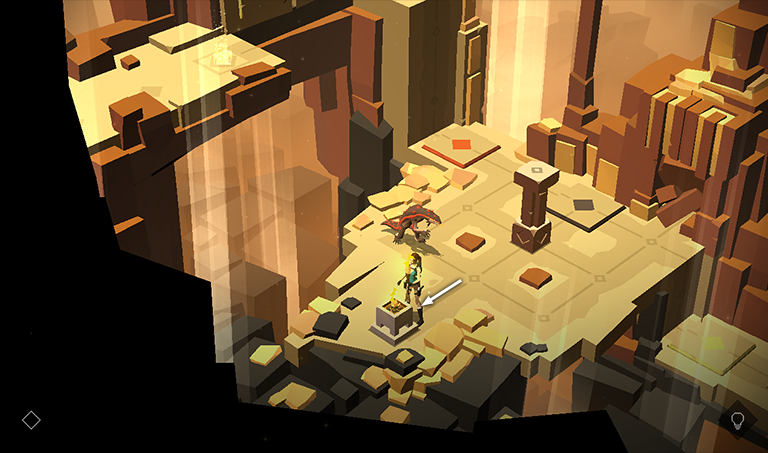
When the spider moves off the pillar onto the pressure pad with the green diamond, this raises the green platform with the brazier on it.
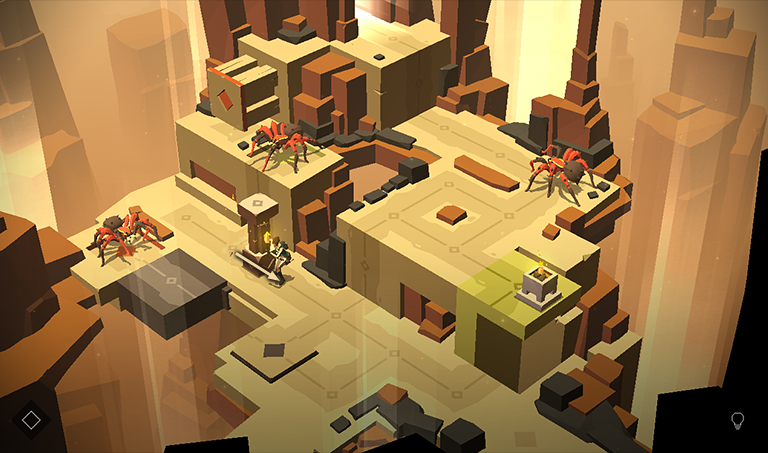
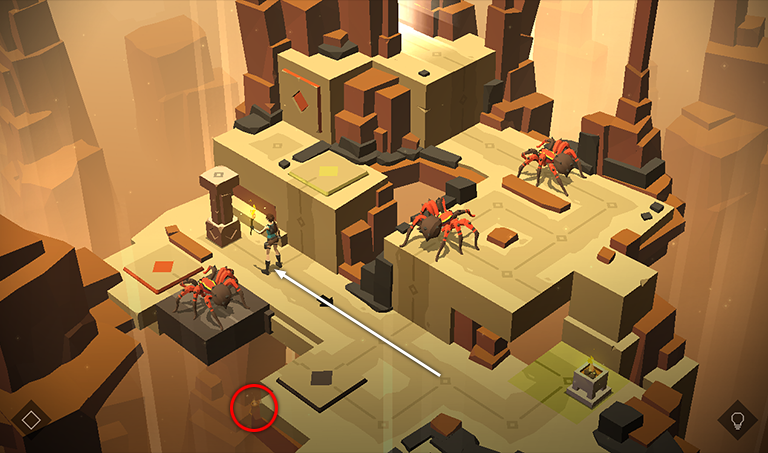
Now pull the pillar away from the ledge so the spider can't move off the pressure pad.
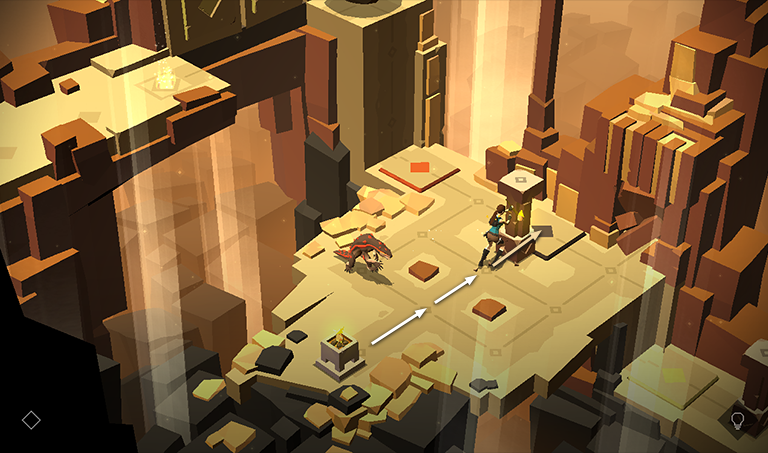
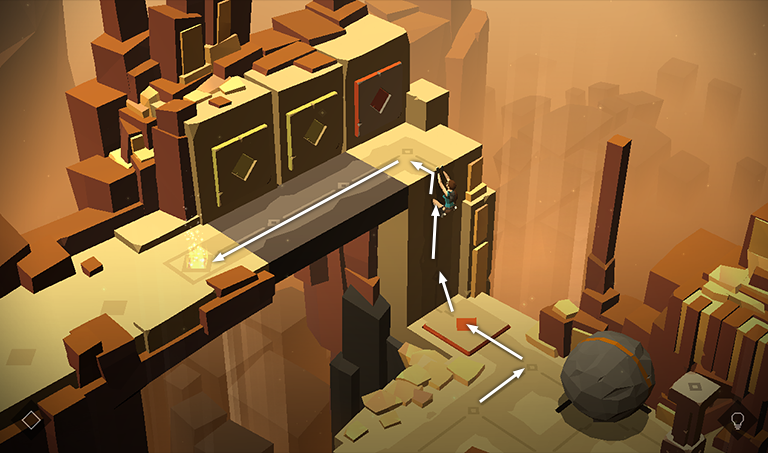
Climb onto the ledge, dropping your torch in the process. Approach the brazier to get another TORCH.
With torch in hand, move toward the third spider and then shoot it with pistols. Now you can climb up to the exit.
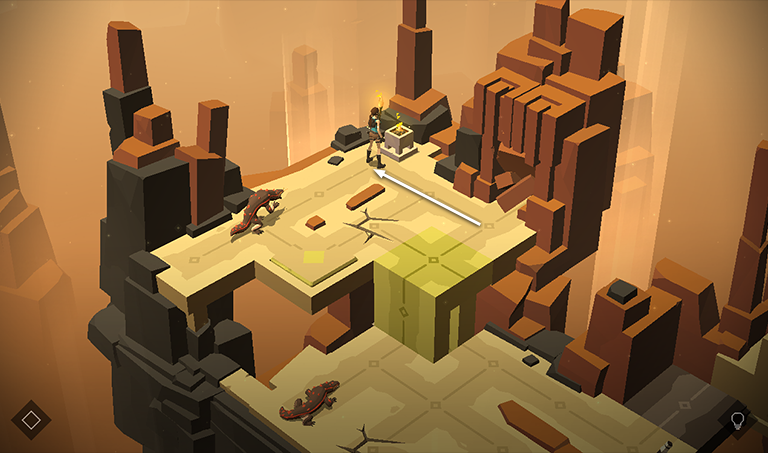
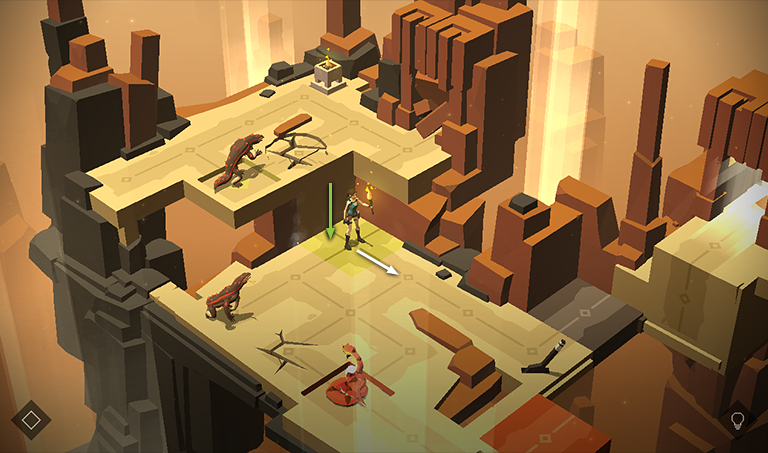
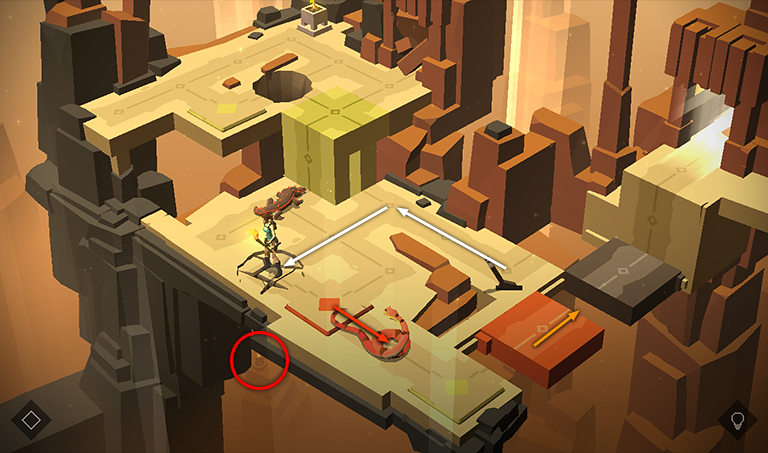
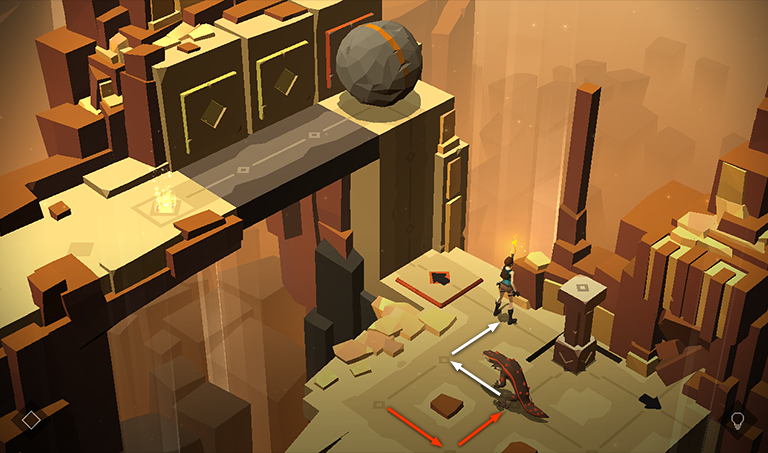
In the next area, move to the brazier to get a TORCH. When you do this, the lizard off to the left notices Lara.
Move toward the lizard, driving it back into the corner, but don't kill it.
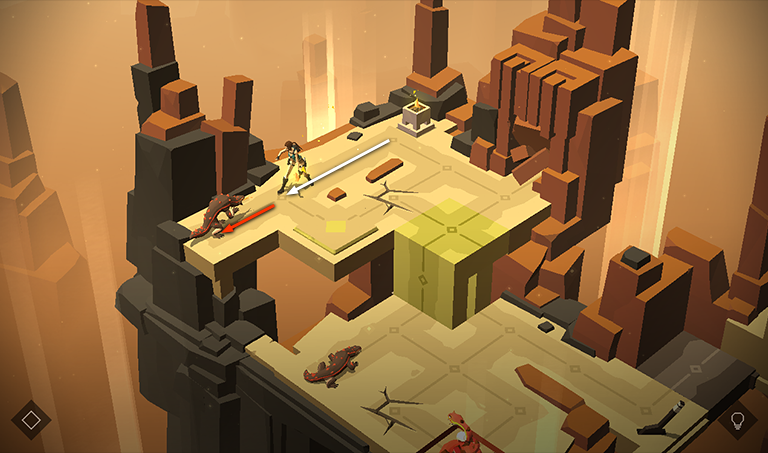
Instead, step onto the pressure pad, then the cracked floor, then the green platform.
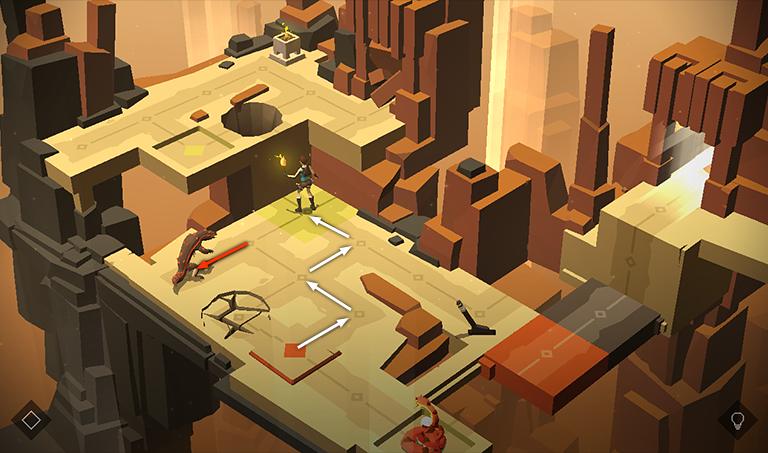
As you do this, the lizard follows, activating the pressure pad and lowering the green platform with Lara standing on it. When you reach the lower level, the second lizard notices Lara. Step to the right, away from it.
Meanwhile, the lizard above moves off the pressure pad onto the cracked floor, falling through the floor and returning the green platform to its original position. The second lizard moves forward to pursue Lara but is stopped by the green platform. Don't kill the lizard, even though you could, since you'll need its help to reach the exit.
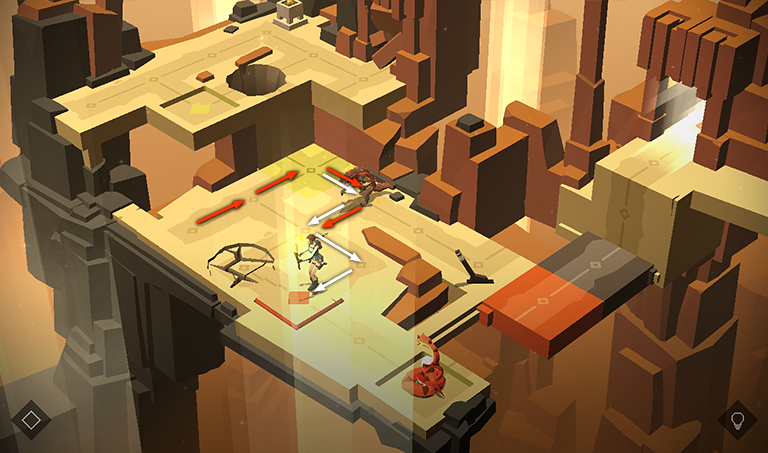
Continue forward to the lever and pull it to shift the gray platform to the right.
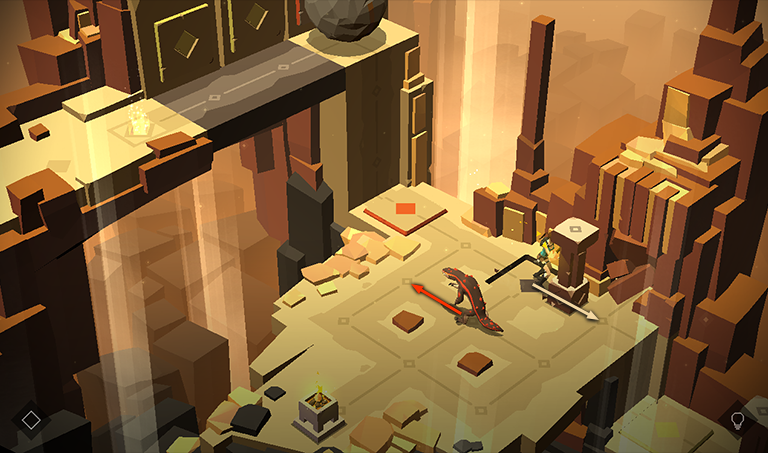
Move around to the left, onto the cracked floor, driving the snake off the pressure pad with the orange diamond and shifting the orange platform to the right. Break the vase in the background directly below where Lara is standing to obtain another RUBY (5/17).

Step forward onto the pressure pad with the orange diamond, shifting the orange platform back to the left, and driving the snake onto the pressure pad with the green diamond, lowering the green platform.
Move onto the green platform in front of the lizard. Since Lara still has a torch, the lizard is driven back into the corner.
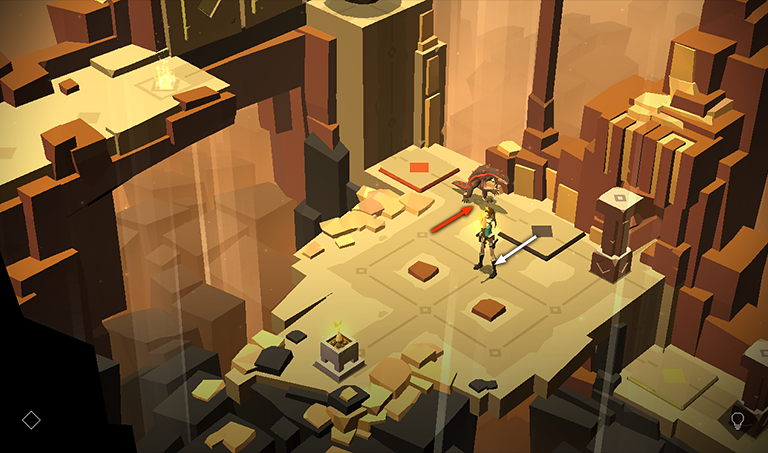
Now zigzag back the way you came, avoiding the cracked floor, until Lara is standing on the pressure pad with the orange diamond. The lizard follows two spaces behind.
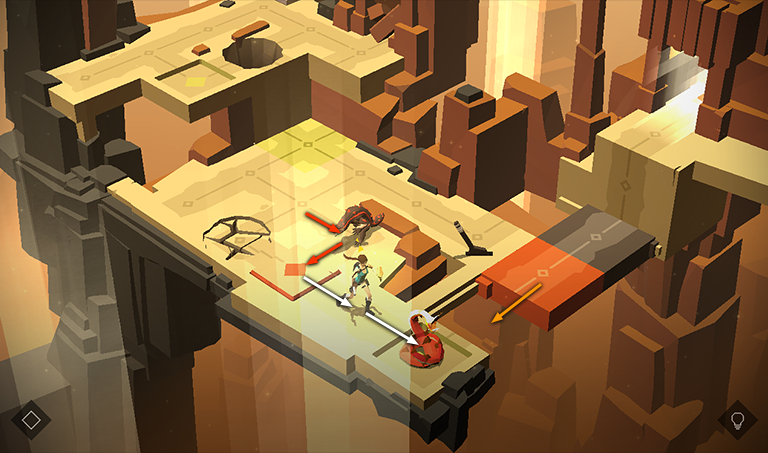
Move into the lower corner, killing the snake and taking its place on the pressure pad. Meanwhile, the lizard, still following Lara, moves onto the pressure pad with the orange diamond, shifting the orange platform toward Lara.
Step onto the orange platform. When you do, the lizard moves off the pressure pad...
...and the orange platform moves back toward the gray platform, allowing you to reach the exit.

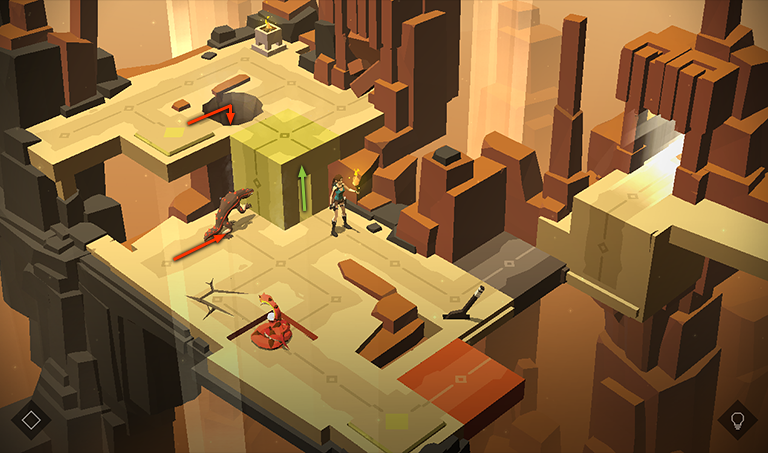
In the final area, smash the vase sitting below the ledge where Lara is standing to get a fragment of THE BLOOD SALAMANDER relic (2/7). Then move forward toward the movable pillar.
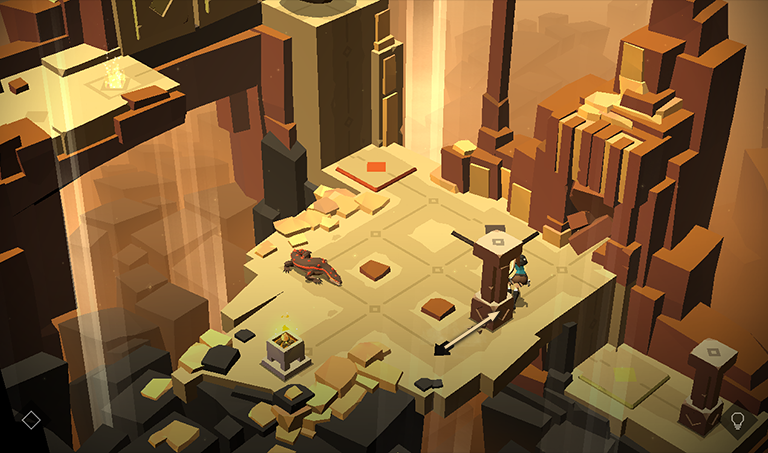
Pull the pillar to the right.
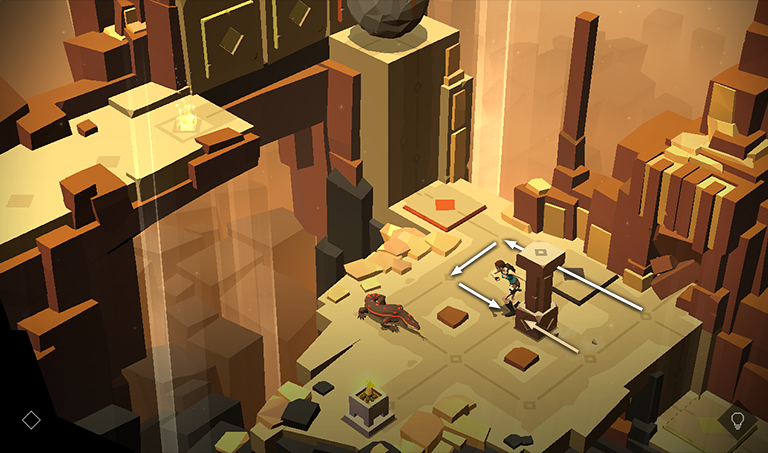
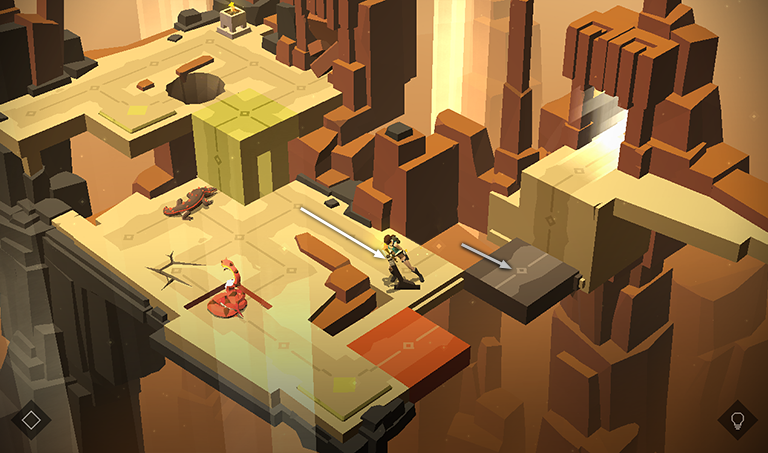
Then go around to the upper left. (As you move over the gray pressure pad, the gray ledge above extends, but there's no danger.) Now pull the pillar into the middle of the room. Do not kill the lizard, since you'll need it's help to reach the exit.
Move clockwise around the room into the lower corner to get the lizard's attention.
Retrace your steps, this time moving counterclockwise around the room. The lizard follows two spaces behind Lara.
When you reach the left side of the room, approach the brazier to get a TORCH.
Move back to the right and push the pillar onto the pressure pad with the gray diamond. (This extends the gray ledge above but that's not important yet.) Now that you have the torch, the lizard will not attack.
Move around to the upper left side of the pillar (between the pressure pads).
Then push the pillar into the right corner. The lizard continues to follow Lara.
Now, move once to the lower left (into the middle of the room). The lizard continues to follow the path Lara took earlier, moving into the space between the pressure pads.
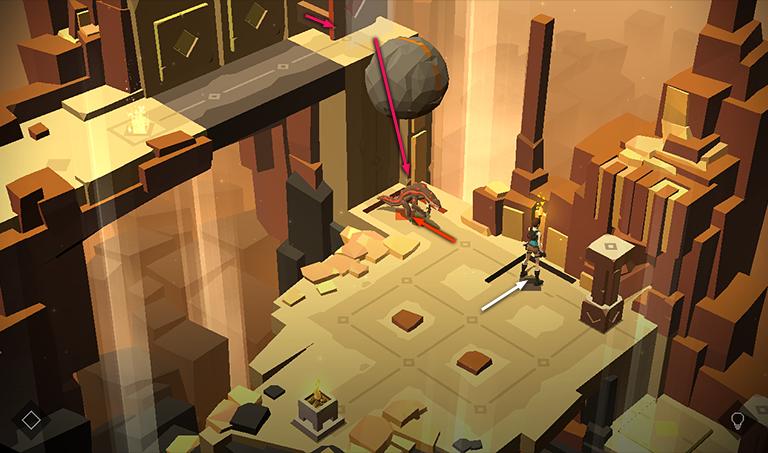
Move back to the right, onto the pressure pad with the gray diamond. This drives the lizard back onto the pressure pad with the orange diamond, activating the block trap on the ledge above and pushing the orange-striped boulder off the ledge and onto the lizard.
Move into the middle of the room once more to get out of the boulder's path. Then move to the upper left. As you go, the boulder rolls onto the pressure pad with the gray diamond, extending the gray ledge above. The pillar you placed in the right corner stops the boulder from rolling farther, so the ledge remains extended.
Climb the wall, cross the gray ledge, and exit the level.
†UPDATE HISTORY: 9/10/15 - Walkthrough first posted, along with video.
9/11/15 - Fixed a significant typo. I had initially labeled this level's relic fragment 3/7. It's actually 2/7, since since there is no relic fragment in the first level in this chapter.
WAS THIS WALKTHROUGH HELPFUL? If not, I apologize and invite you to contact me with any questions. If you need help right away, I recommend the r/TombRaider subreddit. Other fan-run forums are listed at tombraiders.net/stella/community.html. If this site was useful, please consider supporting it financially or in other ways. For details, visit tombraiders.net/stella/support.html. As always, I welcome your corrections/suggestions. Thank you!
Copyright © - Stellalune ( ). Screenshots were made using the Andy Android emulator. Feel free to copy or print this walkthrough for personal use. Share it with friends if you like, but please include this credit line so people can send me their feedback. No part of this walkthrough may be reproduced on another site without permission. Follow this link for details about this site's advertising and privacy policy.
Stella's Tomb Raider Site: tombraiders.net.